Page is loading ...

Hand-Held pH Meter/Simulator
Model 2410
Instruction Manual
IM/2410_6

ABB
BS EN ISO 9001:2000
Cert. No. Q5907
The Company
We are an established world force in the design and manufacture of
instrumentation for industrial process control, flow measurement, gas and
liquid analysis and environmental applications.
As a part of ABB, a world leader in process automation technology, we
offer customers application expertise, service and support worldwide.
We are committed to teamwork, high quality manufacturing, advanced
technology and unrivalled service and support.
The quality, accuracy and performance of the Company’s products result
from over 100 years experience, combined with a continuous program of
innovative design and development to incorporate the latest technology.
The UKAS Calibration Laboratory No. 0255 is just one of the ten flow
calibration plants operated by the Company, and is indicative of our
dedication to quality and accuracy.
EN 29001 (ISO 9001)
Lenno, Italy – Cert. No. 9/90A
R
E
G
I
S
T
E
R
E
D
Health and Safety
To ensure that our products are safe and without risk to health, the following points must be noted:
1. The relevant sections of these instructions must be read carefully before proceeding.
2. Warning labels on containers and packages must be observed.
3. Installation, operation, maintenance and servicing must only be carried out by suitably trained personnel
and in accordance with the information given.
4. Normal safety precautions must be taken to avoid the possibility of an accident occurring when operating
in conditions of high pressure and/or temperature.
5. Chemicals must be stored away from heat, protected from temperature extremes and powders kept dry.
Normal safe handling procedures must be used.
6. When disposing of chemicals ensure that no two chemicals are mixed.
Safety advice concerning the use of the equipment described in this manual or any relevant hazard data
sheets (where applicable) may be obtained from the Company address on the back cover, together with
servicing and spares information.
Electrical Safety
This instrument complies with the requirements of CEI/IEC 61010-1:2001-2 "Safety requirements for electrical
equipment for measurement, control, and laboratory use". If the instrument is used in a manner NOT specified by the
Company, the protection provided by the instrument may be impaired.
Symbols
One or more of the following symbols may appear on the instrument labelling:
Information in this manual is intended only to assist our customers in the efficient operation of our equipment. Use
of this manual for any other purpose is specifically prohibited and its contents are not to be reproduced in full or part
without prior approval of the Technical Communications Department.
Warning – Refer to the manual for instructions
Caution – Risk of electric shock
Protective earth (ground) terminal
Earth (ground) terminal
Direct current supply only
Alternating current supply only
Both direct and alternating current supply
The equipment is protected
through double insulation

1
1 INTRODUCTION ................................... 1
2 PREPARATION ...................................... 2
2.1 Optional Accessories .................... 2
3 CONTROLS ........................................... 2
3.1 Familiarisation with Controls .......... 2
4 OPERATION AS A SIMULATOR ........... 3
4.1 Prepare a pH Analyzer
for Testing ..................................... 3
4.2 Prepare for pH Simulation
(pH output only) – Fig. 4.1 ............. 3
4.3 Calibrating 4500 and 4600 Series
Analyzers ...................................... 4
4.3.1 Calibration Mode – Fig. 4.2 4
4.3.2 Checking Temperature
Compensation – Fig. 4.3 ... 5
4.4 Calibrating Conventional pH
Analyzers ...................................... 5
4.4.1 Calibration Mode – Fig. 4.3 5
4.4.2 Checking Temperature
Compensation – Fig. 4.3 ... 5
4.5 Checking Input Impedance of a pH
Analyzer – Fig. 4.4 ........................ 7
5 OPERATION AS A METER ................... 7
5.1 Calibration for pH Measurements –
Fig. 5.1 ......................................... 7
5.1.1 pH Measurement – Fig. 5.2 8
5.1.2 Temperature Measurement –
Fig. 5.3 .............................. 8
5.1.3 mV/Redox (ORP)
Measurement – Fig. 5.4 ..... 9
6 MAINTENANCE .................................... 9
6.1 Replacing the Battery – Fig. 6.1 .... 9
7 SPECIFICATION .................................. 10
NOTES ...................................................... 11
CONTENTS 1 INTRODUCTION
The Model 2410 pH meter/simulator is a
battery-operated instrument designed for
measuring pH, Redox and temperature when
used with the appropriate sensors. It can also
be used as a simulator for injecting input
signals when servicing pH instruments.
The unit can inject any pH value from 0 to
14 pH and any millivolt value from –1000 to
1000 mV in 1 mV increments. A high
impedance output (1x10
9
Ω) can be switched
into the circuit to simulate the resistance of a
glass electrode. A 100k Ω reference check is
also available for detection of reference to
earth leaks.

2
TEMP
C
OUTPUT
ADJUST
1000M
100k
CALIBRATE
MEASURE
TEMP
Temp mV pH
0
20
25
40
60
80
100
CALIB
SLOPE
ON OFF
6.98
Auto
Switch-off
Moulding
Battery
Compartment
Output
Adjustment
Control
Function
Switch
BNC
Socket
Power
Switch
Mode
Switch
Temperature
Control
Slope
Control
Calibration
Control
Earth
Socket
Temperature
Socket
(accepts 3mm
jack plug)
3 / Digit
LCD
1
2
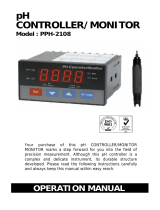
Fig. 3.1 Familiarisation with Controls
2.1 Optional Accessories
There are a number of accessories available which are supplied to order dependent on the
operating requirements:
7730-160 Kit of test leads
1413-400 Combination pH electrode (epoxy bodied), 1m (3.25 ft), BNC termination
1441-400 Combination Redox (ORP) electrode, 1m (3.25 ft), BNC termination
3055-100 Pt100 temperature probe
1411-400 Combination pH electrode (glass bodied), 1m (3.25 ft), BNC termination
1415-400 Combination spear pH electrode, 1m (3.25 ft), BNC termination
0400-135 Buffer powder kit
* Comprising:
BNC to BNC lead (part no. 7730130)
Earth lead (part no. 7730150)
BNC to tags lead (part no. 0312740)
3.1 Familiarisation with Controls
Instrument controls are as detailed in Fig. 3.1 below.
2 PREPARATION
3 CONTROLS

3
TEMP
C
OUTPUT
ADJUST
1000M
100k
CALIBRATE
MEASURE
TEMP
Te mp mV pH
0
20
25
40
60
80
100
CALIB
SLOPE
ON OFF
1
2
3
4 5
6
7
8
9
4
7
4.1 Prepare a pH Analyzer
for Testing
a) Ensure that the pH analyzer to be tested is
correctly earthed through its power supply
earth lead (where applicable), then switch
on the power supply (it may be necessary
to allow some older types of analyzer to
warm up).
b) Set the pH analyzer under test to the
CHECK position (where applicable) and
disconnect the electrodes from the input
terminals (refer to the relevant instruction
manual).
c) Connect a suitable lead from the input
terminals of the pH analyzer to the Model
2410's BNC connector. If using a lead with
tag terminations, connect the core (white)
to the glass electrode terminal and the
screen (black) to the reference terminal.
d) Manual temperature compensation – set the
temperature control on the pH analyzer
under test to that of the ambient
temperature.
Automatic temperature compensation –
connect a suitable decade resistance box
to the analyzer under test in place of the
temperature compensator. Set the
resistance box to the value equivalent to
one of the temperatures in Table 4.1, e.g.
10°C, 20°C etc.
e) If testing a pH analyzer with differential
amplifier (e.g. Models 9180 or 4530/40),
connect the earth socket on the Model
2410 (see Fig. 3.1) to the pH analyzer
solution earth terminal using the earth wire
supplied.
4.2 Prepare for pH Simulation
(pH output only) – Fig. 4.1
Before using the 2410 as a pH simulator it is
necessary to standardise the output for
correct pH units with respect to the voltage
(mV) output.
1
Set the 'Temp °C' control to 25°C.
2
Set the Function switch to 'CALIBRATE'.
3
Set the Power switch to 'ON'.
4
Set the Mode switch to 'mV' and use the
'OUTPUT ADJUST' control to set '000' on
the display.
5
Set the Mode switch to 'pH'.
6
Adjust the 'CALIB' control to set '7.00' on
the display.
7
Set the Mode switch to 'mV' and use the
'OUTPUT ADJUST' control to set '177' on
the display.
8
Set the Mode switch to 'pH'.
9
Adjust the 'SLOPE' control to set '4.00' on
the display.
The simulator can now be used in either the
'pH' or 'mV' output modes.
Note. If the 2410 is always used as
a simulator, the above procedure
need only be carried out once,
unless the control settings are
disturbed.
Fig. 4.1 Preparation for pH Simulation
4 OPERATION AS A SIMULATOR

4
TEMP
C
OUTPUT
ADJUST
1000M
100k
CALIBRATE
MEASURE
TEMP
Temp mV pH
0
20
25
40
60
80
100
CALIB
SLOPE
ON OFF
1
2 3
4
1479 01
tCHpVmHpVmHpVmHpVmHpVm
0 80.18.023000.46.26101.74.5–574.91.431–072.012.771–
01 90.10.233799.37.86150.78.2–743.99.131–451.012.771–
02 90.18.343000.45.47100.70 332.99.921–540.011.771–
52 90.16.943500.42.77199.66.0281.91.921–599.92.771–
03 01.19.453110.48.97179.68.1431.94.821–849.93.771–
04 01.16.663720.47.48179.69.1150.94.721–668.91.871–
05 11.13.873050.42.98179.69.1389.81.721–008.95.971–
06 11.14.983080.40.39179.60.2239.87.721–357.90.281–
07 11.10.104611.44.69199.67.0898.82.921–827.97.581–
08 21.10.214951.41.99130.71.2–088.87.131–527.99.091–
09 31.10.324802.42.10280.78.5–048.86.231–057.92.891–
59 —— 532.40.202——098.81.831–077.93.202–
…4 OPERATION AS A SIMULATOR
4.3 Calibrating 4500 and 4600
Series Analyzers
4.3.1 Calibration Mode – Fig. 4.2
ABB 4500 and 4600 Series analyzers
incorporate buffer values within their memories
for automatic calibration. Table 4.1 gives the
millivolt value for different temperature values
for the five standard buffers stored in the
Models 4530/40. Only the 4 and 9 values apply
to the Models 4535/45 and 4630/35.
When checking 4500 and 4600 Series
analyzers for accuracy, or when determining
the correct functioning of the automatic
temperature compensation, refer to Table 4.1
to ascertain the required millivolt value
equivalent to a pH value at a given
temperature.
Note. Before carrying out the
following procedure, check the
electrode connections – core to
glass, screen to reference and earth
connection to solution earth of the
instrument (Models 4530 and 4540
only).
Refer to Fig. 4.2 and:
1
Set the Function switch to 'CALIBRATE'.
2
Set the Mode switch to 'pH' or 'mV'
(dependent on requirement).
3
Set the Power switch to 'ON'.
Carry out an automatic pH calibration check
using the 4500 and 4600 Series calibration
procedure as detailed in the appropriate
instruction manual.
4
Use the 'OUTPUT ADJUST' control to
inject the required pH or millivolt value,
selected from Table 4.1.
The same procedure can be used to check the
instrument in the Manual Calibration mode if
required.
Note. Once a successful pH
calibration has been achieved,
operate the FUNCTION switch on
the transmitter and then use the
simulator to inject alternative pH
values to check the performance of
the instrument.
Carry out the impedance tests as described on
page 7.
Fig. 4.2 Calibration Mode
Table 4.1 mV Equivalents for 4500 and 4600 Series Instruments Buffer Values

5
TEMP
C
OUTPUT
ADJUST
1000M
100k
CALIBRATE
MEASURE
TEMP
Temp mV pH
0
20
25
40
60
80
100
CALIB
SLOPE
ON OFF
2 3
1
4
5
4 OPERATION AS A SIMULATOR…
4.3.2 Checking Temperature
Compensation – Fig. 4.3
a) Calibrate the Model 2410 as detailed in
Section 4.3.1.
b) Programme the instrument under test for
manual temperature compensation and
set the temperature to 0°C.
With reference to Fig. 4.3:
1
Set the Function switch to 'CALIBRATE'.
2
Set the Mode switch to 'mV'.
3
Set the Power switch to 'ON'.
4
Use the 'OUTPUT ADJUST' control to set
163 mV on the Model 2410's display
(rounded up from 162.6mV in Table 4.1).
The instrument under test should read
4.00.
5
Use the 'OUTPUT ADJUST' control to set
–134 mV on the Model 2410's display
(rounded down from 134.1 mV in Table
4.1). The instrument under test should
read 9.47.
Note. The instrument under test
should read 9.47 as this is the
correct value for the 9.00 buffer at
0°C.
Repeat steps 4 and 5 at 50°C and 80°C using
the corresponding millivolt equivalent.
4.4 Calibrating Conventional pH
Analyzers
4.4.1 Calibration Mode – Fig. 4.3
1
Set the Function switch to 'CALIBRATE'.
2
Set the Mode switch to either 'pH' or 'mV'
dependant on the calibration required.
3
Set the Power switch to 'ON'.
4
Use the 'OUTPUT ADJUST' control to
obtain an appropriate calibration value on
the digital display of the Model 2410, e.g.
7 pH (if pH units selected).
Adjust the reading on the pH analyzer under
test to 7.00 pH using the adjust buffer,
standardise or calibrate control on that
instrument, as applicable.
5
Use the 'OUTPUT ADJUST' control to give
0, 2, 4, 6, 8, 10, 12 and 14 pH to check the
accuracy of the pH analyzer.
Alternatively, if mV units are selected,
adjust to the corresponding millivolt
equivalents from Table 4.2.
4.4.2 Checking Temperature
Compensation – Fig. 4.3
a) Calibrate the Model 2410 as detailed in
Section 4.4.1.
b) Set the manual temperature control on the
instrument under test to 10°C.
Refer to Fig. 4.3 and:
1
Set the Function switch to 'CALIBRATE'.
2
Set the Mode switch to 'mV'.
3
Set the Power switch to 'ON'.
4
Use the 'OUTPUT ADJUST' control to set
the appropriate millivolt outputs for 4, 7
and 9 pH (at 10°C) on the Model 2410
display from Table 4.2.
Check the reading on the pH analyzer
under test for each value.
Repeat the check with the temperature control
set to 50°C and 100°C.
Fig. 4.3 Temperature Compensation and
Calibration Mode

6
…4 OPERATION AS A SIMULATOR
Table 4.2 Millivolt Equivalent of pH v Temperature
Hp
tC
0123456789 0111213141
02– 36.15304.10361.15239.00296.05164.00132.050 32.05–64.001–96.051–39.002–61.152–04.103–36.153–
01– 25.56303.31380.16278.80256.65134.40122.250 22.25–34.401–56.651–78.802–80.162–03.313–25.563–
0 14.97312.52310.17208.61206.26104.80102.450 02.45–04.801–06.261–08.612–10.172–12.523–14.973–
01 03.39311.73339.08247.42265.86173.21191.650 91.65–73.211–65.861–47.422–39.082–11.733–03.393–
02 91.70420.94358.09286.23215.47143.61171.850 71.85–43.611–15.471–86.232–58.092–20.943–91.704–
03 80.12429.06377.00326.04264.08113.02151.060 51.06–13.021–64.081–26.042–77.003–29.063–80.124–
04 79.43438.27396,01355.84214.68182.42141.260 41.26–82.421–14.681–55.842–96.013–38.273–79.434–
05 68.84437.78316.02394.65273.29142.82121.460 21.46–42.821–73.291–94.652–16.023–37.783–68.844–
06 57.26446.69335.03334.46223.89112.23111.660 11.66–12.231–23.891–34.462–35.033–46.693–57.264–
07 46.67445.80454.04363.27272.40281.63190.860 90.86–81.631–72.402–63.272–54.043–45.804–46.674–
08 35.09454.02483.05303.08232.01251.04180.070 80.07–51.041–32.012–03.082–83.053–54.024–35.094–
09 24.40563.23403.06342.88281.61221.44160.270 60.27–21.441–81.612–42.882–03.063–53.234–24.405–
001 30.81562.44422.07371.69231.22290.84140.470 40.47–90.841–31.222–71.692–22.073–62.444–30.815–
011 91.23571.65441.08311.40380.82260.25130.670 30.67–60.251–80.822–11.403–41.083–71.654–91.235–
021 80.64570.86460.09350.21340.43220.65110.870 10.87–20.651–40.432–50.213–61.093–70.864–80.645–

7
TEMP
C
OUTPUT
ADJUST
1000M
100k
CALIBRATE
MEASURE
TEMP
Temp mV pH
0
20
25
40
60
80
100
CALIB
SLOPE
ON OFF
2 3
4
1
5
6
TEMP
C
OUTPUT
ADJUST
1000M
100k
CALIBRATE
MEASURE
TEMP
Te mp mV pH
0
20
25
40
60
80
100
CALIB
SLOPE
ON OFF
2
3
4
1
5 6
7
4.5 Checking Input Impedance of a
pH Analyzer – Fig. 4.4
All pH measuring instruments require an
extremely high input impedance (greater than
10
12
) to operate corr ectly. If the input
impedance is degraded (due to contamination
of the connection block or connection cable)
the instrument may function correctly with a
low impedance signal, but gives incorrect
readings (low or high or, in some cases, off-
scale) when connected to an electrode pair.
The Model 2410 has the facility to check the
input impedance of the glass electrode using
the 1000M Ω position of the Function switch
and the reference electrode input using the
100K Ω position.
Refer to Fig. 4.4 and:
1
Set the Function switch to 'CALIBRATE'.
2
Set the Mode switch to 'pH'.
3
Set the Power switch to 'ON'.
4
Use the 'OUTPUT ADJUST' control to set
an appropriate pH value, e.g. 10 pH.
5
Set the Function switch to '1000M Ω'.
After an initial 'spike', the reading on the
pH analyzer under test should return to
within 0.1 pH of 10.00 pH. If the change in
the reading is greater than 0.1 pH the input
impedance is too low.
6
Repeat step 5 but setting the Function
switch to '100k Ω'.
For laboratory analyzers, the most likely
cause of the above is the coaxial input cable or
the BNC socket on the instrument under test.
For industrial systems, the cause is likely to
be attributed to:
the junction box in the electrode system
the wall mounting junction box
the interconnection cable
the instrument (less likely).
5.1 Calibration for pH
Measurements – Fig. 5.1
For optimum measurement accuracy the
calibration procedure should be carried out at
frequent intervals.
Prepare 4 pH and 9 pH buffer solutions.
1
Connect the electrode to the BNC socket.
2
Set the Function switch to 'MEASURE'.
3
Set the Mode switch to 'pH'.
4
Set the 'TEMP °C' control to the
temperature of the buffer solutions.
5
Set the Power switch to 'ON'.
Fig. 4.4 Checking the Input Impedance
Fig. 5.1 Calibration for pH Measurement
…4 OPERATION AS A SIMULATOR 5 OPERATION AS A METER

8
TEMP
C
OUTPUT
ADJUST
1000M
100k
CALIBRATE
MEASURE
TEMP
Temp mV pH
0
20
25
40
60
80
100
CALIB
SLOPE
ON OFF
2
3
4
1
5
TEMP
C
OUTPUT
ADJUST
1000M
100k
CALIBRATE
MEASURE
TEMP
Te mp mV pH
0
20
25
40
60
80
100
CALIB
SLOPE
ON OFF
2
3
4
1
…5 OPERATION AS A METER
Immerse the combination pH electrode in the
4 pH buffer solution and allow the displayed
reading to stabilise.
6
Adjust the 'CALIB' control to achieve a
4 pH reading on the digital display.
Remove the electrode from the buffer
solution and wash the electrode using
demineralised water. Carefully wipe the
excess water from the electrode using a
soft tissue.
Immerse the electrode in the 9 pH buffer
solution and allow the displayed reading to
stabilise.
7
Adjust the 'SLOPE', control to achieve a
9pH reading on the digital display.
Repeat
6
and
7
to obtain the best
accuracy.
5.1.1 pH Measurement – Fig. 5.2
1
Connect the electrode to the BNC socket.
2
Set the Function switch to 'MEASURE'.
3
Set the Mode switch to 'pH'.
4
Set the 'TEMP °C' control to the
temperature of the sample solution.
5
Set the Power switch to 'ON'.
Immerse the combination pH electrode in the
sample solution and note the pH value when
the display has stabilised.
5.1.2 Temperature Measurement –
Fig. 5.3
1
Set the Function switch to 'MEASURE'.
2
Set the Mode switch to 'TEMP'.
3
Connect the temperature probe to the
temperature socket (3mm jack plug).
4
Set the Power switch to 'ON'.
Immerse the probe approximately 1 inch below
the surface of the sample solution.
Note the temperature when the display has
stabilised.
Fig. 5.2 pH Measurement
Fig. 5.3 Temperature Measurement

9
TEMP
C
OUTPUT
ADJUST
1000M
100k
CALIBRATE
MEASURE
TEMP
Temp mV pH
0
20
25
40
60
80
100
CALIB
SLOPE
ON OFF
2 3
4
1
5
6
2
3
1
…5 OPERATION AS A METER
5.1.3 mV/Redox (ORP)
Measurement – Fig. 5.4
1
Set the Function switch to 'MEASURE'.
2
Set the Mode switch to 'mV'.
3
Set the Power switch to 'ON'.
4
Short circuit the BNC socket and verify the
instrument reads zero.
5
Remove the short circuit and plug in the
Redox (ORP) electrode.
Immerse the probe in the solution.
Note the reading when the display has
stabilised.
Fig. 5.4 mV/Redox (ORP) Measurement
Fig. 6.1 Replacing the Battery
6.1 Replacing the Battery – Fig. 6.1
After a prolonged period of use the battery may
require replacement (battery type 6LR61 or
equivalent).
1
Open the case fully.
2
Release the battery cover using a small
flat-bladed screwdriver or similar.
3
Remove the cover.
Replace the battery and fit cover.
6 MAINTENANCE

10
7 SPECIFICATION
General
Display viewing angle Adjustable from 90° to 180°
Electrode connection BNC for pH and Redox
3.5mm jack plug for temperature probe
Measurements
pH range 0 to 14.00pH
pH accuracy ±0.1pH
mV range –1000 to 1000
mV accuracy ±0.1%
Temperature range 0 to 100°C
Temperature accuracy ±0.5°C
Resolution 0.01pH, 1mV, 0.1°C
Temperature compensation 0 to 100°C manual
Input impedance > 1x10
12
Ω
Calibrator
pH output 0 to 14pH in 0.01 steps
mV output –1000 to 1000 in 1mV steps
Output impedance Low (1x10
5
Ω) or
high (1x10
9
Ω)
switch selectable
Accuracies ±0.02 pH, ±0.1% mV
Connections
A kit of three leads can be supplied (part no. 7730M-160) comprising:
BNC to BNC Part no. 7730130
Earth lead Part no. 7730150
BNC to tags Part no. 0312740
Power
9V battery giving 100 hours continuous life –
Alkaline 6LR61
Dimensions
96 x 108 x 45mm (3.78 x 4.25 x 1.94 in.) when folded
Weight
0.34kg (0.15 lb) with battery
SS/2410 Issue 4

11
NOTES

12
…NOTES

PRODUCTS & CUSTOMER SUPPORT
Products
Automation Systems
• for the following industries:
– Chemical & Pharmaceutical
– Food & Beverage
– Manufacturing
– Metals and Minerals
– Oil, Gas & Petrochemical
– Pulp and Paper
Drives and Motors
• AC and DC Drives, AC and DC Machines,
AC motors to 1kV
• Drive systems
• Force Measurement
• Servo Drives
Controllers & Recorders
• Single and Multi-loop Controllers
• Circular Chart , Strip Chart and Paperless
Recorders
• Paperless Recorders
• Process Indicators
Flexible Automation
• Industrial Robots and Robot Systems
Flow Measurement
• Electromagnetic Flowmeters
• Mass Flow Meters
• Turbine Flowmeters
• Flow Elements
Marine Systems & Turbochargers
• Electrical Systems
• Marine Equipment
• Offshore Retrofit and Refurbishment
Process Analytics
• Process Gas Analysis
• Systems Integration
Transmitters
• Pressure
• Temperature
• Level
• Interface Modules
Valves, Actuators and Positioners
• Control Valves
• Actuators
• Positioners
Water, Gas & Industrial Analytics
Instrumentation
• pH, conductivity, and dissolved oxygen
transmitters and sensors
• ammonia, nitrate, phosphate, silica,
sodium, chloride, fluoride, dissolved
oxygen and hydrazine analyzers.
• Zirconia oxygen analyzers, katharometers,
hydrogen purity and purge-gas monitors,
thermal conductivity.
Customer Support
We provide a comprehensive after sales service via a
Worldwide Service Organization. Contact one of the
following offices for details on your nearest Service
and Repair Centre.
United Kingdom
ABB Limited
Tel: +44 (0)1453 826661
Fax: +44 (0)1453 829671
United States of America
ABB Inc
Tel: +1 775 850 4800
Fax: +1 775 850 4808
Client Warranty
Prior to installation, the equipment referred to in
this manual must be stored in a clean, dry
environment, in accordance with the Company's
published specification.
Periodic checks must be made on the
equipment's condition. In the event of a failure
under warranty, the following documentation
must be provided as substantiation:
1. A listing evidencing process operation and
alarm logs at time of failure.
2. Copies of all storage, installation, operating
and maintenance records relating to the
alleged faulty unit.

IM/2410 Issue 6
The Company’s policy is one of continuous product
improvement and the right is reserved to modify the
information contained herein without notice.
Printed in UK (08.04)
© ABB 2004
ABB Inc.
Analytical Instruments
9716 S. Virginia St., Ste. E
Reno, Nevada 89521
USA
Tel: +1 775 850 4800
Fax: +1 775 850 4808
ABB Limited
Oldends Lane, Stonehouse
Gloucestershire
GL10 3TA
UK
Tel: +44 (0)1453 826661
Fax: +44 (0)1453 829671
ABB has Sales & Customer Support expertise
in over 100 countries worldwide
www.abb.com
/