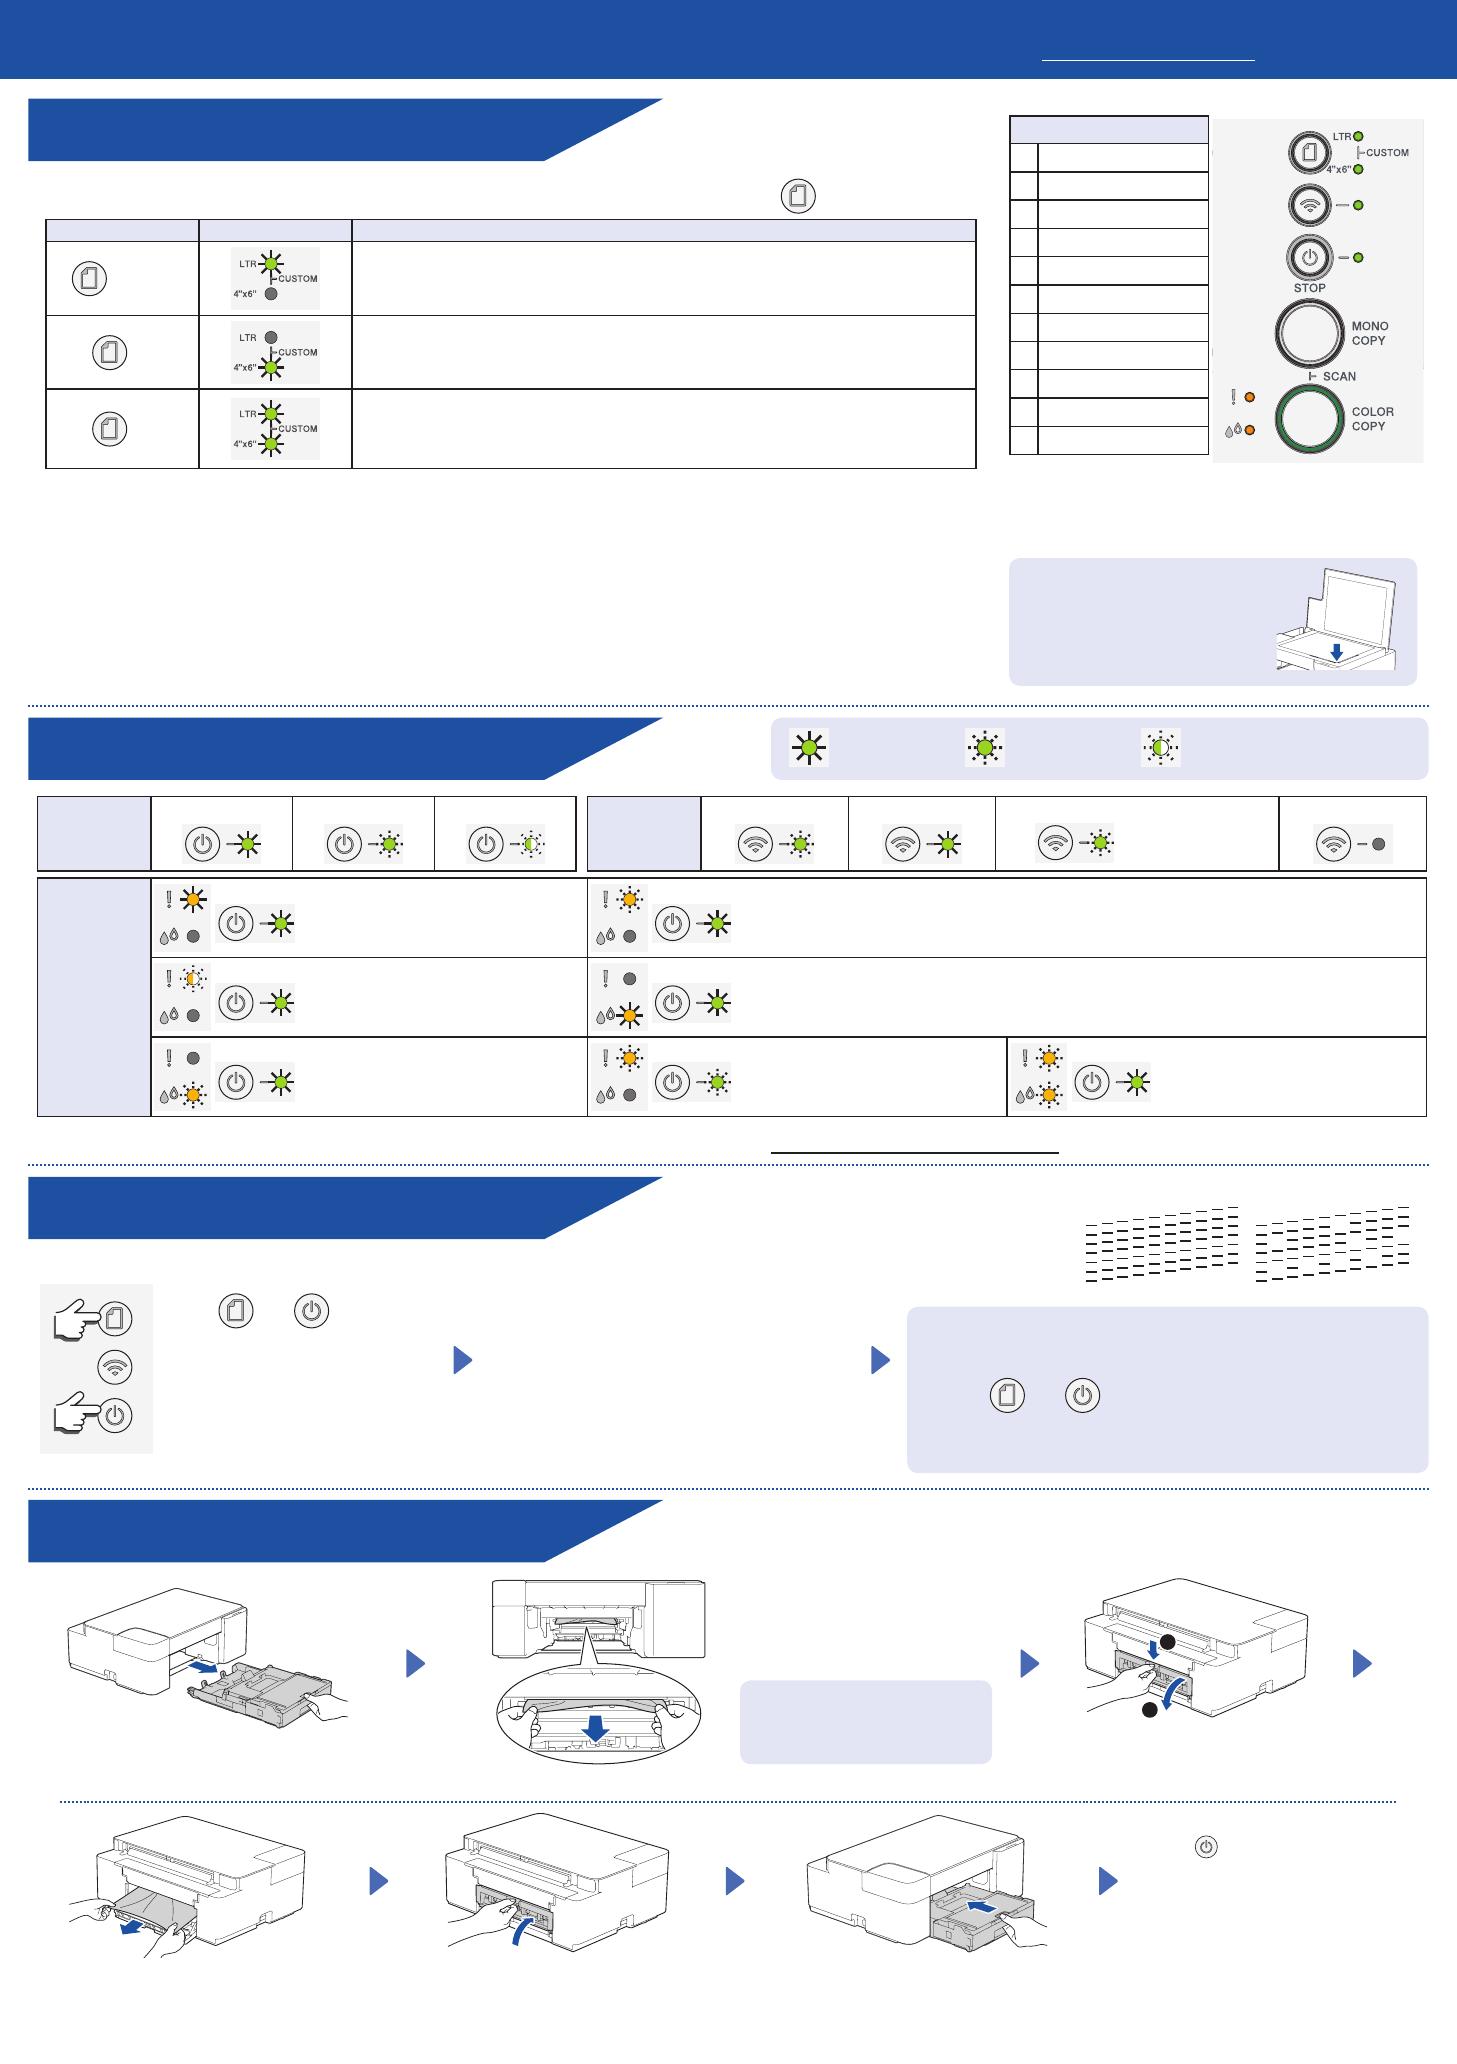
Press and
simultaneously.
The Ink LED blinks.
Do one of the following:
• For cleaning only black, press
MONO COPY.
• For cleaning all colors, press
COLOR COPY.
The machine cleans the print head, and then
prints the Print Quality Check Sheet.
Check the print
quality of the four
color blocks on the
sheet.
If the print quality is still poor after cleaning several times, try the
Special cleaning:
1. Press
and simultaneously, and then release.
2. Press and hold MONO COPY and COLOR COPY simultaneously
for five seconds.
When copying or scanning;
Place the document face
down in the bottom right
corner of the scanner glass.
Change the paper settings from the control panel
You can print or copy using the following paper settings, depending on the number of times you press
(a).
Paper Button LED Indication Paper Settings
(Default)
• Paper type: Plain
• Paper size: Letter
(For printing standard documents)
x 1
• Paper type: Other glossy
• Paper size: 4” x 6”
(For printing photos)
x 2
Custom - To change these settings, access the Print menu in Web Based
Management using either the Brother Mobile Connect app on your mobile device or
the Brother iPrint&Scan app on your computer. For details, see the Online User's
Guide.
Print
Go to your application’s print dialog box, make sure your machine is selected and online, and then click Print. To change the print
settings (for example, 2-sided printing), click the printing properties or preferences button.
Copy (f/g)
• To print a single copy, load your document, and then press f or g once.
• To print multiple copies, load your document, and then press f or g repeatedly, depending on the number of copies you want.
Scan
To scan a single page, load your document, and then press f and g simultaneously. For scanning multiple pages or other
scanning features, use your preferred scanning software/application. For details, see the Online User’s Guide.
Reference and Troubleshooting
For detailed machine information and product specifications,
see the Online User's Guide at support.brother.com/manuals.
Basic Operations
If ink gets on your skin or
clothing, immediately wash it off
with soap or detergent.
LED Indications
Improve Print Quality
Remove Jammed Paper
* To use your machine on a wireless network, see the
Online User's Guide.
Pull the paper tray completely out of the
machine.
Open the Jam Clear Cover at the back of
the machine.
Press
to clear the Paper Jam
error.
If the machine has not completed a
job due to the paper jam, try again.
Slowly pull the jammed paper out
of the machine.
Slowly pull the jammed paper out of the
machine.
Close the Jam Clear Cover. Push the paper tray firmly back in
the machine.
Machine
Status
Ready
Busy Sleep
Wi-Fi
®
Status
Connecting
Connected
Disconnected
(Blinking slowly)
Off
Error
Status
No Paper:
Refill the paper tray, and then press
MONO COPY or COLOR COPY.
Wrong Paper Size:
Check that the paper settings you selected using the machine's control panel match the size of
the paper in the tray. After correcting the paper size, press MONO COPY or COLOR COPY.
Ink Cover Open:
Firmly close the ink cartridge cover
until it locks into place.
No Ink Cartridge / Cannot Detect / Monochrome Print Only:
• Reinstall the ink cartridge slowly and firmly, or replace the ink cartridge with a new one.
• One or more of the color ink cartridges need to be replaced.
Ink Low:
Prepare to replace the ink cartridge
when necessary.
Paper Jam:
See the Remove Jammed Paper
section below.
Memory Full:
Cancel any operations in progress,
and then try again.
Control Panel
h
a
k
j
f
g
b
c
d
e
i
a
Paper button
b
LTR (Letter) LED
c
4” x 6” LED
d
Wi-Fi LED
e
Power LED
f
Mono Copy button
g
Color Copy button
h
Ink LED
i
Warning LED
j
Power/Stop button
k
Wi-Fi button *
Lit Blinking Blinking slowly and faintly
1
2
© 2021 Brother Industries, Ltd. All rights reserved.
For more information about troubleshooting, see the Online User’s Guide at support.brother.com/manuals.
OK Poor

