Kodak EasyShare Z1275 User manual

Type
User manual

Kodak EasyShare Z1275 is a user-friendly digital camera that lets you capture life's moments with ease. Its features include optical and digital zoom for close-ups, a variety of scene modes for different lighting conditions, and video recording with sound. The camera also has a self-timer for group shots and a built-in flash for low-light situations.

Kodak EasyShare Z1275 is a user-friendly digital camera that lets you capture life's moments with ease. Its features include optical and digital zoom for close-ups, a variety of scene modes for different lighting conditions, and video recording with sound. The camera also has a self-timer for group shots and a built-in flash for low-light situations.

www.kodak.com/go/z1275support 1
ENGLISH
Installing the software
Loading the batteries
After installing the software, return to this
Getting Started Guide.
Before connecting any cables, install the software that was
included with your camera. Follow the on-screen instructions.
CRV3 lithium
(non-rechargeable)
Ni-MH
(rechargeable)
2 AA (rechargeable or
non-rechargeable)
urg_00732.book Page 1 Monday, March 26, 2007 9:13 AM
2 www.kodak.com/go/easysharecenter
ENGLISH
Turning on the camera
Setting the language, date/time
to change.
OK
to accept.
to change.
OK
to accept.
Language:
Date/Time:
for previous/next field.
urg_00732.book Page 2 Monday, March 26, 2007 9:13 AM
www.kodak.com/go/z1275support 3
ENGLISH
Taking a picture/video
3
Pictures Videos
1
3
1
Press the Shutter button halfway to
focus and set exposure.
When the Ready light turns green,
press the Shutter button
completely down.
22
Press the Shutter button
completely down and release.
To stop recording, press and
release the Shutter button
again.
Framing
marks
Ready
light
urg_00732.book Page 3 Monday, March 26, 2007 9:13 AM
4 www.kodak.com/go/easysharecenter
ENGLISH
Reviewing pictures/videos
Transferring pictures/videos
1
2
for previous/next picture/video.
Press Review. (Press again to exit.)
Play
2X, 4X reverse
2X, 4X forward
Videos:
Review
Pause/unpause
OK
USB cable Kodak EasyShare printer
dock or camera dock
(May be sold separately.)
For dock compatibility, visit
www.kodak.com/go/dockcompatibility.
To purchase accessories, visit
www.kodak.com/go/z1275accessories.
To use an EasyShare dock, see its
Getting Started Guide.
Turn on camera.
3
Connect USB cable.
1
Turn off camera.
Kodak EasyShare software
opens on your computer
and prompts you through
the transfer process.
2
USB
cable
U-8
Adjust the volume
urg_00732.book Page 4 Monday, March 26, 2007 9:13 AM
www.kodak.com/go/z1275support 5
ENGLISH
Keep learning about your camera!
Congratulations!
You have:
• set up your camera
• taken pictures
• transferred pictures to your computer
Visit www.kodak.com/go/z1275support and
www.kodak.com/go/easysharecenter for:
• the extended user’s guide
• interactive troubleshooting and repairs
• interactive tutorials
• FAQs
• downloads
• accessories
• printing information
• product registration
Keep learning!
Finish reading this book, so you can take and share your best pictures!
urg_00732.book Page 5 Monday, March 26, 2007 9:13 AM
6 www.kodak.com/go/easysharecenter
ENGLISH
Front view
1 Mode dial 6 Self-timer/Burst button
2 Shutter button 7 Flash
3 Self-timer/Video light 8 Speaker
4 On/Off button 9 Microphone
5 Flash button 10 Lens
10
2
1
3
4
5
6
7
8
9
urg_00732.book Page 6 Monday, March 26, 2007 9:13 AM
www.kodak.com/go/z1275support 7
ENGLISH
Back view
1 LCD 10 USB, A/V Out
2 OK/ 11 DC-In, for optional 3V AC adapter
3 Ready light 12 Share button
4 LCD/Info button 13 Menu button
5 Delete button 14 Review button
6 Wide angle (W) button 15 Battery compartment
7 Telephoto (T) button 16 Tripod socket
8 Strap post 17 Dock connector
9 Slot for optional SD or MMC card
8
10
11
12
13
14
15
16
17
9
76543
2
1
urg_00732.book Page 7 Monday, March 26, 2007 9:13 AM
8 www.kodak.com/go/easysharecenter
1 Doing more with your camera
Capture modes
Capture mode For
Smart Scene
General picture taking. When the Shutter button is pressed halfway,
faces are detected, the scene is analyzed, and the best settings are
applied.
P, M Program, Manual modes for more creative control. (See page 18).
High ISO
People in low-light scenes indoors using a higher ISO.
Digital
Image
Stabilization
Minimizing the effects of camera shake and subject movement.
Scene
Point-and-shoot simplicity when taking pictures under special
conditions.
Video
Capturing video with sound. (See page 3.)
Favorites
Viewing favorite pictures.
Choose the mode that best suits
your subjects and surroundings.
P/M
ISO
SCN
urg_00732.book Page 8 Monday, March 26, 2007 9:13 AM
Doing more with your camera
www.kodak.com/go/z1275support 9
Using optical zoom
Use optical zoom to get up to 5X closer to your subject while taking pictures/videos.
Optical zoom is effective when the lens is no closer than 24 in. (60 cm) to the subject or
7.9 in. (20 cm) in Close-up mode.
1 Press Telephoto (T) to zoom in. Press Wide Angle (W)
to zoom out.
The zoom indicator shows zoom status.
2 Take the picture or video.
Using digital zoom
Use digital zoom to get up to 5X beyond optical zoom while taking pictures. Press
Telephoto (T) to the maximum optical zoom. Release the button, then press it again.
NOTE: You may notice decreased image quality when using digital zoom. The slider on the zoom indicator
turns red when the picture quality reaches the limit for an acceptable 4 x 6-in. (10 x 15 cm) print.
Zoom indicator
Optical
zoom
range
Digital
zoom
range
WTD
urg_00732.book Page 9 Monday, March 26, 2007 9:13 AM
Doing more with your camera
10 www.kodak.com/go/easysharecenter
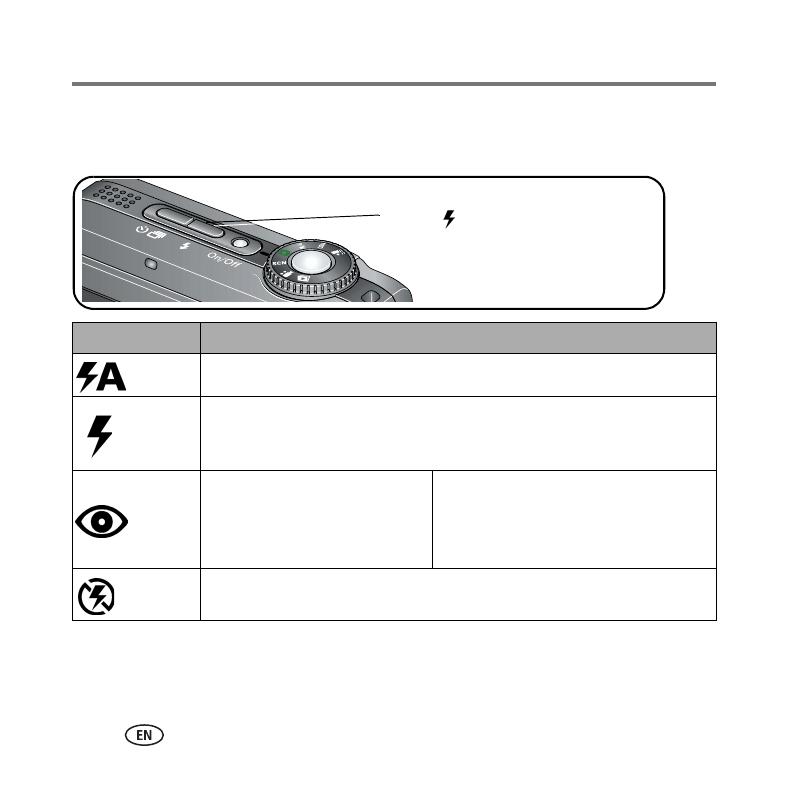
Using the flash
Use the flash when you take pictures at night, indoors, or outdoors in heavy shadows.
Flash-to-subject distance
Wide angle: 2–19.3 ft (0.6–5.9 m) @ ISO 400
Telephoto: 2–10.5 ft (0.6–3.2 m) @ ISO 400
Flash modes Flash fires
Auto When the lighting conditions require it.
Fill
Every time you take a picture, regardless of the lighting conditions. Use when
the subject is in shadow or is “backlit” (when the light is behind the subject).
In low light, hold the camera steady or use a tripod.
Red-eye
If Red-eye Pre-flash is turned off:
The flash fires once and the
camera automatically corrects
red-eye in the picture.
If Red-eye Pre-flash is turned on:
The flash fires once so the eyes become
accustomed to the flash, then fires again
when the picture is taken.
Off Never.
Press the
button repeatedly to scroll
through flash modes. (See flash modes below.)
urg_00732.book Page 10 Monday, March 26, 2007 9:13 AM
Doing more with your camera
www.kodak.com/go/z1275support 11
Using the self-timer
Use the self-timer when you want to be included in a picture, or to ensure a steady
Shutter button press.
To cancel the Self-timer before the picture is taken, press the Self-timer/Burst button
, or press the Shutter button completely down.
Use the same procedure to use the self-timer in Video mode, but:
Turn the Mode dial to Video .
Press the Shutter button completely down.
NOTE: The video stops when no storage space remains. Only the 2- and 10-second options are available in
video mode.
1
2
Place camera on a tripod or flat surface.
Compose the scene.
Press the Shutter button halfway, then
completely down.
• Once for a 10-second delay (so you have time to get into the scene)
• Again for a 2-second delay (for a steady, auto-shutter release on a tripod)
• Again for 2-shot (one picture taken after 10 seconds and another picture
In most Still modes, press the Self-Timer/Burst button
taken 8 seconds later)
4
3
:
The picture is taken after the delay.
urg_00732.book Page 11 Monday, March 26, 2007 9:13 AM
Doing more with your camera
12 www.kodak.com/go/easysharecenter
Understanding the picture-taking icons
Status icons indicate mode, feature, and camera status.
Picture size
Pictures/time remaining
Storage location
Low battery
Camera mode
Flash
Self-timer/Burst
Focus mode
Date stamp
Album name
Framing marks
Histogram
Aperture
ISO speed
P/M mode
Shutter speed
Exposure compensation
White balance
Exposure metering
Focus zone
Zoom indicator
urg_00732.book Page 12 Monday, March 26, 2007 9:13 AM
www.kodak.com/go/z1275support 13
1 Working with pictures/videos
Deleting pictures/videos
1 Press the Review button.
2 Press to find a picture/video.
3 Press the Delete button.
4 Follow the screen prompts.
Using the undo delete feature
If you accidentally delete a picture/video, use Undo Delete to retrieve it. This feature is
available only immediately after you delete a picture/video in Review mode (when the
Undo Delete option appears).
1 Press to highlight Undo Delete.
2 Press OK.
The deleted picture/video appears.
3 Select Exit to exit the Delete menu.
urg_00732.book Page 13 Monday, March 26, 2007 9:13 AM
Working with pictures/videos
14 www.kodak.com/go/easysharecenter
Using the menu button in Review
1 Press the Review button, then the Menu button.
2 Press to choose a tab:
Review to view pictures/videos
Edit to edit pictures/videos
Setup for other camera settings
3 Press to highlight a setting, then press the OK button.
4 Choose an option, then press the OK button.
Options Options
View By
Pictures
Perfect Touch tech.
Album Crop
Slide Show Sound Tags
Multi-up
Videos
Make Picture
Copy To Trim
Protect/Unprotect Action Print
Select/Deselect All Bookmark
urg_00732.book Page 14 Monday, March 26, 2007 9:13 AM
Working with pictures/videos
www.kodak.com/go/z1275support 15
Adding sound tags
You can record a voice or sound (up to 1 minute long) to a picture.
NOTE:
Only one sound tag can be added to each picture (not to videos).
Recording a sound tag
1 Press the Review button, then to find a picture.
2 Press the Menu button, then to highlight the Edit tab.
3 Press to highlight Sound Tag. Press the OK button.
4 Choose Record, then press OK.
5 Follow the screen prompts.
The sound tag is applied to your picture.
Press the Menu button to exit the menu.
Playing a sound tag
1 Press the Review button, then to find a
tagged picture.
2 Press to play the sound tag.
3 Press to adjust the volume.
4 Press OK to stop playback.
Review
urg_00732.book Page 15 Monday, March 26, 2007 9:13 AM
Working with pictures/videos
16 www.kodak.com/go/easysharecenter
Understanding the review icons
Pictures
Videos
Scroll arrows
Email tag
Favorite tag
Print tag/number of prints
Kodak Perfect Touch
tech.
Picture number
Image storage location
Review mode
Protected
Low battery
Album name
Sound tag
Scroll arrows
Email tag
Favorite tag
Video length
Video number
Image storage location
Review mode
Protected
Album name
urg_00732.book Page 16 Monday, March 26, 2007 9:13 AM
www.kodak.com/go/z1275support 17
1 Doing more with your camera
Using the Menu button to change settings
NOTE: Some settings remain until you change them; others remain until you turn off the camera.
1 Press the Menu button.
2 Press to highlight a menu tab:
Capture for the most common picture-taking settings.
Capture Plus for other picture-taking settings.
Setup for other camera settings.
3 Press to highlight a setting, then press the OK button.
4 Choose an option, then press the OK button.
NOTE: Press the LCD/Info button for information about camera settings and options. Some
capture modes (page 8) offer limited settings.
urg_00732.book Page 17 Monday, March 26, 2007 9:13 AM
Doing more with your camera
18 www.kodak.com/go/easysharecenter
P and M modes
Use Program and Manual modes when you want more control over your camera
and pictures.
NOTE: Settings you change in P or M mode apply only to pictures taken in that mode. For example, if you
change the Color Mode to Sepia while in P or M mode, you retain the default setting of Color for
Smart scene and Scene modes.
The settings, including Flash, are maintained for P and M modes—even when you change modes or
turn off the camera.
Mode For
Press to control
Ease of auto shooting with full access to most
menu options. The camera automatically sets the
shutter speed and aperture (f-stop) based on the
scene lighting.
Exposure compensation (how
much light enters the camera),
Focus mode, and ISO speed
The highest level of creative control. (To prevent
blur, use a tripod for slow shutter speeds.)
Aperture, shutter speed, focus
mode, and ISO speed
to change modes
Program
Manual
urg_00732.book Page 18 Monday, March 26, 2007 9:13 AM
Doing more with your camera
www.kodak.com/go/z1275support 19
Changing P or M mode settings
P/M modes control ISO, Focus, exposure compensation, shutter speed, and aperture
(f-number, also known as f-stop). Use the Menu button to control all other settings.
1 Turn the Mode dial to P/M.
The mode options are displayed.
2 Use to move between settings and to change the value.
NOTE: Some settings may be unavailable (see P/M color options above). The arrows disappear when you
cannot make further value changes.
3 Take a picture.
Aperture
Shutter speed
Exposure compensation
White—selectable
Grey—non-selectable
Yellow—changeable value
Red—out of range
ISO speed
P/M Options
Focus mode
Mode
urg_00732.book Page 19 Monday, March 26, 2007 9:13 AM
Doing more with your camera
20 www.kodak.com/go/easysharecenter
P/M mode—see page 18.
ISO speed—adjust the sensitivity to light. Higher ISO indicates greater sensitivity.
NOTE: A higher ISO may produce unwanted “noise” in a picture.
Exposure Compensation—adjust the exposure. If the picture is too light, decrease
the setting; if it’s too dark, increase the setting.
Shutter speed—control how long the shutter stays open.
Aperture—(also known as f-stop) control the size of the lens opening, which
determines the depth of field.
Smaller f-stop numbers indicate a larger lens opening; good for portraits and
low-light conditions.
Larger f-stop numbers indicate a smaller lens opening; keeps the main subject
sharp; good for landscapes and well-lit conditions.
Focus modeselect a large or concentrated area of focus.
Focus mode Description
Normal AF Focus setting for general picture-taking.
Macro
Sharpness and detail in pictures at close range. The camera automatically
sets the focus distance depending on the zoom position.
Infinity Distant subjects. Auto-focus framing marks are unavailable.
Manual
Focus is at center position. When MF icon appears, press OK to display
focus indicator. Press
to adjust the setting.
urg_00732.book Page 20 Monday, March 26, 2007 9:13 AM
  • Page 1 1
  • Page 2 2
  • Page 3 3
  • Page 4 4
  • Page 5 5
  • Page 6 6
  • Page 7 7
  • Page 8 8
  • Page 9 9
  • Page 10 10
  • Page 11 11
  • Page 12 12
  • Page 13 13
  • Page 14 14
  • Page 15 15
  • Page 16 16
  • Page 17 17
  • Page 18 18
  • Page 19 19
  • Page 20 20
  • Page 21 21
  • Page 22 22
  • Page 23 23
  • Page 24 24
  • Page 25 25
  • Page 26 26
  • Page 27 27

Kodak EasyShare Z1275 User manual

Type
User manual

Kodak EasyShare Z1275 is a user-friendly digital camera that lets you capture life's moments with ease. Its features include optical and digital zoom for close-ups, a variety of scene modes for different lighting conditions, and video recording with sound. The camera also has a self-timer for group shots and a built-in flash for low-light situations.

Ask a question and I''ll find the answer in the document

Finding information in a document is now easier with AI