Haier QVE801DTWW 80 CFM Exhaust Fan User manual

Type
User manual

This manual is also suitable for

User Manual and
Installation Instructions
QVE801DTWW
80 CFM Exhaust Fan
49-7000174 Rev. 5 03-22 GEA
ESPAÑOL
Para consultar una version en español
de este manual de instrucciones,
visite nuestro sitio de internet
Haierappliances.com.
49-7000174 Rev. 5 3
ENGLISH
RECORD KEEPING
Thank you for purchasing this Haier product. This user manual
will help you get the best performance from your new exhaust
fan.
For future reference, record the model and serial number
located on a label inside the housing.
Staple your proof of purchase to this manual to aid in
obtaining warranty service if needed.
____________________________________________________
Model number
____________________________________________________
Serial number
____________________________________________________
Date of purchase
TABLE OF CONTENTS
SAFETY INFORMATION ............................................................................................4
USING THE EXHAUST FAN .........................................................................................5
PRODUCT CARE ..................................................................................................5
INSTALLATION INSTRUCTIONS ....................................................................................6
TROUBLESHOOTING TIPS ........................................................................................14
LIMITED WARRANTY ............................................................................................ 15
HAIER WEBSITE
Have a question or need assistance with your appliance? Try the Haier Website 24 hours a day, any day of the year! You
can also shop for more great Haier products and take advantage of all our on-line support services designed for your
convenience. In the US: Haierappliances.com
Register Your Appliance
Register your new appliance on-line at your convenience! Timely product registration will allow for enhanced communication
and prompt service under the terms of your warranty, should the need arise.
• Scan QR Code on product registration card, or on product.
NOTE: This is just an example of what a QR code represents.
• Or go to Haierappliances.com/register
• Or mail in your pre-printed registration card included in the packing material
449-7000174 Rev. 5
ENGLISH
READ AND SAVE THESE INSTRUCTIONS
IMPORTANT SAFETY INFORMATION
READ ALL INSTRUCTIONS BEFORE USING THE APPLIANCE
SAFETY INFORMATION
WARNING TO REDUCE THE RISK OF FIRE,
ELECTRIC SHOCK OR INJURY TO PERSONS, OBSERVE
THE FOLLOWING:
A. Use this unit only in the manner intended by the
manufacturer. If you have questions, contact the
manufacturer.
B. Before servicing or cleaning unit, switch power off at
service panel and lock the service disconnecting means
to prevent power from being switched on accidentally.
When the service disconnecting means cannot be
locked, securely fasten a prominent warning device,
such as a tag, to the service panel.
C. This unit must be grounded.
D. Do not use this fan with any solid-state speed control
device.
CAUTION FOR GENERAL VENTILATING USE
ONLY. DO NOT USE TO EXHAUST HAZARDOUS OR
EXPLOSIVE MATERIALS AND VAPORS.
E. Please read specification label on product for further
information and requirements.
PROPER DISPOSAL OF YOUR APPLIANCE
Dispose of or recycle your product in accordance with Federal and Local Regulations. Contact your local authorities for
the environmentally safe disposal or recycling of your product.
49-7000174 Rev. 5 5
ENGLISH
USING THE EXHAUST FAN
OPERATION
To operate the fan and light separately, use a 2-function wall switch. Refer to installation instructions, Step 3, for wiring
instructions.
PRODUCT CARE
Verify that power is turned off at the source before cleaning.
For quiet and efficient operation, long life, and attractive appearance - lower or remove grille and vacuum interior of unit with
the dusting brush attachment.
649-7000174 Rev. 5
ENGLISH
INSTALLATION INSTRUCTIONS
BEFORE YOU BEGIN
Read these instructions completely and carefully.
IMPORTANT Save these instructions for local
inspector’s use.
IMPORTANT Observe all governing codes
and ordinances.
Note to Installer – Be sure to leave these instructions with
the Consumer.
Note to Consumer – Keep these instructions for future
reference.
Skill level – Installation of this exhaust fan requires basic
mechanical skills.
Proper installation is the responsibility of the installer.
Product failure due to improper installation is not covered
under the Warranty.
WARNING TO REDUCE THE RISK OF FIRE,
ELECTRIC SHOCK OR INJURY TO PERSONS,
OBSERVE THE FOLLOWING:
A. Installation work and electrical wiring must be
done by qualified person(s) in accordance with all
applicable codes and standards, including fire-rated
construction.
B. Sufficient air is needed for proper combustion and
exhausting of gases through the flue (chimney) of fuel
burning equipment to prevent back drafting. Follow
the heating equipment manufacturer’s guidelines
and safety standards such as those published by
the National Fire Protection Association (NFPA), the
American Society for Heating, Refrigeration and Air
Conditioning Engineers (ASHRAE) and the local code
authorities.
C. When cutting or drilling into wall or ceiling, do not
damage electrical wiring and other hidden utilities.
D. Ducted fans must always be vented to the outdoors.
E. If this unit is to be installed over a tub or shower, it
must be marked as appropriate for the application
and be connected to a GFCI (Ground Fault Circuit
Interrupter)-protected branch circuit.
F. Do not mount this product in a wall.
G. Never place a switch where it can be reached from a
tub or shower.
H. Install fan at least 2.1 meters (7 feet) above the floor.
I. This unit must be grounded
J. Not for use in kitchens.
K. Before beginning the installation, switch power off
at service panel and lock the service disconnecting
means to prevent power from being switched on
accidentally. When the service disconnecting means
cannot be locked, securely fasten a prominent
warning device, such as a tag, to the service panel.
49-7000174 Rev. 5 7
ENGLISH
INSTALLATION PREPARATION
TOOLS AND MATERIALS REQUIRED
(NOT SUPPLIED)
Wire cutter/stripper
Duct tape
Safety glasses
Screwdriver
Strain relief for
junction box, 3/4”
diameter knockout
Strain Relief I
UL listed wire nuts
Wire Nuts
Pencil and tape measure
Gloves
REMOVE THE PACKAGING
CAUTION Wear gloves to protect against sharp
edges.
Remove and properly discard the plastic bag and other
packaging materials.
Consider recycling options for your appliance
packaging material.
POWER SUPPLY
IMPORTANT – (Please read carefully)
WARNING FOR PERSONAL SAFETY, THIS
APPLIANCE MUST BE PROPERLY GROUNDED.
Remove house fuse or open circuit breaker before
beginning installation.
Do not use an extension cord or adapter plug with this
appliance. Follow National Electrical Codes or prevailing
local codes and ordinances.
Electrical supply
These exhaust fans must be supplied with 120V, 60Hz,
and connected to a properly grounded branch circuit,
and protected by a 15 or 20 amp circuit breaker or time
delay fuse.
Acceptable for use over a tub or shower when
connected to a GFCI (Ground Fault Circuit Interrupter)
- protected branch circuit.
Never place a switch where it can be reached from a
tub or shower.
Wiring must be 2 wire with ground.
If the electrical supply does not meet the above
requirements, call a licensed electrician before
proceeding.
Route house wiring as close to the installation location
as possible in the ceiling or wall.
Connect the wiring to the house wiring in accordance
with local codes.
Grounding instructions
The grounding conductor must be connected to
a ground metal, permanent wiring system, or an
equipment-grounding terminal or lead on the hood.
WARNING The improper connection of the
equipment-grounding conductor can result in a risk
of electric shock. Check with a qualified electrician or
service representative if you are in doubt whether the
appliance is properly grounded.
Electric drill with #2 Phillips
drill bit
HARDWARE PACKAGE (supplied)
Locate and check contents.
A. 1" screw (QTY: 4)
Used for hanger bar
installation to joist
(QTY: 3) 13" Hanger Bar
for mounting fan
(QTY: 1) 6-3/4" Hanger
Bar for mounting fan
B. 1/2" screw (QTY: 2)
Used for securing hanger
bars together
849-7000174 Rev. 5
ENGLISH
INSTALLATION
PREPARE EXHAUST FAN
1. Unplug the motor connector from the wiring plate and
uninstall the motor assembly by removing the 3 screws
shown and pulling it up from the housing.
2. Uninstall the wiring plate with wires by removing the
screw shown below.
Remove the knockout bracket and install strain relief
on the open knock out. Rotate the knockout bracket to
align the open knockout with side or top of housing as
needed.
3. Verify that power is turned off at the source and pull
house wiring through the strain relief. Secure the
knockout bracket in place using the screw provided.
Screw Wiring Plate
Cover
Knockout
Bracket
LOCATION
Choose your exhaust fan location and plan the duct route to vent exhaust to the outdoors. To maximize the ventilation
performance, the following is recommended:
a. Minimize the duct run length and number of transitions and elbows.
b. Maintain a constant duct size and minimize the length of flexible ducting used.
Motor
Connector
Screws
Light
Connector
49-7000174 Rev. 5 9
ENGLISH
INSTALLATION
STEP 1. INSTALL HOUSING
IMPORTANT: This product can only be mounted to a
ceiling.
A. NEW CONSTRUCTION INSTALLATION: The housing
can be mounted directly to the joist or i-joist using the
side flange or mounted using hanger bars provided and
the bottom flange
I. Mounting Joist: Make sure that the bottom edge of
the housing is in contact with the bottom of the joist.
Screw the housing assembly to the joist using the
side flanges and the 4 screws (A) provided.
II. Hanger bar and bottom flange between framing
mounting: To mount, slide hanger bar into the
housing channel, adjusting it to fit between the
framing. If the spacing between the joists is 16 to
17", the housing channel on the side opposite to the
damper should be used.
Place the housing so the bottom flange of the
housing is in contact with the bottom of the joist.
Using screws (A) provided, secure the bottom flange
to the joist and screw the hanger bar to the opposite
joist.
Using screw (B) provided,
attach hanger bar to
housing.
NOTE: If the housing
needs to be mounted in
a specific orientation to
accommodate for duct
routing or electrical, 2X4
framing can be used for
housing installation.
III. Hanger bar and bottom flange mounting: Slide
hanger bar into the housing channel. Place the
housing so the bottom flange of the housing is in
contact with the bottom of the joist. Using screws
(A) provided, attach the flange to the joist. Screw
the hanger bar to joist using screws (A) provided
and attach hanger bar to housing using screws (B)
provided.
IV. Mount with hanger bars provided: The hanger bars
span up to 24" and are compatible with all types of
framing.
Slide hanger bars into the housing channels,
extending it to fit between the framing. Place the
housing so that the hanger bar tabs are in contact
with the bottom of the joist framing. Screw the
hanger bars to the joist using an screw (A) through
one of the holes on each end tab of the hanger bars.
Secure the hanger bars together using screw (B)
through one of the available slots on the hanger
bars.
NOTE: To avoid
motor bearing
damage and noisy
and/or unbalanced
impellers, keep
drywall spray,
construction dust,
etc. off of unit. A
cardboard dust cover is provided with exhaust fan
that can be used to protect the motor assembly
during construction.
Screws
Side Flange
Bottom Flange
Bottom
Flange
Bottom
Flange
Hanger
Bar Channel on Housing
Channel on Housing
Hanger Bar
Hanger Bar
Screws
Screws
Screws
Screw
Screw
Screw
Screw
Bottom
Flange
Screws
Screw
Channel on
Housing Hanger Bar
10 49-7000174 Rev. 5
ENGLISH
INSTALLATION
STEP 1. INSTALL HOUSING (Cont.)
B. INSTALLATION IN EXISTING CEILING OR
REPLACING AN EXISTING FAN
Existing ceiling: With a pencil, trace an outline of
the housing onto the ceiling. Set the housing aside
and cut out a 9-1/2” by 9-1/2” opening for the
fan. The cardboard protective cover can be used
as a template for the ceiling cut out. Position the
housing against the joist and make sure the bottom
edge of housing is flush with the bottom of the
joist. Leave ductwork and wiring in place. Proceed
to Mount Housing.
Replacing existing fan: Remove existing fan. Enlarge
ceiling opening to 9-1/2" x 9-1/2" if needed.
Fold the mounting ears flat
against the housing sides.
Position the housing against
the joist and make sure the
bottom edge of housing is flush
with the bottom of the joist.
Leave ductwork and wiring
in place. Proceed to Mount
Housing.
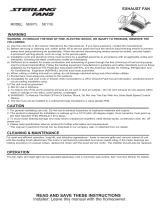
Mount Housing: The housing can be mounted directly to
the joist using the internal mounting holes or mounted
using the bottom flange.
I. Internal holes: Position the housing against the
joist and make sure the bottom edge of housing is
flush with the bottom of the joist. Using screws (A)
provided, attach the housing directly to the framing
or joist using the internal mounting holes in the
housing. Motor assembly must be removed to gain
access to the internal mounting holes.
STEP 1. INSTALL HOUSING (Cont.)
II. Flange holes: Position the housing assembly
against the joist and make sure the bottom edge
of housing is flush with bottom of the joist. Use the
screws (A) provided to secure the housing to the
joist through the bottom flange holes.
Internal Mounting Holes
Flanges
Screws
Screws
STEP 2. CONNECT DUCTWORK
Pull ducting through housing discharge opening. This
exhaust fan has a 4” exhaust damper. Connect house
ducting to the exhaust damper and seal all connections
with duct tape. Ensure that the exhaust damper flap
functions freely.
Push exhaust damper back through opening, fixing the
exhaust damper by the tab. Run the ductwork to a roof
or wall cap.
NOTE: The ducting from this fan to the outside of
building has a strong effect on the air flow, noise and
energy use of the fan. Use the shortest, straightest
duct routing possible for best performance, and avoid
installing the fan with smaller ducts than recommended.
Insulation around the ducts can reduce energy loss and
inhibit mold growth. Fans installed with existing ducts
may not achieve their rated air flow.
Ta b
9-1/2”
9-1/2”
Joist
49-7000174 Rev. 5 11
ENGLISH
INSTALLATION
STEP 3. CONNECT ELECTRICAL
Verify that power is turned off at the source. Take the
wiring plate with wires and connect black wire to black
house wire, white wire to white house wire and green
wire to green house wire using UL approved wire nuts. All
electrical connections must be made inside the unit. Refer
to the wiring diagram for connection to wall switch.
WARNING If house wiring is not 2-wire with a
ground wire, a ground must be provided by the installer.
When house wiring is aluminum, be sure to use UL
approved anti-oxidant compound and aluminum-to-
copper connectors.
Connection to one wall switch. Fan and light will be
controlled together.
Push all the wiring to the corner of the unit and install the
wire plate cover in the housing and secure in place using
the screw. Ensure wires are not pinched.
NOTE: To prevent wires from getting pinched under the
motor assembly, do not leave wires outside the wiring
plate.
WARNING Disconnect all electrical power at the main circuit breaker or fuse box before making connections.
LIGHT
FAN
SWITCH 1
NEUTRAL
GROUND GRN
SWITCH 1
SWITCH 2
NEUTRAL
GROUND
BLACK
GREEN
WHITE
BLUE
POWER SUPPLY
AC 120 V 60 Hz
LIGHT
FAN
BLACK
GREEN
WHITE
BLUE
POWER SUPPLY
AC 120 V 60 Hz
WHT
BLU
BLK
GRN
WHT
BLU
BLK
12 49-7000174 Rev. 5
ENGLISH
INSTALLATION
STEP 3. CONNECT ELECTRICAL (Cont.)
Connection to two wall switches. Fan and light will be
controlled separately.
LIGHT
FAN
SWITCH 1
NEUTRAL
GROUND GRN
SWITCH 1
SWITCH 2
NEUTRAL
GROUND
BLACK
GREEN
WHITE
BLUE
POWER SUPPLY
AC 120 V 60 Hz
LIGHT
FAN
BLACK
GREEN
WHITE
BLUE
POWER SUPPLY
AC 120 V 60 Hz
WHT
BLU
BLK
GRN
WHT
BLU
BLK
49-7000174 Rev. 5 13
ENGLISH
STEP 4. INSTALL MOTOR
ASSEMBLY & GRILLE
Insert the motor assembly into the housing. Secure it in
place using the screws as shown and connect the motor
connector to the wiring plate.
Connect the light connector from the grille to the
wiring plate. Press the springs on the sides of the grille
together and insert them
into the slots in the motor
assembly. Firmly push the
attached grille up against
the ceiling.
Motor
Connector
Screws
PRODUCT REPLACEMENT
In case of Haier product replacement, follow the steps
below to replace unit:
WARNING Disconnect all electrical power at
the main circuit breaker or fuse box before product
replacement.
1. Remove the grille from existing unit.
2. Unplug the motor and the light connectors from the
wiring plate of the current unit. Uninstall the motor
assembly by removing the screws and pulling it out of
the housing.
3. Discard the motor assembly and grille.
4. Unbox new unit and follow step 2 of this section to
remove motor assembly and light grill from new unit.
5. Install the new motor assembly into the existing
housing using the screws as shown in installation
instructions Step 4. Install motor assembly and grill.
6. Reinstall the grille and turn power on to test unit.
INSTALLATION
14 49-7000174 Rev. 5
ENGLISH
TROUBLESHOOTING TIPS
Save time and money! Review the chart below first and you may not need to schedule service.
Problem Possible Cause What To Do
Fan/light does not
operate when switch is
turned on
A GFCI or circuit breaker is tripped, or
house fuse may be blown.
Reset GFCI, circuit breaker or replace house fuse. If
this does not fix the issue, please refer to the LIMITED
WARRANTY section.
Fan fails to circulate air
or moves air slower than
normal and/or fan is
making loud or abnormal
airflow noise
Obstructions in duct work. Make sure nothing is blocking the vent. Make sure that if
your wall or roof cap has a blade or door that it is open.
Damper flap on the product may not be
open
Make sure damper swings freely. Damper flap may flip
over and will not fully open when this happens. Adjust to
original position.
Wrong duct size used in installation. This fan requires 4” ducting to perform optimally. Using
smaller duct size will cause reduced venting. Minimize
the duct run length and number of transitions and
elbows.
Motor bearings are
making excessive or
unusual noises.
Obstruction in the motor housing or
bearing failure
Check for obstructions in the motor housing, refer to the
PRODUCT CARE section for cleaning instructions. The
motor is permanently lubricated and never needs oiling.
If the issue in not fixed, please refer to the LIMITED
WARRANTY section.
49-7000174 Rev. 5 15
ENGLISH
Haierappliances.com
For a warranty claim, please call Haier at 888.384.3641. Please have your Model and Serial number available. Additionally, proof of
original purchase date is needed to make a warranty claim.
What Haier will not cover:
Failure of the product if it is abused, misused, modified,
or used for other than the intended purpose or used
commercially.
Replacement of house fuses or resetting of circuit
breakers.
Damage caused after delivery.
Damage to the product caused by accident, fire, floods, or
acts of God.
Incidental or consequential damage caused by possible
defects with this appliance.
EXCLUSION OF IMPLIED WARRANTIES
Your sole and exclusive remedy is product repair as provided in this Limited Warranty. Any implied warranties, including
the implied warranties of merchantability or fitness for a particular purpose, are limited to one year or the shortest period
allowed by law.
For sale in the 50 United States and the District of Columbia only:
For US Customers: This limited warranty is extended to the original purchaser for products purchased for home use within the
USA.
Some states do not allow the exclusion or limitation of incidental or consequential damages. This limited warranty gives you
specific legal rights, and you may also have other rights which vary from state to state. To know what your legal rights are,
consult your local or state consumer affairs office or your states Attorney General.
Warrantor: GE Appliances, a Haier company
Louisville, KY 40225
For the period of Haier will replace
One year
From the date
of the original
purchase
If the exhaust fan fails due to a defect in materials or workmanship, during this limited one-year
warranty, Haier will either repair your product or replace your product with a new or remanufactured
product, or refund the purchase price of the product at Haier's sole discretion.
LIMITED WARRANTY
16 49-7000174 Rev. 5
ENGLISH
IMPORTANT
Do Not Return This Product To The Store
If you have a problem with this product, please call 888.384.3641 for the name and telephone number of the nearest
authorized service center.
DATED PROOF OF PURCHASE REQUIRED FOR WARRANTY SERVICE
Printed in China
  • Page 1 1
  • Page 2 2
  • Page 3 3
  • Page 4 4
  • Page 5 5
  • Page 6 6
  • Page 7 7
  • Page 8 8
  • Page 9 9
  • Page 10 10
  • Page 11 11
  • Page 12 12
  • Page 13 13
  • Page 14 14
  • Page 15 15
  • Page 16 16

Haier QVE801DTWW 80 CFM Exhaust Fan User manual

Type
User manual
This manual is also suitable for

Ask a question and I''ll find the answer in the document

Finding information in a document is now easier with AI