3
ATTACH OPENER ARM
STEP 3: DETERMINE SPRING TYPE, BRACKET TYPE AND ATTACH
NOTE: For extension spring doors with openers, the opener arm
must attach to the bracket in the center of the door.
NOTE: The opener arm should be attached roughly at the same
height as the top rollers of the door. This is about 3" to 5" from the
top of the door.
TORSION SPRING DOORS
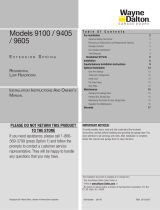
ATTACH TO OPERATOR REINFORCEMENT BRACKET
Attach opener arm to one of the operator reinforcement brackets by
sliding the clevis pin through either hole A or B, then through the hole on
the opener arm and nally through the opposite hole A or B. Once the
clevis pin is completely through, insert the cotter ring at the end of the
clevis pin as illustrated in Fig. F.
It may be necessary to mount the operator off-center of door to align with
operator reinforcement bracket.
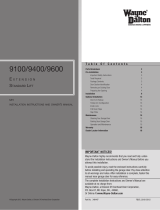
ATTACH TO HORIZONTAL ANGLE
Attach opener arm to the center bracket on the horizontal angle by sliding
the clevis pin through the center bracket hole, then through the hole on
the opener arm and nally through the opposite hole. Once the clevis pin
is completely through, insert the cotter ring at the end of the clevis pin as
illustrated in Fig. G.
ATTACH TO STRUT
Attach opener arm to the center bracket on the strut by sliding the
clevis pin through the center bracket hole, then through the hole on the
opener arm and nally through the opposite hole. Once the clevis pin is
completely through, insert the cotter ring at the end of the clevis pin as
illustrated in Fig. G.
EXTENSION SPRING DOORS
ATTACH TO HORIZONTAL ANGLE
Attach opener arm to the center bracket on the horizontal angle by sliding
the clevis pin through the center bracket hole, then through the hole on
the opener arm and nally through the opposite hole. Once the clevis pin
is completely through, insert the cotter ring at the end of the clevis pin as
illustrated in Fig. G.
ATTACH TO STRUT
Attach opener arm to the center bracket on the strut by sliding the
clevis pin through the center bracket hole, then through the hole on the
opener arm and nally through the opposite hole. Once the clevis pin is
completely through, insert the cotter ring at the end of the clevis pin as
illustrated in Fig. G.
Fig. F
Fig. G
Opener Arm
Opener Arm
Cotter Ring
Cotter Ring
Clevis Pin
Clevis Pin
Center Bracket
or Punched Angle
Horizontal Bracket
or Strut
Hole A
Hole B