Clopay SUP-1038031 Operating instructions
- Category
- Garage Door Opener
- Type
- Operating instructions
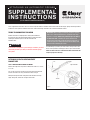
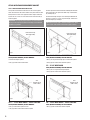
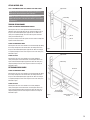
Clopay SUP-1038031 is an automatic garage door opener reinforcement bracket designed to enhance the safety and functionality of your Clopay steel sandwich residential garage door. This device plays a crucial role in providing a secure mounting point for your automatic garage door opener. By reinforcing the top section of your door, it prevents damage and ensures a stable and reliable operation of your automatic opener. With its easy installation process, using prepunched holes and sheet metal screws, you can effortlessly attach the bracket to your door's reinforcing plates.
Clopay SUP-1038031 is an automatic garage door opener reinforcement bracket designed to enhance the safety and functionality of your Clopay steel sandwich residential garage door. This device plays a crucial role in providing a secure mounting point for your automatic garage door opener. By reinforcing the top section of your door, it prevents damage and ensures a stable and reliable operation of your automatic opener. With its easy installation process, using prepunched holes and sheet metal screws, you can effortlessly attach the bracket to your door's reinforcing plates.


-
 1
1
-
 2
2
-
 3
3
-
 4
4


Clopay SUP-1038031 Operating instructions
- Category
- Garage Door Opener
- Type
- Operating instructions
Clopay SUP-1038031 is an automatic garage door opener reinforcement bracket designed to enhance the safety and functionality of your Clopay steel sandwich residential garage door. This device plays a crucial role in providing a secure mounting point for your automatic garage door opener. By reinforcing the top section of your door, it prevents damage and ensures a stable and reliable operation of your automatic opener. With its easy installation process, using prepunched holes and sheet metal screws, you can effortlessly attach the bracket to your door's reinforcing plates.
Ask a question and I''ll find the answer in the document
Finding information in a document is now easier with AI
Related papers


Other documents
-
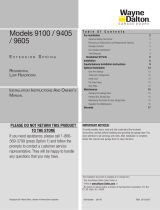 Wayne-Dalton TORQUEMASTER 9100 Installation Instructions And Owner's Manual
-
 Wayne-Dalton 7100 Series User manual
-
Craftsman 139.53606 User manual
-
 Wayne-Dalton CRT Television 9100/9400/9600 User manual
-
 Wayne-Dalton 5255 User manual
-
 Wayne-Dalton 2415 User manual
-
 Wayne-Dalton 8850 User manual
-
-
Chamberlain 1150 User manual
-
B&D Controll-A-Door P N1134 Instructions Manual


