Page is loading ...

1
0
2
0
3
0
4
0
5
0
0
0
50
10
30
60
20
40
24
12
18 6
T
M
E
C
A
L
A
L
M
L
-
A
L
L
-
T
M
L
A
P
S
P
L
T
M
R
When reading this instruction manual please keep the watch diagram at
left folded out and in view.
• Refer to “1. NAME OF PARTS” (p. 6) for the symbols on the diagram.
• The design may differ according to the model.
Beim Lesen dieser Bedienungsanleitung beziehen Sie sich bitte auf die
Abbildung im linken Faltblatt.
• Für die in der Abbildung verwendeten Symbole sich auf das Kapitel “1.
BEZEICHNUNG DER TEILE” (S. 68) beziehen.
• Das Design kann je nach Modell verschieden sein.
Pendant la lecture de ce mode d'emploi, dépliez le dessin de la montre à
gauche de manière à pouvoir vous y référer.
• Pour les symboles du dessin de la montre, reportez-vous à “1. NOMEN-
CLATURE DES ORGANES” (p. 136).
• Le design de la montre peut varier selon le modèle.
Cuando lea este manual de instrucciones por favor tenga el esquema del
reloj de la izquierda desplegado y a la vista.
• Diríjase a “1. DENOMINACION DE LAS PARTES” (pág. 210) para los
símbolos que aparecen en el esquema.
• El diseño puede variar según el modelo.
e
d
c
h
g
f
B
A
a
b
M
C

32
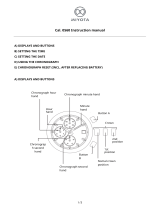
This watch is a combination watch which incorporates two kinds of
chronograph functions and a timer function that facilitates clocking
various time competitions in one watch besides the usual time indication,
calendar and alarm functions.
Moreover, this watch has other convenient functions: the time difference
correction, local time indication and alarm in local time.
English

4 5
CONTENTS
1. NAMES OF PARTS . . . . . . . . . . . . . . . . . . . . . . . . . . . . . . . . . . .6
2. CHANGING FUNCTIONS (MODES) . . . . . . . . . . . . . . . . . . . . .10
3. SETTING TIME . . . . . . . . . . . . . . . . . . . . . . . . . . . . . . . . . . . . .11
4. HOW TO CORRECT TIME DIFFERENCE . . . . . . . . . . . . . . . .14
5. USING HAND RETRACTOR FUNCTION . . . . . . . . . . . . . . . . .15
6. SETTING CALENDAR . . . . . . . . . . . . . . . . . . . . . . . . . . . . . . .16
7. USING ALARM . . . . . . . . . . . . . . . . . . . . . . . . . . . . . . . . . . . . .20
8. USING SPL CHRONOGRAPH . . . . . . . . . . . . . . . . . . . . . . . . .24
9. USING LAP CHRONOGRAPH . . . . . . . . . . . . . . . . . . . . . . . . .32
10. USING TIMER . . . . . . . . . . . . . . . . . . . . . . . . . . . . . . . . . . . . . .40
11. USING LOCAL TIME INDICATION . . . . . . . . . . . . . . . . . . . . . .43
12. USING LOCAL TIME ALARM . . . . . . . . . . . . . . . . . . . . . . . . . .47
13. SETTING HANDS TO “0” POSITION . . . . . . . . . . . . . . . . . . . .51
14. ALL RESET . . . . . . . . . . . . . . . . . . . . . . . . . . . . . . . . . . . . . . . .54
15. PRECAUTIONS . . . . . . . . . . . . . . . . . . . . . . . . . . . . . . . . . . . . .56
16. SPECIFICATIONS . . . . . . . . . . . . . . . . . . . . . . . . . . . . . . . . . . .62

7
LAP
TIMER LOCAL TIME LOCAL ALARM
CHRONOGRAPH
Time difference
START/STOP START/STOP
correction in local time
AM/PM monitor
(setting forward)
To show
Hand Retractor
memorized time
Time difference
Alarm ON/OFF
Reset/Split Reset/flyback
correction in local time
switch
(setting back)
To timer mode
To “0” position
To local time mode To local alarm mode To time mode
correction status
To Setting status To Setting status
To Setting status
6
MODE
TIME CALENDAR ALARM
SPL
NAME CHRONOGRAPH
Time difference
A: BUTTON A correction AM/PM monitor START/STOP
(setting forward)
B: BUTTON B Hand retractor
To show
split memo’s
Time difference
C: BUTTON C correction
Alarm ON/OFF switch
Reset/Split
(setting back)
M: BUTTON M To SPL To LAP
Pressing in To calender mode To Alarm mode
chronograph mode chronograph mode
Pulling out
To Setting status To Setting status To Setting status
To “0” position
one step
.
correction status
1.NAMES OF PARTS

98
LAP
TIMER LOCAL TIME LOCAL ALARM
CHRONOGRAPH
Lap number
Set “Minute(s)” or Main time
Alarm time
indication
remaining “Minute(s)” “Hour(s)” “Hour(s)”
indication indication indication
1/100 of a
Set “00” or
Main time Alarm time
second or lap
remaining
“Minute(s)” “Minute(s)”
time indication
“Second(s)”
indication indication
indication
Local time “Hour(s)” indication by 24-hour system
Local time “Hour(s)” indication
Local time “Minute(s)” indication
LAP chronograph Main time
“Second(s)” “Second(s)” Local time “Second(s)” indication
indication indication
LAP chronograph
Set “Minute(s)”
“Minute(s)”
indication
Always set at “0” position
indication
LAP TMR L-TM L-AL
MODE
TIME CALENDAR ALARM
SPL
NAME CHRONOGRAPH
a: DIGITAL
Alarm time
Split number
DISPLAY I
Day indication Month indication “Hour(s)”
indication
indication
Alarm time
1/100 of a
b: DIGITAL
Date indication Date indication
indication
second or split
DISPLAY II “Minute(s)”
time indication
indication
c: 24HOUR HAND
Main time “Hour(s)” indication by 24-hour system
d: HOUR HAND Main time “Hour(s)” indication
e: MINUTE HAND
Main time “Minute(s)” indication
f: SECOND HAND/
SPL chronograph
FUNCTION HANDI
Main time “Second(s)” indication “Second(s)”
indication
g: FUNCTION
SPL chronograph
HAND II
Always set at “0” position “Minute(s)”
indication
h: MODE HAND
TME CAL ALM SPL

3. SETTING TIME
[How to set hour indication]
(1)Press M button to shift the mode to “TME.”
(2)Pull M button out to the time setting position.
• The second, minute, hour and 24-hour hands stop, and
seconds indication appearing on the digital display II
starts blinking at the same time.
• The function hand II stops at “0” position.
* If you try to shift the mode to “TME” (time setting
mode) from the Hand Retractor state, the mode
is switched to the second setting mode as the watch remains in the Hand
Retractor state in actuality.
• For details of the Hand Retractor function (mode), refer to “5. USING HAND
RETRACTOR FUNCTION.”
(3)Press button C for resetting seconds.
11
2. CHANGING FUNCTIONS (MODES)
Besides the usual time indication function, this watch has seven other functions
(modes): the calendar, alarm, SPL chronograph, LAP chronograph, timer, local
time indication and alarm in local time. These modes can be changed one after
another by pressing the M button. The current mode is shown by the mode
indicator.
10
TME
Time mode
L-AL
Local alarm mode
CAL
Calendar mode
L-TM
Local time mode
ALM
Alarm mode
TMR
Timer mode
SPL
SPL chronograph mode
LAP
LAP chronograph mode
➞
➞
➞
➞
➞➞➞
➞
50
10
30
60
20
40
24
12
18 6
T
M
E
C
A
L
A
L
M
L
-
A
L
L
-
T
M
L
A
P
S
P
L
T
M
R
Since analog time indication (hour, minute, second, 24-hour hands) is
synchronized with digital time indication, set the digital time indication
correctly first and then press M button in to the original position. Accordingly,
all the hands will be set to the correct positions automatically.
Second indication

1312
• If button C is pressed while the seconds indication is between 30 and 59
seconds, the minutes indication is advanced to the next minute.
(4)If button A is pressed in the seconds reset status (seconds indication is
blinking), the watch is switched into the minute setting status.
• In this case, hour indication appears on the digital display I while minute
indication blinks in the digital display II.
(5)Press button C to set minutes.
• If button C is left pressed, minutes can be set quickly.
(6)If button A is pressed in the minute setting status (minutes indication is
blinking), the watch is switched into the hour setting status.
• In this case, hour indication appearing in the digital display I starts blinking.
(7)Press button C to set hours.
• If button C is left pressed, hours can be set quickly.
• Hour indication is set in the 24-hour system.
(8)Press button A and the watch returns to the seconds reset status.
(9)If button M is pressed in to the normal position in the time setting mode, the
watch returns to the usual time indication mode.
• The second, minute, hour and 24-hour hands are automatically set to their
correct positions, synchronous with the digital time indication.
The second hand starts 1-second interval movement. The minute, hour and
24-hour hands move every 20 seconds.
Usual time mode
Hand Retractor
mode
Hand Retractor
mode
B
➞
B
A
➞
A
➞
A
B
MM
➞
➞
➞
➞
➞
➞
Day Date
Second setting status
Second
Minute setting status
Hour Minute
Hour setting status
Hour
Minute
*
If button B is pressed in the time (second, minute, hour) setting status, the
watch enters the Hand Retractor mode.

15
4. HOW TO CORRECT TIME DIFFERENCE
• Time difference can be corrected by hours.
(1)If button A is pressed for 2 seconds or more in the normal time mode, the
24-hour, hour and minute hands are advanced by an hour (hours).
• If button A is left pressed, it quickens forward correction of the time
difference.
(2)If button C is pressed for 2 seconds or more, the 24-hour, hour and minute
hands are set back by an hour (hours).
• If button C is left pressed, it quickens backward correction of the time
difference.
14
5. USING HAND RETRACTOR FUNCTION
• If either digital display is hard to see because the hour hand and/or minute
hand overlap in the time, calendar, alarm, local time or local alarm mode,
the disturbing hands can be moved aside by the Hand Retractor function.
[How to use the Hand Retractor function]
(1)If button B is pressed for 2 seconds or more in a normal mode, the second
hand quickly moves to the “0” position and stops there. At the same time, the
24-hour hand moves to the 24 hours position (24:00) while the hour and
minute hands are moved quickly to the 12 hours and “0” minute positions
(12:00) respectively.
• If button B is pressed again while the hands are moving quickly, each hand
stops immediately.
(2)If button B is pressed once more, the Hand Retractor mode is canceled and
each hand returns to its original position.

1716
6. SETTING CALENDAR
[How to set calendar]
(1)Press button M to switch the mode to “CAL.”
(2)Pull out button M to the calendar setting position.
• The month appearing on digital display I starts blinking.
* If you try to shift the mode to “CAL” (calendar setting mode) from the
general Hand Retractor status, the mode is shifted to the month setting
mode as the watch remains in the Hand Retractor status in actuality.
(3)Press button C to set the month.
•If button C is left pressed, the month can be set quickly.
Normal position
50
10
30
60
20
40
24
12
18 6
T
M
E
C
A
L
A
L
M
L
-
A
L
L
-
T
M
L
A
P
S
P
L
T
M
R
[Indication after the mode is switched to the
calendar mode from another mode]
• Digital display I: Month
• Digital display II: Date
• Second, minute, hour and 24-hour hands
indicate the current time.
• Function hand II stops at “0” position.
(4)If button A is pressed in the month setting status (month indication is
blinking), the watch is switched into the date setting status.
• The date appearing on digital display II starts blinking.
(5)Press button C to set the date.
• If button C is left pressed, the date can be set quickly.
(6)If button A is pressed in the date setting status, the watch is switched into
the year setting status.
• In that event, digital display I shows the first two digits of the Christian year
while digital display II shows the last two digits, and all the digits appearing
on the displays are blinking.
(7)Press button C to set the year.
• If button C is left pressed, it quickens setting of the year.
• The year can be set in the range from 1997 to 2099.
(8)Press button A and the watch returns to the month setting status.
(9)If button M is pressed in to the normal position in the calendar setting mode,
the watch returns to the usual calendar indication mode.
* If button B is pressed in the calendar setting status, the watch enters the Hand
Retractor mode.
Calendar setting position

18
Usual calendar mode
Hand Retractor
mode
Hand Retractor
mode
B
➞
B
A
➞
A
➞
A
B
MM
➞
➞
➞
➞
➞
➞
Month
Date
Month setting status
Day
Date
Date setting status
Day
Date
Year setting status
First two digits of
Christian year
Last two digits of
Christian year
Year Year
19
Automatic month-end correction function
• If the calendar is set to such an unreal date as 30th of February or 31st of
September, the calendar automatically corrects the error in setting and it
indicates the 1st day of the next month as the watch is restored to the usual
calendar mode.
Automatic day setting function
• With setting of the date, month and year, the day of the week is automatically
set.
Year indication
• Year indication appears in the calendar setting mode only.

2120
7. USING ALARM
[Indication after the mode is shifted to the alarm mode from another mode]
Digital display I Digital displayII
•Alarm ON: Hour Minute
• Alarm OFF: No indication “OF”
• Alarm time is indicated in the 24-hour system
on the digital displays.
• Second, minute, hour and 24-hour hands
indicate the current time.
• Function hand stops at “0” position.
[How to set alarm time]
(1)Press button M to switch the mode to “ALM.”
(2)Pull button M out to the setting position, and the watch enters the alarm time
setting mode.
• The hour indication appearing on digital display I starts blinking.
50
10
30
60
20
40
24
12
18 6
T
M
E
C
A
L
A
L
M
L
-
A
L
L
-
T
M
L
A
P
S
P
L
T
M
R
Alarm indication
Normal position
Minute
Hour
setting position
• Digital display II shows the minute.
*
If you try to switch the mode to “ALM” (alarm setting mode) from the general
Hand Retractor status, the mode is changed to the hour setting status of the
alarm mode as the watch remains in the Hand Retractor status in actuality.
(3)Press button C to set the hour.
• In the alarm setting mode, the hour can be set in the 24-hour system only.
• If button C is left pressed, the hour can be set quickly.
(4)Press button A to switch from the hour setting status to the minute setting
status.
• Digital display I shows the hour.
• The minute indication appearing on digital display II starts blinking.
(5)Press button C to set the minute.
• If button C is left pressed, the minute can be set quickly.
(6)If button A is pressed once more, the watch returns to the hour setting status
of the alarm setting mode.
(7)If button M is pressed in to the normal position in the alarm setting status, the
watch returns to the alarm time indication mode (alarm on).
*
If button B is pressed in the alarm time setting status, the watch enters the
Hand Retractor mode.

2322
[How to distinguish between the alarm time in AM and that in PM]
(1)In case the alarm time has been set.
• Press button A in the alarm mode, and “AM” or “PM” appears on digital
display II.
(2)In case no alarm time has been set.
• Press button A in the alarm mode, and “OF” appears on digital display II.
[How to switch the alarm ON/OFF]
(1)Each time button C is pressed in the alarm mode, the alarm is switched on
and off alternately.
[Alarm monitor]
(1)Press button C for 2 seconds or more, and the alarm will continue to sound
while button C is being pressed.
Hand Retractor
mode
A
➞
A
M
M
➞
➞
B
➞
B
➞
Hour setting status
Hour
Minute
Minute setting status
Hour
Minute
Hand Retractor
mode
➞
C
➞
B
➞
B
➞
➞
Alarm ON status
Hour
Minute
Alarm OFF status
OF
Usual alarm mode
Alarm time setting mode

25
24
8. USING SPL CHRONOGRAPH
•The chronograph is capable of checking and
indicating a time up to 23 hours 59 minutes
59 and 99/100 seconds in units of 1/100 of a
second. If 24 hours passes after starting a
time check, the chronograph stops with the
indication of 0 hours 0 minutes 0 seconds
which is the reset state.
This SPL chronograph function is capable of
checking split time (elapsed time) and
checked split time, up to 9 records in total can
be saved in the memory.
50
10
30
60
20
40
24
12
18 6
T
M
E
C
A
L
A
L
M
L
-
A
L
L
-
T
M
L
A
P
S
P
L
T
M
R
Chronograph
minute hand
Chronograph
second hand
Mode hand
1/100 second
indication (After
60 minutes has
elapsed, it
indicates the
chronograph
hour(s).)
[Reset status of chronograph]
[Indication after the mode is shifted to the SPL chronograph mode from
another mode]
• The second hand serves as the chronograph second hand and the function
hand II serves as the chronograph minute hand.
• The minute, hour and 24-hour hands indicate the current time.
• Digital display I: Indicates “S” + number in the split time check mode. In
other modes, nothing is indicated on this display.
• Digital display II: 1/100 of a second indication (After 60 minutes has
elapsed, it indicates the chronograph hour(s).)
[How to check total time]
(1)Press M button to switch the mode to “SPL.”
(2)Press A button to start checking time.
• Each time button A is pressed, the chronograph stops and starts checking
time alternately.
• Each time button A is pressed, the split time is memorized. If button A is
pressed only once, the total time is memorized.
(3)If button C is pressed while the chronograph is stopped, the chronograph
indication is reset.
• If button A or C is pressed, the watch beeps for confirmation.
Lap time
Lap time
Lap time
Split
Split
Split
L1 L2 L3
S1
S2 S3
LE
T
T

2726
[How to check split time (elapsed time)]
(1)Press button A to start checking time. Each time button A is pressed, the
chronograph starts and stops alternately.
(2)If button C is pressed during a time check, the chronograph indicates a split
time.
• While a split time is being indicated, “S” and the split number blink on digital
display I.
(3)If button C is pressed while a split time is being indicated, the elapsed time
for the split time indication is added and the chronograph enters the next split
time checking status.
• Every time button C is pressed, each split time is numbered and saved in
the memory.
Maximum of nine split times can be saved in the memory. When the tenth
split time is checked, the oldest record is erased and the latest check time
is recorded, and so on.
• Split times are numbered in the checking order.
(4)If button A is pressed while a split time is being indicated, the chronograph is
switched into the time check end status.
• If no button is pressed for 10 seconds while a split time is being indicated,
the chronograph automatically returns to the time check status to continue
checking time.
(5)If button C is pressed when the chronograph is out of operation (time check
end status), it resets the chronograph.
* When button A or C is pressed, the watch beeps for confirmation.
[How to show a recorded split time]
(1)Press button B in the chronograph mode (reset, time check, stop or split
time status), and chronograph indicates the split time of the oldest record in
the memory together with its split number on the display.
• Each time button B is pressed, the chronograph shows the split times
recorded in the memory one after another, and the latest recorded split time
is followed by the oldest split time.
• If button B is pressed to show the recorded split times in the reset or stop
status, all the recorded split times are shown one after another in the
recording order. Following the last recorded split time, the chronograph
shows the total of the recorded split times. Henceforth, the chronograph
shows the oldest split time again and other records follow it in the
aforementioned order.
• If no split time is recorded, the chronograph shows the total time.
• The total time represents the elapsed time from the start to the end of a
time check in the chronograph mode. While a total time is shown, “T” blinks
on digital display I.

2928
(2)If no button is pressed for 10 seconds after a split time is shown, the
chronograph returns to the status it showed just before the split time (reset,
time check, or stop status).
(3)If button A or C is pressed, the chronograph returns to the status it showed
just before the split time (reset, time check, or stop status).
* All the records of split times are cleared when button A is pressed to start a
new time check, after the chronograph is reset.
[Indication after memo is called back]
• The second hand moves to the position that was previously memorized and
stops there.
• The function hand II moves to the chronograph minute position that was
previously memorized and stops there.
• Digital display I: Shows “S” and the memo number, both of which are
blinking.
• Digital display II: Indicates time in hundredths of a second. (After 60
minutes has elapsed, it indicates the chronograph hour(s).)
• The minute, hour and 24-hour hands indicate the current time.
Automatic return
after 10 seconds
Chronograph time check
Calling memo
A, C or automatic return after 10 seconds
It is possible to call memo in the
reset or time check end status.
➞
➞
B
A
➞
➞
A
B
A
C
C
C
B
➞
➞
➞
➞
➞
➞
➞
Reset
Showing split time Showing total time
Time check
Finish of time check
(Indication of
elapsed time)
➞
B
➞
Split time

3130
[In case the mode is switched from the SPL chronograph mode to another]
(1)In case the SPL chronograph mode is switched to another mode once and it
is switched back to the SPL chronograph mode again, the last time check
status, just before the first mode change, is recovered.
However, 1) if the chronograph was in the split time check status just before
the first mode change, the chronograph is set for the time check status after
the second mode change, 2) if the chronograph was in the split time calling
status just before the first mode change, the chronograph is set in the
status (reset, time check or time check end status) just before the split time
calling status, after the second mode change.
(2)In case the SPL chronograph mode is switched to the LAP chronograph
mode, the time check status does not change.
• In case the last chronograph status was the SPL chronograph reset status,
the chronograph is switched into the LAP chronograph reset status.
• In case the last chronograph status was the SPL chronograph time check
status, the chronograph is switched into the LAP chronograph time check
status.
• In case the last chronograph status was the SPL chronograph time check
end status, the chronograph is switched into the LAP chronograph time
check end status.
However, 1 if the last status was the split time check status, the
chronograph enters the LAP chronograph time check status,
2 if the last status was the split time calling status, the
chronograph enters the status (reset, time check or time check
end status) just before the split time calling status,
3 if the SPL split time was called in the split time status, the
chronograph enters the LAP chronograph time check status.

3332
9. USING LAP CHRONOGRAPH
• The chronograph is capable of checking and indicating a time up to 23
hours 59 minutes 59 and 99/100 seconds in units of 1/100 of a second. If
24 hours passes after starting a time check, the chronograph stops with the
indication of 0 hour 0 minute 0 second which is the reset state. This LAP
chronograph function is capable of checking lap time (elapsed time) and
checked lap time, up to 9 records in total, can be saved in the memory.
[Reset status of LAP chronograph]
[Indication after the mode is switched to the
LAP chronograph mode from another mode]
• The second hand serves as the LAP
chronograph second hand and the function
hand II serves as the LAP chronograph minute
hand.
• The minute, hour and 24-hour hands indicate
the current time.
50
10
30
60
20
40
24
12
18 6
T
M
E
C
A
L
A
L
M
L
-
A
L
L
-
T
M
L
A
P
S
P
L
T
M
R
Chronograph
minute hand
Chronograph
second hand
Mode hand
1/100 second
indication
(After 60
minutes has
elapsed, it
indicates the
chronograph
hour(s).)
• Digital display I: Indicates “L”+ number in the lap time check mode. In
other modes, nothing is indicated on this display.
• Digital display II: Chronograph 1/100 of a second indication (After 60
minutes has elapsed, it indicates the LAP chronograph
hour(s).)
[How to check total time]
(1)Press button M to switch the mode to “LAP.”
(2)Press button A to start checking time.
• Each time the button A is pressed, the chronograph stops and starts
checking time alternately.
• Each time button A is pressed, the split time is memorized. If button A is
pressed only once, the total time is memorized.
(3)If button C is pressed while the chronograph is stopped, the chronograph
indication is reset.
• If button A or C is pressed, the watch beeps for confirmation.
[How to check lap time]
(1)Press button A to start checking time.
• Each time button A is pressed, the chronograph starts and stops
alternately.

3534
(2)If button C is pressed during time check, the chronograph indicates a lap
time.
• While a lap time is being indicated, “L” and the lap number blink on the
digital display I.
(3)If button C is pressed while a lap time is being indicated, the elapsed time for
the lap time indication is added and the chronograph enters the next lap time
checking status.
• Every time button C is pressed, each lap time is numbered and saved in
the memory. Maximum of nine lap times can be saved in the memory.
When the tenth lap time is checked, the oldest record is erased and the
latest check time is recorded, and so on.
• Lap times are numbered in the checking order.
(4)If button A is pressed while a lap time is being indicated, the chronograph is
switched into the time check end status.
• If no button is pressed for 10 seconds while a lap time is being indicated,
the chronograph automatically returns to the time check status to continue
checking time.
(5)If button A is pressed when the chronograph is out of operation (time check
end status), it resets the chronograph.
* When button A or C is pressed, the watch beeps for confirmation.
[How to show a recorded lap time]
(1)Press button B in the LAP chronograph mode (reset, time check, stop or lap
time status), and chronograph indicates the lap time of the oldest record in
the memory together with its lap number on the display.
• Each time button B is pressed, the chronograph shows the lap times
recorded in the memory one after another, and the latest recorded lap time
is followed by the oldest lap time.
• If button B is pressed to show the recorded lap times in the reset or stop
status, all the recorded lap times are shown one after another in the
recording order. Following the last recorded lap time, the chronograph
shows the total of the recorded lap times. Henceforth, the chronograph
shows the oldest lap time again and other records follow it in the
aforementioned order.
• The lap between the last lap time and the total time is shown as “LE.”
• If no lap time is recorded, the chronograph shows the total time.
• The total time represents the elapsed time from the start to the end of a
time check in the chronograph mode. While a total time is shown, “T” blinks
on digital display I.
(2)If no button is pressed for 10 seconds after a lap time is shown, the
chronograph returns to the status it showed just before the lap time (reset,
time check, or stop status).

3736
(3)If button A or C is pressed, the chronograph returns to the status it showed
just before the lap time (reset, time check, or stop status).
* All the records of lap times are cleared when button A is pressed to start a
new time check, after the chronograph is reset.
[Indication after memo is called back]
• The second hand moves to the position that was previously memorized and
stops there.
• The function hand II moves to the chronograph minute position that was
previously memorized and stops there.
• Digital display I: Shows “L” and the memo number, both of which are
blinking.
• Digital display II: Indicates time in hundredths of a second. (After 60
minutes has elapsed, it indicates the chronograph hour(s).)
• The minute, hour and 24-hour hands indicate the current time.
Automatic return
after 10 seconds
LAP chronograph time check
Calling memo
A, C or automatic return after 10 seconds
It is possible to call memo in the
reset or time check end status.
➞
➞
B
A
➞
➞
A
B
A
C
C
B
➞
➞
➞
➞
➞
➞
Reset
Showing lap time Showing total time
Time check
Finish of time check
(Indication of
elapsed time)
➞
B
➞
Lap time
➞
C

3938
[In case the mode is switched from the LAP chronograph mode to another]
(1)In case the LAP chronograph mode is switched to another mode once and it
is switched back to the LAP chronograph mode again, the last time check
status, just before the first mode change, is recovered.
However, 1 if the chronograph was in the lap time check status just before
the first mode change, the chronograph is set for the time
check status after the second mode change,
2 if the chronograph was in the lap time calling status just before
the first mode change, the chronograph is set in the status
(reset, time check or time check end status) just before the lap
time calling status, after the second mode change.
(2)In case the LAP chronograph mode is switched to the SPL chronograph
mode, the time check status does not change.
• In case the last chronograph status was the LAP chronograph reset status,
the chronograph is switched into the SPL chronograph reset status.
• In case the last chronograph status was the LAP chronograph time check
status, the chronograph is switched into the SPL chronograph time check
status.
• In case the last chronograph status was the LAP chronograph time check
end status, the chronograph is switched into the SPL chronograph time
check end status.
However, 1 if the last status was the lap time check status, the
chronograph enters the SPL chronograph time check status,
2 if the last status was the LAP lap time calling status, the
chronograph enters the status (reset, time check or time check
end status) just before the lap time calling status,
3 if the lap time was called in the lap time status, the
chronograph enters the SPL chronograph time check status.
/