Trendnet TEW-401PCplus Owner's manual

Category
Networking
Type
Owner's manual

This manual is also suitable for

Copyright ©2004. All Rights Reserved. TRENDware International, Inc.
TRENDnet
TRENDware, USA
What's Next in Networking
TEW-401PCplus/TEW-403PIplus
Version 06.01.04
125Mbps 802.11g Wireless Cards
Quick Installation Guide
Guide d'installation rapide pour le
Cartes Sans Fil 125Mbps de standard 802.11g
Schnell Anleitung
125Mbit/s 801.11g Wirless Karten
Guía de Instalación Rápida para
Tarjetas inalámbricas de 125Mbps 802.11g
Table of Contents
English ......................................................................................................
Troubleshooting .........................................................................................
1
1
2
5
7
10
18
1. Prepare for Installation ......................................................................
2. Install Wireless Configuration Utility ..................................................
3. Install Hardware ................................................................................
4. Install Drivers .....................................................................................
5. Configure Wireless Utility ...................................................................
Thank you for purchasing the TEW-401PCplus/TEW-403PIplus. Your new
wireless network adapter will allow you to connect to 802.11g and 802.11b
networks and begin wirelessly sharing the Internet, files, and other resources.
This guide will help you set up and configure your wireless card. Following this
installation should be quick and easy. If you run into problems, please refer to
the Troubleshooting section or the more detailed installation procedures on the
User's Guide CD-ROM. If you need further technical support, please visit
www.TRENDNET.com or call by phone.
Verify Package Contents
Please make sure you have everything in the box:
1
English
1. Prepare for Installation
English QIG
Before installing this PCI Card or PC Card, you should have a:
1. Computer with an available 32-bit CardBus (TEW-401PCplus) or PCI slot
(TEW-403PIplus)
2. 300 MHz processor and 32 MB of memory (Recommended)
3. CD-ROM drive
4. Properly-installed CardBus Controller (TEW-401PCplus only)
5. 802.11g Access Point (Infrastructure Mode) or another 802.11g wireless
adapter (Peer to Peer Mode).
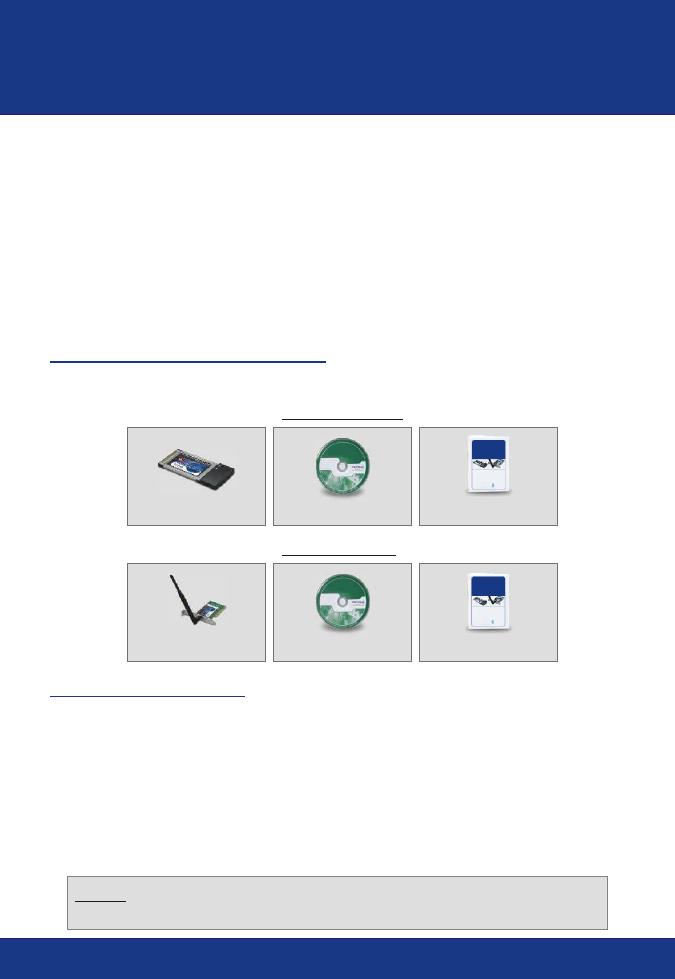
Verify Equipment
TEW-403PIplus
TEW-401PCplus
Utility & Driver CD-ROM
Quick Installation Guide
TEW-401PCplus
Utility & Driver CD-ROM
Quick Installation Guide
TEW-403PIplus
(with detachable antenna)
NOTE: Do not insert the WLAN Adapter in your computer until you have
finished installing the Utility and Driver.
TRENDnet
TRENDware, USA
What's Next in Networking
TRENDnet
TRENDware, USA
What's Next in Networking
TEW-401PCplus/TEW-403PCplus
Version 06.01.04
Version 06.01.04
125Mbps 802.11g Wireless Cards
Quick Installation Guide
Guide d'installation rapide pour le
Cartes Sans Fil 125Mbps de standard 802.11g
Schnell Anleitung
125Mbit/s 801.11g Wirless Karten
Guía de Instalación Rápida para
Tarjetas inalámbricas de 125Mbps 802.11g
125Mbps 802.11g Wireless Cards
Quick Installation Guide
Guide d'installation rapide pour le
Cartes Sans Fil 125Mbps de standard 802.11g
Schnell Anleitung
125Mbit/s 801.11g Wirless Karten
Guía de Instalación Rápida para
Tarjetas inalámbricas de 125Mbps 802.11g
2
2. Install Wireless Configuration Utility
English
Windows 95/98/98SE/ME
1. Insert the TEW-401PCplus/403PIplus CD-ROM into your computer's CD-
ROM drive; the installation menu window will appear automatically. If the
window does not appear automatically, click Start, click Run, and type
E:\Autorun.exe in the text-field. Click OK.
2. On the Installation Menu, Select the Wireless Card and click Install Utility
button.
NOTE: Replace “E” in “E:\Autorun.exe” with whichever letter is assigned
to your CD-ROM drive.
3
English
3. Follow the Install Shield Wizard's instructions to install the wireless
configuration utility, click Next to start.
4. Simply go through the License Agreement and then click Yes to proceed.
5. Now the window will load the utility onto your computer, click Next to
continue.
4
English
6. During the Utility installation procedures of Windows 2000/XP, a warning
message for the Windows Logo testing verification will appear. Click Yes
for Windows 2000 and Continue Anyway for Windows XP to proceed.
7. The Configuration Utility has been installed; click Finish to complete the
installation.
NOTE: For Windows 98SE/ME, Windows will prompt a message for
restarting the computer, select “No, I will restart my computer later,” and
click Finish.
5
English
If you are installing the TEW-401PCplus Wireless PC Card:
Proceed only if you have already completed the steps in Section 2
1. Shut down your computer.
2. Insert the PC Card firmly into your notebook PC's open PC Card slot. Only
the plastic end-piece should protrude from the slot.
3. Reboot your computer.
If you are installing the TEW-403PIplus Wireless PCI Card:
Proceed only if you have already completed the steps in Section 2
1. Shut down your computer.
2. Open your computer case to reveal the motherboard and expansion slots.
(Please refer to your computer's user manual if you need help opening the
case)
3. Insert the wireless card into one of motherboard's free PCI slots. Press down
firmly and evenly on the card until it snaps into place.
3. Install Hardware
6
English
4. Screw the PCI card's metal bracket into your case with a standard bracket
screw. Attach the included antenna to the connector on the back of your
card.
5. Close your computer case, and reboot your computer.
7
English
4. Install Drivers
Windows 98SE/ME
Windows 2000
1. After your computer reboots, window will detect the new hardware and load
the driver automatically.
1. After your computer reboots, window will detect the new hardware and load
the driver automatically.
2. After the driver is installed, windows will prompt the following message, click
Yes to save the changes and restart the computer.
3. Driver installation is now complete.
2. When Digital Signature Not Found Window appears, click Yes to continue.
3. Driver installation is now completed.
NOTE: TRENDnet's Wireless Adapters have been fully tested under all
supported Windows Operating Systems and have been approved for
their functionality.
8
English
1. After your computer reboots, the “Found New Hardware Wizard” will appear.
Click Next to load the driver.
2. A warning message will tell you that the device you're installing has not yet
been certified for Windows XP compatibility. Click Continue Anyway.
Windows XP
NOTE: TRENDnet's Wireless Adapters have been fully tested under all
supported Windows Operating Systems and have been approved for
their functionality.
9
English
3. Now the driver has been installed, click Finish to complete the installation.
4. Restart your computer.
10
English
5. Configure Wireless Utility
Infrastructure Mode (PC-to-Access Point Connection)
1. Double-click the wireless computer icon in your system tray (next to the
clock in the bottom right corner of your screen).
2. From the Wireless Monitor window, select Profile Setting tab , then click
Add.
3. Type in a Profile Name, and then click Next.
11
English
4. Type in your Access Point's or Wireless Router's SSID for the Network Name
and click Next.
5. If your wireless network does not require security setting, click Next to
continue.
NOTE: If you would like to set the Authentication Mode, select the
option from the drop down menu and make sure the setting matches
your wireless network's security settings.
12
English
6. If you do not need to configure IP settings, click Complete.
7. Select the Profile you just created and click on the Connect button to
connect.
NOTE: IP Setting is “Disable” means the wireless card will Obtain an IP
address automatically from a DHCP server. Otherwise, please specify
an IP address to meet your wireless network's configuration.
13
English
8. To verify your connectivity, you can select the Link Information tab and click
More button. If you see connection information, your card's wireless
configuration is complete.
1. Double-click the wireless computer icon in your system tray (next to the
clock in the bottom right corner of your screen).
Your Wireless Card is now configured and ready for use!
Ad-Hoc Mode (PC-to-PC connection)
14
English
2. From the Wireless Monitor window, select Profile Setting tab, then click Add.
3. Create a Profile Name, and then click Next.
5. If your wireless network does not require security setting, click Next to
continue.
15
English
NOTE: If you would like to set the Authentication Mode, select the
option from the drop down menu and make sure the setting matches
your wireless network's security settings.
4. Create a Network Name for your Peer to Peer network and use the drop-
down menus, set the: Network Type to Peer to Peer, Transfer Rate to
Automatic, and select a Channel. Click Next to continue.
7. Using the drop-down menu, set the DHCP Status to Disable and input the IP
address. (in this example, the IP address is 192.168.1.10 and the Subnet
Mask is 255.255.255.0)
NOTE: On the second computer, follow the same steps 1 9. On step 9,
you must specify a different IP address. For example, you may use the
IP address 192.168.1.11, but the Subnet Mask remains 255.255.255.0)
16
English
6. If your wireless network does not require security setting, click Next to
continue.
8. Click Complete to finish the configurations.
10. To verify the “Peer to Peer” wireless network connection, select the Link
Information tab, and click More. If you see connection information, your
card's wireless configuration is not complete.
Your Wireless Network Adapter is now configured and ready for use!
17
English
9. Once you have configured both computers for “Peer to Peer” connection,
select the Profile Name then click Connect.
18
Q1. I completed all the steps in the quick installation guide, but my card
isn't connecting to my access point. What should I do?
A1.
Q2. Windows is unable to recognize my hardware. What should I do?
A2.
Q3. I cannot open the wireless configuration utility. What should I do?
A3.
You should first verify that the Network SSID matches your wireless
router or access point's SSID. If they already match, you should check
your TCP/IP properties to ensure that Obtain an IP address
automatically is selected.
Make sure your computer meets the minimum requirements as
specified in Section 1 of this quick installation guide. Also, you must install
the wireless configuration utility (as described in Section 2) before you
physically install your network card. Lastly, you may consider moving the
card to a different PCI/PC Card Slot.
Go to your device manager (control panel system) to make sure the
adapter is installed properly. If you see a networking device with a yellow
question mark or exclamation point, you will need to reinstall the device
and/or the drivers.
Troubleshooting
If you still encounter problems, please refer to the User's Guide CD-ROM or
contact technical support.
Technical Support Hours
7:00AM ~ 6:00PM, Monday through Friday
Pacific Standard Time (except holidays)
Contact Technical Support
Telephone: +1-310-626-6252
Fax: +1-310-626-6267
Website: www.TRENDNET.com
Certifications
This equipment has been tested and found to comply with FCC and CE Rules.
Operation is subject to the following two conditions:
(1) This device may not cause harmful interference.
(2) This device must accept any interference received, including interference that may
cause undesired operation.
  • Page 1 1
  • Page 2 2
  • Page 3 3
  • Page 4 4
  • Page 5 5
  • Page 6 6
  • Page 7 7
  • Page 8 8
  • Page 9 9
  • Page 10 10
  • Page 11 11
  • Page 12 12
  • Page 13 13
  • Page 14 14
  • Page 15 15
  • Page 16 16
  • Page 17 17
  • Page 18 18
  • Page 19 19
  • Page 20 20
  • Page 21 21

Trendnet TEW-401PCplus Owner's manual

Category
Networking
Type
Owner's manual
This manual is also suitable for

Ask a question and I''ll find the answer in the document

Finding information in a document is now easier with AI