True to the Music
www.radialeng.com
®
True to the Music
®
User Guide
JDV-Pre
™
500
Instrument Preamp and DI
500 Series Module
www.radialeng.com
Radial Engineering Ltd.
1588 Kebet Way, Port Coquitlam
British Columbia, Canada, V3C 5M5
tel: 604-942-1001 • fax: 604-942-1010
email: [email protected]

WARNING NOTICE TO USER!
The Radial JDX 500 is not a load box. This means that if you are using it with a guitar
amplifi er it must be connected to a speaker cabinet or some type of load box. Failure
to do so could result in damaging the JDX and your amplifi er which of course would not
be covered under warranty. Always ensure you have proper cables and connections
have been checked. We recommend using high quality 12 gauge speaker cables.
Because the JDX 500 can also be used as a direct input from a guitar, we have
instituted a slow fl ashing LED to let you know when you are in this mode. This safety
measure reminds you that you should not connect a guitar amplifi er output to the JDX
when in guitar mode as this may damage the JDX.
Although preventative safety measures have been designed into Radial 500 series
products we strictly advise against hot-swapping modules or plugging and
unplugging them when the Workhorse or other 500 series rack is powered on. Hot
swapping can cause connection sparks at the card-edge connector that could send
damaging transients to other equipment. This also greatly reduces the life span of the
contacts. Damage due to hot swapping is not covered under warranty. There are no
user serviceable parts inside.
Radial
®
JDV-Pre
™
500
User Guide
Table of Contents ......................................................Page
Feature Set .................................................................... 1
Overview ........................................................................ 2
Getting Started ............................................................... 4
Using and Adjustments .................................................. 6
Specifi cations ................................................................. 9
Block Diagram ................................................................ 9
Warranty ........................................................... Back cover
Congratulations… you’ve done it! You have invested in what we believe is one of the
most musical sounding instrument preamps ever made. The JDV-Pre went through many
design revisions before we fi nally decided to release it to market. Why so long? Each time
we plugged it in, we found ourselves asking for extra bits that could make the JDV that much
better.
What this really means is that behind what appears to be a simple control panel are lots of
extra cool features that have been carefully incorporated into the design. And the only way
to take full advantage of them is to actually read this manual. Once you have done so, there
may be questions that have not been answered. For these, we kindly ask that you visit the
JDV-Pre FAQ page. This is where we answer questions from users, like yourself, with the
latest information that can be helpful when using the JDV-Pre live on-stage or in the studio.
If of course you cannot fi nd what you are looking for, either post a question on the FAQ or
feel free to send us an email at [email protected] and we will do our very best to get back
to you in short order.
Now close your eyes and listen. You are about to hear your vintage Fender Jazz bass for
the very fi rst time.

True to the Music
®
Radial Engineering Ltd.
JDV-Pre
™ 500 Module
10
1
9
8
Rear Panel
7
1
4
3
2
6
5
FEATURE SET
1. GAIN: AccuState level control simultaneously adjusts the
gain and input sensitivity to ensure lowest noise at all gain
settings.
2. INVERT: Reverses the polarity on the JDV output. Ideally
suited for reducing feedback on stage or can be used in the
studio to better phase align two signals for improved stereo
imaging.
3. HP FILTER: High-pass fi lter reduces low frequency
resonance, helps clean up the sound of acoustic instruments
and eliminates run-away feedback. Great for layering tracks
when recording.
4. DRAG: Engages the Drag control. This shifts the impedance of
the front panel ¼” input from a fi xed 3.9meg-Ohms for passive
piezo pickups to a variable load for magnetic pickups.
5. LOAD ADJUST: Varies the load from 22k-Ohms (fully counter-
clockwise) to 500k-Ohms (fully clockwise). Replicates the load
of a tube amplifi er on a magnetic pickups for a smoother, more
natural tone. Great for bass and guitar!
6. LED INDICATORS: For power, signal present, peak-overload,
and phantom power provide visual feedback of the JDV-Pre
operating status.
7. INPUT: Used to connect high impedance instruments to the
JDV-Pre. This front switching jack has priority over the XLR
mic input on rear panel of 500 series rack.
8. AUX OUT: Buffered output used to feed a guitar amplifi er.
Transformer isolated to eliminate buzz and hum caused by
ground loops.
9. OMNIPORT: Balanced, low impedance direct box output (mic-
level) designed to feed a snake system and mixing console
in a live touring environment. Available when used with the
Workhorse rack.
10. XLR INPUT (rear panel of rack): Microphone input with
phantom power. Enables the JDV-Pre to be used with
instrument condenser mics. Transformer coupled for optimal
signal fl ow. This input is disabled when a plug is inserted into
the front panel ¼” input.
11. PHANTOM POWER - Turns on/off the +48V power supplied
through the rear panel XLR microphone input. When engaged
the front panel LED indicator will illuminate. Used to power
condenser microphones connected to the XLR mic input.
Phantom On
11

Radial Engineering Ltd.
JDV-Pre™ 500 Module
True to the Music
®
2
JDV-PRE OVERVIEW
The JDV-Pre is a preamp dedicated to instruments. In other words, when we designed the
JDV-Pre, our goal was to deliver a device that would be equally effective at amplifying a
guitar, violin, mandolin or a contra-bass. So we started by optimizing the front end for the
most natural tone and widest possible bandwidth. We then added a variable low-cut fi lter that
would enable the engineer to ‘size’ the preamp so that it would translate the instrument’s true
character while eliminating problem resonance.
As we developed the design, it became abundantly clear that instruments are amplifi ed in
many different ways depending on the transducer. In our audio world, a transducer captures
vibrations and converts them into an electrical impulse. This can be in the form of a magnetic
pickup that captures the vibrations of a string, a piezo element that captures the vibrations
at the bridge or even a microphone capturing the vibrations of sound as it travels through
the air.
Passive Piezo
Element
Magnetic &
Active Pickups
Condenser
Instrument Mic
Instrument
Amplifi er
Live PA
System
Multi-track
Recorder
Each transducer reacts differently to an electrical circuit. For instance a magnetic pickup
sounds warmest when the impedance is set around the 200k-Ohm mark. A piezo really
works best when the impedance approaches 4meg-ohms. And with condenser and dynamic
microphones, one has to consider 48V phantom power, the input impedance and of course
how much gain you introduce. The more gain, the more opportunity for noise. The more noise
fi ltering you employ, the more you can affect the instrument’s natural harmonics. Great care
is needed all the way along.
Once you captured the source, the next goal is to send it along to one or more destinations.
For instance when recording, the JDV-Pre must produce a +4dB balanced line output to feed
digital audio workstation and a thru-put for the musician’s amplifi er. On a live stage, the JDV-
Pre must also be able to feed the artist’s instrument amp and produce a mic-level output like
a direct box so that it can feed a snake system.
The JDV-Pre user’s guide follows the fl ow chart above and discusses how each of these
functions is addressed. Let’s get started!

True to the Music
®
Radial Engineering Ltd.
JDV-Pre
™ 500 Module
3
Making Connections
Before making any connections, start by turning off your audio system and turning all
volume levels down. This helps protect equipment from turn-on transients that could damage
loudspeakers and other sensitive equipment. We recommend using a power bar with an on-
off switch as this makes it easy to turn on and off the 500 series rack, monitors and so on,
using a single switch. Carefully plug the JDV-Pre module into your 500 series rack avoiding
stress on the card edge connector. Screw the module in to ensure it does not accidentally
become dislodged.
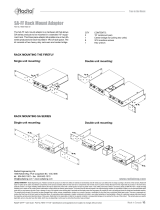
The JDV-Pre has two input connections; the front panel ¼” and the XLR as found on the rear
panel of 500 series racks. The front panel input connector is typically used for high impedance
instrument pickups while the rear XLR is optimized for a low impedance microphone. There
are three outputs on the JDV: The front panel aux out which is used as a thru-put to the guitar
or bass amplifi er when recording; the XLR output on the 500 rack and, if you are using it with
a Workhorse, the Omniport which in this case is set up as a balanced low impedance direct
box output (mic-level).
INPUT
OMNIPORT
FEED
LINK
1
OFF
OFF
CARD SLOT 1
OUTPUT
OUTPUT
INPUT
-
+
G
-
+
G
-
+
G
1
2
3
4
5
Line
Level
Inst.
Level
Mic
Level
Mic
Level
Recorder
MixerAmp
Instrument
JDV-Pre Workhorse I/O
If you are familiar with audio equipment you will fi nd the JDV to be extremely easy to use. You
plug in, turn up the input gain, adjust the high-pass fi lter and play. The variations really come
down to the type of pickup or microphone you are using.
Start by setting up the JDV-Pre 500 controls as follows:
1. GAIN: set fully counter-clockwise
2. HP FILTER: set fully counter-clockwise (bypass)
3. INVERT: outward position
4. DRAG: outward position (bypassed)
5. LOAD ADJUST: set to 12 o’clock position (approximately 200K Ohms)
6. If you plan on connecting a condenser mic ensure the phantom
power LED is illuminated.

Radial Engineering Ltd.
JDV-Pre™ 500 Module
True to the Music
®
4
Using magnetic pickups
Magnetic pickups such as those found on a typical Fender bass are often recorded direct in
the comfort of the control room. The JDV-Pre’s front mounted ¼” input connector makes this
easy. All you do is plug in, turn up the volume and you are set to go.
Line
Level
Inst.
Level
Drag control brings the natural tone of the instrument to a whole new level by allowing you
to replicate the load on the pickup as if connected to an amplifi er. This not only makes the
instrument sound more natural, it changes the response of the instrument so that it feels
right. To activate, you simply depress the Drag control on switch. This changes the input
impedance from 3.9m Ohms (optimized for piezo pickups) to a variable load that ranges from
22k Ohms to 500k Ohms.
Begin by setting the Drag Control to 12 o’clock. Then turn it clockwise.
The sound will become brighter with greater clarity. As you turn it
counter-clockwise the tone will warm up and sound smoother. Setting
the Drag is particularly important if you intend to Reamp the signal
down the way (read more about Reamping later in this manual). By
adjusting the load with the Drag control, guitars, pedals and amps will
sound more realistic.
The JDV-pre is equipped with a ¼” Aux output on the front panel. This is used to send the
instrument signal to a guitar amp while recording. This enables the guitarist to hear himself
play through a distorted amp while you capture the dry clean track on your recorder. The Aux
out is transformer isolated to help eliminate hum and buzz caused by ground loops. Ground
loops are a common problem when interfacing some guitar amps to pro-audio equipment.
Line
Level
Inst.
Level

True to the Music
®
Radial Engineering Ltd.
JDV-Pre
™ 500 Module
5
Using an active bass or guitar
Active pickups have been around for years. They have become more popular since the
advent of 5 and 6 string basses. And although these can sound absolutely amazing, more
often than not these instruments are so loud, they overload the instrument input on most
devices. This is because traditional passive basses generally produce around 1 Volt of signal
while their active counterparts (powered with 9 Volt batteries) can deliver well over 6 Volts
when played hard! Unless your interface has enough headroom, you will get distortion. The
JDV-Pre addresses the problem by providing 30 Volts of headroom for active electronics.
Connection is the same as using a passive bass. However, Drag control will have little or no
effect on active pickups as the signal is already buffered by the bass’s internal electronics.
Using piezo pickups
Musicians usually complain that piezo equipped instruments sound squawky and harsh.
This is not so much the fault of the piezo element as it is the built-in preamp that normally
accompanies it. Piezo pickups sound best when they ‘see’ a very high input impedance.
But when you increase the input impedance, you also elevate susceptibility to background
noise and hiss. Therefore most manufacturers compromise by using a 1meg-ohm input. This
results in an acceptable sound that is functional on a live stage.
But what few realise is that if you couple the output of a piezo transducer directly to a really
good high-impedance preamp, you can produce sounds that are as good as a condenser
microphone. The JDV-Pre has been carefully crafted with a very high input impedance and
ultra low noise circuitry to get the best possible bandwidth and transient response from piezo
elements.
By disengaging the Drag Control, the JDV-Pre’s input impedance elevates to 3.9 meg-ohms,
or about four times higher than the typical input impedance found at the input of most guitar
and bass amplifi ers. Careful attention is paid to reducing noise while the class-A feed-forward
circuit assures the most natural tone. For best results, try to bypass the internal preamp in
your instrument and connect the piezo directly to the JDV-Pre’s ¼” input on the front panel.
You will immediately notice a much warmer, natural sounding tone. This is not only effective
on acoustic guitars, but equally so on diffi cult to amplify instruments such as violin, mandolin,
banjo, and contrabass. In the studio and live on-stage, piezo pickups offer consistent results
as opposed to microphones where placement can vary the sound from session to session.
Piezo element wired
directly to output jack.
Piezo element wired to
battery powered preamp.

Radial Engineering Ltd.
JDV-Pre™ 500 Module
True to the Music
®
6
Using an active acoustic guitar
As described above, most acoustic guitars for stage use are outfi tted with some form of
transducer and a built-in battery powered preamp. These are designed to be plug and play
easy to use, and although they do not necessarily sound the best for studio recording, they
are extremely functional for live performance. In the studio they are great for tracking song
ideas or recording demos. Those that simply want to use their guitar’s built-in preamp with the
JDV-Pre will benefi t from the huge internal rail voltage the 500 series provides with greater
dynamics, headroom and lower distortion.
Using a microphone
There is no denying… capturing the sound of the instrument with a high quality condenser
microphone is just about as good as it gets. The real magic lies, not merely with the choice of
mic, but the marriage with the preamp you use. The JDV-Pre’s zero-feedback front end Class-
A circuit sounds nothing short of remarkable. In fact it sounds so good; don’t be surprised
if you end up using the JDV-Pre as your go-to mic preamp for vocal tracks too! It sounds
fantastically warm and natural and will surely captivate your senses as you start using it.
What truly makes it a marvel is the circuit design and the addition of an old school Hammond
broadcast transformer. Transformers naturally compress the sound. This is because
transformers do not so much distort, they saturate. In other words, as they reach their
maximum signal handling capacity, instead of going from say 1% to 100% distortion like an
active circuit, the distortion increases gradually. They naturally compress to create a sonic
effect that folks refer to as “vintage”. When used on acoustic instruments that are typifi ed
with fast transient peaks such as a banjo, acoustic guitar or mandolin, the transformer gently
smoothes out the tone.
Connection is made using the rear panel XLR
input on your 500 series rack or Workhorse. The
JDV-Pre is well suited to accommodate dynamic,
ribbon and condenser microphones. To active
48V phantom power, you merely set the phantom
switch adjacent to the card edge connector to ON
before you plug it into your rack. Although phantom
power will not harm dynamic microphones, most
engineers tend to turn it off when not in use. This
helps reduce the pops that are associated when
plugging in equipment.
Note that if the Drag Control is turned on, it will affect the load on the microphone. For fun,
try increasing or decreasing the load as you test various microphones. You may fi nd that the
effect can be very pleasing on some instruments.
Using the 180º invert switch
A wonderful feature built into the JDV-Pre is the invert switch. This reverses the electrical
polarity of the signal by 180º, essentially putting it out of phase. The most common application
for this function when recording is combining two mics to create a stereo fi eld. Sometimes,
fl ipping the polarity can bring certain frequencies in phase resulting in better tone.
Another less known application has to do with using the 180º invert switch to eliminate room
resonance. This is primarily applied in live performance environments where the sound from
the PA system may be interfering with echo in the room. This can create a hot spot (room

True to the Music
®
Radial Engineering Ltd.
JDV-Pre
™ 500 Module
7
mode) which can amplify certain frequencies causing resonant feedback. By inverting the
phase, you basically move the hot spot thus solving the problem.
Using the high-pass fi lter
The JDV-Pre is equipped with a high-pass (low cut) fi lter that is designed to reduce resonance
and excessive low frequency build up from instruments. In fact, it is always on. You just can’t
hear it. This is because it begins to take effect at 5Hz which of course is well below the human
hearing threshold. As you turn it up (clockwise) it slowly rises to gently remove unwanted low
frequencies.
Using the high-pass fi lter with acoustic instruments will change your world for the better.
Acoustic instruments are resonating devices with all kinds of harmonics emanating from
the body, top, sound hole and neck. When recording, these resonances many not even be
immediately audible but depending on the playback system, they can turn what could be a
wonderful mix into a low frequency mud fest. The ‘Nashville Trick’ is eliminating the problem
before it hits the recording system. All you do is dial in the high-pass fi lter until the bottom end
cleans up. Once you have found what you think is the cut-off frequency, take the time to play
a little longer so that you get use to the effect, and then add some bass back in by dialling
backwards. You will be amazed at how well this can work! Not just on acoustics, but also on
voice and just about any other musical source.
Using The JDV-Pre in the studio
Most of the applications detailed above apply to using the JDV-Pre in the studio and on
a live stage. But for those that are new at recording, we felt it would be good to discuss a
standard recording setup. Generally speaking, if you are recording an acoustic instrument,
the instrument is connected to the JDV-Pre and the output will be sent directly to the recording
system. Playback for monitoring is normally done via headphones.
When recording electric instruments like a guitar, the process tends to be a little different as
the guitar signal will have to feed the effects pedals and amp before it is mic’d. Today, most
top studio engineers will record a ‘dry’ track at the same time as they record the ‘wet’ guitar
signal. This enables them to Reamp the track later to better fi t the fi nal mix.
Reamping in the studio
Once you have recorded a dry track, send the output to a Reamper like the Radial X-Amp.
From the X-Amp, you can then drive the signal through various pedals and amplifi ers and
move the mics around the room to capture the ultimate tone. Best of all, Reamping lets you
do the work without the artist having to perform.
The JDV-Pre on a live stage
The advent of in-ear monitors and line arrays has spawned a demand for better sounding
instrument interfaces. In the past, we lived with what we got. Today, artists can truly hear what
their instruments sound like and often, they are under-whelmed. The JDV-Pre is perfectly
suited for live stages, particularly when coupled with the Radial Workhorse.
Because the JDV-Pre is so clean and void of distortion, it is less susceptible to feedback.
This means that instead of having to fi ght problem frequencies with a radical notch fi lter, you
can quickly dial out the resonance using the high-pass fi lter and enjoy the natural tone of
the instrument. The Radial JDV-Pre is an exceptionally well rounded device that will surprise
you with respect to the natural sound it can produce and the effi ciency that it brings to your
production.

Radial Engineering Ltd.
JDV-Pre™ 500 Module
True to the Music
®
BLOCK DIAGRAM*
8
CONNECTOR WIRING
GROUND
HOT (+)
COLD (-)
GROUND
TRS ¼” Phone Connector
HOT (+)
TS ¼” Phone Connector
1
2
3
HOT (+)
COLD (-)
XLR Connector
GROUND
MIX
BUSS
XLR
INPUT
48V
PHANTOM
POWER
DRAG
CONTROL™
FET INPUT
BUFFER
AUX OUTPUT
BUFFER
FRONT PANEL
AUX OUT
FRONT PANEL
AUX OUT
UNITY GAIN
FRONT PANEL
AUX OUT
VARIABLE
GAIN
HIGH PASS
FILTER
ACCUSTATE
VARIABLE GAIN
STAGE
XLR
OUTPUT
MIX BUSS
DRIVER
OMNIPORT
MIC LEVEL
BAL OUTPUT
4.7K
Peak
LED
FRONT PANEL
INSTRUMENT INPUT
Signal
LED
180°
POLARITY
REVERSE
1
2
3
1
2
3

True to the Music
®
Radial Engineering Ltd.
JDV-Pre
™ 500 Module
PRELIMINARY
JDV-PRE 500 MODULE SPECIFICATIONS*
* Subject to change without notice.
9
Specifi cation
Circuit type Autopadding discreet component
Clip Level - Buss output Buss Output clips at +12dbu Due to Class A Design
Clip Level - Input - 1/4” Input >+26dbu With Gain Control Set to 2
Clip Level - Input - 1/4” Input -15dbu With Gain Control Set to 10
Clip Level - Omniport +5dbu input and +25dbu output
Clip Level - Output +10dbu
Clip Light Threshold +7db Monitors XLR Output
Dynamic range >93db
Equivalent Input Noise: -90dbu Input Gain Control at 5
Frequency Response: 20Hz ~ 20kHz (+/- 2 dB)
Front Panel Connectors: Instrument Output, Aux Output
Gain - Maximum - 1/4” Front: 26db Input Gain Control at 10
Gain - Maximum - XLR - Rear: 46db Input Gain Control at 10
Gain - Omniport: +20db fi xed With relation to 1/4” input
Input - Rear Panel XLR: Transformer Isolated Microphone Level With Phantom Power
Input Impedance - 1/4” Input: 3.9M Drag Off
Input Impedance - 1/4” Input: 22K to 500K Drag On
Omniport Function: Unity Gain Microphone Level Output
Output Headroom: +10dbu
Output Impedance - Aux Out: 2.8K Ohms
Output Impedance - Rear XLR: 321 Ohms, Balanced Output
Output Level Maximum - Rear XLR: +10dbu
Current Draw: 80mA

®
www.radialeng.com
True to the Music
THREE YEAR TRANSFERABLE LIMITED WARRANTY
RADIAL ENGINEERING LTD. (“Radial”) warrants this product to be free from defects in material and
workmanship and will remedy any such defects free of charge according to the terms of this warranty.
Radial will repair or replace (at its option) any defective component(s) of this product (excluding fi nish
and wear and tear on components under normal use) for a period of three (3) years from the original
date of purchase. In the event that a particular product is no longer available, Radial reserves the
right to replace the product with a similar product of equal or greater value. In the unlikely event that
a defect is uncovered, please call 604-942-1001 or email [email protected] to obtain an RA
number (Return Authorization number) before the 3 year warranty period expires. The product must be
returned prepaid in the original shipping container (or equivalent) to Radial or to an authorized Radial
repair centre and you must assume the risk of loss or damage. A copy of the original invoice showing
date of purchase and the dealer name must accompany any request for work to be performed under
this limited and transferable warranty. This warranty shall not apply if the product has been damaged
due to abuse, misuse, misapplication, accident or as a result of service or modifi cation by any other
than an authorized Radial repair centre.
THERE ARE NO EXPRESSED WARRANTIES OTHER THAN THOSE ON THE FACE HEREOF
AND DESCRIBED ABOVE. NO WARRANTIES WHETHER EXPRESSED OR IMPLIED, INCLUDING
BUT NOT LIMITED TO, ANY IMPLIED WARRANTIES OF MERCHANTABILITY OR FITNESS FOR
A PARTICULAR PURPOSE SHALL EXTEND BEYOND THE RESPECTIVE WARRANTY PERIOD
DESCRIBED ABOVE OF THREE YEARS. RADIAL SHALL NOT BE RESPONSIBLE OR LIABLE
FOR ANY SPECIAL, INCIDENTAL OR CONSEQUENTIAL DAMAGES OR LOSS ARISING FROM
THE USE OF THIS PRODUCT. THIS WARRANTY GIVES YOU SPECIFIC LEGAL RIGHTS, AND
YOU MAY ALSO HAVE OTHER RIGHTS, WHICH MAY VARY DEPENDING ON WHERE YOU LIVE
AND WHERE THE PRODUCT WAS PURCHASED.
API, Lunchbox, Protools and Neve are registered trademarks of their respective owners.
Reamp, Reamper, Reamping and Workhorse are trademarks of Radial Engineering Ltd.
Copyright 2011 Radial Engineering Ltd. All rights reserved.
Specifi cations and appearances subject to change without notice.
Radial
®
JDV-Pre
™
500 Module User Guide Rev1.0 June 2011 - Part #: R870 XXXX 00 Printed in Canada
!
This product is intended for professional use only.
The user should be familiar and experienced with
the 500 series rack and module format
Radial Engineering Ltd.
1588 Kebet Way, Port Coquitlam, British Columbia, V3C 5M5
tel: 604-942-1001 • fax: 604-942-1010 • email: [email protected]
/