Page is loading ...

AP 13
ACOUSTIC PREAMPLIFIER
BA
CUT
RING=MIC
RING=PIEZO
–
PIEZO
PICKUP GAIN TRIM
PHANTOM
TIP=PIEZO
TIP=MIC
15V6V
POWER
INPUT
101010 A12
10
0
INVERT INVERT
180
250
12
9
6
80
3
MIC
6
3
35
9
20
C
2
0
4
180
2
B 0 250
4
80
6
8
6
35
8
20
LOW
+
CUT 40 100 250 OUT630 1.6k 10k4k LEVELPAN
LOW
–
6
10
4
101010A12
C0
12
9
6
3
B
6
3
9
222
0 0 0
4 4 4
0
6 66
8 8 8
2
630100
+
40 250 1.6k 4k 10k PAN
SEND
LEVEL
A B
RTN
LEVEL
0 10
28 8
4 6
LEVEL
13AP
PZO
MIC
OL
INSTRUMENT
PIEZO PICKUP
POWER
MUTE
MIC PICKUP MAIN OUT
PREAMPLIFIER
OL
ACOUSTIC
HEADPHONE

108367
IMPORTANT SAFETY INSTRUCTIONS
For the continued safety of yourself and others we recommend that you read the following
safety and installation instructions. Keep this document in a safe location for future reference.
Please heed all warnings and follow all instructions.
Do not use this equipment in a location where it might become wet. Clean only with a damp
cloth.
is equipment may be installed in an industry standard equipment rack. We recommend that
all mounting holes be used, providing the best physical support. e equipment may be used as
a table top device, although stacking of the equipment is dangerous and not recommended.
Do not directly block any of the ventilation openings. If rackmounting, please provide adequate
ventilation. Equipment may be located directly above or below this unit, but note that some
equipment (like large power amplifiers) may cause an unacceptable amount of hum or may
generate too much heat and degrade the performance of this equipment.
Protect the power cord and plug from damage caused by being walked on or pinched. Protect
the line cord, where it exits the unit, from excessive strain. Only use attachments and acces-
sories specified by Rane.
Unplug this equipment during lightning storms or when unused for long periods of time.
Refer all servicing to qualified service personnel. Servicing is required when the apparatus has
been damaged in any way, such as power supply cord or plug damage, spilled liquid, fallen
objects into an opened chassis, exposure to rain or moisture, a dropped unit, or abnormal
operation.

Manual-1
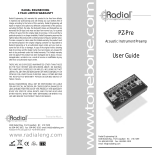
OPERATORS MANUAL AP 13
ACOUSTIC PROCESSOR
QUICK START
The AP 13 accommodates the signals from two pickups from any acoustic instrument, where the pickups are wired to
the tip and ring of a standard stereo ¼" TRS (Tip, Ring, Sleeve) plug. You do not need internal preamps when using the
AP 13. Phantom power voltage is available for electret and other condenser mic pickups. It is assumed one pickup is a
piezo-type while the other is some type of microphone.
1. Slide the Input Wiring switch to the correct position agreeing with your pickup wiring situation.
2. If your mic pickup requires Phantom Power, select it using the switch on the AP 13 rear. Make sure the appropriate LED
lights by the INPUT jack.
3. Turn the MAIN OUT LEVEL controls down.
4. Connect the AP 13 to your amplifier using the ¼" MAIN OUTPUTS or use the HEADPHONE jack.
5. Initially, turn the PIEZO and MIC PICKUP GAIN TRIM controls half way up.
6. Move each LOW CUT slider to the top (15 Hz); center all EQ sliders; center the PAN sliders; leave the INVERT
pushbuttons out; and position the LEVEL sliders to “4”
7. Plug your instrument into the INPUT jack on the front of the AP 13 with a stereo ¼" TRS cable.
8. Power up the AP 13, then turn on your amplifier.
9. Play your instrument and slowly turn up the MAIN OUT LEVEL controls. You should hear sound from your speakers.
If not, recheck all settings and wiring, and read the next few pages.
Never connnect anything except an approved Rane power supply to the red thing that looks like a telephone jack on the
rear of the unit. This is an AC input and requires special attention if you do not have a power supply exactly like the one
originally packed with your unit. See the full explanation of the power supply requirements elsewhere in this manual.
WEAR PARTS: This product contains no wear parts.

Manual-2
FRONT PANEL DESCRIPTION
Acoustic INSTRUMENT INPUT: is a stereo ¼" TRS (Tip-Ring-Sleeve) INPUT jack for use with any acoustic instrument
with two pickups; however, also accepts instruments with only one pickup. When using a mono cable, signal is routed to the
TIP selected by the Input Wiring Switch (see ).
MIC & PIEZO pickup input OVERLOAD indicators: An individual red indicator for each type of pickup. Useful in
monitoring pickup level and initially in setting PICKUP GAIN TRIM controls. These indicators light approximately 4 dB
before actual clipping, so occassional flickering is okay, but they should never be allowed to light steadily.
PHANTOM POWER indicators: are either Off=no Phantom Power; Yellow=+15 VDC Phantom Power; or Green=+6
VDC Phantom Power.
Input wiring switch: allows choice of Input wiring. Either TIP=PIEZO and RING=MIC, or vice-versa. Proper setup
requires careful selection—if in doubt, consult the technician that wired your instrument for the correct choice.
Input PICKUP GAIN TRIMS: set the proper Gain for each pickup. Range is from 6 dB minimum to 60 dB maximum.
PICKUP INVERT switches: Invert the polarity (phase) of the piezo pickup with respect to the mic pickup. Either MIC or
PIEZO PICKUPS may be individually Inverted.
LOW CUT frequency: adjusts the corner frequency of the LOW CUT (high-pass) filter from 15 Hz to 250 Hz. Use to
reduce unwanted low frequencies in either MIC or PIEZO PICKUPS.
7-band graphic equalizer boost/cut controls: Seven sliders that control the amount of boost/cut for each of the indicated
bands in both MIC and PIEZO sections. A grounded center detent guarantees flat response for filters not used.
PIEZO PICKUP output LEVEL: adjusts the Level of the PIEZO OUTPUT jack. Located post-LEVEL and pre-PAN, so it
is dependent on the position of the PIEZO PICKUP LEVEL control and independent of the PIEZO PAN control.
PAN control: Separate controls for both PIEZO and MIC PICKUP sections allow routing the signal anywhere from A-only
to B-only at the Main Output.
LEVEL controls: Separate PIEZO and MIC LEVEL controls the overall Level of each signal.
SEND A/B controls: adjust the amount of signal at each of the SEND jacks.
RETURN control: is a “stereo” Return. Controls the amount of A and B entering the RETURN jacks.
MAIN OUT MUTE button: Mutes both A and B Main Outputs. Does not affect the Headphone Output. The red LED
indicates a Muted output.
MAIN OUT A & B LEVELS: Concentric controls used to separately set the Main A & B Output Levels.
MAIN OUT OVERLOAD indicator: monitors both A and B Main Outputs. An overload condition (within 4dB of
clipping) on either Channel causes this red LED to light.
HEADPHONE LEVEL: controls the volume of the HEADPHONE Output jack.
POWER indicator: glows yellow when the proper power supply is connected and powered.
Headphone jack: Accepts standard stereo headphones rated from 32-600 ohms equipped with a ¼" TRS plug.
AKG Micro-Mic Users
The Phantom Power requirement for these mics demands a minor modification to the inside of the AP 13. Remove the
top and bottom covers and replace R220 with a 15k ohm resistor (see layout on the back page). Once modified with the new
resistor, the input will not be compatible with other mics.

Manual-3
REAR PANEL DESCRIPTION
MAIN OUTPUTS—MIC-level: Two XLR connectors used as a direct feed to mixing console mic inputs. Pin 2 is “+”
positive, pin 3 is “–” negative, and pin 1 is signal ground.
MAIN OUTPUTS—LINE-level: Two ¼" TRS (Tip-Ring-Sleeve) connectors deliver the Main A & B Line Level Outputs.
No surprises here: the tip is “+” positive, the ring is “–” negative and the sleeve is signal ground.
MAIN OUTPUTS MONO button: Engaging this pushbutton combines or Monoes the Main A & B Output.
EXPAND IN A & B jacks: Two unbalanced ¼" TS jacks used to expand the AP 13. These inputs sum (pre-Main Level
control) with the Main A & B signals. Mono expansion is done using only the EXPAND IN A jack. As long as nothing is
plugged into the B jack, the signal from EXPAND A automatically drives EXPAND B. These jacks also provide an auxil-
iary input path.
INSERT loop A & B jacks: Two unbalanced ¼" TRS jacks wired per the tip=send, ring=return convention. Allows placing
an outboard signal processor in series with the main signal paths.
RETURN A & B jacks: Two unbalanced ¼" TS jacks used as the return path from the OUTPUTS of an outboard signal
processor. Mono signals use only the RETURN A jack. As long as nothing is plugged into the B jack, the signal from
RETURN A automatically drives RETURN B.
SEND A & B jacks: Two unbalanced 1/4" TS jacks used to connect to the inputs of an outboard signal processor. Mono
effects units should wire only to the SEND A jack.
PIEZO OUTPUT: An unbalanced ¼" TS jack gives a direct dry Output signal from the Piezo Pickup only. The PIEZO
PICKUP OUT slider controls the amount of signal; however, since this Output is located after the PIEZO PICKUP LEVEL
slider, then LEVEL also controls this Output.
TUNER OUTPUT: An unbalanced ¼" TS jack used for direct tuner connection, fed by the PIEZO input. Located post EQ
but pre-LEVEL, this Output is unaffected by either the LEVEL or OUT controls. For convenience, the tuner may be left
connected during performances.
Ground lift switch: provides the ability to separate chassis ground and signal ground. Normally, this switch should be in
the “grounded” position. In some circumstances, moving it to the opposite position eliminates hum and buzz problems.
Remote power supply input: This unit is supplied with a Rane RS 1 Remote AC Power Supply (RAP) suitable for connec-
tion to this input jack. The power requirements call for an 18 VAC center-tapped transformer. This is not a telephone jack.
Never use a power supply other that the one supplied or a replacement approved by Rane. Using any other type of supply
may damage the unit and void the warranty.
MIC PHANTOM POWER switch: controls the voltage used to power an electret or other condenser mic pickup. Front
panel LEDs indicate one of the three positions of this switch.
Chassis grounding screw: A #6-32 screw is used for chassis grounding purposes. See CHASSIS GROUNDING below.
CHASSIS GROUNDING NOTE
If after hooking up your system it exhibits excessive hum or buzzing, there is an incompatibility in the grounding
configuration between units somewhere. Here are some things to try:
1. Try combinations of lifting grounds on units that are supplied with ground lift switches or links.
2. If your equipment is in a rack, verify that all chassis are tied to a good earth ground, either through the line cord
grounding pin or the rack screws to another grounded chassis.
3. Units with outboard power supplies do not ground their chassis through the line cord. Make sure that these units are
grounded either to another chassis which is earth grounded (such as the amplifier), or directly to the grounding screw on an
AC outlet cover.
Please refer to RaneNote 110, “Sound System Interconection” (included in this manual) for further information on
system grounding.

Manual-4
OPERATING INSTRUCTIONS
OPTIMIZING PICKUP GAIN CONTROLS
The Gain of each pickup input is adjusted via recessed
PICKUP GAIN TRIM controls on the front of the AP 13.
Unity Gain is located at approximately 9:00. To set the Gain
use a screw driver, guitar pick, or other suitable tool to turn
the GAIN TRIM clockwise until a very strong input signal
(e.g. strumming a loud chord) causes the overload LED to
flicker occasionally. For extra headroom, turn the GAIN
TRIM slightly counterclockwise.
SETTING UP EACH PICKUP
Start by turning one of the LEVEL controls to off or “0”.
Now play your instrument and use the LOW CUT filter and
EQ sliders to adjust for the desired timbre. (Try rolling off the
low end of the MIC for presence, and roll off the high end of
the PIEZO to reinforce the sound without shrillness.) Turn
this Channel’s LEVEL control off and repeat the procedure
for the other pickup. When through, adjust both LEVEL
controls for optimum loudness balance and use the PAN
sliders to create a panoramic sound field between the A and B
Outputs.
If the sound seems weak or thin when both pickups are
turned up, especially a noticeable loss of bass, try using one
or the other of the INVERT pushbuttons. This problem often
occurs when pickups are out-of-phase and their outputs are
canceling instead of combining.
EFFECTS LOOPS
Most often the SEND/RETURN loop is used for a reverb,
while something more specialized like a compressor or multi-
effects processor fills the INSERT loop.
Hook-up is simple: connect the SENDs to the inputs of the
reverb and run the outputs back to the RETURN jacks. To
send mono and return stereo, connect only the SEND A
(MONO) jack to the input and return both outputs to the
RETURN jacks; or to send and receive mono use just the A
(MONO) SEND and RETURN jacks. The AP 13 splits and
sums the mono input equally with the A and B Outputs.
Adjust the SEND & RETURN sliders as necessary for correct
levels.
The INSERT loops are the single ¼" send/return type
where tip=send and ring=return. Use standard stereo (2-
conductor) cable with a stereo jack on one end, then split it
out into two mono (1-conductor) cables with mono jacks on
the other. These are common enough, you shouldn’t have to
make them. There are no controls to worry about with this
loop.
SEND/RETURN vs. INSERT
An effect unit will deliver a full “wet” signal when
patched into the INSERT. A standard TRS insert style (tip-
send, ring-return) Y-cord gets input and output from the
INSERT jack to the effects unit. In the SEND and RETURN
loop, the most you can obtain is a 50% effects signal, because
the dry signal is internally mixed with the return. See Figure 1
to the right.
Another effects tip: If you want to put one effect on just
the mic, and a different effect on just the piezo, but you want
a mono output, just pan everything hard left and right for
stereo and push the MONO switch on the rear of the AP 13.
CONNECTING TWO GUITARS TO THE AP 13
A Y-cord can be used, as long as you don’t try to run two
piezo pickups. The impedance of a piezo won’t work right in
the MIC channel, but it won’t hurt anything either. (Qualifier:
If you have a piezo system that has active circuitry like a
battery powered preamp, then run it into the MIC channel
with the straight piezo in the PIEZO channel.)
EXPAND JACKS
Signal entering the AP 13 through these jacks sums (post-
EQ and effects loops) with the internal signal. Mono signal
applied to the A (MONO) EXPAND IN jack sums equally
into Main A and B Outputs.
MAIN OUTPUTS
Two sets of Main Outputs exist. Both are fully balanced,
both may be used at the same time. The ¼" TRS jack operates
at line-level and should be used to drive additional signal
processing, your power amplifier, or any line-level inputs.
The XLR connectors are intended for mic-level inputs on
mixers, tape recorders or a snake. This level is 40 dB less than
the line-level outputs. It is, in effect, a built-in direct box.
©Rane Corporation 10802 47th Ave. W., Mukilteo WA 98275-5098 TEL (425)355-6000 FAX (425)347-7757 WEB http://www.rane.com
Figure 1. Effects Loop Options.
103211
/