Barclay Products 4-9060WH Installation guide
- Type
- Installation guide

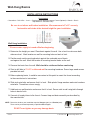
Wall-Hung Basins
INSTALLATION INSTRUCTIONS
P 847•244•1234 www.barclayproducts.com
5/17/18
Tools Needed
• Screwdriver • Drill & Bits • Level • • Plumbers Basin Wrench to secure Faucet (Optional) • Wrench • Pencil •
Tape Measure • Plumbers Putty •
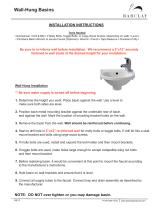
Be sure to re-inforce wall before installation. We recommend a 2”x12” securely
fastened to wall studs at the desired height for your installation.
NOTE: Determine whether your installation requires Hangers (pair) or a Bracket (one).
These can be purchased separately to provide added support.
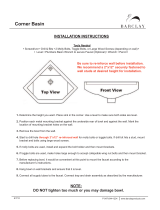
DO NOT over tighten or you may damage basin.
Bracket
Hangers
Wall Hung Installation
** Be sure water supply is turned off before beginning.
1. Determine the height you want. Place basin against the wall. Use a level to make sure both
sides are level. Mark location on wall for mounting holes on back of sink.
2. Position each metal mounting bracket against the underside rear of basin
and against the wall. Mark the location of mounting bracket holes on the wall.
3. Remove the basin from the wall. Wall should be reinforced before continuing.
4. Start to drill hole in
2”x12” re-inforced wall for mounting hardware. Screw large wood screws
provided into wall.
5. Before replacing basin, it would be convenient at this point to mount the faucet according
to the manufacturer’s instructions.
6. Slide sink onto bolts and ensure that it is level. Slide plastic flange washers and metal washers
onto bolts. Thread hex nuts on snugly.
7. Hold basin on wall brackets and ensure that it is level. Secure sink to wall using bolts through
holes in back of sink.
8. Connect all supply tubes to the faucet. Connect trap and drain assembly as described by
the manufacturer.
Mounting Hardware
-
 1
1

Barclay Products 4-9060WH Installation guide
- Type
- Installation guide
Ask a question and I''ll find the answer in the document
Finding information in a document is now easier with AI
Related papers
-
PRIVATE BRAND UNBRANDED 4-951WH Installation guide
-
Barclay Products 4-1125WH Installation guide
-
Barclay Products IWH3036 Installation guide
-
 Barclay Products 4R-531WH Installation guide
-
 Barclay Products 4-750WH Installation guide
-
Barclay B2-170WH Installation guide
-
 Barclay Products SWHM-CH Installation guide
-
 Barclay Products TKADTR60-BCP3 Installation guide
-
 Barclay Products TKATS67-WBN4 Installation guide
-
 Barclay Products TKADTR60-WCP2 Installation guide


Other documents
-
 Badeloft WT-01 Installation Instructions Manual
-
none 4-551WH Installation guide
-
American Standard 9024011EC.020 Installation guide
-
-
American Standard 9140021.020 User manual
-
-
Sloan Valve 3873103 Installation guide
-
Swiss Madison SM-WS314 User manual
-
-
American Standard 0900001.222 Installation guide
