Builders Edge 070120031009 Installation guide
- Type
- Installation guide

Installation Instructions
Electric drill, 1/4" drill bit, 1/8" drill bit, screwdriver, screws
For use on any surface including: wood, aluminum, vinyl, stucco, hardboard, brick, or masonry.
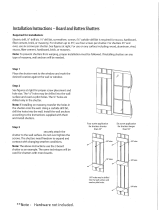
Step 1
Place the shutter next to the window and mark the desired
location against the wall or window. See figure at right.
Step 2
For sizes below 55" use four screws per shutter. For larger sizes,
55" and over, use six screws per shutter. See figures below for proper
screw placement and hole size. The 1/8" holes may be drilled into the
wall surface and used as pilot holes. The 1/4 holes are drilled only in
the shutter.
Step 3
Use the enclosed screws to securely attach the shutter to the
wall surface. Do not over tighten the screws. The shutters
need freedom to expand and contract with changing weather
conditions.
Four Screw
Application
For less than 55"
Six Screw
Application
For 55" or greater
Note: If installing on masonry, transfer the holes in the shutter
onto the wall. Using a masonry drill bit, drill the holes
into the wall. Install the wall anchors according to the instructions
supplied with them and install shutters.
1/4" holes
1/4" holes
1/4" holes
1/4" holes
Note: The above instructions use the 3 board shutter as an
example. The same techniques will be used for
shutters with more boards.
Note: To prevent shutters from warping, proper installation must be followed.
If installing shutters on any type of masonry, wall anchors will be needed.
1/8" holes
-
 1
1
Builders Edge 070120031009 Installation guide
- Type
- Installation guide
Ask a question and I''ll find the answer in the document
Finding information in a document is now easier with AI
Related papers
Other documents
-
Alpha VBLR43RO Installation guide
-
 Vantage 8214039030 Installation guide
-
Quadra-Fire DV-40 User manual
-
 Pinecroft SHBBO63 Installation guide
-
Quadra-Fire Front Solitaire Front 839-1390 User manual
-
Quadra-Fire TOPAZ 839-1320 User manual
-
Whirlpool SS373PEX1 User manual
-
Quadra-Fire TOPAZ-D-CSB Owner's manual
-
 Omni Group GREEN SMART 864 User manual
-
Quadra-Fire Garnet Instructions Manual


