Page is loading ...

5, Espace Guintran, 06620 Le Bar Sur Loup, France.
Tel : +33 (0)4 93 42 96 00 Fax : +33 (0)4 93 42 96 80
Email : [email protected]
Cosmic Rider
Temporary User's Manual (GB)
The Cosmic Rider has already passed the DHV flight and load tests and it received a Grade 1-2
with trimmers.This tempory user manual has been issued as we cannot print the complete
manual until we receive the final documentaion from the DHV. When we receive this, you will
receive your complete user manual from your dealer.

THANK YOU…
for flying an OZONE glider. Our philosophy is to produce sweet-handling aircraft which give a special
blend of safety and performance, so we are confident that you will enjoy every minute of it.
This manual will help you to get the most from your glider. If you would like to know more about it,
don’t hesitate to contact your dealer, school, distributor or any of us here at OZONE.
We are confident your glider will satisfy your flying needs for a long time. This booklet gives advice
on keeping it safe and in the sort of condition which will give you the best resale value if you ever
want to change. You can help this by logging all your flights and maintenance.
Please ensure that this manual is passed on to the new owner if you do resell the glider.
Rob Whittall, John Pendry, Bruce Goldsmith, Dave Pilkington and Mike Cavanagh
THE OZONE PEOPLE
Rob Whittall: Testing, teaching, competing and winning; Rob has flown on most flyable days for the
last 14 years and his passion for flying burns stronger than ever. A test pilot of ten years and a two time
World Champion, Rob knows better than most the limits of a paraglider and this has molded his drive
for safe gliders that handle beautifully at all speeds. He has a meticulous approach to his work and his
passionate belief in Ozone's philosophy drives the development direction.
Bruce Goldsmith: With a decade of glider design behind him as Airwave's designer, Bruce is one of
the oldest and wisest players around. In 1999 he took his career to new heights by winning the PWC
serial class. As a test-pilot, competitor and cross-country enthusiast with over twenty years experience,
Bruce's advice column in Cross Country magazine, 'Icaristics', has become essential reading for free
flight enthusiasts throughout the world.

David Pilkington: Doctor Dave is the man behind Ozone's highly advanced computer design software
and his technical expertise slices the time from drawing board to sky. A doctor of aerodynamics and a
keen and talented pilot too, Dr Dave plays a major part in Ozone's design process. The Doc is not just a
computer boffin he has competed in the British nationals for the past three years, although his real love
is fiddling with wings whether it be paragliders or kites.
John Pendry: 25 years of free flying and two-time World Champion; John Pendry is a legend in our
sport. John's vast experience and immense skill are an outstanding asset to Ozone. His desire to see
paraglider development taken safely in to the next millenium saw him, controversially, defend his
current World Champion's title on a standard Ozone Proton in Austria last year. His feedback and
advice helps us mould our paraglider design as we move in to the new millenium.
Mike Cavanagh: Mike, the company's financial wizard, is the man with his finger on Ozone's pulse. A
fully trained accountant, his watchful eye help keeps company overheads low and the R&D budget
high. The result is that we can give maximum attention to the development of the gliders, and the
fairest price possible to our pilots. As a keen XC pilot and a seasoned competitor in the British
National Championships, Mike is one of the few accountants who looks forward to taking his work
home.
OZONE Pedigree
In 1998 Bruce was awarded the Royal Aero Club’s Salomen Trophy for design excellence by Prince
Andrew, as well as being British Champion. John and Rob have each won two World Championships
and twice been awarded the Gold Medal of the Royal Aero Club. OZONE are proud that they have
brought such experience to this young company.
OZONE Materials
Ozone's Fabrics
Ozone gliders are constructed from the most durable high performance fabrics currently available. We
know that the lifespan of our gliders is directly linked to your satisfaction with Ozone so we have
chosen our sail cloths with both performance and longevity in mind.
The top surface of your wing is subject to more abuse on the ground and in the air than any other part
of your paraglider. For its outstanding strength and resistance to both UV damage and general wear
and tear we have chosen to use the heavyweight Gelvenor fabric from South Africa. This high tenacity,
100% polyamide sailcloth is silicone-coated and weighs in at 49g/m
2.
We believe this gives more
resistance to aging and UV damage than any other cloth on the market.
The under surfaces and cell walls of all Ozone gliders are made of Porcher - Marine's Skytex Plus
ripstop nylon from France. As the under surface is much less prone to damage than the upper we can
use a lighter fabric and this well known and tried-and-tested cloth gives the best strength-for-weight
ratio possible. Skytex Plus 45g/m
2
has a very high resistance to stretching which gives it the strength
and stability that is vital if a glider is to keep it's safe-flying characteristics after a lot of use.
Our leading edges are reinforced at the cell openings with double-laminated Mylar. Selected for long-
term durability, this ensures that your glider's take-off characteristics will remain consistently good for
season after season.
Lines
Ozone's lines are made up from Edelrid's Aramide. Edelrid have long led the field of suspension line
development and we chose their Aramide line for its resistance to stretching, and high thermal
tolerance. Its supple sheath helps prevent lines tangling and kinking adding further durability to
Aramide's market leading product.
The lower lines are strength and age tested by the DHV.
Line specifications: 120/320 kg breaking strength.
Risers

The Cosmic Rider uses black 25mm zero-stretch polyester webbing. A & B risers are marked
separately for easy identification both on the ground and in the air. Our 'baby A' riser connects to the
outer A line making 'big ears' simple and smooth to use.
Shackles
We use the highest quality delta maillons from the creators of the original maillon, market leaders
Maillon Rapide.
Pulleys
AustriAlpin aluminum mini pulleys with brass rollers are the smoothest running and most durable
pulleys available.
All these components have been chosen for their renowned quality and durability; they are simply the
best we can find. Nevertheless, we are constantly looking to improve our products in every way and
should you have any feedback on any of our paragliders or their components we would love to hear
from you.
CHECKING YOUR NEW GLIDER
Your glider will have undergone thorough checks at every stage of manufacture and have been signed-
off by skilled inspectors. But don’t believe us! Do a pre-flight check for your first flight and then at
least at the start of every flying day.
When you receive your new glider you should also receive:
1) Manual
2) Pair of spreader bars
3) 2 steel trapezoidal links
4) Stuff sack
5) Packing strap to go around the glider
6) Rucksack
7) Identification label to go in the top pocket of the rucksack.
8) Glider repair kit (spare material).
PRE-FLIGHT CHECK / MAINTENANCE
It is very important that you perform regular maintenance checks on your glider especially before and
after long flights, flying trips and long periods of storage.
To avoid forgetting points it is helpful to always use the same procedure:
1 Inspect all sewing on the harness, rescue bridle and risers.
2 Check all quick links, maillons and karabiners.
3 Check brake handle knot. Follow brake lines up to the wing, checking for knots and damage.
4 Check all other lines up to the wing.
5 Inspect all line attachment points to the wing.
6 Inspect upper and lower surface for damage and ageing.
7 Interior inspection: inspect ribs for damage or fatigue.
If you find any signs of damage or abnormal wear, consult your dealer, school or OZONE for advice.
BRAKE LINES
The brake lines connect to the trailing edge via a series of subsidiary lines. Because of their positions
they are more easily scuffed than other lines on your glider, so they should be checked extra
frequently.
The main brake lines run through pulleys connected to the rear risers. The brake handles are tied to the
main lines and conveniently positioned press-studs attach them to the risers when not in use. This
should prevent them twisting and tangling.
Adjusting brake lines

Important: the lengths of the brake lines will have been set carefully during testing and manufacture.
At OZONE we feel it is better to have slightly long brake lines and to fly with a wrap (one turn of line
around the hand). However, we know that some pilots prefer the lines slightly shorter and may wish to
adjust them. Whatever you choose, make the following checks:
• Ensure both main brake lines are of equal length.
• If a brake handle has been removed for any reason, check that its line is still routed through the
pulley when it is replaced.
• When the brake handles are released in flight the brake lines should be slack. There should be a
substantial “bow” in them and absolutely no deformation of the trailing edge.
We recommend a minimum of 10cm of free play between the brake release position and the start of
deformation on the glider. This will prevent the trailing edge from being deformed when using the
speed system.
In the unlikely event of a brake line snapping in flight, or a handle becoming detached, the glider can
be flown by gently pulling the rear risers (D-risers) for directional control.
TRIMMERS
Your glider is fitted with trimmers to give the pilot the ability to fly in the optimum trim for each
particular stage of his flight and wing loading. The trimmers should be released for launch, which
helps the glider come up faster. After launch the glider can be flown quite safely with the trimmers in
any position providing of course you are within the certified weight range.
The brake pressure is considerably less with the trimmers in the slow position. If you are flying the
glider near the bottom of the weight range we recommend that the glider should not be flown at the
slowest trim. If you are near the top of the top of the weight range the best can be obtained from the
glider by not using the fastest trim.
SPREADER BARS
Your new tandem comes with a pair of Ozone spreader bars, and two steel trapezoidal links. There are
three attachment points on each bar and each one is colour coded. The red loops are for the attachment
of the pilot's harness, the grey loops for the passenger and the black loops are for attaching the
spreaders to the risers. The spreaders should be attached to the risers of the glider with the trapezoidal
links so that the shorter red loops are at the back for the pilot to clip into.
We recommend that you always fly with a reserve parachute that suits your total flying weight.
Therefore Ozone spreader bars are designed to be used with a reserve. A twin bridle reserve should be
used, each bridle should be attached to the main suspension point at the centre of the spreader bar with
another link (not supplied). The two bridles should be threaded up through the velcro loop, and under
the protective black cloth flap, and attached to the main attachment maillon.
PREPARING FOR TAKE-OFF
To familiarise yourself with the glider it is a good idea to perform practice inflations and small flights
on a training hill. This will enable you to set up your equipment correctly.
Lay the canopy out on its top surface ensuring that the leading edge is in a pronounced arc with the
centre of the wing further up the slope than the tips. Lay out the lines one side at a time. Hold up the
risers and starting from the brake pull all lines clear, then proceed through the D, C, B and A lines.
Mirror the process on the other side. Take care to ensure that no lines are tangled, twisted or knotted. It
is always important to check brake lines are clear of rocks and twigs that may snag during launch.
Take-off check list:
1 Check reserve parachute – pin in and handle secure
2 Helmet on and fastened
3 All harness buckles closed on the pilot and passenger– check leg-loops again
4 Karabiners and maillons tight
5 Lines cleared
6 Leading edge open
7 Aligned directly into wind

8 Airspace and visibility clear
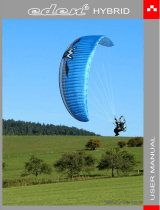
Launching
It is possible to launch your OZONE glider with the usual forward or reverse techniques. You should
make sure that you are standing central to the wing, this will ensure that it inflates evenly and
progressively. On OZONE gliders the outer main A-line is attached to a mini-riser to assist the pulling
of big-ears (‘split A-risers’). We advise using all the A-risers during launch
Light or nil-wind technique: Start your run so that the lines become tight within one or two steps.
The glider will immediately start to inflate and you should maintain a constant pressure on the risers
until the wing is overhead. It is important not to pull down or push the risers forward excessively as
this can result in the leading edge deforming and the take-off procedure becoming difficult. You must
accelerate smoothly through the entire launch procedure. There is no need to rush or snatch, and you
should have plenty of time to look up and check your canopy before taking to the air.
Strong wind technique: The reverse launch method is recommended. For this you set everything out
exactly as for a forward launch, clip in, take hold of the brakes and then turn to face the wing, passing
one entire set of risers over your head as you turn. Then gently try the brakes to see that they are free,
check all is clear and pull the wing up on the A-risers. When the wing is overhead, check it gently with
the brakes, turn and launch. The technique is simple, but can feel strange at first. We advise you to
practice in a flat open area before taking to the hill.
In stronger winds, a helpful tip is to be prepared to take a few steps towards the glider as it inflates and
rises. This reverse-launch technique can be used in surprisingly light winds too.
Important: never take off with a glider that is not fully inflated.
GROUND HANDLING
Practice your ground handling! It will improve your overall enjoyment of the wing by making your
launches easier and giving you a better feel for its flight characteristics.
NORMAL FLIGHT
In the hands-up position in calm air, your glider will be stable in pitch and roll and achieve its ‘best
glide’ speed. By applying the brakes approximately 20cm, the minimum-sink rate will be found. For
increased speed or headwind glides, release the trimmers which will give you an maximum speed.
Active Flying
Active flying is the technique of using input to keep the wing as stable and efficient as possible. All
good pilots do it. For example, on entering a thermal your glider will rock back slightly behind you; at
this point you should reduce brake to allow the glider to come overhead again. As you leave the
thermal your glider will try to accelerate and dive forward slightly, so apply a little brake to stabilise
the wing overhead. When flying in turbulent air, you should be able to sense pressure loss in parts of
the wing through the brake lines. You can then compensate by using a little of the appropriate brake
until you feel the pressure return. This should all be done smoothly and progressively: over-braking
your glider is dangerous and could lead to a stall.
TURNING AND THERMALLING USING WEIGHT SHIFT
To familiarise yourself with your glider your first turns should be gradual and progressive.
For efficient co-ordinated turns: look in the direction of your intended course, then lean into it. Your
first input for directional change should be weight-shift, followed by smooth application of the brake

until the desired bank angle is achieved. To regulate the speed and radius of the turn the outer brake
should be used.
Never initiate a turn at minimum speed (i.e. with full brakes on) as you could risk entering a spin.
WING-OVERS
OZONE paragliders are not designed for aerobatic flying. The limit is tightly banked S-turns,
commonly known as wing-overs. These must not exceed 45 degrees of bank. Uncoordinated wing-
overs can lead to large asymmetric collapses and therefore tight turns should never be executed near
the ground.
DRAG INDUCERS (BIG EARS)
Folding in the tips increases the sink rate of your glider. This is useful for staying out of cloud or
descending in strong winds. You ‘pull big ears’ by drawing in the outermost A-lines until the tips of
the wing fold under and drag behind. OZONE gliders are fitted with split A-risers to make this
procedure easy.
Remember that when the tips are in, you have reduced the area of wing supporting you, so your stall
speed will have increased. Be sure to keep speed on and not to use the brakes other than cautiously for
reinflation. For directional control while using the drag inducers, you should rely on weight shift alone.
To reopen the wing tips, release the small A-risers. Normally the tips will reinflate automatically, but
you can help the process by careful use of the brakes. This is best done one tip at a time to minimise
the chance of inducing a stall. You will find that there is surprisingly little tendency for the glider to
deviate during the process.
CAUTION: do not use Drag Inducers near the ground.
B-line Stall
B-stall is used for fast descents in emergency situations only. B-stall is performed by symmetrically
pulling down on the B-risers. This takes quite a lot of effort. The best way to do this is to place your
fingers between the lines above the maillons at the top of the risers. You should not release the brake
handles while B-stalling. As you first pull the B-lines down the airflow over the wing is broken and the
glider loses its forward speed but remains open. By pulling the B-risers further the sink rate can be
increased as the chord is effectively reduced. To exit the B-stall the B-risers should be returned to their
normal flight position symmetrically in one smooth progressive motion. The glider should then resume
normal forward flight without further input. Always be sure of this before using the brakes again.
It is possible for the wing to resume its normal shape on release of the B-lines, but to remain in steep
descent without full forward motion. This is called ‘deep stall’. It is unlikely to happen on OZONE
gliders, but you should be aware of the possibility. If you suspect it has happened, simply push the A-
risers forwards until normal flight returns. Only then should you use the brakes again.
SPIRAL DIVE
When you turn a series of tightening 360s the paraglider will enter a spiral – a highly banked turn with
rapid height loss. The longer you hold the inside brake on, the faster the turn becomes. Safe descent
rates of 8metres/second (500 ft/min approx.) are possible in a spiral dive, but at these high speeds and
G-forces it is easy to become disorientated, so you must pay particular attention to altitude. To exit the
spiral dive, slowly release the inside brake and apply a small amount of outside brake. As the glider

begins to decelerate it is important to allow it to continue in its turn until enough energy has been lost
for it to return to level flight without excessive surging.
Spiral dives with sink rates over 8 m/s are possible, but should be avoided. They are dangerous and put
unnecessary strain on the glider.
IMPORTANT: SPIRAL DIVES CAUSE DISORIENTATION AND NEED TIME AND HEIGHT TO
RECOVER. DO NOT PERFORM THIS MANOUVER NEAR THE GROUND.
DEEP STALL
Your glider is designed to exit immediately from any deep-stall configuration within four seconds of
the brakes or B-line stall being released. If you find yourself in a deep-stall situation (loss of forward
speed, low internal wing pressure) ensure your brakes are up. If your glider does not return to normal
flight, you should gently push the A-risers forward until the glider surges slightly and normal flight is
resumed.
DEFLATIONS
Due to the flexible form of a paraglider, turbulence may cause a portion of the wing suddenly to
collapse.
An asymmetrical collapse can be easily controlled by weight shifting to the open side and applying the
minimum amount of brake required to control your direction. A long, smooth progressive pump on the
deflated side will assist reinflation. (Flapping your arms uncontrollably will not help).
A symmetrical collapse should reinflate quickly without pilot input, however 15 to 20cm of brake
applied symmetrically will speed the process.
Active flying will virtually eliminate any tendency to collapse.
LANDING
Light wind: The landing approach should be flown using only light input on the brakes. When you are
one or two metres above the ground, apply the brakes progressively so that the full brake position is
attained just before your feet touch down. Always approach with plenty of speed so that it that can be
converted into a full flare.
Strong wind: You should regulate your speed facing into wind. Use the minimum of brake needed to
touch down smoothly, then immediately turn 180 degrees, reach up and pull down both C-risers while
moving towards the glider. This will bring the wing down quickly without pulling you off your feet.
IMPORTANT: Always land into wind in a clear obstacle-free zone.
PACKING YOUR PARAGLIDER
1 Lay the glider out on its top surface, check the lines are not tangled, then lay them on the
wing, free of kinks. The risers should be laid together at the centre of the trailing edge.
2 Fold the wing from each tip to the centre cell by cell, making sure that the leading edge is in
one straight line, until it is one or two cells wide.
3 Push any remaining air out by flattening the folded wing from the trailing edge to the leading
edge.

4. Make four or five folds from the trailing edge up to the leading edge so that the bundle is
approximately the size and shape of the OZONE rucksack. Never roll the wing up as this
introduces unnecessary stresses into the fabric. Finally, wrap the velcro band around the
bundle and put it in the rucksack.
Note: making sure not to pack the paraglider too tightly and taking care that the leading edge is folded
carefully will increase its life. Always pack as loosely as you can, while still being able to fit it in the
rucksack – every fold weakens the cloth on any paraglider. It is best not to keep folding the glider
along the same lines, so don’t worry if it is not completely tidy every time.
GLIDER CARE
The life of your paraglider depends largely on how you look after it. A well looked-after glider can last
twice as long as a badly treated glider with the same number of flying hours! Your glider was a major
investment and should be worth looking after carefully. Do not forget that your life may depend on the
good condition of your wing.
UV damage
It is now commonly known that UV rays from the sun degrade paraglider cloth. Do not leave the wing
lying out in the sun for a moment longer than necessary.
Storage
Moisture is the enemy! Always store paraglider/harness/reserve parachute in a dry room. Do not pack
the paraglider away for any length of time until it is completely dry. A damp paraglider can be dried by
hanging it over a washing line – preferably out of the sun. Allow it to dry naturally, never use a hair
dryer etc.
Even when the paraglider is dry, leave the rucksack zip open when possible to allow residual moisture
to evaporate. Do not store the paraglider in company with chemicals such as dyes, paints or gasoline.
Cleaning
Any abrasion or water will age the cloth of your paraglider, even if only slightly. Therefore we
recommend that stain or marks which have dried into the cloth should be left uncleaned. The glider
may not look so pretty, but it will certainly last longer! If you still feel that the wing must be cleaned,
then use only a soft cloth moistened with water on small areas and remember that the most sensitive
area of the wing is the leading edge top surface – which should on no account be cleaned.
Don’t even think of putting your glider
in the washing machine or using any sort of chemical cleaners!
Wing Repairs
Amateur repairs can do more harm than good. Always let a registered dealer or the manufacturer carry
out glider repairs.
Very small holes in the wing undersurface can be repaired using sticky-back Porcher Marine Sailcloth
as long as the tear is not on the stitching of the wing and a large overlap is used. Stick repair cloth on
the inside and outside of any area you are repairing. The silicone coating on the Gelvenor cloth used to
enhance the life of the of the upper surface makes the use of adhesive repair cloth difficult, so repairs
should be professionally stitched. Please consult your dealer.
Line repairs
Any damage to the lines (even if it is only the outer sheath) means a new line should be ordered
immediately. Ideally a dealer should replace the line. Before fitting a replacement line, check it for
length against its counterpart on the other side of the wing. When a line has been replaced, always
inflate the glider on flat ground to check that everything is in order before flying.
Ground handling
Many paragliders are damaged by careless ground handling. Here are some things to avoid in order to
prolong the life of your aircraft :
DO NOT drag your wing along the ground to another take-off position – this damages the sailcloth.

DO NOT try to open your wing in strong winds without untangling the lines first – this puts
unnecessary strain on the lines.
DO NOT walk on the wing or lines.
DO NOT inflate the glider and then allow it to crash back down. Try to keep this movement as smooth
as possible by moving towards the glider as it comes down.
NEVER allow the glider to crash back down to ground leading edge first! This puts great strain on the
wing and stitching and can even explode cells. Almost all claims of ‘faulty stitching’ or ‘weak
sailcloth’ originate from leading-edge slams.
lnsects
Take care that no insects get packed away with the wing. Some insects (grasshoppers for example)
decay into an acidic substance which can then burn holes in the sailcloth!
TOWING
OZONE gliders may be tow-launched. It is the pilot’s responsibility to ensure that suitable harness
attachments and release mechanisms are used and that she/he is correctly trained on the equipment and
system employed. OZONE make no specific recommendations.
MODIFICATIONS
When your glider leaves the factory, it is trimmed for the optimum balance between performance,
handling and safety. It should be noted that any modification will mean that the glider loses any
certification and will also probably be more difficult to fly. For these reasons, we strongly recommend
that modifications should only be made after contacting OZONE directly.
THE COSMIC RIDER
Flying tandem is about sharing the sensations of flying. To the virgin passenger these feelings can be a
life changing experience. It's great fun to fly together with friends and to be able to talk and discuss the
conditions, marvel at the views and take in the pleasures of a cross country flight.
We at Ozone worked long and hard to make the Cosmic Rider as user friendly as possible. The fully
cross-braced sail allows for less line, which makes for less tangles on launch and less in-flight drag.
Beautiful turn co-ordination and a smooth, dynamic flare for easy landings coupled with top
performance for cross country adventures make for a cosmic ride for pilot and passenger alike. We
know you'll have as much fun flying it as we had building it.

GLIDER SPECIFICATIONS
Number of Places
2
Number of Cells
43
Diagonals
yes
Projected Area (m2)
37.82
Flat Area (m2)
43.04
Projected Span (m)
11.89
Flat Span (m)
14.74
Projected Aspect Ratio
3.74
Flat Aspect Ratio
5.05
Root Cord (m)
3.74
In-flight weight range (Kg)
140 - 230
Certification
DHV1-2
Speed km/h
23 - 41
Number of Risers
4
Trims
yes
Number of A lines
3
Number of B lines
4
Number of C lines
3
Number of D lines
2
Line strength (upper/lower Kg)
120/340
Line sizes (upper/lower mm)
1.3/2.4
Suspension line length (m)
8.57
Total Line Length (m)
520
Glider weight (glider only, Kg)
9.5

RISER ARRANGEMENT
Cosmic Rider
D Riser
A
80mm
B
C
D
Trim Released:
A=450mm, Baby-A=450mm,B=450mm,
C=450mm, D=450mm.
Trim on :
A=450mm, Baby-A=450mm, B=435mm,
C=420mm, D=390mm
Red
Black
60mm
Trim range
Green
Baby A
o

LINE ARRANGEMENT
Cosmic Riser
M1
M1
M1
M1
M1

Line Check Sheet,
Cosmic Rider Rev8
Line No
A B C D
E
Brakes
Brake No
Tip 11
7867 7867 7882 7922 8750
K20
8760
K19
10
8251 8206 8267 8800
K18
8825
K17
9
8407 8377 8447 8850
K16
8830
K15
8
8457 8417 8506 8596 8870
K14
8950
K13
7
8527 8467 8566 8666 8880
K12
8910
K11
6
8597 8517 8607 8717 8940
K10
8980
K9
5
8567 8477 8567 8687 9100
K8
9140
K7
4
8617 8517 8607 8737 9155
K6
9270
K5
3
8637 8517 8597 8746 8816 9350
K4
9450
K3
2
8617 8497 8577 8726 8816 9620
K2
9840
K1
Center 1
8677 8567 8647 8796 8886
Notes: Measurements comply to the official DHV measurement method.
Lines measured from the bottom of the sail to the inside of the maillon.
Measurements made under 5 daN load.
Tip lines adjusted for shorter tabs (10mm)
/