SMART Technologies UF70 (i6 systems) User manual

Category
Projectors
Type
User manual

This manual is also suitable for

SMARTBoard® 600i6
Interactive whiteboard system
Configuration and users guide
smarttech.com/kb/170585
FCC warning
This equipment has been tested and found to comply with the limits for a Class A digital device, pursuant to Part 15 of the FCC Rules. These limits are designed to provide
reasonable protection against harmful interference when the equipment is operated in a commercial environment. This equipment generates, uses and can radiate radio
frequency energy and, if not installed and used in accordance with the manufacturer’s instructions, may cause harmful interference to radio communications. Operation of
this equipment in a residential area is likely to cause harmful interference in which case the user will be required to correct the interference at his own expense.
Trademark notice
SMARTBoard, SMARTNotebook, smarttech, the SMART logo and all SMART taglines are trademarks or registered trademarks of SMARTTechnologiesULC in the U.S.
and/or other countries. TexasInstruments, BrilliantColor, DLP and DLPLink are trademarks of TexasInstruments. Microsoft, Windows and InternetExplorer are either
registered trademarks or trademarks of Microsoft Corporation in the U.S. and/or other countries. Blu-ray is a trademark of the Blu-ray Disc Association. All other third-party
product and company names may be trademarks of their respective owners.
Copyright notice
© 2013SMARTTechnologiesULC. All rights reserved. No part of this publication may be reproduced, transmitted, transcribed, stored in a retrieval system or translated
into any language in any form by any means without the prior written consent of SMARTTechnologiesULC. Information in this manual is subject to change without notice
and does not represent a commitment on the part of SMART.
One or more of the following patents: US6320597; US6326954; US6540366; US6741267; US7151533; US7687736; US7757001; USD612396; USD616462; USD617332; and
USD636784. Other patents pending.
09/2013
i smarttech.com/kb/170585
Important information
Before you install and use your SMARTBoard®600i6 interactive whiteboard system, read and
understand the safety warnings and precautions in this user’s guide and the included warnings
document. These safety warnings and precautions describe the safe and correct operation of your
interactive whiteboard system and its accessories, helping you to prevent injuries and equipment
damage. Ensure that your interactive whiteboard system is always being used correctly.
In this document, interactive whiteboard system refers to the following:
l SMARTBoard 600 series interactive whiteboard
l SMARTUF70 or SMARTUF70w projector
l Accessories and optional equipment
The projector included with your system is designed to work only with certain SMARTBoard
interactive whiteboard models. Contact your authorized SMART reseller (smarttech.com/where) for
more information.
Safety warnings, cautions and important
information
Installation
W A R N I N G
l Failure to follow the installation instructions shipped with your SMART product could result in
personal injury and damage to the product.
l To reduce the risk of fire or electric shock, do not expose the SMART product to rain or
moisture.
I M P O R T A N T I N F O R M A T I O N
ii smarttech.com/kb/170585
l Two people are required to mount your SMART product because it may be too heavy for one
person to safely maneuver.
When you lift your interactive whiteboard, you and your assistant should stand on either side
of the screen, supporting its weight at the bottom while balancing the top with your other
hands.
l When mounting the projector boom on a framed or hollow wall, attach the mounting bracket to
a stud to safely support the projector’s weight. If you use only drywall anchors, the drywall can
fail, resulting in possible personal injury, and damage to the product which may not be covered
by your warranty.
l Do not leave cables on the floor where they can be a tripping hazard. If you must run a cable
over the floor, lay it in a flat, straight line and secure it to the floor with tape or a cable
management strip of a contrasting color. Handle cables carefully and avoid excessive
bending.
C A U T I O N
l Do not operate this unit immediately after moving it from a cold location to a warm location.
When the unit is exposed to such a change in temperature, moisture can condense on the lens
and crucial internal parts. Allow the system to stabilize to room temperature before operation
to prevent possible damage to the unit.
l Do not place the unit in hot locations, such as near heating equipment. Doing so could cause a
malfunction and shorten the life of the projector.
l Avoid setting up and using the SMART product in an area with excessive levels of dust,
humidity and smoke.
l Do not place your SMART product in direct sunlight or near any appliance that generates a
strong magnetic field.
l If you need to lean the interactive whiteboard against a wall before you mount it, make sure it
remains in an upright position, resting on the pen tray brackets, which can sustain the weight
of the interactive whiteboard.
Do not rest the interactive whiteboard on its side or on the top of the frame.
I M P O R T A N T I N F O R M A T I O N
iii smarttech.com/kb/170585
l You must connect the USB cable that came with your SMARTBoard interactive whiteboard to
a computer that has a USB compliant interface and that bears the USB logo. In addition, the
USB source computer must be compliant with CSA/UL/EN 60950 and bear the CE mark and
CSA and/or UL Mark(s) for CSA/UL 60950. This is for operating safety and to avoid damage to
the SMARTBoard interactive whiteboard.
I M P O R T A N T
l The SMARTBoard 680i6 and 685i6 interactive whiteboard system textless installation guide
is also available online (smarttech.com/kb/170498).
l Make sure an electrical socket is near your SMART product and remains easily accessible
during use.
l Using your SMART product near a TV or radio could cause interference to the images or
sound. If this happens, move the TV or radio away from the projector.
Operation
W A R N I N G
l If you are using an external audio system, use only the power supply included with that
product. Using the wrong power supply might create a safety hazard or damage the
equipment. If in doubt, refer to the specification sheet for your product to verify the power
supply type.
l Do not climb (or allow children to climb) on a wall- or stand-mounted SMARTBoard interactive
whiteboard.
Do not climb on, hang from or suspend objects from the projector boom.
Climbing on the interactive whiteboard or projector boom could result in personal injury
or product damage.
C A U T I O N
l Do not block the projector’s ventilation slots and openings.
l If dust or small items prevent pen tray buttons from being pressed or cause constant button
contact, remove the obstructions carefully.
I M P O R T A N T I N F O R M A T I O N
iv smarttech.com/kb/170585
I M P O R T A N T
l Keep your remote control in a safe place because there is no other way to access menu
options.
l Do not disconnect cables from the ECP to connect peripheral devices because you could
disconnect controls for your interactive whiteboard.
l Disconnect the product from its power source when it’s not used for a long period.
Other precautions
If you own a SMARTproduct other than a SMARTBoard 680i6 and 685i6 series interactive
whiteboard system, refer to the installation manual for your product for relevant warnings and
maintenance instructions.
Environmental requirements
Before you install your SMARTBoard600 interactive whiteboard system, review the following
environmental requirements.
Environmental
requirement
Parameter
Operating temperature
l
4F to 95°F (C to 3C) from 0' to 6000' (0 m to 1800 m)
l
4F to 86°F (C to 3C) from 6000' to 9800' (1800 m to 3000 m)
Storage temperature
Humidity
l
Humidity above 80% could cause slight wrinkling in the screen
surface sheet. The wrinkles disappear when the humidity lowers.
Water and fluid
resistance
l
Intended for indoor use only. Doesn’t meet any salt-spray or water
ingress requirements.
l
Don’t pour or spray liquids directly onto your interactive whiteboard,
the projector or any of its sub-components.
Dust
l
Intended for use in office and classroom environments. Not for
industrial use where heavy dust and pollutants can cause
malfunctions or impaired operation. Periodic cleaning is required in
areas with heavier dust. See Cleaning the projector on page 35 for
information on cleaning the projector.
Electrostatic discharge
(ESD)
l
EN61000-4-2 severity level 4 for direct and indirect ESD
l
No malfunction or damage up to 8kV (both polarities) with a 330ohm,
150 pF probe (air discharge)
l
Unmated connectors meet no malfunction or damage up to 4kV (both
polarities) for direct (contact) discharge
I M P O R T A N T I N F O R M A T I O N
v smarttech.com/kb/170585
Environmental
requirement
Parameter
Cables
l
All SMARTBoard600i6 interactive whiteboard system cables should
be shielded to prevent potential accidents and degraded video and
audio quality.
Conducted and radiated
emissions
l
EN55022/CISPR 22, Class A
vii smarttech.com/kb/170585
Contents
Important information i
Safety warnings, cautions and important information i
Environmental requirements iv
Chapter 1: About your interactive whiteboard system 1
SMARTBoard600i6 interactive whiteboard system features 2
Included accessories 4
Chapter 2: Installing your interactive whiteboard system 7
Choosing a location 8
Choosing a height 8
Securing your interactive whiteboard system 8
Routing the cables 9
Installing SMART software 10
Changing your projector’s aspect ratio for use with your SMARTBoard 690 interactive
whiteboard 10
Chapter 3: Using your interactive whiteboard system 11
Using your projector 11
Using your interactive whiteboard 23
Using the Extended Control Panel (ECP) 23
Appendix 4: Integrating other devices 27
Video format compatibility 27
Connecting peripheral sources and outputs 33
Chapter 5: Maintaining your interactive whiteboard system 35
Maintaining your interactive whiteboard 35
Cleaning the projector 35
Focusing and adjusting the projector image 36
Replacing the projector lamp 37
Chapter 6: Troubleshooting your interactive whiteboard system 43
Before you start 44
Determining your interactive whiteboard system’s status 45
Resolving interactive whiteboard issues 47
Resolving projector issues 48
Resolving ECP issues 53
Accessing the service menu 54
C O N T E N T S
viii smarttech.com/kb/170585
Transporting your interactive whiteboard system 55
Appendix A: Remotely managing your system through a network interface 57
Web page management 57
Simple Network Management Protocol (SNMP) 65
Appendix B: Remotely managing your system through an RS-232 serial interface 67
Connecting your room control system to the SMART UF70 projector 68
Projector programming commands 70
Appendix C: Disabling user USB access 97
Appendix D: Remote control code definitions 101
Appendix E: Hardware environmental compliance 103
Waste Electrical and Electronic Equipment and Battery regulations (WEEE and Battery
Directives) 103
Batteries 103
Mercury 103
More information 103
Index 105
Chapter 1
1 smarttech.com/kb/170585
Chapter 1: About your interactive
whiteboard system
SMARTBoard600i6 interactive whiteboard system features 2
SMARTBoard 600 series interactive whiteboard 2
SMARTUF70 or SMARTUF70w projector 3
Extended Control Panel (ECP) 4
Included accessories 4
Remote control 4
Pens 4
Eraser 5
VGA connection kit 5
Your SMARTBoard600i6 interactive whiteboard system combines the following components:
l SMARTBoard 600 series interactive whiteboard
l Wall-mounted, short-throw SMARTUF70 or SMARTUF70w projector
l Accessories and optional equipment
This chapter describes the features of your interactive whiteboard and provides information about
product parts and accessories.
C H A P T E R 1
About your interactive whiteboard system
2 smarttech.com/kb/170585
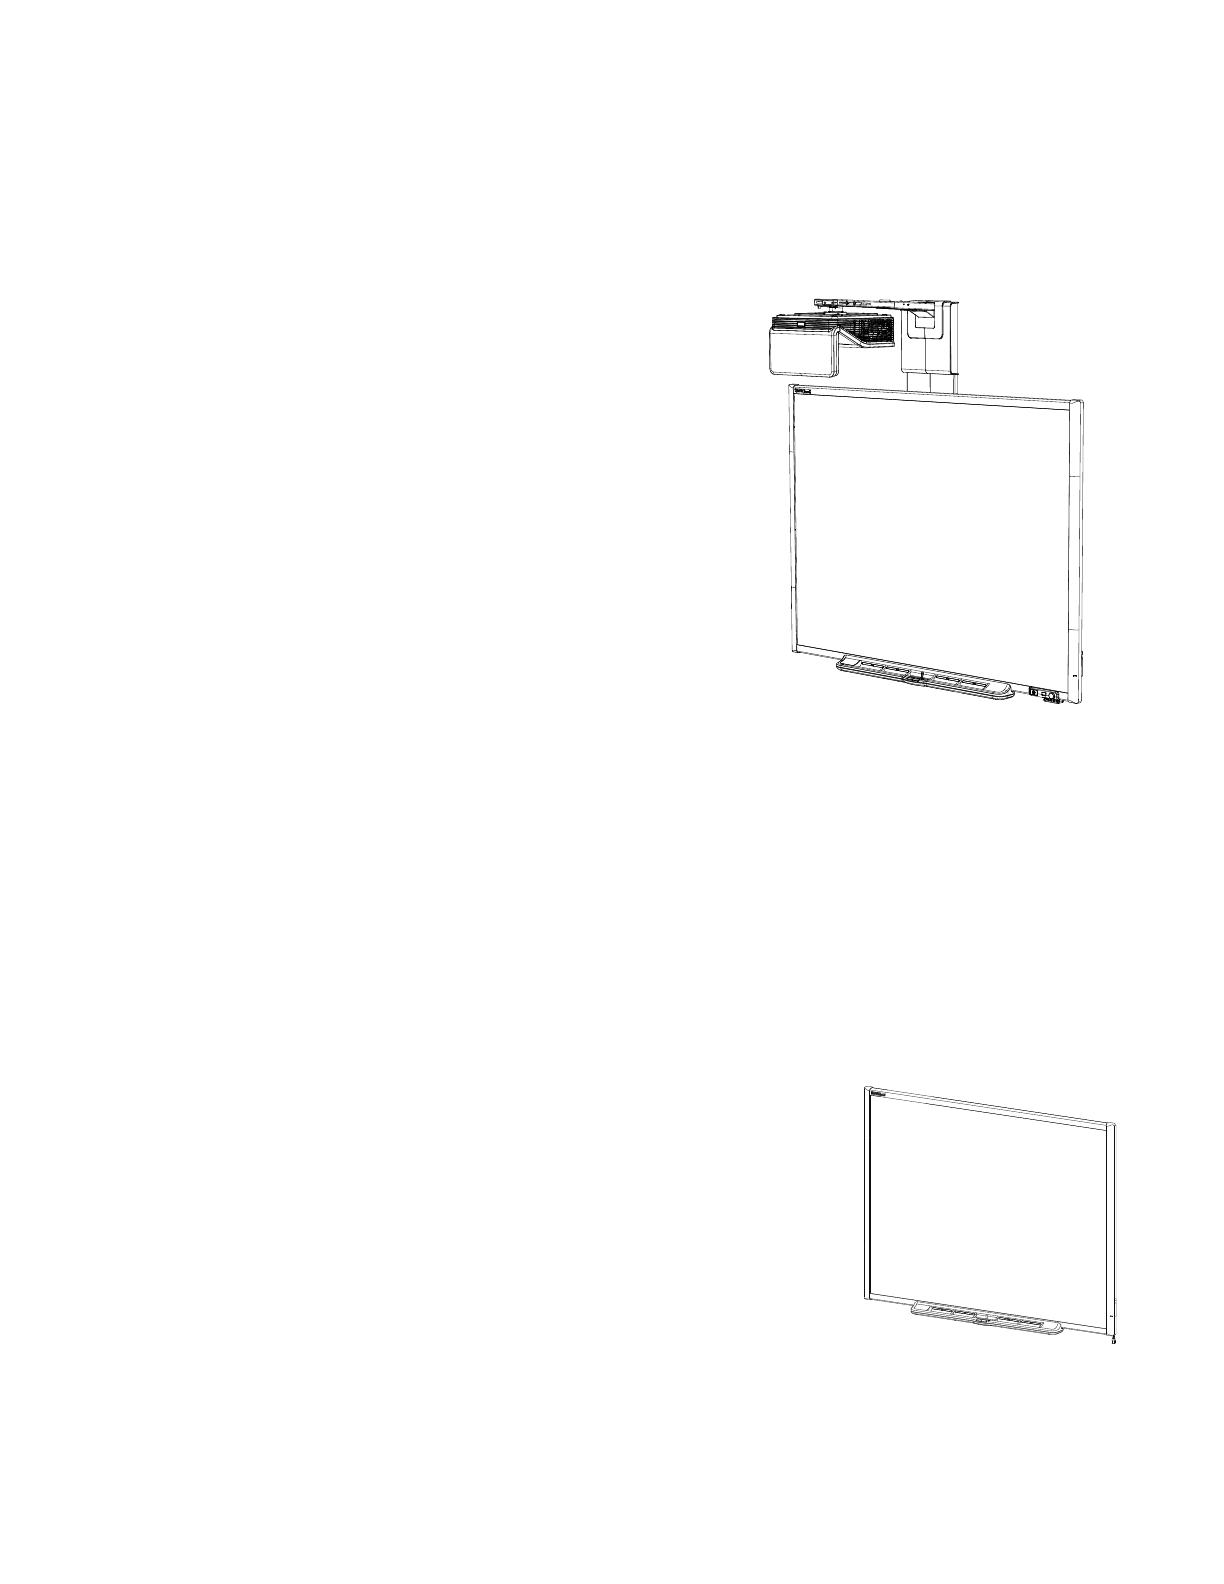
SMARTBoard600i6 interactive whiteboard
system features
Your SMARTBoard600i6 interactive whiteboard
system uses the short-throw, high-offset
SMARTUF70 or SMARTUF70w projector. The throw
distance of the SMARTUF70 or SMARTUF70w
projectors is half that of the SMARTUF65 projector,
resulting in a shorter boom and reduced shadows on
the projected image.
When the projector displays an image from your
computer on the touch-sensitive interactive
whiteboard, you can do everything that you can do at
your computer—open and close applications, scroll
through files, conference with others, create new
documents or edit existing ones, visit websites, play
video clips and moreby touching the screen. This
projector also supports video and audio connections
from a variety of devices, including DVD/Blu-ray™ players, VCRs, document cameras and digital
cameras, and can project media from these sources onto the interactive screen.
When you use SMART software with your SMARTBoard600i6 interactive whiteboard system, you
can write or draw over the projected computer image in digital ink using a pen tray pen or your finger,
and then save these notes to a .notebook file or directly into any Ink Aware application.
SMARTBoard 600 series interactive whiteboard
Your SMARTBoard 600 series interactive whiteboard has many features, including a resistive touch
screen and a pen tray.
Other features of your interactive whiteboard include the following:
l A pen tray that automatically detects when you pick up a pen
tray pen or the eraser
l Pen tray buttons that activate the on-screen keyboard,
right-click, Orientation and Help functions
l A durable tear-resistant surface optimized for projection and
easily cleaned with whiteboard cleaner
l A security cable lock feature that enables you to lock your
interactive whiteboard to help safeguard it from theft
C H A P T E R 1
About your interactive whiteboard system
3 smarttech.com/kb/170585
For more information about your SMARTBoard interactive whiteboard, see the SMARTBoard 600
and D600 series interactive whiteboard installation and user’s guide (smarttech.com/kb/001414).
SMARTUF70 or SMARTUF70w projector
The SMARTUF70 or SMARTUF70w projector system includes a
short-throw projector for use with SMARTBoard interactive
whiteboards and a sturdy support system suitable for many different
environments.
Other features of your projector system include:
l A wall-mounted, high-offset projector engine that uses DLP® technology by
TexasInstruments™, providing BrilliantColor™ performance and Gamma 2.2 correction with
SMART Presentation, Bright Room, Dark Room, sRGB and User modes
l PAL, PAL-N, PAL-M, SECAM, NTSC, and NTSC 4.43 video system compatibility
l HDMI, Composite,and VESA® RGB video inputs (not included).
l WXGA, QVGA, VGA, SVGA, XGA, SXGA, SXGA+ and UXGA video format compatibility
l Native 1024 × 768 resolution (SMARTUF70 projector)
OR
Native 1280 × 720 resolution (SMARTUF70w projector in 16:9 aspect ratio mode)
l Remote management via a serial RS-232 interface, web page or SNMP
l An alert broadcast feature that enables administrators to send notification messages to network-
connected projector systems for immediate on-screen display
l Protected cable routing through a cable cover that limits tampering and clutter
l A secure mounting and installation system that includes the following:
o
An optional projector padlock ring to prevent removal of the projector from the boom
o
Accessory mounting hardware for solid masonry or framed wall installations kit part number
1007416
o
Templates and instructions for positioning the system safely
Projector information
C H A P T E R 1
About your interactive whiteboard system
4 smarttech.com/kb/170585
Extended Control Panel (ECP)
Your projector system’s ECP attaches to the bottom frame
of your interactive whiteboard. The ECP features controls
for power, source selection and volume adjustment, as well
as an integrated USB hub that enables you to switch
seamlessly between two connected computers.
Connection receptacles for your source inputs include:
l One USB A receptacle on the front of the ECP for USB drives
l Two USB A receptacles behind the interactive whiteboard
l Two RCA jacks on the front of the ECP for dual-channel audio input
l One RCA jack on the front of the ECP for composite video input
l One captive USB B receptacle for your primary computer
l One DB15M receptacle behind the interactive whiteboard for connecting to the projector
l One USB B receptacle behind the interactive whiteboard for connecting a secondary computer
Included accessories
The following accessories are included with your interactive whiteboard system.
Remote control
The remote control enables you to control the system and set up your projector. Use the
remote control to access menu options, system information and input selection options.
Pens
The pens have rubberized grip areas and are colored to match four colors of
digital ink: black, red, green and blue.
You can use dry-erase markers to replace the included pens, as long as
they’re a similar shape, don’t scratch or mark your interactive whiteboard
surface and reflect infrared light. If the substitute doesn’t reflect infrared
light, the pen tray sensors might not detect the presence of the pen.
C H A P T E R 1
About your interactive whiteboard system
5 smarttech.com/kb/170585
N O T E
Some of SMART’s older pens aren’t designed to reflect infrared light and the pen tray sensors might
not detect them reliably.
T I P
Wrap light-colored tape around a substitute pen to improve the reflection of infrared light and help
with tool detection.
Eraser
The eraser resembles a rectangular chalkboard eraser. You can use a
substitute object, as long as it has a similar shape, reflects infrared light and
doesn’t scratch or mark the interactive whiteboard surface.
VGA connection kit
The VGA connection kit allows you to connect a laptop to your interactive
whiteboard system using a VGA cable. The end of the VGA connection kit
can be attached to either side of the interactive whiteboard or to a wall in a
convenient location.
You can add a variety of accessories to your interactive whiteboard to best
meet your specific needs. Purchase these items from your authorized
SMART reseller.
For more information on accessories, go to smarttech.com/accessories.
Chapter 2
7 smarttech.com/kb/170585
Chapter 2: Installing your interactive
whiteboard system
Choosing a location 8
Choosing a height 8
Securing your interactive whiteboard system 8
Locking the pen tray to your interactive whiteboard 8
Securing the projector to the boom 8
Routing the cables 9
Installing SMART software 10
Changing your projector’s aspect ratio for use with your SMARTBoard 690 interactive whiteboard 10
Consult the SMARTBoard600i6 interactive whiteboard system installation document included with
your product for instructions on how to install and secure your system.
I M P O R T A N T
Use the SMARTBoard 660i5,680i5, 685i5 and 690i5 interactive whiteboard system installation
guide (smarttech.com/kb/154547) to install your interactive whiteboard, projector and ECP.
This chapter provides additional considerations and details for installing your interactive whiteboard
system.
C H A P T E R 2
Installing your interactive whiteboard system
8 smarttech.com/kb/170585
Choosing a location
Choose a location for your interactive whiteboard system that’s far from bright light sources, such as
windows and strong overhead lighting. Bright light sources can cause distracting shadows on your
interactive whiteboard and can reduce the contrast of the projected image.
Select a wall with a flat, regular surface and sufficient clearance to accommodate your interactive
whiteboard system. Install the projector and your interactive whiteboard on the same flat surface. For
best presentation alignment, mount your interactive whiteboard system in a location that’s central to
your audience’s viewing direction.
For mobile or adjustable installation options, contact your authorized SMART reseller.
Choosing a height
SMART includes a mounting template with each interactive whiteboard system. If you lose this
template, contact your authorized SMART reseller. Using this template ensures that you can do the
following:
l Mount the projector at a safe height for head space clearance, while maintaining enough space
for airflow and installation access above the unit.
l Position the projector at the correct height above your interactive whiteboard to align the
projected image with the touch screen.
Dimensions on the template recommend a distance from the floor suitable for adults of average
height. You should consider the general height of your user community when you choose a location
for your interactive whiteboard.
Securing your interactive whiteboard system
This section explains how to secure the different components of your interactive whiteboard system.
Locking the pen tray to your interactive whiteboard
To learn how to lock the pen tray to your interactive whiteboard, see the SMARTBoard 600 and D600
series interactive whiteboard installation and user’s guide (smarttech.com/kb/001414).
Securing the projector to the boom
To learn how to secure the SMARTUF70 or SMARTUF70w projector to the boom, see the included
SMARTBoard 660i6,680i6, 685i6 or 690i6 interactive whiteboard system installation guide
(smarttech.com/kb/154547).
C H A P T E R 2
Installing your interactive whiteboard system
9 smarttech.com/kb/170585
Routing the cables
When connecting cables from your SMARTUF70 projector to your interactive whiteboard system,
make sure that all cables pass along the top of the interactive whiteboard wall-mounting bracket and
then down the side of the interactive whiteboard.
When connecting cables from a SMARTUF70w projector to the interactive whiteboard, make sure
that all cables pass between the two interactive whiteboard wall-mounting brackets. Space your wall-
mounting brackets 4" (10.2 cm) apart to provide full support for the weight of your interactive
whiteboard.
Cable routing for SMARTBoard 660 and 680
interactive whiteboards
Cable routing for SMARTBoard 685 and 690
interactive whiteboards
I M P O R T A N T
Do not connect the power cable to a power outlet until you have connected all the cables to the
projector and ECP.
C H A P T E R 2
Installing your interactive whiteboard system
10 smarttech.com/kb/170585
Installing SMART software
You must install SMARTsoftware, such as SMARTMeetingPro software or SMARTNotebook™
collaborative learning software on the computer connected to your interactive whiteboard system to
access all of its features.
Download SMARTsoftware from smarttech.com/software. These web pages list the minimum
hardware requirements for each software version. If SMART software is already installed on your
computer, take this opportunity to upgrade your software to ensure compatibility.
Changing your projector’s aspect ratio for use
with your SMARTBoard 690 interactive
whiteboard
Before you align the projected image on your SMARTBoard 690 interactive whiteboard, you must
change the native aspect ratio on your SMARTUF70w projector to 16:9. You don’t need to perform
this step with any other model of interactive whiteboard. The procedure you use to change the native
aspect ratio depends on the DDP firmware version of your projector.
To determine the DDP firmware version of your projector
1. Turn on your projector.
2. Press Menu on the remote control, and then press Right five times.
3. Record the DDP firmware version in the Firmware Version row.
To change the aspect ratio of a projector with DDP firmware version 0.0.1.7
1. Using the remote control, press the following buttons quickly to access the service menu:
Down, Up, Up, Left, Up.
2. Scroll to WXGA_720P_MODE, and then press Right to select 16:9.
3. Press Menu on the remote control.
To change the aspect ratio of a projector with DDP firmware version 0.0.2.1 or later
1. Press Menu on the remote control, and then press Right twice.
2. Scroll to Native DLP Resolution, and then press Right to select 16:9.
3. Press Menu on the remote control.
  • Page 1 1
  • Page 2 2
  • Page 3 3
  • Page 4 4
  • Page 5 5
  • Page 6 6
  • Page 7 7
  • Page 8 8
  • Page 9 9
  • Page 10 10
  • Page 11 11
  • Page 12 12
  • Page 13 13
  • Page 14 14
  • Page 15 15
  • Page 16 16
  • Page 17 17
  • Page 18 18
  • Page 19 19
  • Page 20 20
  • Page 21 21
  • Page 22 22
  • Page 23 23
  • Page 24 24
  • Page 25 25
  • Page 26 26
  • Page 27 27
  • Page 28 28
  • Page 29 29
  • Page 30 30
  • Page 31 31
  • Page 32 32
  • Page 33 33
  • Page 34 34
  • Page 35 35
  • Page 36 36
  • Page 37 37
  • Page 38 38
  • Page 39 39
  • Page 40 40
  • Page 41 41
  • Page 42 42
  • Page 43 43
  • Page 44 44
  • Page 45 45
  • Page 46 46
  • Page 47 47
  • Page 48 48
  • Page 49 49
  • Page 50 50
  • Page 51 51
  • Page 52 52
  • Page 53 53
  • Page 54 54
  • Page 55 55
  • Page 56 56
  • Page 57 57
  • Page 58 58
  • Page 59 59
  • Page 60 60
  • Page 61 61
  • Page 62 62
  • Page 63 63
  • Page 64 64
  • Page 65 65
  • Page 66 66
  • Page 67 67
  • Page 68 68
  • Page 69 69
  • Page 70 70
  • Page 71 71
  • Page 72 72
  • Page 73 73
  • Page 74 74
  • Page 75 75
  • Page 76 76
  • Page 77 77
  • Page 78 78
  • Page 79 79
  • Page 80 80
  • Page 81 81
  • Page 82 82
  • Page 83 83
  • Page 84 84
  • Page 85 85
  • Page 86 86
  • Page 87 87
  • Page 88 88
  • Page 89 89
  • Page 90 90
  • Page 91 91
  • Page 92 92
  • Page 93 93
  • Page 94 94
  • Page 95 95
  • Page 96 96
  • Page 97 97
  • Page 98 98
  • Page 99 99
  • Page 100 100
  • Page 101 101
  • Page 102 102
  • Page 103 103
  • Page 104 104
  • Page 105 105
  • Page 106 106
  • Page 107 107
  • Page 108 108
  • Page 109 109
  • Page 110 110
  • Page 111 111
  • Page 112 112
  • Page 113 113
  • Page 114 114
  • Page 115 115
  • Page 116 116
  • Page 117 117
  • Page 118 118
  • Page 119 119
  • Page 120 120

SMART Technologies UF70 (i6 systems) User manual

Category
Projectors
Type
User manual
This manual is also suitable for

Ask a question and I''ll find the answer in the document

Finding information in a document is now easier with AI