Broan BCSQ130SS ADA Wiring Instructions

Type
ADA Wiring Instructions

The Broan BCSQ130SS is a powerful range hood that will help keep your kitchen air clean and fresh. With its 200 max blower CFM and dishwasher-safe filters, it can handle even the most demanding cooking tasks. The infinite speed control lets you adjust the fan speed to your liking, and the built-in lighting provides bright illumination for your cooktop. Plus, the sleek stainless steel finish will complement any kitchen décor.

The Broan BCSQ130SS is a powerful range hood that will help keep your kitchen air clean and fresh. With its 200 max blower CFM and dishwasher-safe filters, it can handle even the most demanding cooking tasks. The infinite speed control lets you adjust the fan speed to your liking, and the built-in lighting provides bright illumination for your cooktop. Plus, the sleek stainless steel finish will complement any kitchen décor.

99045858ACVR09‐27‐2017


AdditionalInformationfor
RangeHoodsmeetingADACompliance
BroanandNuTonebrandedresidentialrangehoodscanbeinstalledtocomply
withSections308and309ofADAGuidelines,whenusedwithappropriately
mountedcontrolsinstalledat15”to48”abovethefloorandcontrolaccess
shouldnotrequirereachingoveracookingappliance.
ThefollowingrangehoodscanworkinanADACompliantsituationwhenthe
rangehoodiswiredtooperatefromadedicated,standardelectricalwallswitch.
Tofacilitatethisapplication,sharetheinformationonthefollowingpageswith
yourelectricianwhenpreparingfortheinstallation.
THISPROCEDUREAPPLIESTOTHEFOLLOWINGRANGEHOODSERIES
BroanSeries:BCS3,BCSD,BCSEK,BKSA,BKSF,BNSC,BQSEN,BQSJ,CLSC,CRSA
andCRSF
NuToneSeries:AHSA,AVSF,NCS3,NCSEK,NKSAandNQSEN
ADA HIGH VOLTAGE WIRING INSTRUCTIONS FOR SINGLE BLOWER RANGE HOODS WITH
ROCKER SWITCH CONTROL
WARNING
!
For residential (domestic) installation only. Before proceeding, switch power off at service panel and lock service
disconnecting means to prevent power from being switched on accidentally. Installation work and electrical wiring
must be done by qualified person(s) in accordance with all applicable codes and standards, including fire-rated
construction codes and standards. Also, it is recommended to wear safety glasses and gloves.
ACCESS TO RANGE HOOD CONTROL PANEL CONNECTIONS
Remove filters from the hood and set them aside.
NOTE: Some models have only one filter.
Remove the wiring cover (shaded part on illustration below)
retaining screw. Slide out the wiring cover from the hood and set
it aside with its screw.
Unplug the blower connector from the main harness.
NOTE: The illustrations in this procedure are generic; some hood details may slightly differ from the hood you have on hand but the
procedure itself applies to all single blower range hoods listed in this document (see page 3).
Wiring cover
screw
Using a 11/32'' socket, remove the 6 nuts retaining the blower
chamber to the hood assembly (2 nuts on inner back and 2 other
nuts per sides), then use a Phillips no. 2 screwdriver to remove
both front corner screws. See picture below for nuts and screws
locations. Pull out the blower chamber from the hood assembly
and set it aside with its retaining screws and nuts.
HE0253
HD0672
Nuts
Nuts
Screw
Remove and set aside the 4 front screws retaining the bent plate
to the hood.
HD0673
Screw locations
Fold back the bent plate to access to control panel connections.
HD0674
1
99045858A
According to your needs, there are 2 ways to wire a 2-rocker switch control to these range hoods: 120 VAC power cable entering the range
hood or 120 VAC power cable entering the switch box.
2
CAUTION
Use standard switches that are rated 120 VCA, 15 A. Only use wires suitable for at least 90C (194F). Ensure the
wires are reliably routed away from the halogen lights (if present).
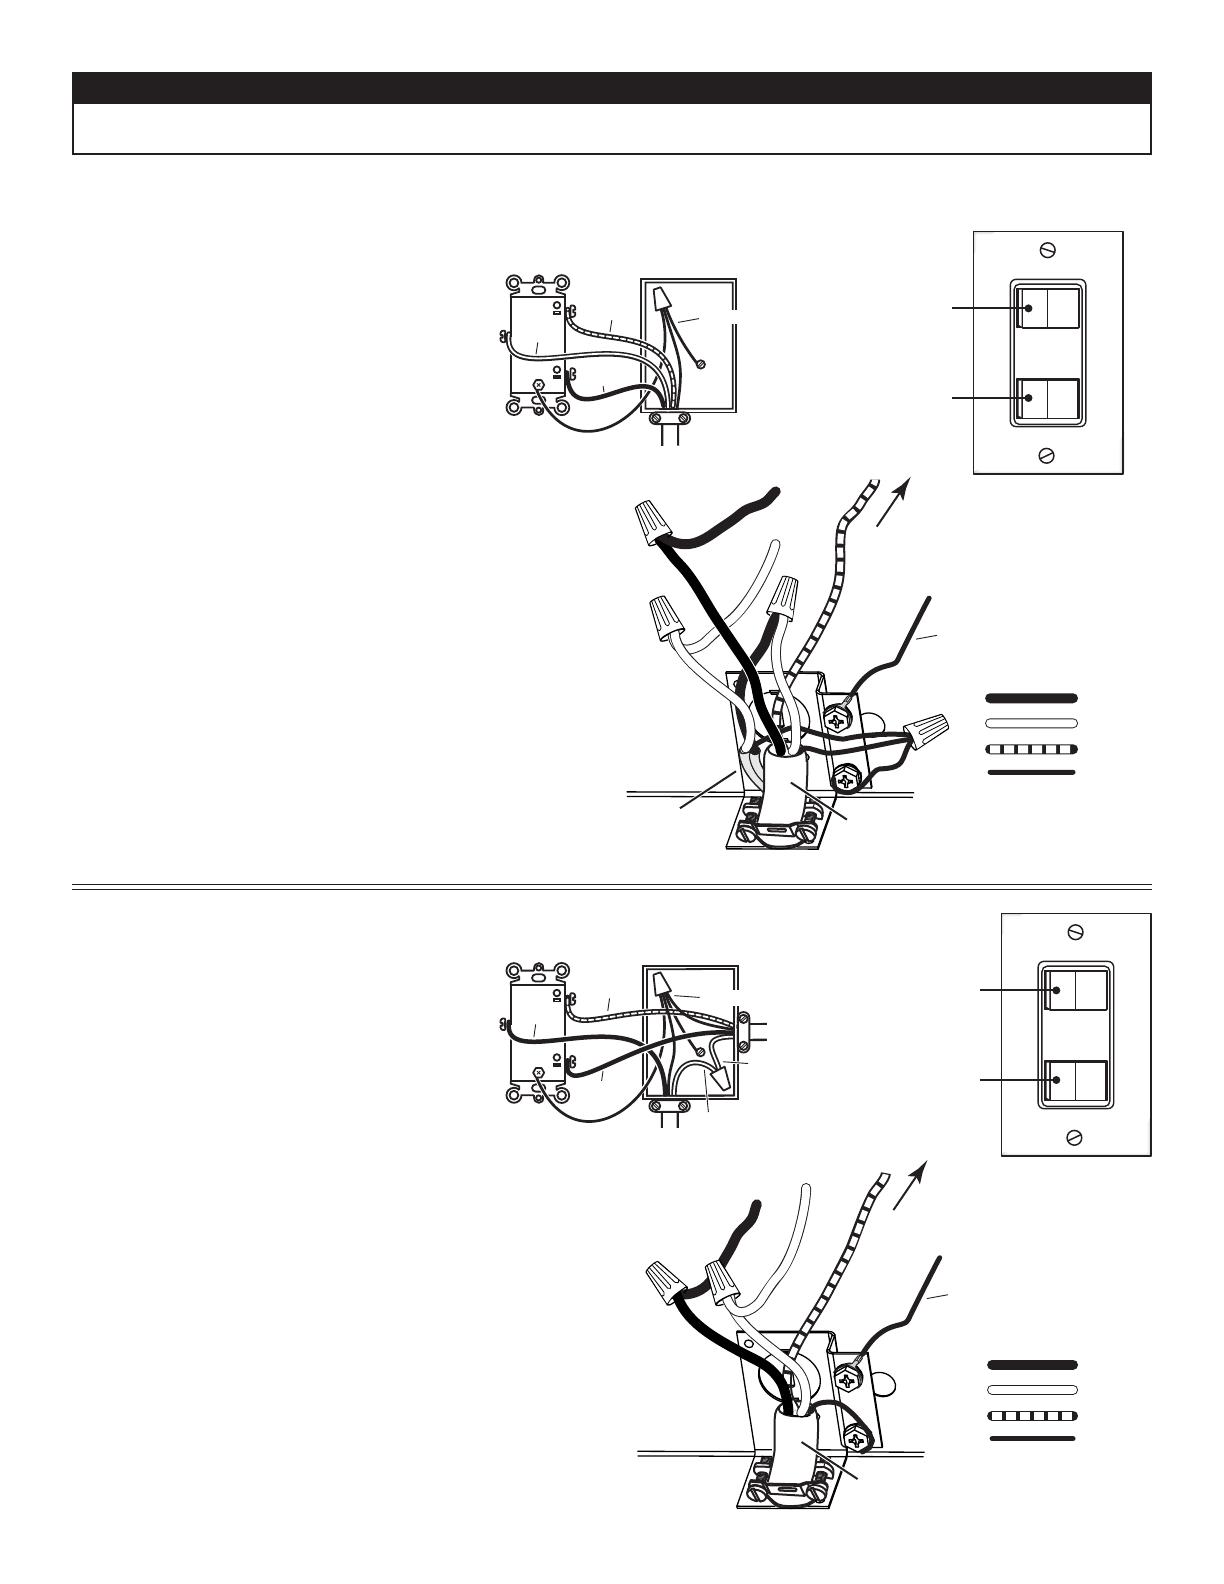
120 VAC POWER CABLE ENTERING THE HOOD
TO HOOD
2-ROCKER
SWITCH
WHITE
GROUND
14/3 CABLE
RED
(motor)
BLACK
(lights)
TO CONTROL PANEL
MOTOR
GROUND
WIRE
14/3 CABLE
120 VAC
HOUSE WIRING
RED
BLACK
WHITE
GROUND
1
2
3
4
5
Install a 2-rocker switch at a convenient place for the
user. Use a 14/3 cable to wire it to the range hood
(see diagram at right).
NOTE: Code requires both ends of WHITE wire
insulation to be colored; use a permanent
marker.
Insert the 14/3 cable along with the 14/2 house wiring cable in the
hood through an UL approved wire clamp, suitable for 2 cables.
Add a GROUND wire and connect one end to the GREEN ground
screw. Use an appropriate wire nut to connect the other end of the
added GROUND wire with the ground wire coming from the 14/3
cable and the ground wire coming from 14/2 house wiring cable.
Connect BLACK wire from house wiring to WHITE wire from
14/3 cable using an appropriate wire nut.
Connect BLACK wire from 14/3 cable to BLACK wire from range
hood wiring using an appropriate wire nut.
Connect WHITE wire from house wiring to WHITE wire range
hood wiring using an appropriate wire nut.
Run RED wire from 14/3 cable through bend plate wiring opening
for hood control connection. See next page for RED wire
connection.
120 VAC POWER CABLE ENTERING THE SWITCH
GROUND
WHITE
WHITE
120 VAC
LINE IN
TO HOOD
14/3 CABLE
BLACK
2-ROCKER
SWITCH
RED
(motor)
BLACK
(lights)
TO CONTROL PANEL
MOTOR
GROUND
WIRE
14/3 CABLE
RED
BLACK
WHITE
GROUND
1
2
3
4
Install a 2-rocker switch at a convenient place for the
user. Feed the switch box with 120 VAC house wiring
and use a 14/3 cable to wire it to the range hood (see
diagram at right).
Insert the 14/3 cable in the hood through an UL approved wire
clamp. Connect ground wire to the GREEN ground screw.
Connect WHITE wire from 14/3 cable to WHITE wire from range
hood wiring using an appropriate wire nut.
Connect BLACK wire from 14/3 cable to BLACK wire from range
hood wiring using an appropriate wire nut.
Run RED wire from 14/3 cable through bend plate wiring opening for
hood control connection. See next page for RED wire connection.
Motor switch
Light switch
Motor switch
Light switch
NOTE: Allow enough length of 14/3 cable to perform the RED wire
connection in the hood nose.
NOTE: Allow enough length of 14/3 cable to perform the RED wire
connection in the hood nose.
MOTOR SWITCH
TERMINALS
LIGHT SWITCH
TERMINALS
MOTOR SWITCH
TERMINALS
LIGHT SWITCH
TERMINALS
BLACK WIRE
RED WIRE
FROM 14/3 CABLE
A
B
NOTE: The light switch in rocker switch controls differs from models to others; some light switch have 2 terminals while others have
3 terminals. The illustrations below applies to both light switch models.
A Cut the BLACK wire that is connected to motor switch and light switch.
B Cap off the BLACk wire connected to the light switch terminal. Connect the RED
wire from 14/3 cable to the BLACK wire from the motor switch, using an appropriate
wire nut.
RED WIRE CONNECTION
LIST OF SINGLE BLOWER RANGE HOODS COMPATIBLE WITH THIS PROCEDURE
Once all the connections are done, finalize the installation by reversing steps to on first page.
NOTE: Be careful while reinstalling wiring cover to the hood.
CAUTION
Ensure both tabs on inner top of hood are engaged in their corresponding slots in wiring cover. Also, take care not
to pinch wires while reinstalling wiring cover.
SCREW
TABS ON INNER
TOP OF HOOD
ENGAGED IN
WIRING COVER
SLOTS.
3
Broan Series: BCS3, BCSD, BCSEK, BKSA, BKSF, BNSC, BQSEN, BQSJ, CLSC, CRSA and CRSF
NuTone Series: AHSA, AVSF, NCS3, NCSEK, NKSA and NQSEN
Venmar Bistro Series: VBNSA
Venmar Chef Series: VCQSEN
  • Page 1 1
  • Page 2 2
  • Page 3 3
  • Page 4 4

Broan BCSQ130SS ADA Wiring Instructions

Type
ADA Wiring Instructions

The Broan BCSQ130SS is a powerful range hood that will help keep your kitchen air clean and fresh. With its 200 max blower CFM and dishwasher-safe filters, it can handle even the most demanding cooking tasks. The infinite speed control lets you adjust the fan speed to your liking, and the built-in lighting provides bright illumination for your cooktop. Plus, the sleek stainless steel finish will complement any kitchen décor.

Ask a question and I''ll find the answer in the document

Finding information in a document is now easier with AI