Page is loading ...

READ THIS BOOK FIRST
©The Holland Grill Co. V2010 PN CG1-MAN
Instruction Manual
GRILL INSTALLER - LEAVE THIS INSTRUCTION
BOOKLET FOR THE GRILL OWNER.
GRILL OWNER - SA
VE THIS INSTRUCTION
BOOKLET FOR FUTURE REFERENCE.
BH421CG1
Patriot
Patriot
The Holland
Charcoal Grill

CARE AND MAINTENANCE
OF YOUR HOLLAND CHARCOAL GRILL
There is very little care and maintenance needed. The Holland Grill is designed and made of materials
that will last many years with normal use. Following these instructions will improve the longevity and
quality of cooking. To assure safe operation of your Holland Grill, the area for cooking should always be
kept free of combustible materials of any type, such as gasoline or other flammable vapors or liquids.
Outside of body: The grill bottom is aluminum, the grill top is aluminized steel.
They can be cleaned
easily with warm, soapy water or mild cleaner. If paint gets scratched, remove grease and repaint with a
heat resistant paint. The metal surface will last longer. Do not use wire brushes, scrapers or abrasive
cleaners for normal cleaning.
Cooking Grid: The grid is made of high quality Stainless steel. The grid should be brushed with a
brass, copper, or stainless steel brush immediately after removing food while grill is still warm.
Inside Grill: Use warm soapy water to clean this area. Do not allow grease to build up.
Food Boards: These are made from high density polyethylene, approved by the FDA for direct food
contact. Warm soapy water can be used for cleaning. CAUTION: It should not be used as a chopping
block, nor should more than 15 pounds be placed on it at any time.
General: This grill, like all equipment, will look better and last longer if kept out of weather when not in
use. When using a cover, never place it on the grill until the entire unit has cooled at least 30 minutes.
IMPORTANT
FIRST TIME USE: It is important that the grill be lit and allowed to operate at
least 30 minutes before any food is placed on the grill grid. Some smoke may
appear during this period. This is the preservative used during manufacturing.
After initial heating, the grill is ready for use. After burning off the grill, spray
the cooking grid and the inside of the lid with PAM or similar spray, so
food does not stick to the grid and the inside is easier to clean.
HOLLAND GRILL OWNERS MANUAL

P-1
• Only use this grill on a hard, level, non-combustible, stable surface (concrete, ground, etc.) capable of
supporting the weight of the grill. Never use on surfaces that could burn.
• DO NOT use grill without charcoal ash tray in place. DO NOT attempt to remove charcoal ash tray while
tray contains hot coals.
• Proper clearance of 10 feet between the grill and combustible material (bushes, trees, wooden decks,
fences, buildings, etc.) or construction should be maintained at all times when grill is in use. Do not
place grill under a roof overhang or other enclosed area.
• For outdoor use only. Do not operate grill indoors or in an enclosed area.
• For household use only. Do not use this grill for other than its intended purpose.
• We recommend the use of a Charcoal Chimney Starter to avoid the dangers associated with charcoal
lighting fluid. If you choose to use charcoal lighting fluid, only use lighting fluid approved for lighting
charcoal. Carefully read manufacturer’s warnings and instructions on the charcoal lighting fluid and
charcoal prior to the use of their product. Store charcoal lighting fluid safely away from grill.
• When using charcoal lighting fluid, allow charcoal to burn with grill lid open until covered with a light
ash (approximately 20 minutes). This will allow charcoal lighting fluid to burn off. Failure to do this
could trap fumes from charcoal lighting fluid in grill and may result in a flash fire or explosion when
lid is opened.
• Use only a high grade charcoal or charcoal/wood mixture. Holland recommends natural wood lump
charcoal for a longer and hotter burn time.
• Do not use gasoline, kerosene or alcohol for lighting charcoal. Use of any of these or similar products
could cause an explosion possibly leading to severe bodily injury.
• Never add charcoal lighting fluid to hot or even warm coals as flashback may occur causing severe
burns.
• Place grill in an area where children and pets cannot come into contact with unit. Close supervision
is necessar
y when grill is in use.
• Do not leave grill unattended when in use.
• When adding charcoal and/or wood, use extreme caution.
•
Do not store or use grill near gasoline or other flammable liquids, gases or where flammable vapors
may be present.
Grill is hot when in use. T
o avoid burns:
• DO NOT attempt to move the grill.
• Wear protective gloves or oven mitts when adjusting the cooking grid height.
• DO NOT touch any hot grill surfaces.
• DO NOT wear loose clothing or allow hair to come in contact with grill.
WARNING SAFETY INFORMATION PLEASE READ CAREFULLY!
!

P-2
• When grilling, grease from meat may drip into the charcoal and cause a grease fire. If this should
happen close lid to suffocate the flame. Do not use water to extinguish grease fires.
• Use caution since flames can flare-up when fresh air suddenly comes in contact with fire. When
opening the lid, keep hands, face and body a safe distance from hot steam and flame flare-ups.
• In windy weather, place grill in an outdoor area that is protected from the wind.
• Close lid to suffocate flame.
• Never leave coals and ashes in grill unattended. Before grill can be left unattended, remaining coals
and ashes must be removed from grill. Use caution to protect yourself and property. Carefully place
remaining coals and ashes in a non-combustible metal container and saturate completely with water.
Allow coals and water to remain in metal container 24 hours prior to disposing.
• Extinguished coals and ashes should be placed a safe distance from all structures and combustible
materials.
• With a garden hose, completely wet the surface beneath and around grill to extinguish any ashes,
coals or embers which may have fallen during the cooking or cleaning process.
• After each use, clean the grill thoroughly. Cover the grill to protect it from the elements.
• We advise that a fire extinguisher be on hand. Refer to your local authority to determine proper size
and type of fire extinguisher.
• Store the grill in a dry location when not in use.
USE CAUTION AND COMMON SENSE WHEN OPERATING YOUR GRILL.
FAILURE TO ADHERE TO SAFETY WARNING AND GUIDELINES IN THIS MANUAL
COULD RESULT IN BODILY INJURY OR PROPERTY DAMAGE.
SAVE THIS MANUAL FOR FUTURE REFERENCE.
DANGER
!

SHELF
GRILL TOP/LID
H
ANDLE SPRING/BRACKET
GRILL BODY BOTTOM
ADJUSTABLE
AIR VENTS
SHELF
SUPPORT
BRACKET
P-3
LID STOP
CHARCOAL TRAY
ADJUSTABLE
COOKING GRID
ADJUSTABLE
S
TACK VENTS
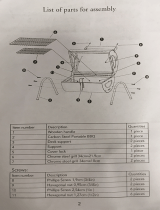
Tools needed for assembly:
1. Phillips screwdriver
2. 11/32”, 3/8” & 7/16” nut driver
3. adjustable and 9/16” wrench for wheel casters
(4) 1/4 - 20 x 5/8” Hex Head Bolt, Lockwasher
& Nut, Fasten base pedestal Corner Braces
(24) 1/4 - 20 x 5/8” Hex Head Bolt & Lockwasher,
All applications where threads are provided
(8) #10 - 24 x 3/8” Philips Head Bolt, Lockwasher
& Locknut,
Attach Stacks to grill lid
(2) #8-32 x 3/8” Philips Head Bolt & Locknut, Attach
swivel Stack Vent to grill lid. (in seperate plastic bag)
(8) #10 - 24 x 1” Carriage Bolt, Lockwasher
& Nut,
Attach Shelf to Shelf Support Brackets
PATRIOT CHARCOAL GRILL ASSEMBLY INSTRUCTIONS
MODEL BH421CG1
FIGURE 1
4 Caster Wheels
,
Two 3/8” washers
lock washer and nut
WHEEL CASTERS
BASE PEDESTAL
GRILL BASE
Fasteners Guide

Step 1.
Open Boxes
On a flat surface (table or floor), OPEN AND EMPTY ALL BOXES.
REFER TO THE CONTENTS LIST TO BE SURE NO PARTS ARE
MISSING. Tighten all factory installed fasteners that may have loosened
during shipping.
Step 2.
Assemble Grill Base
Refer to Figur
e 2.
Select the following parts for assembly:
1. grill base
2. casters (4 ea)
3. base pedestal
4. cor
ner braces (2)
P-4
A. Attach the four casters. Lay grill base on its back. Place one each
3/8” flat washer onto a caster stud, insert then secure with another 3/8”
flat washer, 3/8” locking washer and 3/8” nut. Tighten securely. Repeat
for other 3 corners.
NOTE: Locking casters go on the front. Lock the
casters to prevent cabinet from moving around during assembly.
B. Turn the grill base back over so the casters are on the floor. Attach
the base pedestal to the grill base using 8-1/4-20 x 1/2 Hex Head Bolts
and lock washers. Tighten securely.
C. Attach the two corner braces to the grill pedestal using 4-1/4-20 x
1/2 Hex Head Bolts, lock washers and nuts. Make sure the large
oblong drain pipe hole is away from the base pedestal. See image 2C.
Finger tighten only.
❍
❍
❍
❍
2A
2B
2C
CORNER BRACES
FIGURE 2

P-5
Step 3.
Attach Grill Base to Grill Bottom Shell
Refer to Figure 3.
Select the following parts for assembly:
1. Grill bottom and top assembly
2. (4) Shelf brackets
3. (2) Shelf
4. Gril Base Assembly with caster wheels
Select the base assembly from the previous step. Make sure it is on a level
surface. Make sure it will not roll or slide.
A.
With help from a friend, gently lift and center the grill body assembly on
top of the base assembly and s
ecure to the grill bottom shell using 4-1/4-
20 x 1/2” Hex Head Bolts and lock washers.
Y
ou might find it helpful to
use the phillips head screwdriver to align the grill base and grill bottom
shell holes. Tighten securely.
B. Secure corner braces to the grill bottom shell using 4-1/4-20 x 1/2”
Hex Head Bolts and lock washers. Tighten securely. Now tighten the 4
Hex Head Bolts, lock washers and nuts that secure the corner braces
to the grill pedestal.
C.
Attach the (4) shelf brackets using eight 1/4 - 20 x 5/8” bolts and lock
washers. Make sure that the top flange of the brackets face each other
.
Correct alignment will allow the shelf bracket holes to line up. Tighten
completely.
D.
Select the 2 shelves and secure to the shelf brackets with the #10 - 24 x
1” carriage bolts, lock washers and hex nuts.Tighten firmly, do not overtight-
en or the plastic shelves may crack.
Step 4. Install the Handle
Refer to Figure 3.
Select the following parts for assembly:
1. Grill Handle Bracket
2. Spring Handle
A.
Select the handle bracket and attach it to the grill lid as shown with
two
1/4 - 20 x 5/8” bolts and lock washers.
Tighten completely.
B.
Now place the spring handle onto the studs of handle bracket by
compressing it and sliding it into place.
FIGURE 3
SHELF
BRACKETS
SHELF
GRILL BOTTOM
AND TOP
A
SSEMBLY
❍
❍
❍
❍
❍
3A
3B
3C
3D
4A
4B
❍
❍

Step 5. Install the Lid Stacks
Refer to Figure 4.
Select the following parts for assembly:
1. Lid Stacks (2)
2. Stack Vent Spacers (2)
3. Stack Vent Control (2)
A.
Select The Stack Vent control and attach it to the lid using the phillips
head bolt and lock nut supplied in the seperate plastic bag.
T
ighten nut
then back off 1/4 turn to allow the Stack Vent Control arm to move freely.
B.
Select the Stack Vent Spacer and position it over the Stack Vent
Control.
The opening in the spacer should point twoard the outside edge
of the grill lid.
C, D, E.
Select the Lid Stack and attach it to the grill lid using four #10 -
24 x 3/8” phillips head bolts, lockwashers and nuts. The Stack Vent
Spacer should be sandwiched between the Stack and the grill lid to
allow the Stack Vent Control to rotate freely.
P-6
Step 6. Install Charcoal Tray & Cooking Grid
Refer to Figure 4.
Select the following parts for assembly:
1. Charcoal Tray
2. Cooking Grid
A.
Insert the Charcoal Tray into the tray/grid tower.
B.
Insert the Cooking Grid into the tray/grid tower
.
Special Features:
• Fully adjustable Char
coal T
ray and Cooking Grid height.
• Access panel through the cooking grid to the charcoal.
No need to completely remove a hot cooking grid with
food to make minor coal adjustments.
• Fully adjustable four vent system designed for maximum
heat control.
F
IGURE 4
❍
❍
❍
❍
❍
ST
ACK VENT
C
ONTROL
ST
ACK VENT
SPACER
5B
5C
5D
5E
6A
6B
5A

GRILLING/SEARING
Step 1
Lightly coat all interior surfaces of the Grill including cooking grid with
vegetable oil or vegetable oil spray. Do not coat charcoal tray.
Step 2
Follow the instructions below carefully to build a fire. You may use
charcoal and/or wood as fuel in the Holland Charcoal Grill.
WARNING: Use only a high grade plain charcoal or charcoal/wood mix-
ture. If using a Charcoal Chimney Starter, follow all manufacturer’s warn-
ings and instructions regarding the use of their product. Start with 8 to 10
pounds of charcoal. This should be enough charcoal to cook with. When
charcoal is burning strong, carefully place hot coals in center of charcoal
grate.
WARNING: DO NOT use grill without charcoal tray in place. DO NOT
attempt to remove charcoal tray while tray contains hot coals.
NOTE: To extend the life of your grill, make sure that hot coals and
wood do not touch the walls of grill.
IF USING CHARCOAL CHIMNEY STARTER, PROCEED
TO STEP 5.
If you choose to use charcoal lighting fluid, ONLY use charcoal lighting
fluid approved for lighting charcoal. Do not use gasoline, kerosene,
alcohol or other flammable material for lighting charcoal. Follow all
manufacturer’s warnings and instructions regarding the use of their
product. Start with 8 to 10 pounds of charcoal. This should be enough
charcoal to cook with. Place the charcoal in center of charcoal tray.
Step 3
Saturate charcoal with lighting fluid. With lid open wait 2 to 3 minutes
to allow lighting fluid to soak into charcoal. Store charcoal lighting fluid
safely away from the grill.
Step 4
W
ith grill lid open, stand back and carefully light charcoal and allow to
burn until covered with a light ash (approximately 20 minutes).
WARNING: Charcoal lighting fluid must be allowed to completely burn
off prior to closing grill lid (approximately 20 minutes). Failure to do this
could trap fumes from charcoal lighting fluid in grill and may result in a
flash-fire or explosion when lid is opened.
Step 5
Place cooking grid on grid support rack at desired cooking level.
WARNING: Wear protective gloves or oven mitts when adjusting cooking
grid height.
Step 6
Place food on cooking grid and close grill lid.
Always use a meat ther
-
mometer to ensure food is fully cooked before removing from grill.
Step 7
Allow grill to cool completely. Store grill for next use.
FLAVORING WOOD
To obtain your favorite smoke flavor, experiment by using chunks,
sticks or chips of flavor producing wood such as hickory, pecan, apple,
cherry, or mesquite. Most fruit or nut tree wood may be used for
smoke flavoring. Do not use resinous wood such as pine as it will
produce an unpleasant taste.
Wood chunks or sticks 3" to 4" long and 1" to 2" thick work best.
Unless the wood is still green, soak the wood in water for 30 minutes
or wrap each piece in foil and tear several small holes in the foil to
produce more smoke and prevent the wood from burning too quickly.
A lot of wood is not required to obtain a good smoke flavor. A recom-
mended amount for the Holland Charcoal Grill is 5 to 6 wood chunks
or sticks. Experiment by using more wood for stronger smoke flavor or
less wood for milder smoke flavor.
Additional flavoring wood should not have to be added during the
cooking process. However, it
may be necessary when cooking
very large pieces of food.
ADDING CHARCOAL
DURING COOKING
Additional charcoal and/or wood
may be required to maintain or
increase cooking temperature.
NOTE: Dry wood burns hotter than charcoal, so you may want to
increase the ratio of wood to charcoal to increase the cooking temper-
ature. Hardwood such as oak, hickory, mesquite, fruit and nut wood
are an excellent fuel because of their burning rate. When using wood
as fuel, make sure the wood is seasoned and dry
. DO NOT
use
resinous wood such as pine as it will produce an unpleasant taste.
Step 1
Stand back and carefully open grill lid. Use caution since flames can
flare-up when fresh air suddenly comes in contact with fire.
WARNING: Wear protective gloves or oven mitts when opening cooking
grid hatch door or adjusting cooking grid height.
Step 2
Open cooking grid hatch to allow access to charcoal tray below.
Step 3
Stand back a safe distance and use long cooking tongs to lightly
brush aside ashes on hot coals. Use cooking tongs to add charcoal
and/or wood to charcoal tray, being careful not to stir-up ashes and
sparks. If necessary, use your Charcoal Chimney Starter to light
additional charcoal and/or wood and add to existing fire.
WARNING: Never add charcoal lighting fluid to hot or even warm coals
as flashback may occur causing severe burns.
Step 4
When charcoal is burning strong again, close the grill lid and allow
food to continue cooking.
P-7
PATRIOT CHARCOAL GRILL ASSEMBLY INSTRUCTIONS
WARNING: Wear protective gloves or
o
ven mitts to open cooking grid hatch door
when grill is hot.

HOLLAND CHARCOAL GRILL REPLACEMENT PARTS
Model BH421CG1
CG1-100 Grill Bottom
SG2-301 Smoke Stacks (2)
CG1-302
Stack Spacers (2)
CG1-303
Stack V
ent Control (2)
SG5-202 Handle Bracket, Angled, Black
SG2-202A Spring Handle
SS1-701SS Black Side Shelf (2)
AG4-703 Shelf Bracket, RF/LR
AG4-702 Shelf Bracket, LF/RR
SG4-500
Pedestal
MAV-530 Base
AG4-559 Pedestal Brace
AG4-51
1
Locking Caster
AG4-512
Non Locking Caster
CG1-300 SS Cooking Surface Rack
CG1-301 SS Charcoal Tray
CG1-MAN Owners Manual
CG1-001 Serial Number Plate
Logo Plate
Holland Logo
CG1-1014 Hardware Bag (Nuts and Bolts only)
REPLACEMENTS PARTS LIST
Part No. Description
Replacements can be found at most hardware stores.
1. Hex Head Bolt, 1/4-20x5/8”
2. Lockwasher, 1/4”
3. Hex Nut, 1/4-20
4. Screw
, Phillips #10-24x3/8”
5. Carriage Bolt, #10-24x1”
6. Lockwasher
, #10
7. Hex Nut, #10-24
8. Screw, Phillips, #8-32x3/8”
9. Lockwasher, #8
The following parts are factory installed but may be ordered individually:
CG1-304
SS Rack
Adjustment Bracket (2)
SG2-101
Hinges (2)
CG1-200 Grill Top
CG1-305
Front V
ent (2)
SS5-914C Lid Stop (2)
Fastners
If you have a question about the warranty or want to order parts or accessories, please contact your
local Holland Grill dealer or call 800-880-9766 or visit us on the web at hollandgrill.com
P-8

PATRIOT CHARCOAL GRILL ASSEMBLY INSTRUCTIONS
N
otes:
P-9

Notes:
PATRIOT CHARCOAL GRILL ASSEMBLY INSTRUCTIONS
P-10

The Holland Grill Company, Inc.
121 Thomas Mill Road Holly Springs, NC 27540
Call 1-800-880-9766 or visit www.hollandgrill.com for a dealer near you.

The Holland Grill N0-Hassle Limited Warranty
Your Holland grill, when subjected to normal residential use, is warranted to the original purchaser to be free
from factory defects in workmanship and materials.
• All parts of the Holland Patriot Charcoal Grill are warranted
against rust-through or burn-out to the original purchaser, for
one-year from the date of purchase.
This warranty will be valid when the purchaser returns a warranty card to The Company
within 30 days of purchase. All parts under this warranty will be replaced free of charge
during the first year. The obligation of The Company under this warranty is to repair or
replace, at its option, the defective part during the warranty period.
After the warranty period, you can easily identify and order any replacement parts you may
need at www.hollandgrill.com.
The following will not be covered under this warranty: related labor charges, damage resulting from negligent or improper use of the product, paint or
cosmetics, use of improper heat source, use not in accordance with operating instructions, or alteration of any part by anyone other than a Company
representative. Repair or replacement does not extend the warranty period.
Warranty procedure: Within 30 days of purchase, send in the warranty card.
For on-line warranty service: go to www.Hollandgrill.com.
For personal service: you may also contact the company at 919-557-2001. Please have your model number, serial number and date
of purchase available when requesting warranty service.
What the company will do: If The Company determines that a part is defective, Holland will, at its option, either repair or replace the
defective part. If for any reason during the warranty period, the part cannot be repaired after a reasonable number of attempts by Holland, or if a replace-
The Holland Grill Owner Information
Name: _____________________________________________________________________________________________________________________________________
Address: ____________________________________________________________________________________________________________________________________
City, State, Zip: _____________________________________________________________________________________________________________________________
Phone: ________________________________________________________________________________ Date Purchased: _________________________________
Dealer/Store Name: ________________________________________________________________________________________________________________________
Comments: _________________________________________________________________________________________________________________________________
Model No.: _____________________________________________________________________________________________________________________
Serial No.: _______________________________________________________________________________________________________________________
(stamped on metal plate below lid handle)
Please submit within 30 days of purchase to register your warranty
✃
T
T
h
h
e
e
H
H
o
o
l
l
l
l
a
a
n
n
d
d
C
C
o
o
m
m
p
p
a
a
n
n
y
y
d
d
o
o
e
e
s
s
n
n
o
o
t
t
s
s
e
e
l
l
l
l
y
y
o
o
u
u
r
r
p
p
e
e
r
r
s
s
o
o
n
n
a
a
l
l
i
i
n
n
f
f
o
o
r
r
m
m
a
a
t
t
i
i
o
o
n
n
o
o
r
r
p
p
h
h
o
o
n
n
e
e
n
n
u
u
m
m
b
b
e
e
r
r
t
t
o
o
m
m
a
a
i
i
l
l
i
i
n
n
g
g
l
l
i
i
s
s
t
t
s
s
.
.
continued on back
IMPOR
T
ANT
: list your model number and serial number below
.

The Holland Co.
121
Thomas Mill Road
Holly Springs, NC 27540
The Holland Co.
121
Thomas Mill Road Holly Springs, NC 27540
Place
Stamp
Her
e
ment part is not available, Holland may ask you to return the grill, freight pre-paid, and will, at our option, send
you a comparable grill or refund the purchase price of your Holland grill, reduced pro-rata, based on the number of
m
onths of service. All shipments will be to the original purchaser.
This warranty will be void, and Holland will assume no liability for any damage or injury that results from (1) tampering with or alteration of the
grill, (2) abuse, misuse, neglect, or accident, (3) any commercial or other unintended use of the grill, or (4) failure to follow manufacturer’s
instructions concerning care and maintenance (please consult your use & care manual), or failure to follow local codes.
Product repair or parts replacement at the option of the Holland Grill Co. is the exclusive remedy under this warranty. The Company shall not be liable for
any incidental or consequential damages resulting from the use or transportation of any Holland grill, or for breach of any express or implied warranty on
the Holland grill. Except to the extent prohibited by applicable law, any implied warranty of merchantability or fitness for a particular purpose of this
product is limited to the duration of the above warranty. Some states do not allow the exclusion or limitation of incidental or consequential damages, or
allow limitations on how long an implied warranty lasts, so the above limitations or exclusions may not apply to certain purchases. This warranty gives
the purchaser specific legal rights, and there may be other rights which vary from state to state.
Pool chemicals, cleaners and atmospheric conditions disclaimer.
Materials – pool chemicals – corrosion:
Be aware that various chemical exposure and/or atmospheric conditions may cause corrosion or
discoloration on surfaces or components of this product. Pool stores in particular, with high concentrations of chemicals, may cause visible damage to
this product. The Holland Company, Inc. does not warranty against surface or component degradation or discoloration by exposure to atmospheric
conditions, pool or other chemicals, or cleaning solutions. Damage due to the display, storage or use of this product from exposure to known or
unknown chemicals or atmospheric conditions are not covered by warranty.
continued
The Holland Grill N0-Hassle Limited Warranty
/