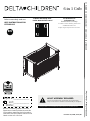
Delta Children Brookside 4-in-1 Convertible Crib Assembly Instructions
- Category
- Baby furniture
- Type
- Assembly Instructions
This manual is also suitable for

To Make Assembly Even
Easier Watch Video Here!
ADULT ASSEMBLY REQUIRED
Due to the presence of small parts during assembly,
keep out of reach of children until assembly is complete.
EN
December 29, 2020, 41467, R0
This product is not intended for institutional or commercial use.
Read all instructions
before assembly and use.
KEEP INSTRUCTIONS FOR
FUTURE USE.
Style #:
Lot:
Date:
___________
___________
___________
B
REV
Before contacting Delta Consumer
Experience Center please ensure this
information matches the information
matches the information found on the
label on the Left Crib End.
For Questions or
to Contact Us:
DeltaChildren.com/Help
If unable to access website, please email
Expect longer response times via email.
©2020 Delta Children’s Products Corp.
ASSEMBLY INSTRUCTIONS • INSTRUCCIONES DE MONTAJE
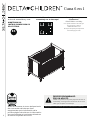
6 in 1 Crib

Debido a la presencia de piezas pequeñas durante el
ensamblaje, mantenga fuera del alcance de los niños
hasta que complete el ensamblaje.
DEBE SER ENSAMBLADO
POR UN ADULTO
ES
Este producto no esta hecho para uso institucional o comercial.
Para facilitar más aun el
ensamblaje ver el video aquí
Antes de contactar el Centro de Experiencia
del Consumidor de Delta por favor
asegúrese de que la información de la
primera página coincida con la información
que se encuentra en la etiqueta ubicada en
el extremo izquierdo de la cuna.
Lea todas las instrucciones
antes de ensamblar y usar.
MANTENGA LAS
INSTRUCCIONES PARA SU
USO FUTURO.
Para preguntar o para
contactarnos :
DeltaChildren.com/Help
Si no puede acceder el sitio web, por
favor envíenos un email a
El tiempo de espera para respuestas
será más largo por email.
2
Cuna 6 en 1

3
ASSEMBLY INSTRUCTIONS • INSTRUCCIONES DE MONTAJE

4
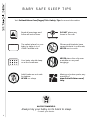
BABY SAFE SLEEP TIPS
AAP RECOMMENDS:
Always lay your baby on its back to sleep.
Consult your doctor.
Visit Deltachildren.Com/Pages/Crib-Safety-Tips for more information
DO NOT place any
items in the crib.
Your baby should sleep
on a firm mattress.
Pillows and blankets have
caused infants to suffocate,
NEVER use in a crib.
Adult beds are not safe
for babies:
NEVER co-sleep.
NEVER place the crib near
a window or any wall
hangings.
The safest place for your
baby to sleep is in a
JPMA Certified crib.
Missing or broken parts, any
questions?
www.DeltaChildren.com/
Help
Read all warnings and
follow all instructions.

5
ASSEMBLY INSTRUCTIONS • INSTRUCTIONS DE MONTAGE • INSTRUCCIONES DE MONTAJE
Missing or broken parts, any
questions?
www.DeltaChildren.com/
Help
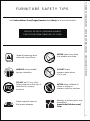
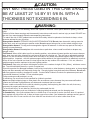
DO NOT set TV’s or other
heavy objects on the top of
bedroom or nursery
furniture.
ALWAYS use provided
tipover restraints.
NEVER allow children to
climb or hang on
drawers, doors,or shelves.
Place heaviest items in
the lowest drawers.
NEVER open more than
one drawer at a time.
DO NOT leave
drawers open when
not in use.
Read all warnings and
follow all instructions.
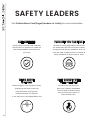
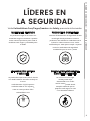
FURNITURE SAFETY TIPS
Visit Deltachildren.Com/Pages/Leaders-In-Safety for more information
SERIOUS OR FATAL CRUSHING INJURIES
CAN OCCUR FROM FURNITURE TIP-OVER.

6
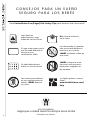
CONSEJOS PARA UN SUEÑO
SEGURO PARA LOS BEBÉS
APP RECOMIENDA:
Haga que su bebé duerma siempre boca arriba.
Consulte a su médico.
Visite Deltachildren.Com/Pages/Crib-Safety-Tips para obtener más información
NO coloque artículos
en la cuna.
Su bebé debe dormir
sobre un colchón firme.
Las almohadas y frazadas
han provocado asfixia en
menores; por lo tanto,
JAMÁS se deben utilizar en
una cuna.
Las camas para adultos
no son seguras para los
bebés: JAMÁS duerma
con ellos.
JAMÁS coloque la cuna
cerca de una ventana o
elementos colgados en
las paredes.
El lugar más seguro para
que su bebé duerma es
una cuna con
certificación JPMA.
¿Le faltan piezas o vienen
rotas?
www.DeltaChildren.com/
Help
Lea todas las
advertencias y siga
todas las instrucciones.

7
ASSEMBLY INSTRUCTIONS • INSTRUCTIONS DE MONTAGE • INSTRUCCIONES DE MONTAJE
Visite Deltachildren.Com/Pages/Leaders-In-Safety para obtener más información
¿Le faltan piezas o vienen
rotas?
www.DeltaChildren.com/
Help
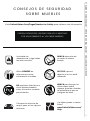
PUEDEN PRODUCIRSE LESIONES GRAVES O MORTALES
POR APLASTAMIENTO AL VOLCARSE MUEBLES.
NO posicione televisores u
otros objetos pesados
sobre la cama o muebles
para infantes.
Utilice SIEMPRE las
retenciones contra
volcamiento incluidas
NUNCA permita que los
niños trepen sobre
cajones, puertas o baldas
de estantería ni que se
cuelguen de ellos.
Coloque los artículos de
mayor peso en los cajones
inferiores.
NUNCA abra más de
un cajón al mismo
tiempo.
NO DEJE cajones
abiertos si no los está
utilizando.
Lea todas las
advertencias y siga todas
las instrucciones.
CONSEJOS DE SEGURIDAD
SOBRE MUEBLES

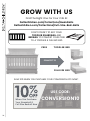
Your Next Purchase From
DeltaChildren.com
Welcome to the
Here's a Gift From Us To You
DELTA FAMILY
*Subject to Change
*Exclusions Apply
DELTA10
USE CODE:
Visit Deltachildren.com To Start Shopping
REVIEW TO WIN $2500
R ULES TO ENTER
My husband was impressed with the directions and organization of the hardware package.
He easily assembled this crib in an hour without any help. It's very sturdy and we like that it
has adjustable levels for the mattress height. To top it all off, it's so incredibly darling!!!
“We LOVE, LOVE, LOVE this crib”
WRITE A REVIEW for this product on the store’s website from where it was purchased
1
TAKE A SCREENSHOT of your review and upload it to www.DeltaChildren.com/Review
2
IT’S THAT EASY! Upon submission, you’ll be instantly ENTERED TO WIN $2,500
3
DELTA CHILDREN
SAVE BIG WITH
@deltachildren
FOLLOW US FOR MORE CHANCES TO WIN
SCAN HERE
For more
information &
to see all of
our products
8

DELTA CHILDREN
AHORRE MUCHO CON
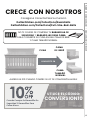
Visita Deltachildren.com Para Comenzar A Comprar
*Subject to Change
*Exclusions Apply
Aquí Está Nuestro Regalo
Para Usted
FAMILIA DELTA
Bienvenido a la
Su Próxima Compra En
DeltaChildren.com
DELTA10
UTILICE EL CÓDIGO:
CALIFIQUE EL PRODUCTO en la página web de la tienda donde haya sido comprado
1
HAGA UNA CAPTURA DE PANTALLA de su calificación y cárguela a la pagina www.DeltaChildren.com/Review
2
ES ASÍ DE FÁCIL! En cuanto lo envíe ya estará instantáneamente PARTICIPANDO PARA GANAR $2.500
3
REGLAS PARA PARTICIPAR
CALIFIQUE EL PRODUCTO PARA GANAR $2500
@deltachildren
SÍGANOS PARA TENER MAS CHANCES DE GANAR
ESCANEE AQUÍ
Para más
información
y para ver todos
nuestros productos
9
ASSEMBLY INSTRUCTIONS • INSTRUCCIONES DE MONTAJE

10
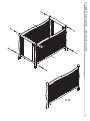
PARTS: MAKE SURE THAT ALL PRE-ASSEMBLED PARTS ARE TIGHT
PIEZAS: ASEGÚRESE DE QUE TODAS LAS PIEZAS PRE-ENSAMBLADAS ESTÁN BIEN APRETADAS.
Left Post x 2
Poste Izquierdo x 2
41454
C
Right Post x 2
Poste Derecho x 2
41455
D
Crib End x 2
Extremo de la Cuna x 2
41451
A
Mattress Support x 1
Soporte para el Colchón x 1
24242
F
Pouch attached to mattress support- keep
instructions in this pouch after assembly.
Warnings related to the safe use ofthis crib
are printed on the pouch.
Funda adjunta al colchón Soporte: guarde las
instrucciones en esta funda después de
armar. Las advertencies Relacionadas con el
uso seguro de esta cuna están impresas en
la funda.
Back Rail x 1
Barandilla posterior x 1
41453
E
Front Rail x 1
Barandilla frontal x 1
41452
P

11
ASSEMBLY INSTRUCTIONS • INSTRUCCIONES DE MONTAJE
PARTS: HARDWARE KITS PART#24390
PIEZAS: EL KIT DE HERRAMIENTAS - PIEZA #24390
M4 Allen Wrench (Supplied)
Llave Allen M4 (se Incluye)
1177
No drills necessary.
Do not use power screwdriver.
No hace falta taladrar.
No utilice destornilladores eléctricos
Flat Head Screwdriver (not supplied)
Destornillador plano (no suministrado)
M6 x 80 mm Bolt x 4
Perno M6 x 80 mm x 4
5473
G
M6 x 35 mm Bolt x 4
Perno M6 x 35 mm x 4
5464
K
M6 x 50 mm Bolt x 4
Perno M6 x 50 mm x 4
5467
J
M6 x 60 mm Bolt x 4
Perno M6 x 60 mm x 4
5469
H
M6 x 18 mm Bolt x 8
Perno M6 x 18 mm x 8
5763
L
M6x17mm Barrel Nut x 8
Tuerca Cilíndrica M6x17mm x 8
5479
N
Φ4x30 mm Metal Pin x 4
Clavija metálica Φ4x30 mm x 4
5493
M

Crib End x 2
Extremo de la Cuna x 2
A
M6 x 35 mm Bolt x 4
Perno M6 x 35 mm x 4
K
M6 x 60 mm Bolt x 4
Perno M6 x 60 mm x 4
H
Φ4x30 mm Metal Pin x 4
Clavija metálica Φ4x30 mm x 4
M
M6x17mm Barrel Nut x 4
Tuerca Cilíndrica M6x17mm x 4
N
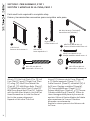
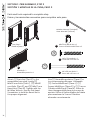
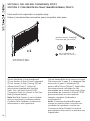
SECTION 1: CRIB ASSEMBLY, STEP 1
SECCIÓN 1: MONTAJE DE LA CUNA, PASO 1
M4 Allen Wrench (included)
Llave Allen M4 (incluido)
12
Parts and tools required to complete step
Piezas y herramientas necesarias para completar este paso
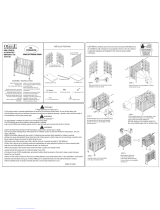
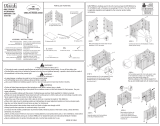
Attach (1) Crib End (Part A) to (1) Left
Post (Part C) and (1) Right Post (Part
D) using (2) Φ4x30 mm Metal Pins
(Part M), (2) M6x35mm Bolts (Part K),
(2) M6x60mm Bolts (Part H) and (2)
M6x17mm Barrel Nuts (Part N). Tighten
with the M4 Allen Wrench. Use the Flat
Head Screwdriver to hold the Barrel
Nut in the proper alignment.
Repeat on the other Crib End.
Una el (1) Extremo de la Cuna (Pieza A)
a (1) Poste Izquierdo (Pieza C) y (1)
Poste Derecho (Pieza D) utilizando (4) Φ
4x30 mm Clavijas metálica (Pieza M),
(2) Pernos M6x35mm (Pieza K), (2)
Pernos M6x60mm (Pieza H) y (2) Tuerca
Cilíndrica M6x17mm (Pieza N). Utilice la
Llave Hexagonal M4 para el proceso de
apriete. Utilice el Destornillador de Paleta
para mantener la Tuerca Cilíndrica
alineado correctamente.
Repita lo mismo para el otro Extremo de
la Cuna.
Left Post x 2
Poste Izquierdo x 2
C
Right Post x 2
Poste Derecho x 2
D

13
ASSEMBLY INSTRUCTIONS • INSTRUCCIONES DE MONTAJE
A
C
H
D
N
H
N
M
M
K
K
x 2

M6 x 80 mm Bolt x 2
Perno M6 x 80 mm x 2
G
M6x17mm Barrel Nut x 2
Tuerca Cilíndrica M6x17mm x 2
N
From Step 1
Desde el paso 1
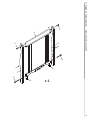
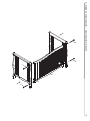
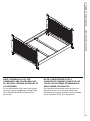
SECTION 1: CRIB ASSEMBLY, STEP 2
SECCIÓN 1: MONTAJE DE LA CUNA, PASO 2
M4 Allen Wrench (included)
Llave Allen M4 (incluido)
14
Parts and tools required to complete step
Piezas y herramientas necesarias para completar este paso
Attach (1) Back Rail (Part E) to the
assemblies from step 1 using (2)
M6x50 mm Bolts (Part J), (2) M6x80
mm Bolts (Part G) and (2) M6x17 mm
Barrel Nuts (Part N). Tighten with the
M4 Allen Wrench. Use the Flat Head
Screwdriver to hold the Barrel Nut in
the proper alignment.
Una (1) Barandilla posterior (Pieza E) a
los componentes del paso 1 utilizando
(2) Pernos M6x50mm (Pieza J), (2)
Pernos M6x80mm (Pieza G) y (2) Tuerca
Cilíndrica M6x17mm (Pieza N). Utilice la
Llave Hexagonal M4 para el proceso de
apriete. Utilice el Destornillador de Paleta
para mantener la Tuerca Cilíndrica
alineado correctamente.
M6 x 50 mm Bolt x 2
Perno M6 x 50 mm x 2
J
Back Rail x 1
Barandilla posterior x 1
E

15
ASSEMBLY INSTRUCTIONS • INSTRUCCIONES DE MONTAJE
G
J
N
E
J
G
N

M4 Allen Wrench (Supplied)
Llave Allen M4 (se Incluye)
From Step 2
Desde el paso 2
16
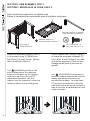
SECTION 1: CRIB ASSEMBLY, STEP 3
SECCIÓN 1: MONTAJE DE LA CUNA, PASO 3
Parts and tools required to complete step
Piezas y herramientas necesarias para completar este paso
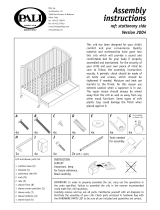
Attach the Mattress Support (Part F)
in all corners using (1) M6x18 mm
Bolt (Part L) in each corner. Tighten
with the M4 Allen Wrench.
The WARNINGS printed on the
pouch attached to the mattress
support must face up, the springs
must face up. This crib has (3)
adjustment positions, use the
highest only for newborns, move the
mattress down as the child grows.
Una el Soporte del Colchón (Pieza F)
en todas las esquinas utilizando (1)
Perno M6 x 18 mm (Pieza L) en cada
una de las esquinas. Utilice la Llave
Hexagonal M4 para el proceso de
apriete.
Las ADVERTENCIAS impresas en
la bolsa unida al soporte del colchón
deben quedar boca arriba y los
resortes boca abajo. La cuna tiene
(3) posiciones de ajuste, utilice las
más altas solo para recién nacidos y
baje el colchón a medida que el niño
vaya creciendo.
Mattress Support x 1
Soporte para el Colchón x 1
F
M6 x 18 mm Bolt x 4
Perno M6 x 18 mm x 4
L

F
L
1
2
3
17
ASSEMBLY INSTRUCTIONS • INSTRUCCIONES DE MONTAJE
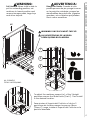
Fall Hazard: When child is able to
pull to a standing position, set
mattress to lowest position and
remove bumper pads, large toys
and other objects.
WARNINGS ON POUCH MUST FACE UP.
LAS ADVERTENCIAS DE LA BOLSA
DEBEN QUEDAR BOCA ARRIBA.
ALL CORNERS
TODAS LAS ESQUINAS
To adjust the mattress support to 1 of the 3 height
positions remove the 18mm bolts (Part L). Then install
in the desired location.
Para ajustar el Soporte del Colchón a 1 de los 3
posiciones de la altura saque los pernos 18mm
(Pieza L). Luego, instale el Soporte del Colchón en la
posición deseada.
WARNING: ADVERTENCIA:
Riesgo de Caída: Cuando el niño
pueda ponerse de pie, ponga la cuna
en la posición más baja y saque las
almohadillas de protección, juguetes
grandes y otros objetos que puedan
servir como escalones.
UP

From Step 3
Desde el paso 3
SECTION 1: CRIB ASSEMBLY, STEP 4
SECCIÓN 1: MONTAJE DE LA CUNA, PASO 4
M4 Allen Wrench (included)
Llave Allen M4 (incluido)
18
Parts and tools required to complete step
Piezas y herramientas necesarias para completar este paso
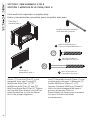
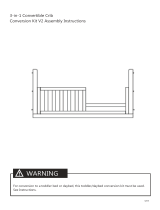
Attach (1) Front Rail (Part P) to the
assembly from step 3 using (2)
M6x50mm Bolts (Part J), (2)
M6x80mm Bolts (Part G) and (2)
M6x17mm Barrel Nuts (Part N). Tighten
with the M4 Allen Wrench. Use the Flat
Head Screwdriver to hold the Barrel
Nut in the proper alignment.
Una (1) Barandilla frontal (Pieza P) a los
componentes del paso 3 utilizando (2)
Pernos M6x50mm (Pieza J) y (2)
Tuercas Cilíndrica M6x17mm (Pieza N).
Utilice la Llave Hexagonal M4 para el
proceso de apriete. Utilice el
Destornillador de Paleta para mantener
la Tuerca Cilíndrica alineado
correctamente.
M6 x 80 mm Bolt x 2
Perno M6 x 80 mm x 2
G
M6x17mm Barrel Nut x 2
Tuerca Cilíndrica M6x17mm x 2
N
M6 x 50 mm Bolt x 2
Perno M6 x 50 mm x 2
J
Front Rail x 1
Barandilla frontal x 1
P

19
ASSEMBLY INSTRUCTIONS • INSTRUCCIONES DE MONTAJE
G
P
J
G
J
N
N
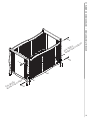
PULL GENTLY
SAQUE CON CUIDADO
PULL GENTLY
SAQUE CON CUIDADO

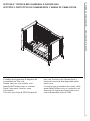
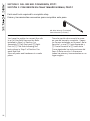
SECTION 1: STORING INSTRUCTION BOOKLET
SECCIÓN 1: CONSERVER LE GUIDE DE MONTAGE
Assembly Instruction Booklet
Folleto de instrucciones de Montaje
20
Parts and tools required to complete step
Piezas y herramientas necesarias para completar este paso
Store the assembly instruction booklet
in the pouch attached to the mattress
support. Store all parts and tools
separately, in a safe place.
Guarde las instrucciones en la
bolsa que está en el soporte del
colchón. Guarde todas las piezas
y herramientas por separado, en
un lugar seguro.
See page 22 for information
Vea la página 23 para obtener información
WARNING:
ADVERTENCIA:
AI BAG
To Make Assembly Even
Easier Watch Video Here!
ADULT ASSEMBLY REQUIRED
Due to the presence of small parts during assembly,
keep out of reach of children until assembly is complete.
EN
December 29, 2020, 24391, R5
This product is not intended for institutional or commercial use.
Read all instructions
before assembly and use.
KEEP INSTRUCTIONS FOR
FUTURE USE.
Style #:
Lot:
Date:
___________
___________
___________
A
REV
Before contacting Delta Consumer
Experience Center please ensure this
information matches the information
matches the information found on the
label on the Left Crib End.
For Questions or
to Contact Us:
DeltaChildren.com/Help
If unable to access website, please email
Expect longer response times via email.
©2020 Delta Children’s Products Corp.
ASSEMBLY INSTRUCTIONS • INSTRUCCIONES DE MONTAJE
6 in 1 Crib
Page is loading ...
Page is loading ...
Page is loading ...
Page is loading ...
Page is loading ...
Page is loading ...
Page is loading ...
Page is loading ...
Page is loading ...
Page is loading ...
Page is loading ...
Page is loading ...
Page is loading ...
Page is loading ...
-
 1
1
-
 2
2
-
 3
3
-
 4
4
-
 5
5
-
 6
6
-
 7
7
-
 8
8
-
 9
9
-
 10
10
-
 11
11
-
 12
12
-
 13
13
-
 14
14
-
 15
15
-
 16
16
-
 17
17
-
 18
18
-
 19
19
-
 20
20
-
 21
21
-
 22
22
-
 23
23
-
 24
24
-
 25
25
-
 26
26
-
 27
27
-
 28
28
-
 29
29
-
 30
30
-
 31
31
-
 32
32
-
 33
33
-
 34
34


Delta Children Brookside 4-in-1 Convertible Crib Assembly Instructions
- Category
- Baby furniture
- Type
- Assembly Instructions
- This manual is also suitable for
Ask a question and I''ll find the answer in the document
Finding information in a document is now easier with AI
in other languages
Related papers
-
 Delta Children Brookside 4-in-1 Crib Assembly Instructions
-
 Delta Children Mercer 6-in-1 Convertible Crib Assembly Instructions
-
 Delta Children Skylar 4-in-1 Convertible Crib Assembly Instructions
-
 Delta Children Farmhouse 6-in-1 Convertible Baby Crib Assembly Instructions
-
 Delta Children Emery Deluxe 6-in-1 Convertible Crib Assembly Instructions
-
 Delta Children GN10006-130 User guide
-
Delta Children Winnie The Pooh 4-in-1 Convertible Crib Assembly Instructions
-
 Delta Children Archer Deluxe 6-in-1 Convertible Crib Assembly Instructions
-
 Delta Children Bentley S Series Deluxe 6-in-1 Convertible Crib Assembly Instructions
-
 Delta Children Bentley S Series Deluxe 6-in-1 Convertible Crib Assembly Instructions


Other documents
-
evolur 0322R2-927 Stilnovo Mid Century Convertible Crib Owner's manual
-
Crib Monterey Assembly Instructions
-
 ORBELLE Tina Assembly Instructions
-
 ORBELLE Tian Assembly Instructions
-
 Pali Crib Assembly Instructions Manual
-
 Signature Sleep 3215198 Owner's manual
-
 Kolcraft AQ603 User manual
-
Handy Living DB7-CNF17 Installation guide
-
Chipolino Co-sleeping crib Operating instructions
-
Graco 8824 User manual


