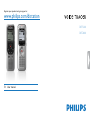
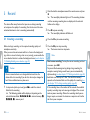
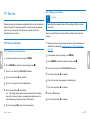
Philips Voice Tracer 2000 User manual
- Category
- Dictaphones
- Type
- User manual
This manual is also suitable for


3
Table of contents
Table of contents
1 Important safety information 5
1.1 Safety instructions 5
2 About this user manual 7
2.2 Symbols used 7
3 Digital Voice Tracer 8
3.1 Product highlights 8
3.2 What's in the box 9
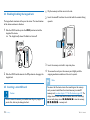
3.3 Product overviews 10
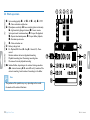
3.3.1 Front and rear sides (DVT1200) 10
3.3.2 Front and rear sides (DVT2000) 11
3.3.3 Keys (DVT1200) 12
3.3.4 Keys (DVT2000) 13
3.4 Start-up screen 14
3.4.1 Menu overview 15
4 First steps 16
4.1 Inserting the batteries 16
4.2 Power on/o 17
4.3 Initial installation process 17
4.3.1 Language selection 17
4.3.2 Set date & time 17
4.4 Enabling/disabling the keypad lock 18
4.5 Inserting a microSD card 18
4.6 Accessories 19
4.6.1 How to connect headphones 19
4.6.2 Connecting an external microphone 20
4.7 Connecting to a computer 20
4.7.1 Transferring files from or to the device 21
4.7.2 Disconnecting from a computer 21
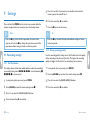
5 Record 22
5.1 Creating a recording 22
5.1.1 Recording using an external microphone 23
5.2 Starting recording automatically 23
5.2.1 Use Timer function 23
5.2.2 Use voice activation 23
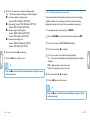
6 Playback 24
6.1 Selecting a recording 24
6.2 Playback a recording or music file 24
6.3 Adjusting playback speed 24
6.4 Quick search 25
6.5 Repeat a file / repeat a sequence 25
6.6 Protecting a recording / lock file 26
6.7 Unprotect / unlock file 26
7 Delete 27
7.1 Deleting recordings on the device 27
7.2 Deleting all recordings in the folder 27
8 Radio (DVT2000) 28
8.1 Radio mode 28
8.2 Saving a radio station pre-set 28
8.2.1 Saving radio stations automatically 28

4
Table of contents
8.2.2 Saving a radio station manually 28
8.2.3 Deleting a pre-set radio station 29
8.3 Recording from FM radio 29
9 Settings 30
9.1 Recording settings 30
9.1.1 Set file location 30
9.1.2 Setting recording quality 30
9.1.3 Setting microphone sensitivity 31
9.1.4 Enabling/disabling noise reduction 32
9.1.5 Setting the timer 32
9.1.6 Enabling/disabling voice-activated recording 33
9.1.7 Setting auto divide 34
9.1.8 Enabling/disabling the record indicator 34
9.2 Display settings 35
9.2.1 Select language 35
9.2.2 Adjusting the display contrast 35
9.2.3 Enabling/disabling the background light 36
9.3 Device settings 36
9.3.1 Set date & time 36
9.3.2 AUTO-OFF 37
9.3.3 Enabling/disabling key and signal tones 38
10 Service 39
10.1 Service functions 39
10.1.1 Display device information 39
10.1.2 Memory formatting 39
10.1.3 Device reset 40
10.2 Replacing batteries or rechargeable batteries 40
10.3 Updating the firmware 41
10.4 Troubleshooting 42
11 Appendix 43
11.1 Technical data 43

5
Table of contents
1 Important safety information
Do not make any adjustments and modifications that are not described
in this manual. Follow all safety instructions to ensure proper
operation of the device. The manufacturer assumes no liability for
damages resulting from non-compliance with the safety instructions.
1.1 Safety instructions
• Protect the device from rain or water to prevent a short circuit.
• Do not expose the device to excessive heat caused by placing it on a
heating device or in direct sunlight.
• Protect the cables from damage by being trapped, particularly at the
plugs and where cables exit the housing.
• Back up your data and recordings. The manufacturer cannot be held
responsible for any loss of data.
• Do not perform any maintenance operations that are not
described in this user manual. Do not disassemble the device into
its component parts to carry out repairs. The device may only be
repaired in authorised service centres.
1.1.1 Batteries and rechargeable batteries
• Only use AAA batteries with the device.
• Never try to recharge alkaline or non-rechargeable batteries.
• Remove batteries or rechargeable batteries from the device if it
will not be used for an extended period of time. The device can be
damaged by leaking batteries or rechargeable batteries.
• Do not remove batteries or rechargeable batteries from the device
while it is recording. If you do this, data may be damaged or lost.
Device malfunctions may also occur.
• Batteries and rechargeable batteries contain substances that may
pollute the environment. Used batteries and rechargeable batteries
should be disposed of at an ocial collection point.
1.1.2 Memory cards
• The device supports microSD memory cards up to 32 GB in capacity
(optimised for class 6 or higher).
• Make sure that the card has a suciently high data transfer rate. The
manufacturer makes no guarantee for trouble free operation.
• Formatting a memory card erases all data on the card. The memory
card must always be formatted in the device to ensure that the
format is correct. Formatting the memory card using a computer
can lead to eventual errors when reading or writing data.

6
Table of contents
1.1.3 Hearing protection
Observe the following guidelines when using headphones:
• Set the volume to a moderate level and do not use headphones to
listen for excessively long periods of time.
• Be particularly careful to avoid adjusting the volume to a level that
your hearing cannot deal with.
• Do not turn the volume up so high that you cannot hear what is
going on around you.
• In potentially dangerous situations you must be very careful, or
temporarily discontinue use.
• Do not use headphones while operating a motorised vehicle, cycling,
or skateboarding, etc. You could be a hazard to yourself and other
road users, and possibly be breaking the law.
1.1.4 Maximum sound power
• The manufacturer guarantees compliance with the maximum sound
power of its audio players as determined by relevant regulatory
bodies, but only with the original model of headphones supplied. If
you need to replace these headphones, we recommend contacting
your dealer to order the respective original Philips model.
1.1.5 Legal restrictions on recording
• The use of the device's recording function is subject to the legal
restrictions that may apply in your country. You should also respect
the privacy and personal rights of the third parties if you record
talks or lectures.
• Please note that, in certain countries, you may be legally required
to inform the person you are conversing with on the telephone
that you are recording the conversation, or that the recording of
telephone conversations is illegal. Please check if the use of such
data is legal in your country prior to recording telephone calls.

7About this user manual
Table of contents
2 About this user manual
You can find a quick overview of your device in the following pages.
For detailed description, see the following chapters of this user
manual. Read this user manual carefully.
2.1 Model-specific features and diagrams
This user manual describes a number of models of the device product
range. Please note that some features are only available on certain
models.
2.2 Symbols used
Tip
• This symbol identifies information that helps you to use your
device more eciently and simply.
Note
• This symbol indicates notices which you must observe when
handling or operating the device.
Caution
• This symbol warns of damage to the device and possible data loss.
Damage can be caused by improper handling.
Warning
• This symbol warns of danger to persons. Bodily injury or damage
could be caused by improper handling.

8
Digital Voice Tracer
Table of contents
3 Digital Voice Tracer
We are delighted that you have chosen a Philips device. Visit our
website for comprehensive support such as user manuals, software
downloads, warranty information and much more:
www.philips.com/dictation.
3.1 Product highlights
• Voice-activated recording mode without pressing buttons
• Slot for microSD card for extra memory
• Highlight important parts of your recording using index marks
• Noise reduction for clear recordings

9
Digital Voice Tracer
Table of contents
Register your product and get support at
www.philips.com/dictation
DVT1200
DVT2000
Quick start guide
Need help?
User manual
See the user manual stored on the recorder.
Online
Go to www.philips.com/dictation.
Regis
ter your product and get support at
www.philips.com/dictation
User manual
MENU
j e
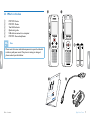
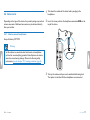
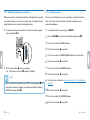
3.2 What's in the box
a DVT1200: Device
b DVT2000: Device
c Two AAA batteries
d Quick-start guide
e USB cable to connect to a computer
f DVT2000: Stereo headphones
Note
• Please note that some individual components may not be included
in delivery with your model. If any item is missing or damaged,
please contact your distributor.

10
Digital Voice Tracer
Table of contents
3.3 Product overviews
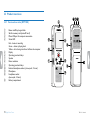
3.3.1 Front and rear sides (DVT1200)
a Power on/o key, keypad lock
b Slot for memory card (microSD card)
c Micro USB port for computer connection
d Status LED:
Red–device is recording
Green–device is playing back
Yellow–data is being transferred to/from the computer
e Display
f Operating panel with keys
g Speaker
h Noise reduction
i Operating panel with keys
j External microphone socket, (stereo jack, 3.5 mm)
k Microphone
l Headphone socket
(stereo jack, 3.5 mm)
m Battery compartment

11
Digital Voice Tracer
Table of contents
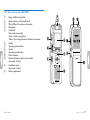
3.3.2 Front and rear sides (DVT2000)
a Power on/o key, keypad lock
b Slot for memory card (microSD card)
c Micro USB port for computer connection
d Microphone
e Status LED:
Red–device is recording
Green–device is playing back
Yellow–data is being transferred to/from the computer
f Display
g Operating panel with keys
h Speaker
i Operating panel with keys
j Noise reduction
k External microphone socket, line-in socket
(stereo jack, 3.5 mm)
l Headphone socket
(stereo jack, 3.5 mm)
m Battery compartment
MENU
j e

12
Digital Voice Tracer
Table of contents
3.3.3 Keys (DVT1200)
a a Stop mode: Change folder
b h Short press: jump to the previous recording
Long press: fast seek rewind mode
Menu navigation: display previous menu tab
c j Stop playback (stop key), close menu
d g Start recording (record key), confirm selection
e e Play recording (playback key), Pause playback (pause key)
f b Short press: jump to the next recording
Long press: fast seek forward mode
Menu navigation: call next menu tab
g z Delete recording (delete key)
h Short press: set index mark, long press: display list of index
registers (INDEX key)
i Call up menu functions (MENU key)
j + Increase volume, menu navigation: Select menu functions
– Volume down, menu navigation: Select menu functions
k Switch on noise reduction (N.R key)
N.R
VOL +-
MENU
INDEX

13
Digital Voice Tracer
Table of contents
3.3.4 Keys (DVT2000)
a Call up menu functions (MENU key)
b + Increase volume, menu navigation: Select menu functions
b Short press: jump to the next index mark
Menu navigation: display next menu tab
Long press: fast seek forward mode
– Volume down, menu navigation: Select menu functions
h Short press: jump to the previous recording
Menu navigation: display previous menu tab
Long press: fast seek rewind mode
c j Stop playback (stop key), close menu
d e Play recording (playback key), Pause playback (pause key)
e g Start recording (record key), confirm selection
f z Delete recording (delete key)
g Switch on noise reduction (N.R key)
h Short press: Set index mark, display list of index marks
(INDEX key)
i a Stop mode: Change folder
MENU
j e
INDEX
N.R
a

14
Digital Voice Tracer
Table of contents
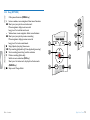
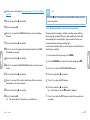
3.4 Start-up screen
a ‹ Set recording quality: Œ–LP, Ž–SP, ‹–HQ, €–PCM
b Š – Voice activation switched on
c º Microphone sensitivity: ¹ – low sensitivity (shorter distance),
º – high sensitivity (longer distance), Ç – Line-in source
d Set repeat mode / continuous loop: –Repeat file playback,
ÖRepeat selection/sequence, Á–Repeat folder playback,
Ä–Random repeat mode
e [ – Noise reduction on
f ¾ Battery charge level
g j S–Playback, {–Pause, j–Stop, g–Record, |–Pause
record
h Position indicator of current playback/recording
i Playback/recording time / Remaining recording time
j File name of current playback/recording
k u Selected folder, depending on the selected sttorage medium
(u–internal memory, i–microSD card)/ number of the
current recording / total number of recordings in the folder
Note
• The position of the symbols may vary, depending on the model,
the mode and the selected functions.

15
Digital Voice Tracer
Table of contents
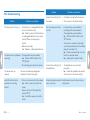
3.4.1 Menu overview
Note
• In stop mode (start-up screen), press
MENU, to call the menu.
• Press h / b to select one of the
following menus: Ò, Ó, Ô, Õ or Ö.
Ò File menu:
Repeat a file / repeat a sequence
Protecting a recording / lock file
Ó Recording settings:
Setting microphone sensitivity
Setting recording quality
Setting the timer
Enabling/disabling voice-activated recording
Setting auto divide
Ô Display settings:
Select language
Adjusting the display contrast
Enabling/disabling the background light
Õ Device settings:
Set date & time
AUTO-OFF
Memory formatting
Enabling/disabling the record indicator
Enabling/disabling key and signal tones
Set file location
Display device information
Device reset
Ö Radio settings: (DVT2000)
Radio mode
Saving a radio station pre-set

16
First steps
Table of contents
4 First steps
Use the installation guide on the following pages to start using your
device quickly and easily.
Caution
• Follow the instructions on handling the device, especially the
batteries and rechargeable batteries (see also chapter 1.1.1
Batteries and rechargeable batteries, page 5).
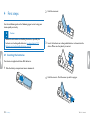
4.1 Inserting the batteries
Your device is supplied with two AAA batteries.
1
Slide the battery compartment cover downwards.
2
Fold the cover out.
3
Insert the batteries or rechargeable batteries as shown into the
device. Make sure the polarity is correct.
4
Fold the cover in. Push the cover up until it engages.

17
First steps
Table of contents
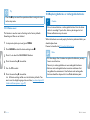
4.2 Power on/o
1
Slide the on/o switch on the side of the device downwards for
approximately two seconds.
X The device turns on and the start-up screen is displayed.
MENU
j e
2
To power o, pull down the power switch on the side of the device
again and hold for about two seconds.
Note
• The device switches itself o automatically if no key is pressed
within a pre-set period of time (see also chapter 9.3.2 AUTO-
OFF, page 37).
4.3 Initial installation process
When using for the first time, you must set the display language as well
as the date and time of the device.
4.3.1 Language selection
Follow the description in the chapter "Select language" (see also
chapter 9.2.1 Select language, page 35).
Note
• Your language might not be available. Select an alternative one.
4.3.2 Set date & time
Follow the description in the chapter "Set date & time" (see also
chapter 9.3.1 Set date & time, page 36).

18
First steps
Table of contents
4.4 Enabling/disabling the keypad lock
The keypad lock deactivates all keys on the device. The timer function
of the device continues to function.
1
Slide the HOLD switch up into the HOLD position to lock the
keypad of the device.
X The display briefly shows ‘On Hold’ and turns o.
MENU
j e
2
Slide the HOLD switch down to the O position to disengage the
keypad lock.
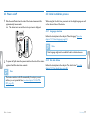
4.5 Inserting a microSD card
Caution
• Do not remove the memory card while recording is in progress. If
you do this, data may be damaged or lost.
1
Flip the memory card slot cover to the side.
2
Insert the microSD card into the card slot with the contacts facing
upwards.
MENU
j e
3
Insert the memory card until it snaps into place.
4
To remove the card press the memory card slightly until the
snapping mechanism unlocks and the card is ejected.
Note
• To ensure that the device stores the recordings on the memory
card, you must switch from the internal memory to microSD
memory card (see also chapter 9.1.1 Set file location, page 30). The
display shows a folder icon which indicates where the recordings
are currently being stored: u, v, w, x, y–internal memory,
¡, ¢, £, ¤, ¥–memory card.

19
First steps
Table of contents
4.6 Accessories
Depending on the type of the device, the product package may include
various accessories. Additional accessories may be obtained directly
from your retailer.
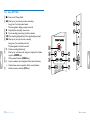
4.6.1 How to connect headphones
Scope of delivery: DVT2000
Warning
• Set the volume to a moderate level and do not use headphones
to listen for excessively long periods of time. Exposure to intense
sound can cause hearing damage. Observe the Hearing safety
instructions (see also chapter 1.1.3 Hearing protection, page 6).
1
Turn down the volume of the device before you plug in the
headphones.
2
Insert the stereo jack into the headphone connection EAR on the
top of the device.
MENU
j e
MIC
EAR
MIC
EAR
3
Turn up the volume until you reach a comfortable listening level.
The speaker is switched o when headphones are connected.

20
First steps
Table of contents
4.6.2 Connecting an external microphone
Note
• If you connect an external microphone to the device, the
recording source will switch automatically and the device
microphone will turn o.
1
Stop the recording currently in progress.
2
Insert the jack into the microphone connection MIC on the top of
the device.
MENU
j e
MIC
EAR
MIC
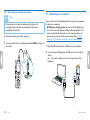
4.7 Connecting to a computer
You can select one of the following options once you have connected
the device to a computer
• A USB mass storage device: You can use the File Explorer to
access the device data without installing additional software. The
device is automatically displayed as a mass storage device. It is a
convenient way to store, back up and and move files. (see also
chapter 4.7.1 Transferring files from or to the device, page 21).
1
Plug the USB connector into a USB port on your computer.
2
Insert the micro USB plug into the USB port on the side of the
device.
X The device is displayed as a mass storage device in File
Explorer.
MENU
j e
Page is loading ...
Page is loading ...
Page is loading ...
Page is loading ...
Page is loading ...
Page is loading ...
Page is loading ...
Page is loading ...
Page is loading ...
Page is loading ...
Page is loading ...
Page is loading ...
Page is loading ...
Page is loading ...
Page is loading ...
Page is loading ...
Page is loading ...
Page is loading ...
Page is loading ...
Page is loading ...
Page is loading ...
Page is loading ...
Page is loading ...
Page is loading ...
Page is loading ...
Page is loading ...
Page is loading ...
Page is loading ...
-
 1
1
-
 2
2
-
 3
3
-
 4
4
-
 5
5
-
 6
6
-
 7
7
-
 8
8
-
 9
9
-
 10
10
-
 11
11
-
 12
12
-
 13
13
-
 14
14
-
 15
15
-
 16
16
-
 17
17
-
 18
18
-
 19
19
-
 20
20
-
 21
21
-
 22
22
-
 23
23
-
 24
24
-
 25
25
-
 26
26
-
 27
27
-
 28
28
-
 29
29
-
 30
30
-
 31
31
-
 32
32
-
 33
33
-
 34
34
-
 35
35
-
 36
36
-
 37
37
-
 38
38
-
 39
39
-
 40
40
-
 41
41
-
 42
42
-
 43
43
-
 44
44
-
 45
45
-
 46
46
-
 47
47
-
 48
48


Philips Voice Tracer 2000 User manual
- Category
- Dictaphones
- Type
- User manual
- This manual is also suitable for
Ask a question and I''ll find the answer in the document
Finding information in a document is now easier with AI
Related papers
-
Philips DVT1100 User manual
-
-
-
-
Philips DVT5500 User manual
-
-
-
-
-
Philips DPM 6700 Operating instructions
Other documents
-
Audiovox ACC104 User manual
-
Sony ICDTX50 User manual
-
Sony ICD-SX713 Operating instructions
-
-
Sony ICD-SX712 Operating instructions
-
-
-
SanDisk Fuze-UM809-ENG User manual
-
SanDisk Fuze-UM809-ENG User manual
-