Canon CANOSCAN N656U User manual
- Category
- Scanner Transparancy Adapters
- Type
- User manual

f o r M a c i n t o s h
Canon Plug-in Module CS-U 3.8
for CanoScan N650U/N656U/N1220U Color Image Scanner
User's Guide

2
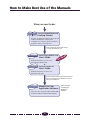
How to Make Best Use of the Manuals
Describes operating procedure from set up and
software installation to scanning and
confirmation of operation. Please read before
using the scanner for the first time.
Printed Manual
CanoScan N650U/N656U/N1220U
Getting Started
Detailed information on how to use
Canon Plug-in Module CS-U.
Canon Plug-in Module CS-U
User's Guide
Electronic Manual
Tells you how to use ArcSoft PhotoStudio 2000,
ArcSoft PhotoBase and Caere Omni Page SE.
Electronic Manuals
Manual for Each
Application Software
After reading this guide and scanner
is set up and ready for use...
When using the
accompanying
application
software.
After you have read this book and mastered
the use of Canon Plug-in Module CS-U and
CanoScan Toolbox CS...
When you open the box
Detailed information on how to use
CanoScan Toolbox CS.
CanoScan Toolbox CS
User's Guide
Electronic Manual
This Guide

3
How to Use this Guide
This guide explains the operating procedures for Canon Plug-in Module CS-U
(hereafter referred to as Plug-in Module CS-U), the Macintosh driver (plug-in
software) used with Canon image scanners.
A plug-in is not an independent software program; it must be used within a plug-in
compliant application, such as CanoScan Toolbox CS or ArcSoft PhotoStudio 2000,
to expand the capabilities of that program. Adding scanning capabilities to your
computer is as easy as putting in a plug. Simply copy the Plug-in Module CS-U files
to your computer.
Please read this guide to perform the installation procedures and scan. Store this
manual in a handy location for future reference.
Where to Look
Quick Start Instructions p. 10
The Quick Start Instructions provide a brief summary of commands and
procedures that will assist in using Plug-in Module CS-U immediately.
Scanning Preparations (Required Reading) p. 13
All users should read this section. This section describes the procedures and
settings required before scanning, including positioning the original and
selecting the output device, resolution, magnification and scanning mode.
Scanning (Required Reading) p. 29
All users should read this section to learn the procedures for scanning and
saving images.
Adjusting Scanned Images p. 35
Read this section for details about how to adjust image brightness, color
balance and other attributes. You can read this section as required.
Appendices
Read this section for troubleshooting tips, glossary terms and the index.
About the Conventions Used in this Guide
The following conventions are used in this guide to draw your attention to
important information.
Caution:
This symbol is used to highlight procedural precautions and limitations.
Always read these topics to avoid errors.
Hint:
This symbol is used to present helpful hints and supplemental information.
Reading these topics is recommended to enhance your enjoyment of
Plug-in Module CS-U.

4
Table of Contents
How to Make Best Use of the Manuals .................................................................. 2
How to Use this Guide ........................................................................................... 3
Table of Contents................................................................................................... 4
Installing Plug-in Module CS-U............................................................................... 6
Control Panel Features ........................................................................................... 7
Scanning Procedures .............................................................................................. 8
Plug-in Module CS-U Special Features .................................................................... 9
Quick Start Instructions............................................................................ 10
STEP 1
Scanning Preparations ................................................................. 13
Displaying the Plug-in Module CS-U Control Panel .............................................. 14
Positioning Originals ............................................................................................ 16
Previewing ........................................................................................................... 17
Selecting the Output Device ................................................................................. 18
Setting the Resolution and Magnification ............................................................19
Setting the Scan Mode ........................................................................................ 21
Verifying the Image before Scanning....................................................................23
Rotating the Image .............................................................................................. 24
Setting Preferences .............................................................................................. 25
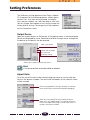
Output Device................................................................................................. 25
Aspect Ratio ................................................................................................... 25
Unit ................................................................................................................ 26
Preview Window ............................................................................................. 26
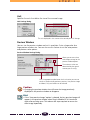
Calibration ...................................................................................................... 27
Reset Default Settings ..................................................................................... 27
Close Plug-in After Scan ................................................................................. 27
STEP 2
Scanning ....................................................................................... 29
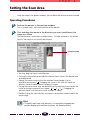
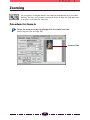
Setting the Scan Area .......................................................................................... 30
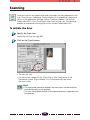
Zooming .............................................................................................................. 31
Scanning .............................................................................................................. 33
Saving Scanned Images ........................................................................................ 34

5
STEP 3
Adjusting Scanned Images .......................................................... 35
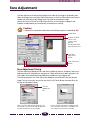
Tone Adjustment.................................................................................................. 36
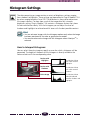
Histogram Settings............................................................................................... 37
Tone Curve Settings ............................................................................................. 40
Brightness and Contrast Settings .........................................................................43
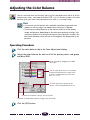
Adjusting the Color Balance................................................................................. 45
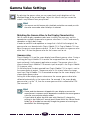
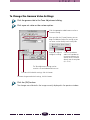
Gamma Value Settings ......................................................................................... 46
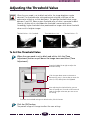
Adjusting the Threshold Value ............................................................................. 48
Auto Tone Correction........................................................................................... 49
Unsharp Mask ...................................................................................................... 50
Descreen .............................................................................................................. 51
Saving/Recalling Settings ...................................................................................... 52
Scanning Techniques ............................................................................................ 54
Appendices................................................................................................ 55
Troubleshooting ................................................................................................... 56
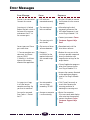
Error Messages .................................................................................................... 58
Glossary ............................................................................................................... 59
Index .................................................................................................................... 64
Canon Customer Support Help Desk ...................................................................66

6
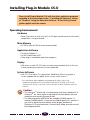
Installing Plug-in Module CS-U
Please install Plug-in Module CS-U with the other application programs
according to the instructions in the “1. Installing the Software” section
of “Chapter 3, Using the Macintosh Platform,” of the Getting Started
guide supplied with the scanner.
Operating Environment
Hardware
• Power Macintosh or iMac with built-in USB ports (performance on Macintosh
compatibles is not guaranteed)
Main Memory
• 32 MB or more (64 MB or more recommended)
Application Software
• CanoScan Toolbox CS
• ArcSoft PhotoStudio 2000
• Other plug-in compatible application programs
Display
• 256 colors or more (32,000 colors or more recommended; black & white or
4-tone monochrome monitors are not supported)
System Software
• Mac OS 8.5 or higher (First-generation, Bondi blue iMacs may require a
system upgrade and an update to the system and firmware.*)
* For information about upgrades and updating for iMacs, refer to the
Troubleshooting menu on the CanoScan Setup Utility CD-ROM. Look for the
“Scanner won’t work on an iMac” item in the topic entitled “Problems with the
Scanner.”
Caution
• The ColorSync
TM
Profiles file is installed along with Plug-in Module CS-U.
ColorSync
TM
Ver. 2.0 or higher is required to use these profiles with the
automatic color matching system (p. 49).
• The following display profile files are available: CANON gamma 1.5
monitor, CANON gamma 1.8 monitor and CANON gamma 2.1 monitor. If
you wish to adjust the color balance of the display, double-click
[ColorSync™] in your Macintosh’s Control Panels folder and select one of
these display profiles.

7
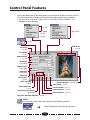
Control Panel Features
When you need more information about a control panel button or menu, refer to
the illustration below and go to the referenced page number for more details.
• The illustration may differ slightly from the version of Plug-in Module CS-U
provided in your package.
Hint
In this guide, menu items are marked in the following manner:
Select [Load] from the [Setting File] menu.
➜ p. 49
➜ p. 36-48
➜ p. 51
➜ p. 50
➜ pp. 25-28
➜ p. 52
Tone Adjustment Button
➜ pp. 36-48
Close Box
➜ p. 14
Scan Mode
➜ p. 21
Zoom In Button
➜ p. 31
Zoom Out Button
➜ p. 32
Output Device
➜ p. 18
Resolution
➜ pp. 19-20
Magnification
➜ pp. 19-20
Image Size
➜ pp. 19-20
Required/
Free memory
➜ p. 21
Browser Button ➜ p. 23
Scan Button ➜ p. 33
Preview Button ➜ p. 17
Preview Window ➜ pp. 14, 26
RGB values
➜ p. 14
Auto Tone Adjustment Button ➜ p. 36
Rotation Button ➜ p. 24

8
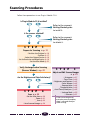
Scanning Procedures
Follow these procedures to use Plug-in Module CS-U.
S T E P 2
S T E P 1
Is the scanner attached?
Prepare for Scanning ➜ p. 13
•
Position the Original
•
Preview
•
Select the Output Device
•
Set the Resolution and Magnification
•
Set the Scan Mode
p. 16
p. 17
p. 18
p. 19
p. 21
•
Set the Scan Area
•
Zoom
•
Scan
•
Save Scanned Images
If the current brightness
and color pose no problem,
there is no need to adjust
these settings.
Scan ➜ p. 29
Adjust and Edit Scanned Images
➜ p. 35
Verify the Image before Scanning
(Browser Window) ➜ p. 23
Are the Brightness and Color Satisfactory?
p. 30
p. 31
p. 33
p. 34
•
Histogram
•
Tone Curve
•
Brightness and Contrast
•
Color Balance
•
Gamma Value
•
Threshold Value
•
Auto Tone (ColorSync
TM
)
•
Unsharp Mask
•
Descreen
p. 37
p. 40
p. 43
p. 45
p. 46
p. 48
p. 49
p. 50
p. 51
Is Plug-in Module CS-U installed?
S T E P 3
Refer to the scanner's
Getting Started guide
to attach it.
Refer to the scanner's
Getting Started guide
to install it.

9
Plug-in Module CS-U Special Features
• See the Results of Adjustments Immediately (Dynamic Preview)
Once in preview mode, the results of adjustments to scan mode settings and colors
are promptly reflected in the preview image.
Highly detailed adjustments can be performed easily because you can see the
results of your changes as they are executed.
• ColorSync™ (Ver 2.0 +) Compatible for Auto Tone Correction
Compatible with the Mac OS 8.5 ColorSync™ (Ver 2.0 +) color management
software. This function automatically matches the color profiles of various devices,
such as scanners, color displays and color printers, for optimal color reproduction.
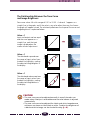
• Browser Function Permits Confirmation of the Real Image
Before Scanning
The Browser function lets you check the image to be scanned in detail before
commencing the scan. This function presents a much higher quality image than the
preview function.
• Histogram Function Realizes Beautiful Contrast
Simple operation allows you to achieve beautiful contrast with half-tone
gradations.
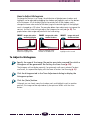
• Gamma Curve Adjusts Image Brightness
The Gamma Curve feature provides four methods you can use to refine in detail
the level of image brightness until you are satisfied with the results.
• Works within Image Processing Software
for Easy Image Editing
Plug-in Module CS-U can be used to extend the functions of plug-in compatible
image processing application programs.

10
Quick Start Instructions
Folow the procedures below to start scanning immediately. If you require more
information at any stage, read the pages referenced at each step.
Install Plug-in Module CS-U
This step is not required if you have already installed Plug-in
Module CS-U following the instructions in the Getting Started
guide.
1. Place the CanoScan Setup Utility CD-ROM into the
computer's CD-ROM drive. The CanoScan Setup Utility will
start automatically. (If it doesn't, double click the [CD-ROM]
icon, followed by the [setup] icon.)
2. Click [Install the Software] to install Plug-in Module CS-U and
the other application programs.
Start Plug-in Module CS-U p. 14
1. Start ArcSoft PhotoStudio 2000 or other plug-in compatible
application.
2. Open the [File] menu, select [Acquire] and [CanonPI CS-U
3.8.0...].
Position materials for scanning and preview them.
p. 16
1. Position an item on the document glass (platen).
2. Click the Preview button.
• The entire scanable area of the document glass will be
previewed and displayed in the preview window.
1
1
2
2
3
3

11
Set the Scan Mode, Output Device, Resolution and
Magnification pp. 18-22
• Scanning mode determines how the image is scanned (p. 21).
•
Output device setting optimizes the images for particular uses (p. 18).
• Resolution determines the amount of detail in the scanned image
(p. 19).
• Magnification determines the amount of enlargement or reduction
of the output image display (p. 19).
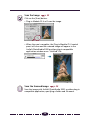
Verify Image Quality with the Browser Function before
Scanning p. 23
1. Click on the [Browser] button.
• The selection frame will appear.
2. Move the selection frame to specify the area of the image
you want verified and click the mouse button.
• Plug-in Module CS-U will read the image and display the
browser image.
3. After you have examined the browser image, click the mouse
anywhere.
Specify the Area of the Image to be Scanned p. 30
Select the area to be scanned by clicking and dragging the
mouse pointer over the image.
• You may find it convenient to use the zoom feature to select
small areas or to select specific scan areas with precision (p. 31).
4
4
5
5
6
6
➟
Selection Frame
The selection frame moves with
the mouse pointer.

12
Scan the Image p. 33
Click on the [Scan] button.
• Plug-in Module CS-U will scan the image.
• When the scan is complete, the Plug-in Module CS-U control
panel will close and the scanned image will appear in the
ArcSoft PhotoStudio 2000 or other plug-in compatible
application window as an “Untitled” file.
Save the Scanned Image p. 34
Save the image with ArcSoft PhotoStudio 2000 or other plug-in
compatible application, specifying a folder and file name.
8
8
7
7
➟

13
STEP 1
Scanning Preparations
Step 1 presents the essential preparations for scanning.
The following procedures are explained on the indicated pages.
■
Displaying the Plug-in Module CS-U Control Panel p. 14
▼
■
Positioning Originals p. 16
▼
■
Previewing p. 17
▼
■
Selecting the Output Device p. 18
■
Setting the Resolution and Magnification p. 19
■
Setting the Scan Mode p. 21
▼
■
Verifying the Image Before Scanning p. 23
■
Rotating the Image p. 24
■
Setting Preferences p. 25

14
S T E P 1
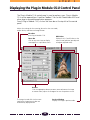
Displaying the Plug-in Module CS-U Control Panel
The Plug-in Module CS-U control panel is used to perform scans. Plug-in Module
CS-U can be opened from CanoScan Toolbox CS or ArcSoft PhotoStudio 2000 and
other plug-in compatible application programs.
To quit Plug-in Module CS-U, click on the close box at the top left of the control
panel.
Menu Bar
Click on any menu item to display
more options in a pull-down menu.
Adjusts the settings for the scanning job such as the scan mode,
output device, resolution and magnification.
The image size and disk size that were
specified in the preview window are
automatically displayed here.
Preview Window
Displays the image in preview mode.
Buttons
Click the appropriate button to zoom, rotate or browse the image
or correct colors, adjust the histogram or start the preview or scan.
Close Box
Quits Plug-in Module CS-U.
RGB Values
Displays the R, G,and B values at the
current cursor position (pre-adjusted
value/post-adjusted value)

15
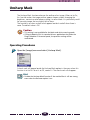
S T E P 1
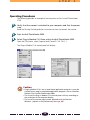
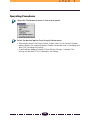
Operating Procedures
The following provides an example of scanning from within ArcSoft PhotoStudio
2000.
Verify that the scanner is attached to your computer and that the power
is on.
Read the Getting Started guide for instructions on how to connect the scanner.
Start ArcSoft PhotoStudio 2000.
Select Plug-in Module CS-U from within ArcSoft PhotoStudio 2000.
Open the [File] menu, select [Acquire] and [CanonPI CS-U 3.8.0...].
The Plug-in Module CS-U control panel will display.
Caution
• Plug-in Module CS-U is not a stand-alone application program. It must be
started from a plug-in compatible application program, such as CanoScan
Toolbox CS or ArcSoft PhotoStudio 2000.
• The size of the Plug-in Module CS-U control panel will vary according to
the resolution of the computer display.
• The size of the control panel can be adjusted with the [Preview
Window...] option in the [Preferences] menu (p. 26).

16
S T E P 1
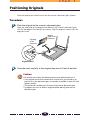
Positioning Originals
Place the original you intend to scan on the scanner's document glass (platen).
Procedures
Place the original on the scanner's document glass.
Open the cover and set the original face down on the scanner’s document glass
with the top edge at the front of the scanner. Align the original’s corner with the
alignment mark.
Close the cover carefully so the original does not shift out of position.
Caution
• Be careful not to dirty the document glass when placing items on it.
• If an original has distinct horizontal or vertical lines, you should try to
position it on the document glass as squarely as possible to have the lines
appear straight.
• The maximum scanable size is the area of the entire document glass.
• Straighten out curls or folds in originals before placing them on the
document glass.
Alignment Mark
Top Edge
of the
Document
Bottom
Edge of the
Document

17
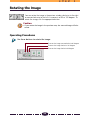
S T E P 1
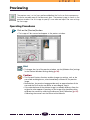
Previewing
The preview scan is a trial scan performed before the final scan that encompasses
the entire scanable area of the document glass. The preview image is shown in the
preview window. Use this image to specify a scan area and adjust the scan settings
for the image.
Operating Procedures
Click on the [Preview] button.
• The image will be scanned and appear in the preview window.
Hint
• To change the size of the preview window, use the [Window Size] settings
in the Preview Window Settings dialog (p. 26).
Caution
• The Dynamic Preview function enables changes to settings, such as the
scan mode and brightness, to be immediately reflected in the preview
image.
• Nevertheless, the preview image provides only an approximation of the
scan and the final results may differ to some degree from it.
• If the color balance of the preview image is markedly different from the
original or color appears in portions of the image that should be white,
calibrate the scanner by selecting [Preferences] and [Calibration] (p. 27).
Calibrating the scanner sets the correct white balance.
➟

18
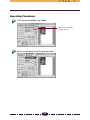
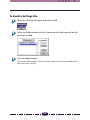
S T E P 1
Selecting the Output Device
Use the following procedures to select the output device (printer, etc.) for the
scanned image. Select the device that corresponds best to your output device and
use of the image.
Operating Procedures
Click the arrow on the [Output Device] section of the control panel and
select a device from the pop-up menu.
Caution
• You can set the device categories in the pop-up menu in advance. You can
also add new devices to the pop-up menu. See Setting Preferences (p. 25).

19
S T E P 1
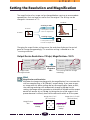
Setting the Resolution and Magnification
The magnification of an image can be changed before scanning to accommodate
reproductions that are larger or smaller than the original. The settings can be
changed in increments of 1%.
Changing the magnification setting causes the resolution display on the control
panel to change correspondingly. This resolution setting is referred to as the
“scanning resolution.”
Output Device Resolution= 720 dpi, Magnification= 100%
Scanning at 200%
Scanning at 50%
12"/30cm
3"/7.5cm
2"/5cm
6"/15cm
4"/10cm
8"/20cm
Scanning with horizontal/
vertical 2x magnification
Scanning with horizontal/
vertical 0.5x magnification
The scanning resolution changes
accordingly.
Magnification
changed to
50%
Magnification
Scanning Resolution
➟
➟
Magnification
50%
Scanned at
360 dpi
Image size = 5"x5"
(12.7 x 12.7cm)
Image size = 2.5"x2.5"
(6.35 x 6.35cm)
Output device
corrects to
720 dpi
Hint
Magnification and Resolution
Why does the image size change with the magnification? Let us answer this
with an example using a “BJ (720 dpi)” output device. If you were to scan
an image with this device setting and set the magnification factor to 50%,
the scanning resolution will automatically change to 360 dpi. At this
setting, the image will be scanned at a resolution of 360 dpi and the output
device will convert this to 720 dpi, shrinking the size of the output in the
process because it will only have half the data with which to fill the space.

20
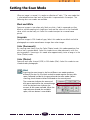
S T E P 1
To Set the Magnification Factor
Set the desired magnification factor on the control panel.
Hint
The Relationship Between Data Volume and Scanning Resolution
The higher the magnification and scanning resolution settings, the greater
the file size of scanned images. There are certain inconveniences associated
with large data volumes, such as longer processing times and the risk of
running out of memory resources. You are advised against setting the
resolution higher than necessary. For example, if you scan an A4 (21.0 x 29.7
cm (8.3 x 11.7 in.)) size image in the color mode, the amount of data varies
according to the resolution.
Slider
Drag the slider bar in either
direction or use the arrow
keys to change the resolution.
Click here to return the
magnification factor to 100%.
Click inside these boxes
to enter values directly.
Click the up or down arrow to
increase or decrease the
setting.
A4 color image
1.6MB
75dpi
6.3MB
150dpi
408MB
1200dpi
102MB
600dpi
25.5MB
300dpi
* These numbers are approximate and may differ from actual scan results.
Page is loading ...
Page is loading ...
Page is loading ...
Page is loading ...
Page is loading ...
Page is loading ...
Page is loading ...
Page is loading ...
Page is loading ...
Page is loading ...
Page is loading ...
Page is loading ...
Page is loading ...
Page is loading ...
Page is loading ...
Page is loading ...
Page is loading ...
Page is loading ...
Page is loading ...
Page is loading ...
Page is loading ...
Page is loading ...
Page is loading ...
Page is loading ...
Page is loading ...
Page is loading ...
Page is loading ...
Page is loading ...
Page is loading ...
Page is loading ...
Page is loading ...
Page is loading ...
Page is loading ...
Page is loading ...
Page is loading ...
Page is loading ...
Page is loading ...
Page is loading ...
Page is loading ...
Page is loading ...
Page is loading ...
Page is loading ...
Page is loading ...
Page is loading ...
Page is loading ...
Page is loading ...
Page is loading ...
-
 1
1
-
 2
2
-
 3
3
-
 4
4
-
 5
5
-
 6
6
-
 7
7
-
 8
8
-
 9
9
-
 10
10
-
 11
11
-
 12
12
-
 13
13
-
 14
14
-
 15
15
-
 16
16
-
 17
17
-
 18
18
-
 19
19
-
 20
20
-
 21
21
-
 22
22
-
 23
23
-
 24
24
-
 25
25
-
 26
26
-
 27
27
-
 28
28
-
 29
29
-
 30
30
-
 31
31
-
 32
32
-
 33
33
-
 34
34
-
 35
35
-
 36
36
-
 37
37
-
 38
38
-
 39
39
-
 40
40
-
 41
41
-
 42
42
-
 43
43
-
 44
44
-
 45
45
-
 46
46
-
 47
47
-
 48
48
-
 49
49
-
 50
50
-
 51
51
-
 52
52
-
 53
53
-
 54
54
-
 55
55
-
 56
56
-
 57
57
-
 58
58
-
 59
59
-
 60
60
-
 61
61
-
 62
62
-
 63
63
-
 64
64
-
 65
65
-
 66
66
-
 67
67


Canon CANOSCAN N656U User manual
- Category
- Scanner Transparancy Adapters
- Type
- User manual
Ask a question and I''ll find the answer in the document
Finding information in a document is now easier with AI
Related papers
-
Canon CANOSCAN D660U User manual
-
Canon CanoScan D646U Owner's manual
-
-
-
-
Canon CanoScan D2400UF Owner's manual
-
-
-
-