
DIGITAL CAMERA
STYLUS-9000 /
P
-9000
● Thank you for purchasing an Olympus digital camera. Before you start to
use your new camera, please read these instructions carefully to enjoy
optimum performance and a longer service life. Keep this manual in a
safe place for future reference.
● We recommend that you take test shots to get accustomed to your
camera before taking important photographs.
● In the interest of continually improving products, Olympus reserves the
right to update or modify information contained in this manual.
● The screen and camera illustrations shown in this manual were produced
during the development stages and may differ from the actual product.
Instruction Manual
2
EN
Step
5
Step
2
Step
4
Step
3
How to Use the Camera
“Three Types of Setting Operations” (p. 3)
Printing
“Direct printing (PictBridge)” (p. 46)
“Print Reservations (DPOF)” (p. 49)
Shooting and Playing Back Images
“Shooting, Viewing, and Erasing” (p. 15)
Preparing the Camera
“Preparing the Camera” (p. 10)
Names of Parts ......................................6
Preparing the Camera .........................10
Shooting, Viewing, and Erasing .........15
Using Shooting Modes ........................18
Using Shooting Functions ..................20
Using Playback Features ....................24
Menus for Shooting Functions ...........26
¾
¾
¾
¾
¾
¾
¾
Menus for Playback, Editing, and
Printing Functions ...............................34
Menus for Other Camera Settings .....39
Printing .................................................46
Using OLYMPUS Master 2...................52
Usage Tips ...........................................54
Appendix ..............................................59
Index .....................................................73
¾
¾
¾
¾
¾
¾
¾
ContentsContents
Step
1
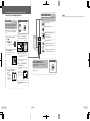
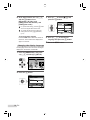
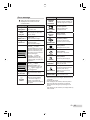
Checking the contents of the box
Digital camera
Strap LI-50B Lithium Ion Battery LI-50C Battery Charger
USB cable
CB-USB6
AV cable
CB-AVC3
OLYMPUS Master 2 CD-ROM microSD Attachment
Other accessories not shown: Instruction Manual (this manual), warranty card
Contents may vary depending on purchase location.
Printed in China VN061201

DIGITAL CAMERA
STYLUS-9000 /
P
-9000
● Thank you for purchasing an Olympus digital camera. Before you start to
use your new camera, please read these instructions carefully to enjoy
optimum performance and a longer service life. Keep this manual in a
safe place for future reference.
● We recommend that you take test shots to get accustomed to your
camera before taking important photographs.
● In the interest of continually improving products, Olympus reserves the
right to update or modify information contained in this manual.
● The screen and camera illustrations shown in this manual were produced
during the development stages and may differ from the actual product.
Instruction Manual
2
EN
Step
5
Step
2
Step
4
Step
3
How to Use the Camera
“Three Types of Setting Operations” (p. 3)
Printing
“Direct printing (PictBridge)” (p. 46)
“Print Reservations (DPOF)” (p. 49)
Shooting and Playing Back Images
“Shooting, Viewing, and Erasing” (p. 15)
Preparing the Camera
“Preparing the Camera” (p. 10)
Names of Parts ......................................6
Preparing the Camera .........................10
Shooting, Viewing, and Erasing .........15
Using Shooting Modes ........................18
Using Shooting Functions ..................20
Using Playback Features ....................24
Menus for Shooting Functions ...........26
¾
¾
¾
¾
¾
¾
¾
Menus for Playback, Editing, and
Printing Functions ...............................34
Menus for Other Camera Settings .....39
Printing .................................................46
Using OLYMPUS Master 2...................52
Usage Tips ...........................................54
Appendix ..............................................59
Index .....................................................73
¾
¾
¾
¾
¾
¾
¾
ContentsContents
Step
1
Checking the contents of the box
Digital camera
Strap LI-50B Lithium Ion Battery LI-50C Battery Charger
USB cable
CB-USB6
AV cable
CB-AVC3
OLYMPUS Master 2 CD-ROM microSD Attachment
Other accessories not shown: Instruction Manual (this manual), warranty card
Contents may vary depending on purchase location.
Printed in China VN061201

3
EN
77
EN
MEMO
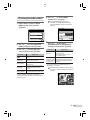
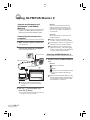
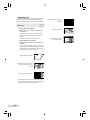
1
Set the mode dial to a position other
than A.
The symbol in “Menu
Settings” (p. 26 to 45)
indicates available shooting
modes.
2
Press the button.
This example describes how to set the
[DIGITAL ZOOM].
MENU
EXIT SET
OK
CAMERA MENU
Shooting mode top menu
3
Use klmn to select the desired
menu, and press the ! button.
Pressing and
holding the E
button displays
an explanation
(menu guide) of the
selected option.
ISO
OFF
OFF
1
2
CAMERA MENU
SET
OK
AUTO
o
FINE ZOOM
DIGITAL ZOOM
DRIVE
AUTOWB
MENU
EXIT
Submenu 1
●
Please read “Menu Settings” (p. 26 to 45) while referring to this page.
button
Arrow pad
! button
Buttons in use
4
Use kl to select the desired
Submenu 1, and press the ! button.
1
2
ISO
OFF
OFF
CAMERA MENU
AUTO
o
FINE ZOOM
DIGITAL ZOOM
DRIVE
AUTOWB
MENU
EXIT SET
OK
1
2
ISO
OFF
OFF
CAMERA MENU
AUTO
o
FINE ZOOM
DIGITAL ZOOM
DRIVE
AUTOWB
MENU
SET
OK
BACK
DIGITAL ZOOM
OFF
ON
Page tab Submenu 2
To quickly move to the desired submenu,
press m to highlight the page tab, and then
use kl to move the page tab. Press n to
return to the Submenu 1.
Some menus include submenus that appear
by pressing the ! button.
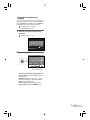
5
Use kl to select the Submenu 2,
and press the ! button.
Once a setting is adjusted, the display returns to
the previous screen.
There may be
additional operations.
“Menu Settings” (p. 26
to 45)
6
Press the button to complete the
setting.
●
Three Types of Setting Operations
E button
Using the MenuUsing the Menu
Various camera settings can be accessed through the
menus, including functions used during shooting and
playback and the date/time and screen display.
There may be unavailable menus depending on the
other related settings or the selected mode
(p. 30).
1
2
ISO
OFF
ON
CAMERA MENU
AUTO
o
FINE ZOOM
DIGITAL ZOOM
DRIVE
AUTOWB
MENU
EXIT SET
OK
3
EN
4
EN
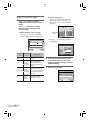
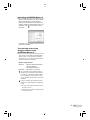
Using the FUNC Menu (p. 23)Using the FUNC Menu (p. 23)
Frequently used shooting menu functions can be set with less
steps using the FUNC menu.
Using the Direct ButtonsUsing the Direct Buttons
Frequently used shooting functions can be accessed using the direct
buttons.
Shutter button (p. 15)
Zoom lever (p. 20, p. 24)
F button (exposure compensation) (p. 21)
& button (macro) (p. 21)
# button ( ash) (p. 20)
Y button (self-timer) (p. 22)
q button (playback) (p. 16)
g/E button (information display change/
menu guide/date and time check) (p. 3, p. 14,
p. 22)
o/ button (panorama/Shadow Adjustment
Technology/multi window/erase) (p. 17, p. 23)
! button (p. 3, p. 23)
Arrow pad
! button
Buttons in use

3
EN
77
EN
MEMO
1
Set the mode dial to a position other
than A.
The symbol in “Menu
Settings” (p. 26 to 45)
indicates available shooting
modes.
2
Press the button.
This example describes how to set the
[DIGITAL ZOOM].
MENU
EXIT SET
OK
CAMERA MENU
Shooting mode top menu
3
Use klmn to select the desired
menu, and press the ! button.
Pressing and
holding the E
button displays
an explanation
(menu guide) of the
selected option.
ISO
OFF
OFF
1
2
CAMERA MENU
SET
OK
AUTO
o
FINE ZOOM
DIGITAL ZOOM
DRIVE
AUTOWB
MENU
EXIT
Submenu 1
●
Please read “Menu Settings” (p. 26 to 45) while referring to this page.
button
Arrow pad
! button
Buttons in use
4
Use kl to select the desired
Submenu 1, and press the ! button.
1
2
ISO
OFF
OFF
CAMERA MENU
AUTO
o
FINE ZOOM
DIGITAL ZOOM
DRIVE
AUTOWB
MENU
EXIT SET
OK
1
2
ISO
OFF
OFF
CAMERA MENU
AUTO
o
FINE ZOOM
DIGITAL ZOOM
DRIVE
AUTOWB
MENU
SET
OK
BACK
DIGITAL ZOOM
OFF
ON
Page tab Submenu 2
To quickly move to the desired submenu,
press m to highlight the page tab, and then
use kl to move the page tab. Press n to
return to the Submenu 1.
Some menus include submenus that appear
by pressing the ! button.
5
Use kl to select the Submenu 2,
and press the ! button.
Once a setting is adjusted, the display returns to
the previous screen.
There may be
additional operations.
“Menu Settings” (p. 26
to 45)
6
Press the button to complete the
setting.
●
Three Types of Setting Operations
E button
Using the MenuUsing the Menu
Various camera settings can be accessed through the
menus, including functions used during shooting and
playback and the date/time and screen display.
There may be unavailable menus depending on the
other related settings or the selected mode
(p. 30).
1
2
ISO
OFF
ON
CAMERA MENU
AUTO
o
FINE ZOOM
DIGITAL ZOOM
DRIVE
AUTOWB
MENU
EXIT SET
OK
3
EN
4
EN
Using the FUNC Menu (p. 23)Using the FUNC Menu (p. 23)
Frequently used shooting menu functions can be set with less
steps using the FUNC menu.
Using the Direct ButtonsUsing the Direct Buttons
Frequently used shooting functions can be accessed using the direct
buttons.
Shutter button (p. 15)
Zoom lever (p. 20, p. 24)
F button (exposure compensation) (p. 21)
& button (macro) (p. 21)
# button ( ash) (p. 20)
Y button (self-timer) (p. 22)
q button (playback) (p. 16)
g/E button (information display change/
menu guide/date and time check) (p. 3, p. 14,
p. 22)
o/ button (panorama/Shadow Adjustment
Technology/multi window/erase) (p. 17, p. 23)
! button (p. 3, p. 23)
Arrow pad
! button
Buttons in use

5
EN
5
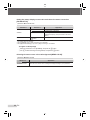
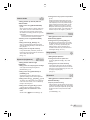
1 G SLIDESHOW ............... p.34
2 H PERFECT FIX ............. p.34
3 M BEAUTY FIX ................ p.34
4 I EDIT
Q (Resize) ................ p.35
P (Crop) .................... p.35
COLOR EDIT ............... p.35
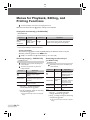
Menus for Playback, Editing, and Printing Functions
When the mode dial is set to the q position, settings can
be adjusted.
MENU
EXIT SET
OK
PLAYBACK MENU
1
2
3
4
5
6
7
8
9
Playback mode top menu
CALENDAR ................. p.36
INDEX.......................... p.36
5 J PLAYBACK MENU
0 (Protect) ............... p.36
y (Rotate)................... p.37
R (Add sound to still
images) .................... p.37
6 K ERASE......................... p.37
7 L PRINT ORDER ............ p.38
8 E SETUP
*
*
Same as “Menus for
Shooting Functions”
9 F SILENT MODE ............ p.45
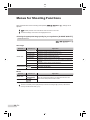
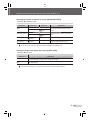
1 A IMAGE QUALITY ......... p.26
2 B CAMERA MENU
WB ............................... p.27
ISO .............................. p.27
DRIVE.......................... p.27
FINE ZOOM................. p.28
DIGITAL ZOOM ........... p.28
ESP/n....................... p.28
AF MODE .................... p.28
R (Sound recording) .... p.29
IMAGE STABILIZER
(Still images)/
DIS MOVIE MODE
(Movies) ................... p.29
SHADOW ADJ ............. p.29
3 O SCENE MODE ............. p.30
4 N PANORAMA ................. p.31
5 D RESET ......................... p.33
6 E SETUP
MEMORY FORMAT/
FORMAT .................. p.39
BACKUP ...................... p.39
W (Language) ........ p.39
PW ON SETUP ........... p.40
MENU COLOR ............ p.40
SOUND SETTINGS..... p.41
REC VIEW ................... p.41
FILE NAME.................. p.42
PIXEL MAPPING ......... p.42
s (Monitor) ............... p.43
X (Date/time) ............ p.43
DUALTIME ................... p.43
VIDEO OUT ................. p.44
POWER SAVE ............. p.45
7 F SILENT MODE ............ p.45
Menu Index
Menus for Shooting Functions
When the mode dial is set to a shooting mode position
(A K s b n), settings can be adjusted.
MENU
EXIT SET
OK
CAMERA MENU
5
1
2
3 7
6
4
Shooting mode top menu

6
EN
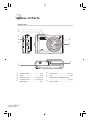
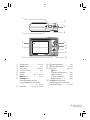
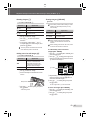
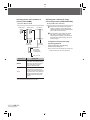
Names of Parts
1
Self-timer lamp .............................p.22
2
Flash ............................................ p.20
3
Multi-connector ................p.44, 46, 52
4
Connector cover ..............p.44, 46, 52
5
Strap eyelet ..................................p.10
Camera unit
1
2
3
4
5
8
7
6
9
6
Microphone ............................p.29, 37
7
Lens .............................................p.59
8
Battery/card compartment cover
............................................... p.11, 55
9
Tripod socket .................................. —

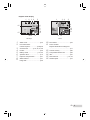
7
EN
1
2
6
7
8
5
3
4
9
10
11
12
13
1
Shutter button ........................p.15, 54
2
n button .............................p.13
3
Zoom lever ............................. p.20, 24
4
Card access lamp ........................ p.61
5
Speaker .......................................... —
6
Monitor ......................... p.8, 15, 43, 54
7
m button .............................. p.3, 5
8
DISP./E button
(information display change/
menu guide/date and time check)
........................................... p.3, 14, 22
9
Mode dial .................p.3, 5, 15, 16, 18
10
q button (playback) ...................p.16
11
button (OK/FUNC)..............p.3, 23
12
Arrow pad ............................p.3, 4, 13
F button
(exposure compensation) ........ p.21
& button (macro) ....................p.21
Y button (self-timer) ............... p.22
# button (fl ash) ....................... p.20
13
o/D button (panorama/
Shadow Adjustment Technology/
multi window/erase) ............... p.17, 23

8
EN
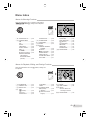
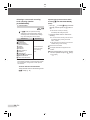
Monitor
Shooting mode display
12
M
+2.0 1/30 F3.2
P
4
IN
ISO
1600
N
ORM
1
8
10
11
9
13151617 1214
23
22
21
20
19
18
2 54 763
+2.0
IN
00:34
VGA
15
1
10
11
9
13 121417
23
20
19
18
2 54 73 6
Still image Movie
1
Shooting mode .......................p.18, 19
2
Flash mode ..................................p.20
3
Silent mode ..................................p.45
4
Image stabilization (still images)/
Digital image stabilization (movies)
.....................................................p.29
5
Macro/super macro ......................p.21
6
Shadow Adjustment Technology
... p.29
7
Battery check ......................... p.10, 55
8
Flash standby/camera shake warning/
fl ash charge ................................. p.54
9
AF target mark ............................. p.15
10
Sound record ...................p.19, 29, 37
11
Dual time ......................................p.43
12
Number of storable still pictures/
remaining recording time
......................................... p.15, 19, 61
13
Current memory ...........................p.60
14
Self-timer .....................................p.22
15
Aperture value .............................p.15
16
Shutter speed ..............................p.15
17
Exposure compensation ..............p.21
18
Compression/Frame rate .............p.26
19
Image size ...................................p.26
20
Metering .......................................p.28
21
Drive ............................................p.27
22
ISO ...............................................p.27
23
White balance ..............................p.27

9
EN
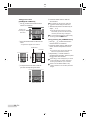
Playback mode display
12
M
2009.08.26 12:30 4
+2.0
F3.2
10
IN
x
100-0004
N
ORM
1/1000
ISO 1
600
2
9
10
8
6
7
11
3
4 51
15
16
121314
2009.08.26 12:30
100-0004
00:14
/
00:34
IN
VGA
15
10
15
8
9
11
3
4 51
1213
Still image Movie
1
Silent mode ..................................p.45
2
Print reservation/
number of prints ................... p.49/p.48
3
Sound record .............p.19, 29, 37, 58
4
Protect .........................................p.36
5
Battery check ......................... p.10, 55
6
Aperture value .............................p.15
7
Exposure compensation ..............p.21
8
White balance ..............................p.27
9
Image size ...................................p.26
10
File number ..................................p.42
11
Frame number
Elapsed time/total recording time
.....................................................p.17
12
Current memory ...........................p.60
13
Compression/Frame rate .............p.26
14
ISO ...............................................p.27
15
Date and time ........................p.13, 43
16
Shutter speed ..............................p.15

10
EN
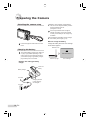
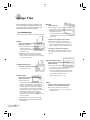
Preparing the Camera
Battery comes partially charged. Before
use, be sure to charge the battery until the
charging indicator goes off
(for approx. 2 hours).
If the charge indicator does not light or
it blinks, the battery may not be inserted
correctly or the battery or the charger may
be broken.
For details on the battery and the charger,
see “Battery and charger” (p. 59).
When to charge the battery
Charge the battery when the error message
shown below appears.
BATTERY EMPTY
Monitor top right Error message
Flashes in red
Attaching the camera strap
Pull the strap tight so that it does not come
loose.
Charging the battery
The included battery charger (AC cable type
or plug-in type) differs depending on the
region where you purchased the camera. If
you received a plug-in type battery charger,
plug it directly into an AC outlet.
Example: AC cable type battery
charger
AC outlet
AC cable
Lithium ion
battery
Battery charger
Charging indicator
Lights: Charging
Off: Charged

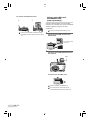
11
EN
Sliding the battery lock knob in the direction
of the arrow to unlock, and then remove the
battery.
Be sure to turn off the camera when you
open or close the battery/card compartment
cover.
When using the camera, be sure to close
the battery/card compartment cover.
3
Insert the card straight in until it clicks into
place.
Do not touch the contact area on the card.
4
This camera allows the user to take pictures
using the internal memory even when
no xD-Picture Card (sold separately) is
inserted. “Using an xD-Picture Card” (p. 60)
“Number of storable pictures (still pictures)/
continuous recording length (movies) in
the internal memory and xD-Picture card”
(p. 61)
NotchIndex area NotchIndex area
Loading the battery and
the xD-Picture Card™ (sold
separately) into the camera
Do not insert anything other than an
xD-Picture Card or the microSD Attachment
into the camera.
1
2
The battery has front side and back side.
Insert the battery in the correct direction
as illustrated. If the battery is not inserted
correctly, the camera does not operate.
Insert the battery while sliding the battery
lock knob in the direction of the arrow.
Battery/card compartment coverBattery/card compartment cover
Battery lock knobBattery lock knob

12
EN
To remove the xD-Picture Card
12
Press in the card until it clicks and comes
out slightly, and then grasp the card to pull it
out.
Using a microSD card/
microSDHC card
(sold separately)
microSD card/microSDHC card (hereinafter
referred to as “microSD card”) is also compatible
with this camera by using the microSD
Attachment.
“Using a microSD Attachment” (p. 62)
1
Insert the microSD card into the
Attachment.
Insert the card to
the end.
2
Insert the microSD Attachment into
the camera.
Notch
To remove the microSD card
Pull the microSD card straight out.
Do not touch the contact area on the
microSD Attachment and microSD card.

13
EN
Arrow pad and operation guide
The symbols 1243, displayed
on various setting and movie playback screens
indicate that arrow pad are used.
2009.08.26
2009.08.26
12:30
12:30
100-0004
100-0004
00:14
/
00:34
00:14
/
00:34
IN
/
2008 08 26 12 30
OK
X
YMD
TIME
MENU
CANCEL SET
Y
Y
M
M
D
D
0.0
0.0
+0.3
+0.3
+0.7
+0.7
+1.0
+1.0
EXPOSURE COMP.
Arrow pad
4
2
1
3
Operation guides displayed at the bottom of the
screen indicate that the m button, button,
zoom lever, or D button is used.
1
4
2
5
3
6
IN
OK
D
MENU
BACK GO
SEL. IMAGE
T
W
SET
OK
MENU
EXIT SET
OK
CAMERA MENU
Operation guide
Setting the date and time
The date and time set here are saved to image
fi le names, date prints, and other data.
1
Press the n button to turn on
the camera.
The date and time setting screen is displayed
when the date and time are not set.
X
YM
YMD
D TIME
---- -- -- -- --
MENU
CANCEL
Date and time setting screen
2
Use kl to select the year for
[Y].
2009
-- -- -- --
X
YM
YMD
D TIME
MENU
CANCEL
3
Press n to save the setting for [Y].
2009
-- -- -- --
X
YM
YMD
D TIME
MENU
CANCEL
●

14
EN
4
As in steps 2 and 3, use klmn
and the button to set
[M] (month), [D] (day), and
[TIME] (hours and minutes), and
[Y/M/D] (date order).
For precise time setting, press the button
as the time signal strikes 00 seconds.
To change the date and time, adjust the
setting from the menu. [X] (Date/time)
(p. 43)
To check the date and time
Press the g button while the camera is
turned off. The current time is displayed for
approx. 3 seconds.
Changing the display language
The language for the menu and error messages
displayed on the monitor is selectable.
1
Press the m button, and press
klmn to select [E] (SETUP).
MENU
EXIT SET
OK
SETUP
2
Press the button.
1
2
3
4
BACKUP
NORMAL
SETUP
ENGLISH
PW ON SETUP
MENU COLOR
MEMORY FORMAT
MENU
EXIT SET
OK
3
Use kl to select [W] and
press the button.
W
FRANCAIS
DEUTSCH
ESPAÑOL
ITALIANO
ENGLISH
ུࢊ
OK
SETBACK
MENU
4
Use klmn to select your
language and press the button.
5
Press the m button.

15
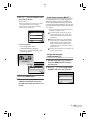
EN
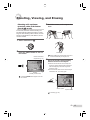
Shooting, Viewing, and Erasing
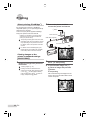
3
Hold the camera, and compose the
shot.
1/400 F3.5
P
Horizontal grip
Vertical grip
Monitor
When holding the camera, take care not to
cover the flash with your fingers, etc.
4
Press the shutter button halfway
down to focus on the subject.
When the camera focuses on the subject, the
exposure is locked (shutter speed and aperture
value are displayed), and the AF target mark
changes to green.
The camera was unable to focus if the AF target
mark fl ashes red. Try focusing again.
1/400 F3.2
P
AF target mark
Press halfway
Shutter speed
Aperture value
“Focusing” (p. 56)
●
●
Shooting with optimum
aperture value and shutter
speed (K mode)
In this mode, automatic camera shooting can
be used while also allowing changes to a wide
range of other shooting menu functions, such as
exposure compensation, white balance, and so
on when needed.
1
Set the mode dial to K.
2
Press the n button to turn on
the camera.
12
M
P
4
IN
N
ORM
Monitor
(standby mode screen)
Number of storable
still pictures (p. 61)
Press the n button again to turn off
the camera.

16
EN
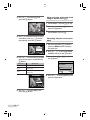
5
To take the picture, gently press
the shutter button all the way down
while being careful not to shake the
camera.
Image review screen
Press fully
P
1/400 F3.2
To view images during shooting
Pressing the q button enables playback of
images. To return to shooting, either press
the q button again or press the shutter
button halfway down.
To shoot movies
“Shooting movies (A mode)” (p. 19)
Viewing images
1
Set the mode dial to q.
1
IN
12
M
2009.08.26 12:30
100-0001
N
ORM
Playback image
Frame number
2
Use klmn to select an image.
Displays
10 frames
before the
current image
Displays next
image
Displays
previous image
Displays
10 frames after
the current
image
The display size of the images can be
changed. “Index view, calendar view, and
close-up view” (p. 24)

17
EN
To play back movies
Select a movie, and press the button.
2009.08.26
2009.08.26
12:30
12:30
100-0004
100-0004
4
4
IN
MOVIE PLAY
OK
Movie
Operations during movie playback
Volume: During playback, press kl.
Fast-forward/rewind: Select with mn.
Each time a button is pressed, the playback
speed cycles through 2x, 20x, and standard
(1x) speed in the direction of the pressed
button.
Pause: Press the button.
2009.08.26
2009.08.26
12:30
12:30
100-0004
100-0004
00:12
/
00:34
00:12
/
00:34
IN
During playback
Elapsed time/
Total recording time
First (last) frame/frame advance:
During pause, press k to display the
fi rst frame, and press l to display the
last frame. Playback is reversed while m is
pressed, playback occurs normally while n
is pressed. Press the button to resume
playback.
2009.08.26
2009.08.26
12:30
12:30
100-0004
100-0004
00:14
/
00:34
00:14
/
00:34
IN
/
During pause
To stop movie playback
Press the m button.
Erasing images during
playback (Single image erase)
1
Press the D button when the
playback image to be erased is
displayed.
ERASE
ERASE
OK
IN
NO
NO
YES
SET
CANCEL
MENU
2
Press k to select [YES], and
press the button.
[K ERASE] (p. 37)

18
EN
Enhancing skin tone and
texture (b mode)
The camera fi nds a person’s face and gives the
skin a smooth, translucent look for taking the
picture.
1
Set the mode dial to b.
12
M
12
M
4
4
IN
N
ORM
N
ORM
b mode indicator
2
Point the camera toward the
subject. Check the frame appearing
around the face detected by the
camera, and then press the shutter
button to take the picture.
The unedited image and edited image are both
saved.
If the image cannot be retouched, only the
unedited image is saved.
For some subjects, the frame may not
appear, may take some time to appear, or
the editing may not be effective.
The [IMAGE SIZE] of the retouched image
is limited to [J] or lower.
●
●
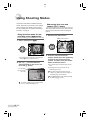
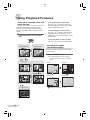
This section describes the available shooting
modes. Depending on the mode, some settings
can be changed. For details on the functions
that can be adjusted, see “Menus for Shooting
Functions” on page 26.
Using the best mode for the
shooting scene (s mode)
1
Set the mode dial to s.
PORTRAIT
SET
OK
MENU
EXIT
An explanation of the selected mode is displayed
while the E button is pressed and held.
2
Use kl to select the best
shooting mode for the scene, and
press the button.
12
M
4
IN
N
ORM
Icon indicating
the scene mode
that is set
To change to another scene mode, use the
menu. [O SCENE MODE] (p. 30)
●
Using Shooting Modes

19
EN
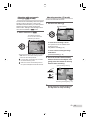
Shooting with automatic
settings (A mode)
The camera will automatically select the optimal
shooting mode for the scene. This is a fully
automatic mode that allows you to take a picture
suited to the scene by simply pressing the
shutter button. Settings in the shooting function
menu are not available in A mode.
1
Set the mode dial to
A
.
12
M
4
IN
N
ORM
i
AUTO
The indicator changes to
the icon for the scene mode
selected by the camera.
Press the shutter button halfway down or press the
g button to check which shooting mode the
camera has automatically selected.
In some cases, the camera may not select
the desired shooting mode.
When the camera cannot identify which is
the optimal mode, P mode will be selected.
●
Shooting movies (n mode)
Audio is recorded with the movie.
1
Set the mode dial to n.
00:35
00:35
QVGA
QVGA
15
15
IN
A mode indicator
To zoom while shooting a movie
The optical zoom is not available while
shooting a movie.
Use [DIGITAL ZOOM] (p. 28).
To shoot a movie with digital image
stabilization
[DIS MOVIE MODE] (p. 29)
2
Press the shutter button halfway
down to focus on the subject, and
gently press the button all the way
down to start recording.
Press halfway
Press fully
00:34
00:34
REC
REC
Lights red during shooting
Remaining recording time (p. 61)
3
Gently press the shutter button all
the way down to stop recording.

20
EN
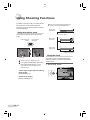
The zoom bar appearance identifi es the
status of the fi ne zoom/digital zoom.
Fine zoom range
Digital zoom range
When using
optical zoom
When using
fi ne zoom
When using
digital zoom
Optical zoom range
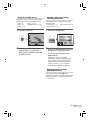
Using the fl ash
The fl ash functions can be selected to best
match the shooting conditions and render the
desired image.
1
Press the # button.
P
OK
OK
AUTO
SET
SET
FLASH AUTO
FLASH AUTO
AUTO
! # $
In addition to the wide variety of shooting modes,
the camera has functions that broaden the
expressive range and shooting options available
to the photographer.
Using the optical zoom
Pressing the zoom lever adjusts the shooting
range.
Press toward W
(Wide)
Press toward T
(Telephoto)
12
M
P
4
IN
N
ORM
12
M
P
4
IN
N
ORM
W T
W T
Zoom bar
Optical zoom: 10×, Digital zoom: 5×.
Use of [IMAGE STABILIZER] (Still images)/
[DIS MOVIE MODE] (Movies) (p. 29) is
recommended when shooting with the
telephoto zoom.
To take larger images without reducing
image quality
[FINE ZOOM] (p. 28)
To take larger images
[DIGITAL ZOOM] (p. 28)
Using Shooting Functions
Page is loading ...
Page is loading ...
Page is loading ...
Page is loading ...
Page is loading ...
Page is loading ...
Page is loading ...
Page is loading ...
Page is loading ...
Page is loading ...
Page is loading ...
Page is loading ...
Page is loading ...
Page is loading ...
Page is loading ...
Page is loading ...
Page is loading ...
Page is loading ...
Page is loading ...
Page is loading ...
Page is loading ...
Page is loading ...
Page is loading ...
Page is loading ...
Page is loading ...
Page is loading ...
Page is loading ...
Page is loading ...
Page is loading ...
Page is loading ...
Page is loading ...
Page is loading ...
Page is loading ...
Page is loading ...
Page is loading ...
Page is loading ...
Page is loading ...
Page is loading ...
Page is loading ...
Page is loading ...
Page is loading ...
Page is loading ...
Page is loading ...
Page is loading ...
Page is loading ...
Page is loading ...
Page is loading ...
Page is loading ...
Page is loading ...
Page is loading ...
Page is loading ...
Page is loading ...
Page is loading ...
Page is loading ...
Page is loading ...
Page is loading ...
Page is loading ...
Page is loading ...
-
 1
1
-
 2
2
-
 3
3
-
 4
4
-
 5
5
-
 6
6
-
 7
7
-
 8
8
-
 9
9
-
 10
10
-
 11
11
-
 12
12
-
 13
13
-
 14
14
-
 15
15
-
 16
16
-
 17
17
-
 18
18
-
 19
19
-
 20
20
-
 21
21
-
 22
22
-
 23
23
-
 24
24
-
 25
25
-
 26
26
-
 27
27
-
 28
28
-
 29
29
-
 30
30
-
 31
31
-
 32
32
-
 33
33
-
 34
34
-
 35
35
-
 36
36
-
 37
37
-
 38
38
-
 39
39
-
 40
40
-
 41
41
-
 42
42
-
 43
43
-
 44
44
-
 45
45
-
 46
46
-
 47
47
-
 48
48
-
 49
49
-
 50
50
-
 51
51
-
 52
52
-
 53
53
-
 54
54
-
 55
55
-
 56
56
-
 57
57
-
 58
58
-
 59
59
-
 60
60
-
 61
61
-
 62
62
-
 63
63
-
 64
64
-
 65
65
-
 66
66
-
 67
67
-
 68
68
-
 69
69
-
 70
70
-
 71
71
-
 72
72
-
 73
73
-
 74
74
-
 75
75
-
 76
76
-
 77
77
-
 78
78


