Page is loading ...

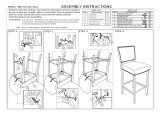
ASSEMBLY INSTRUCTION
ITEM : Oak-Bench
ASSEMBLY COMPLETED
NOTE : AFTER A FEW DAYS OF ASSEMBLY. IT WILL HAVE ACCLIMATIZED TO THE ENVIRONMENT. PLEASE TIGHTEN ALL HARDWARE.CHECK TIGHTNESS OF
ALL SCREWS EVERY 6 - 8 WEEKS.
Put bolt (A) into leg (2).
STEP 1
STEP 3
NO.
NO.
PARTLIST QTY
QTY
HARDWARE
BENCH TOP
11PC
2 4PCS
A
B
C
D
E
F
8PCS
8PCS
8PCS
8PCS
1PC
4PCS
LEG
2 x4
A
BOLT
M6 X 80
SPRING WASHER
FLAT WASHER
FELT MA
WRENCH
NUT
C
B
D
E
2
F
A
2
2
2
1
STEP 2
Put seat (1) upside on floor, pay attention to protect it. Fix leg (2) on seat by
using flat washer (C), spring washer (B), nut (D) and wrench (E). Add felt pad
(F) on leg bottom.
/