resideo TH115-A-240D-B/U Owner's manual
- Category
- Thermostats
- Type
- Owner's manual

M39031
Owner’s Guide
Guide du propriétaire
Guía para el usuario
TH115 (24 V; 15 min.)
Programmable thermostat
Thermostat programmable
Termostato programable 69-2619EFS-09

CAUTION: ELECTRONIC WASTE NOTICE
The product should not be disposed of with other household waste. Check for the nearest authorized collection
centers or authorized recyclers. The correct disposal of end-of-life equipment will help prevent negative
consequences for the environment and human health.
FCC statement:
https://customer.resideo.com/en-US/support/residential/codes-and-standards/FCC15105/Pages/default.aspx
MISE EN GARDE : AVIS DE DÉCHETS ÉLECTRONIQUES
Ne disposez pas ce produit avec les autres ordures ménagères. Recherchez les centres de collecte ou de
recyclage accrédités les plus proches. La mise au rebut appropriée de l’équipement en fin de vie aidera à
prévenir tout effet potentiellement nuisible à l’environnement et à la santé humaine.
Déclaration FCC :
https://customer.resideo.com/en-US/support/residential/codes-and-standards/FCC15105/Pages/default.aspx
PRECAUCIÓN: AVISO DE DESPERDICIO ELECTRÓNICO
El producto no se debe tirar con otros desechos domésticos. Verifique los centros de recolección autorizados
más cercanos o centros de reciclaje autorizados. La eliminación correcta del equipo al final de su vida útil
ayudará a evitar posibles consecuencias negativas para el medio ambiente y la salud humana.
Declaración de la FCC:
https://customer.resideo.com/en-US/support/residential/codes-and-standards/FCC15105/Pages/default.aspx

ENGLISH
TH115 (24V model)
Overview
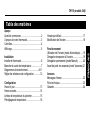
Before you start..................................................2
About your thermostat........................................3
Controls..............................................................4
Display ...............................................................5
Installation
Installing the thermostat.....................................6
Connecting the floor sensor ...............................7
Wiring diagrams ............................................8-11
Setting the configuration switches....................12
Setup
Time and day....................................................13
Daylight Saving Time .......................................14
Floor temperature limits ...................................15
Preset temperatures.........................................16
Default schedule ..............................................17
Modifying the schedule ....................................18
Operation
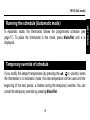
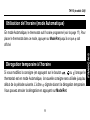
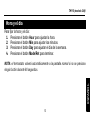
Running the schedule (Automatic mode) .........19
Temporary override of schedule.......................19
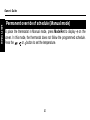
Permanent override (Manual mode) ...............20
Before going on vacation (Vacation mode) ......21
Appendices
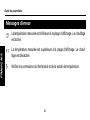
Error messages................................................22
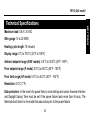
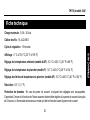
Technical specifications....................................23
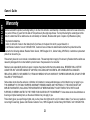
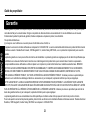
Warranty...........................................................24
Table of contents

Owner’s Guide
2
ENGLISH
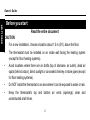
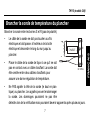
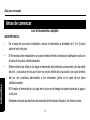
Read the entire document
CAUTION:
• For a new installation, choose a location about 1.5 m (5 ft.) above the floor.
• The thermostat must be installed on an inside wall facing the heating system
(except for floor heating systems).
• Avoid locations where there are air drafts (top of staircase, air outlet), dead air
spots (behind a door), direct sunlight or concealed chimney or stove pipes (except
for floor heating systems).
• Do NOT install the thermostat in an area where it can be exposed to water or rain.
• Keep the thermostat's top and bottom air vents (openings) clean and
unobstructed at all times.
Before you start

TH115 (24V model)
3
ENGLISH
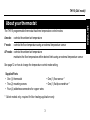
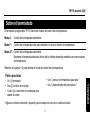
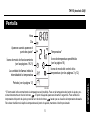
The TH115 programmable thermostat has three temperature control modes:
See page 12 on how to change the temperature control mode setting.
* Select models only; required for floor heating applications only.
About your thermostat
A mode: controls the ambient air temperature
F mode: controls the floor temperature using an external temperature sensor
AF mode: controls the ambient air temperature
maintains the floor temperature within desired limits using an external temperature sensor
Supplied Parts
• One (1) thermostat
• Two (2) mounting screws
• Four (4) solderless connectors for copper wires
• One (1) floor sensor *
• One (1) flat-tip screwdriver *

Owner’s Guide
4
ENGLISH
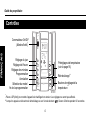
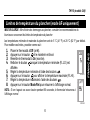
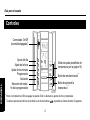
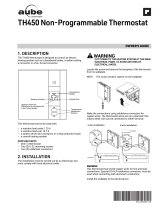
Controls
M39281
On/Off switch*
Day button
Temperature adjustment buttons**
Program button
Mode selection / program exit
Preset temperature buttons
(see page 16)
Backlight button**
Program clear button
Hour button
Minutes button
*
Place at Off to cut power to the heater (e.g., in the summer). This will not affect the time and temperature settings.
** When the backlight button or either of the buttons is pressed, the display illuminates for 12 seconds.

TH115 (24V model)
5
ENGLISH
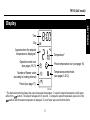
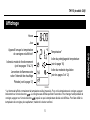
Display
M38982
Temperature*
Operation mode icon
(see pages 19-21)
Period (see page 17)
Time
Number of flames varies
according to heating intensity
Preset temperature icon (see page 16)
Appears when the setpoint
temperature is displayed*
Temperature control mode
(see pages 3 & 12)
Day
* The thermostat normally displays the actual (measured) temperature. To view the setpoint temperature, briefly press
either of the buttons. The setpoint will appear for 5 seconds. To change the setpoint temperature, press one of the
buttons until the desired temperature is displayed. To scroll faster, press and hold the button.

Owner’s Guide
6
ENGLISH
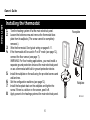
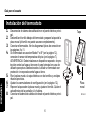
1. Turn the heating system off at the main electrical panel.
2. Loosen the bottom screw and remove the thermostat face-
plate from its wallplate. (The screw cannot be completely
removed.)
3. Wire the thermostat. See typical wiring on pages 8-11.
4. If the thermostat will be used in F or AF mode (see page 12),
connect the floor sensor (see page 7).
WARNING: For floor heating applications, you must install a
separate ground protection device at the main electrical panel
or use a thermostat with built-in ground protection device.
5. Install the wallplate on the wall using the provided screws and
wall anchors.
6. Set the configuration switches (see page 12).
7. Install the faceplate back on the wallplate and tighten the
screw. If there is a sticker on the screen, peel it off.
8. Apply power to the heating system at the main electrical panel.
Installing the thermostat
M39034
Wallplate
Faceplate

TH115 (24V model)
7
ENGLISH
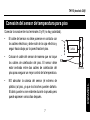
Connect the floor sensor between terminals R and S (no polarity).
• The sensor wires must not come in contact with the
electrical wires and must be routed outside the
electrical box and follow the wall down to the floor.
• Position the sensor cable such that it does not come in
contact with the floor heating wires. The sensor must
be centered between two floor heating wires for best
temperature control.
• Do NOT staple the sensor head (the plastic end) to the
floor. Doing so might damage the sensor. Any damage
might not be noticeable during testing but can become
apparent several days later.
Connecting the floor sensor
M39026
LOAD
C
W
R
S

Owner’s Guide
8
ENGLISH
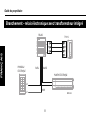
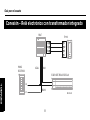
Wiring diagram - Single SSR with Built-in Transformer
ELECTRICAL
PANEL
HEATER
BLUE RED
BLACK
TH115
SSR
M39039
C
W
R
C
W
R
S
L2
L1

TH115 (24V model)
9
ENGLISH
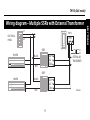
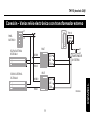
Wiring diagram - Multiple SSRs with External Transformer
ELECTRICAL
PANEL
EXTERNAL 24 V
TRANSFORMER
RED
RED
BLACK
BLACK
SSR
M39040
TH115
C W R S
HEATER
HEATER
SSR
VDC+
VAC
COM–
VDC+
VAC
COM–
L1
L2
L1
L2

Owner’s Guide
10
ENGLISH
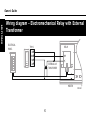
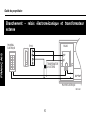
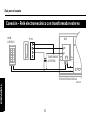
Wiring diagram - Electromechanical Relay with External
Transformer
HEATER
EXTERNAL 24 V
TRANSFORMER
RELAY
M39041
ELECTRICAL
PANEL TH115
C
W
R
S
W
C

TH115 (24V model)
11
ENGLISH
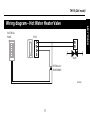
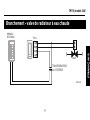
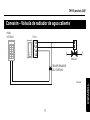
Wiring diagram - Hot Water Heater Valve
VALVE
M39042
ELECTRICAL
PANEL TH115
C
W
R
S
EXTERNAL 24 V
TRANSFORMER

Owner’s Guide
12
ENGLISH
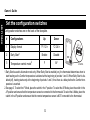
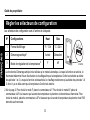
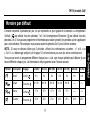
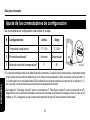
Configuration switches are on the back of the faceplate.
Set the configuration switches
# Configurations Up Down
1 Display format °F / 12 h °C / 24 h
2Early Start1
1.Early Start is used in Automatic mode only. When Early Start is enabled (on), the thermostat determines when to
start heating so the Comfort temperature is attained at the beginning of periods 1 and 3. When Early Start is dis-
abled (off), heating starts only at the beginning of periods 1 and 3; thus there is a delay before the Comfort tem-
perature is reached.
Enable Disable
3Temperature control mode2
2.See page 3. To select the F Mode, place the switch in the F position. To select the AF Mode, place the switch in the
AF position and ensure that the temperature sensor is connected to the thermostat. To select the A Mode, place the
switch in the AF position and ensure that the remote temperature sensor is NOT connected to the thermostat.
FAF M38981
123

TH115 (24V model)
13
ENGLISH
To set the clock and the day:
1. Press the Hour button to set the hour.
2. Press the Min button to set the minutes.
3. Press the Day button to set the day.
4. Press the Mode/Ret button to return the thermostat to normal display.
NOTE: The thermostat will automatically return to normal display if no button is
pressed for 60 seconds.
Time and day

Owner’s Guide
14
ENGLISH
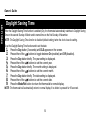
When the Daylight Saving Time function is enabled (On), the thermostat automatically switches to Daylight Saving
Time on the second Sunday of March and to normal time on the first Sunday of November.
NOTE: The Daylight Saving Time function is disabled (default setting) when the clock loses its setting.
To set the
Daylight Saving Time function and to set the date:
1. Press the Day button (3 seconds) until DLS appears on the screen.
2. Press either of the buttons to toggle between On (enabled) and Off (disabled).
3. Press the Day button briefly. The year setting is displayed.
4. Press either of the buttons to set the current year.
5. Press the Day button briefly. The month setting is displayed.
6. Press either of the buttons to set the current month.
7. Press the Day button briefly. The date setting is displayed.
8. Press either of the buttons to set the current date.
9. Press the Mode/Ret button to return the thermostat to normal display.
NOTE: The thermostat will automatically return to normal display if no button is pressed for 60 seconds.
Daylight Saving Time

TH115 (24V model)
15
ENGLISH
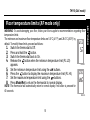
WARNING: To avoid damaging your floor, follow your floor supplier’s recommendations regarding floor
temperature limits.
The minimum and maximum floor temperature limits are 5.0°C (41°F) and 28.0°C (82°F) by
default. To modify these limits, proceed as follows:
1. Switch the thermostat to Off.
2. Press and hold the button.
3. Switch the thermostat back to On.
4. Release the button when the minimum temperature limit (FL:LO)
appears.
5. Set the minimum temperature limit using the buttons.
6. Press the button to display the maximum temperature limit (FL:HI).
7. Set the maximum temperature limit using the buttons.
8. Press Mode/Ret to return the thermostat to normal display.
NOTE: The thermostat will automatically return to normal display if no button is pressed for
60 seconds.
Floor temperature limits (AF mode only)
M38985
M38986

Owner’s Guide
16
ENGLISH
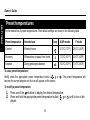
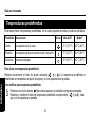
The thermostat has 3 preset temperatures. Their default settings are shown in the following table.
To use a preset temperature:
Briefly press the appropriate preset temperature button ( , or ). The preset temperature will
become the current setpoint and its icon will appear on the screen.
To modify a preset temperature:
1. Press one of the buttons to display the desired temperature.
2. Press and hold the appropriate preset temperature button ( , or ) until its icon is dis-
played.
Preset temperatures
Preset temperature Intended use Icon A/AF modes F mode
Comfort When at home 21.0°C (70°F) 28.0°C (82°F)
Economy When asleep or away from home 17.0°C (63°F) 20.0°C (68°F)
Vacation During prolonged absence 10.0°C (50°F) 10.0°C (50°F)

TH115 (24V model)
17
ENGLISH
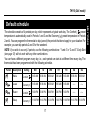
The schedule consists of 4 periods per day, which represents a typical work day. The Comfort ( ) preset
temperature is automatically used in Periods 1 and 3 and the Economy ( ) preset temperature in Periods
2 and 4. You can program the thermostat to skip (cancel) the periods that do not apply to your situation. For
example, you can skip periods 2 and 3 for the weekend.
NOTE: If you wish to use only 2 periods, use the following combinations: “1 and 4” or “2 and 3”. Early Start
(see page 12) will not work with any other combinations.
You can have a different program every day; i.e., each period can start at a different time every day. The
thermostat has been programmed with the following schedule.
Default schedule
Period Description Setting MO TU WE TH FR SA SU
Wake Comfort 6:00 AM 6:00 AM 6:00 AM 6:00 AM 6:00 AM 6:00 AM 6:00 AM
Leave Economy 8:30 AM 8:30 AM 8:30 AM 8:30 AM 8:30 AM --:-- --:--
Return Comfort 5:00 PM 5:00 PM 5:00 PM 5:00 PM 5:00 PM --:-- --:--
Sleep Economy 11:00 PM 11:00 PM 11:00 PM 11:00 PM 11:00 PM 11:00 PM 11:00 PM

Owner’s Guide
18
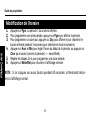
ENGLISH
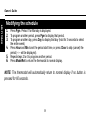
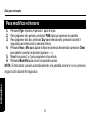
1. Press Pgm. Period 1 for Monday is displayed.
2. To program another period, press Pgm to display that period.
3. To program another day, press Day to display that day (hold for 3 seconds to select
the entire week).
4. Press Hour and Min to set the period start time, or press Clear to skip (cancel) the
period (--:-- will be displayed).
5. Repeat steps 2 to 4 to program another period.
6. Press Mode/Ret to return the thermostat to normal display.
NOTE: The thermostat will automatically return to normal display if no button is
pressed for 60 seconds.
Modifying the schedule
Page is loading ...
Page is loading ...
Page is loading ...
Page is loading ...
Page is loading ...
Page is loading ...
Page is loading ...
Page is loading ...
Page is loading ...
Page is loading ...
Page is loading ...
Page is loading ...
Page is loading ...
Page is loading ...
Page is loading ...
Page is loading ...
Page is loading ...
Page is loading ...
Page is loading ...
Page is loading ...
Page is loading ...
Page is loading ...
Page is loading ...
Page is loading ...
Page is loading ...
Page is loading ...
Page is loading ...
Page is loading ...
Page is loading ...
Page is loading ...
Page is loading ...
Page is loading ...
Page is loading ...
Page is loading ...
Page is loading ...
Page is loading ...
Page is loading ...
Page is loading ...
Page is loading ...
Page is loading ...
Page is loading ...
Page is loading ...
Page is loading ...
Page is loading ...
Page is loading ...
Page is loading ...
Page is loading ...
Page is loading ...
Page is loading ...
Page is loading ...
Page is loading ...
Page is loading ...
Page is loading ...
Page is loading ...
Page is loading ...
Page is loading ...
-
 1
1
-
 2
2
-
 3
3
-
 4
4
-
 5
5
-
 6
6
-
 7
7
-
 8
8
-
 9
9
-
 10
10
-
 11
11
-
 12
12
-
 13
13
-
 14
14
-
 15
15
-
 16
16
-
 17
17
-
 18
18
-
 19
19
-
 20
20
-
 21
21
-
 22
22
-
 23
23
-
 24
24
-
 25
25
-
 26
26
-
 27
27
-
 28
28
-
 29
29
-
 30
30
-
 31
31
-
 32
32
-
 33
33
-
 34
34
-
 35
35
-
 36
36
-
 37
37
-
 38
38
-
 39
39
-
 40
40
-
 41
41
-
 42
42
-
 43
43
-
 44
44
-
 45
45
-
 46
46
-
 47
47
-
 48
48
-
 49
49
-
 50
50
-
 51
51
-
 52
52
-
 53
53
-
 54
54
-
 55
55
-
 56
56
-
 57
57
-
 58
58
-
 59
59
-
 60
60
-
 61
61
-
 62
62
-
 63
63
-
 64
64
-
 65
65
-
 66
66
-
 67
67
-
 68
68
-
 69
69
-
 70
70
-
 71
71
-
 72
72
-
 73
73
-
 74
74
-
 75
75
-
 76
76


resideo TH115-A-240D-B/U Owner's manual
- Category
- Thermostats
- Type
- Owner's manual
Ask a question and I''ll find the answer in the document
Finding information in a document is now easier with AI
in other languages
Related papers
-
resideo RT850T-347-U Electric Heating Solid State Relay User manual
-
resideo R800-26838A User manual
-
-
-
 Aube TH109PLUS Non-programmable Thermostat Owner's manual
-
 Aube TH450 Non-Programmable Thermostat Installation guide
-
-


Other documents
-
Aube TH115-AF-GA Owner's manual
-
Honeywell RLV450 User guide
-
Honeywell RLV3150 Electric Thermostat User manual
-
Aube TH106 Owner's manual
-
 Nuheat NTG5220 Homeowner's Manual
-
King Electric Thermostat TH115-AF-GA User manual
-
WarmlyYours TH115-AF-GA-08 SmartStat Installation guide
-
Honeywell Home RLV3150 Installation guide
-
Honeywell Home RPLS731B User guide
-
Honeywell RLV4305A1014 Owner's manual
