QSC CP8 Quick start guide

Type
Quick start guide

This manual is also suitable for

QSC CP8: Compact and powerful, the QSC CP8 loudspeaker delivers professional-quality audio for a variety of applications. With its 8-inch woofer and 1.4-inch titanium-dome compression driver, the CP8 provides clear, articulate sound with a wide frequency response. The CP8 also features a built-in 2-channel mixer with XLR and 1/4-inch TRS inputs, making it easy to connect microphones, instruments, and other audio sources. With its versatile design and powerful performance, the QSC CP8 is an ideal choice for musicians, DJs, and anyone who needs a high-quality sound system.

QSC CP8: Compact and powerful, the QSC CP8 loudspeaker delivers professional-quality audio for a variety of applications. With its 8-inch woofer and 1.4-inch titanium-dome compression driver, the CP8 provides clear, articulate sound with a wide frequency response. The CP8 also features a built-in 2-channel mixer with XLR and 1/4-inch TRS inputs, making it easy to connect microphones, instruments, and other audio sources. With its versatile design and powerful performance, the QSC CP8 is an ideal choice for musicians, DJs, and anyone who needs a high-quality sound system.

TD-001570-01-A
*TD-001570-01*
CP Series
Yoke Mounting Quick Start Guide
EXPLANATION OF SYMBOLS
The term “WARNING! indicates instructions regarding personal safety. If the instructions are not followed the result may be bodily injury or death.
The term “CAUTION! indicates instructions regarding possible damage to physical equipment. If these instructions are not followed, it may result
in damage to the equipment that may not be covered under the warranty.
The term “IMPORTANT! indicates instructions or information that are vital to the successful completion of theprocedure.
The term "NOTE" is used to indicate additional useful information.
The intent of the lightning flash with arrowhead symbol in a triangle is to alert the user to the presence of un-insulated "dangerous"
voltage within the product's enclosure that may be of sufficient magnitude to constitute a risk of electric shock to humans.
The intent of the exclamation point within an equilateral triangle is to alert the user to the presence of important safety, and operating
and maintenance instructions in this manual.
IMPORTANT SAFETY INSTRUCTIONS
WARNING!: These mounting brackets shall only be used with CP Series loudspeakers. Use with other apparatus could
result in instability and possible injury.
1. Read these instructions.
2. Keep these instructions.
3. Heed all warnings.
4. Follow all instructions.
5. Only use attachments/accessories specified by the manufacturer.
6. Refer all servicing to qualified service personnel. Servicing is required when the apparatus has been damaged in any way, or has
beendropped.
7. Adhere to all applicable, local codes.
8. Consult a licensed, professional engineer when any doubt or questions arise regarding a physical equipmentinstallation.
9. Before placing or installing any loudspeaker product, inspect all hardware, cabinets, transducers, brackets and associated equipment for
damage. Any missing, corroded, deformed, or non-load rated component could significantly reduce the strength of the installation and
should be immediately corrected. Use only hardware which is rated for the loading conditions of the installation and any possible short-term
unexpected overloading. Never exceed the rating of the hardware or equipment.
Warranty
For a copy of the QSC Limited Warranty, visit the QSC website at www.qsc.com
2
TD-001570-01-A
Yoke Mounting the CP Series Loudspeakers
WARNING!: Read and follow these instructions carefully. If the loudspeakers are not installed
properly, they could fall, causing personal injury or death, and damage to the equipment.
Rules for Mounting
Consult a Professional Mechanical or Structural Engineer, licensed in the jurisdiction of the
sound system installation, to review, verify, and approve all attachments to the building
orstructure.
Employ the services of a Professional Rigger for hoisting, positioning, and attaching the
equipment to the supporting structure.
Correct use of all mounting hardware and components is imperative in sound system
installation and deployment.
Consult local codes and regulations to fully understand the requirements for installed loads in the venue in which you will install theequipment.
Use only the recommended yoke for installing the loudspeaker.
Be absolutely certain of the integrity of any structural member intended to support the loudspeaker(s). Hidden structural members can have
hidden structural weakness.
Never assume anything! Owner or third-party supplied attachment points may not be adequate for installing theloudspeakers.
Before lifting, always inspect all components (enclosures, brackets, pins, frames, bolts, nuts, etc.) for cracks, wear, deformation, corrosion,
missing, loose, or damaged parts that could reduce the strength of the assembly. Discard any worn, defective, or suspect parts and replace
them with new appropriately load-rated parts.
Yoke Mounting
Each model has two yoke-mounting points, one on each end of the enclosure.
Yoke Installation Options
Vertical and horizontal are the basic options; there are many possible positions based on the requirements of the venue. Make sure that the surface
is appropriate for the size of the yoke, the weight of both the yoke and loudspeaker, and that the appropriate attaching hardware is used.
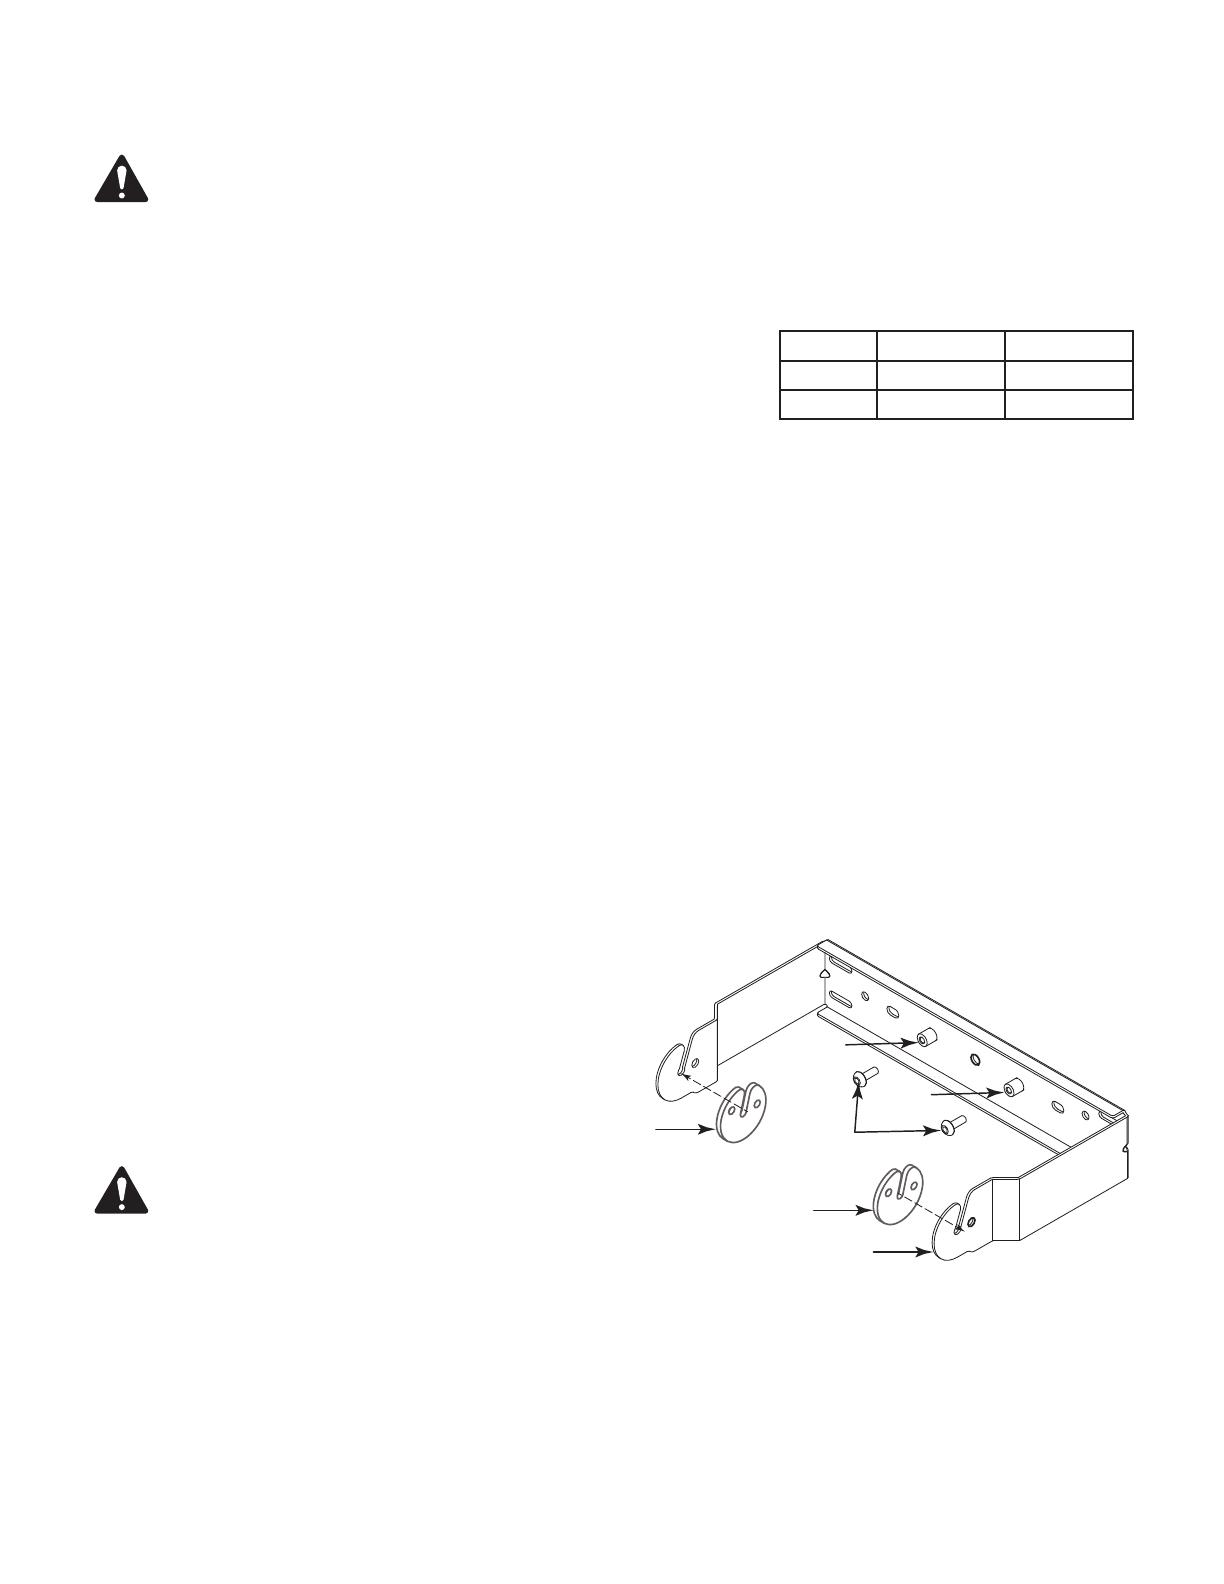
Prepare the Yoke
Refer to Figure 1.
1. Remove the protective paper from the back of a mounting pad (1).
2. Align the slot in the pad with the slot in the yoke (2) and press the
adhesive side of the pad against the inside of the yoke.
3. Repeat for the other mounting pad.
NOTE: The loudspeaker can be secured to the yoke
using the two button-head screws or, the supplied knobs. The
button-head hex screws give you greater security (requires a
tool to remove) or you can use the knobs for ease of removal.
The two threaded inserts (4) are used for storage of the
knobs or screws.
Model Weight (kg) Weight (lbs)
CP8 9.5 21.0
CP12 13.7 30.3
Figure 1
1
1
2
3
4
4
3
TD-001570-01-A
Install the Yoke
WARNING!: Make sure that the installation adheres to all applicable code
and regulations. Consult a licensed, professional engineer when any doubt or
questions arise regarding a physical equipment installation.
Install the yoke assembly on the desired surface. If possible mount the yoke with the open end of the slot pointing up
s shown in Figure 2. Attaching hardware is not included.
Prepare the Loudspeaker
Refer to Figure 3
1. Use a Phillips screwddriver to remove two screws (1) from the pole-cup bracket (2). The screws are
beside the QSC Logo,
2. Use the screws (1) you just removed to secure the tether bracket (3) to the pole-cup bracket. You
can install the tether bracket one of two ways (3a or 3b). The tether bracket can only be installed
on the bottom of the loudspeaker in the location shown in Figure 3.
3. Torque these two screws to 18 Kgf-cm (16 In-Lbs).
4. Thread either the button-head hex screw (4a), or the knob (4b), into the yoke-mounting threaded
insert. Repeat for the top of the loudspeaker. Leave enough room on the small shaft of the screw
(or knob) to allow for the thickness of the yoke.
NOTE: The following procedures assume that the yoke is properly installed.
WARNING!: Use two people to perform the following procedures.
Assemble the Loudspeaker and Yoke
Use the Slots to Mount the Loudspeaker
You can mount the loudspeaker using the button-head hex screw or the knob. Both of these are
shoulder screws that help with the mounting process. Figure 4 shows the function of the shoulder
screws in the slots. The loudspeaker is not shown.
1. Make sure the yoke is properly mounted to the desired surface and that the adhesive pads
areinstalled.
2. Make sure the button-head hex screws or the knobs are threaded into the loudspeaker's yoke
mounting points.
3. Lift the loudspeaker and align the screws / knobs with the slots in the yoke.
4. Slide the narrow shaft of the screws into the slot (1) and all the way to the bottom of the slot.
The shoulder part of the screw will not fit in the slot.
5. With the screws all the way down into the slots, turn the knob or button-head hex screw until
the shoulder is engaged into the slot. When the shoulder is engaged (2), the screw will not slide
back up the slot.
6. Position the loudspeaker at the desired angle (Figure 5) then do one of the following:
Tighten both knobs tight enough to keep the loudspeaker in the desired position.
OR
Use a 6 mm hex key to tighten both button-head hex screws tight enough to keep the loudspeaker in the
desired position.
Figure 2
Slot up
Slot down
Figure 3
1
2
3a
3b
4b
4a
4b
1
4a
Figure 4
1 2
Figure 5
4
TD-001570-01-A
Use the Single Hole to Mount the Loudspeaker
This method gives you about 0.6 in. (15.25 mm) shorter distance from the mounting surface to the front of the
loudspeaker.
Do not install the screws/knobs until the loudspeaker yoke mounting points are aligned with the holes in the yoke.
Refer to Figure 6.
1. Make sure the yoke is properly mounted to the desired surface and that the adhesive pads are installed.
2. Make sure the button-head hex screws or the knobs are not threaded into theloudspeaker.
3. Lift the loudspeaker and align the loudspeaker's yoke-mounting points with the single holes in the yoke arms.
4. Insert either the button-head hex screw or knob through the hole in the yoke and thread it into the loudspeaker
yoke-mounting point.
5. Repeat for the other end of the loudspeaker.
6. Tighten enough to keep the loudspeaker at the desired angle.
Tether the Loudspeaker
Refer to Figure 7.
Refer to local codes and requirements for tethering.
Use an appropriate cable (1) attached to the loudspeaker's tether bracket (2) and to a structural part of
the venue. Use appropriate hardware to attach the tether cable to the structure.
Figure 6
Figure 7
2
1
© 2018 QSC, LLC. All rights reserved. QSC and the QSC logo are registered trademarks of QSC, LLC in the U.S. Patent and Trademark office and other countries. All other
trademarks are the property of their respective owners.
http://patents.qsc.com.
Contact QSC
QSC, LLC
1675 MacArthur Boulevard
Costa Mesa, CA 1468‑92626 USA
Main Number: 1.714.754.6175+
Toll Free 800.854.4079
(US Only)
Website: www.qsc.com
Sales and Marketing:
1.714.957.7100+ or
toll free (USA only) 800.854.4079
FAX: 1.714.754.6174+
E‑mail: info@qsc.com
Customer Service
1.714.957.7150+ or
toll free (USA only) 800.772.2834
FAX: 1.714.754.6173+
E‑mail: service@qsc.com
  • Page 1 1
  • Page 2 2
  • Page 3 3
  • Page 4 4

QSC CP8 Quick start guide

Type
Quick start guide
This manual is also suitable for

QSC CP8: Compact and powerful, the QSC CP8 loudspeaker delivers professional-quality audio for a variety of applications. With its 8-inch woofer and 1.4-inch titanium-dome compression driver, the CP8 provides clear, articulate sound with a wide frequency response. The CP8 also features a built-in 2-channel mixer with XLR and 1/4-inch TRS inputs, making it easy to connect microphones, instruments, and other audio sources. With its versatile design and powerful performance, the QSC CP8 is an ideal choice for musicians, DJs, and anyone who needs a high-quality sound system.

Ask a question and I''ll find the answer in the document

Finding information in a document is now easier with AI