Page is loading ...

For questions or help with this product contact Tech Support at (570) 546-9663 or techsupport@grizzly.com
MODEL T26413,
T26414, & T26415
ARBOR PRESS
INSTRUCTIONS
COPYRIGHT © NOVEMBER, 2013 BY GRIZZLY INDUSTRIAL, INC., REVISED MAY, 2015 (MN)
NO PORTION OF THIS MANUAL MAY BE REPRODUCED IN ANY SHAPE
OR FORM WITHOUT THE WRITTEN APPROVAL OF GRIZZLY INDUSTRIAL, INC.
#TS16037 PRINTED IN CHINA
V2.05.15
Introduction
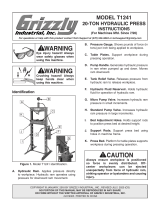
This arbor press is designed to perform small
press jobs, such as staking, riveting, and install-
ing/removing bearings. The ram accepts dies,
inserts, and other tooling for custom work.
Material under pressure
could fly apart and cause
impact injuries. Always
wear safety glasses when
using this press.
Keep hands and fingers
away from the ram when
applying downward pres-
sure to avoid pinching inju-
ries.
Specifications
T26413
Press Capacity ........................................... 1 Ton
Throat Depth..................................................... 4"
Maximum Workpiece Height .........................6
1
⁄8"
Ram Size ................................................... 1" x 1"
Ram Bore .....................
1
⁄2" Diameter x
1
⁄2" Deep
Base Size ....................................... 6" W 10
1
⁄2" D
Overall Size ..................... 7
1
⁄4" W x 11" D x 13" H
Weight .......................................................32 lbs.
T26414
Press Capacity ......................................... 2 Tons
Throat Depth..................................................... 6"
Maximum Workpiece Height ............................8"
Ram Size ............................................ 1
1
⁄4" x 1
1
⁄4"
Ram Bore .....................
1
⁄2" Diameter x
1
⁄2" Deep
Base Size ........................................8" W x 16" D
Overall Size ............... 11
1
⁄2" W x 16
1
⁄2" D x 18" H
Weight .......................................................68 lbs.
T26415
Press Capacity ......................................... 3 Tons
Throat Depth..................................................6
1
⁄4"
Maximum Workpiece Height .......................12
3
⁄4"
Ram Size ............................................1
1
⁄2" x 1
1
⁄2"
Ram Bore .....................
1
⁄2" Diameter x
1
⁄2" Deep
Base Size ........................................8" W x 18" D
Overall Size ............... 11
1
⁄2" W x 18" D x 21
1
⁄2" H
Weight .....................................................108 lbs.
This arbor press is designed to only be
used for small parts. Do not use this arbor
press for operations beyond its capacity or
modify it for increased leverage.
Model T26414
Shown
Figure 1. Model T26414 arbor press.

-2-
T26413/T26414/T26415 (Mfd. 9/13+)
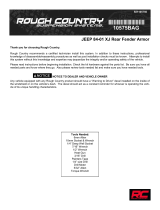
Small Item Inventory (Figure 2)
Description Qty
A. Sliding Handle Assembly ........................... 1
B. Handle Lock Knob Bolt .............................. 1
C. Handwheel Handle (T26413 Only) ............. 1
D. Handwheel (T26413 Only) .......................... 1
E. Table ........................................................... 1
F. Hex Wrench 3mm (T26413 Only) ............... 1
G. Hex Wrench 4mm ....................................... 1
H. Hex Wrench 5mm ....................................... 1
I. Round-Nose Die ......................................... 1
J. Cone-Point Die ........................................... 1
K. Square Die ................................................. 1
HEAVY LIFT!
Straining or crushing injury
may occur from improperly
lifting the arbor press. To
reduce this risk, get help
from other people or lifting
equipment rated for weight
of the arbor press.
Cleanup
The unpainted surfaces of your machine are
coated with a heavy-duty rust preventative that
prevents corrosion during shipment and storage.
This rust preventative works extremely well, but it
will take a little time to clean.
Be patient and do a thorough job cleaning your
machine. The time you spend doing this now will
give you a better appreciation for the proper care
of your machine's unpainted surfaces.
There are many ways to remove this rust preven-
tative, but the following steps work well in a wide
variety of situations. Always follow the manufac-
turer’s instructions with any cleaning product you
use and make sure you work in a well-ventilated
area to minimize exposure to toxic fumes.
Before cleaning, gather the following:
• Disposable Rags
• Cleaner/degreaser (WD•40 works well)
• Safety glasses & disposable gloves
• Plastic paint scraper (optional)
Basic steps for removing rust preventative:
1. Put on safety glasses.
2. Coat the rust preventative with a liberal
amount of cleaner/degreaser (see Page 8
for offerings from Grizzly), then let it soak for
5–10 minutes.
3. Wipe off the surfaces. If your cleaner/
degreaser is effective, the rust preventative
will wipe off easily. If you have a plastic paint
scraper, scrape off as much as you can first,
then wipe off the rest with the rag.
4. Repeat Steps 2–3 as necessary until clean,
then coat all unpainted surfaces with a quality
metal protectant to prevent rust.
NOTICE
Avoid chlorine-based solvents, such as
acetone or brake parts cleaner, that may
damage painted surfaces.
Figure 2. Small item inventory.
D
A
B
C
E
F
G
H
I
J
K

T26413/T26414/T26415 (Mfd. 9/13+)
-3-
Mounting
Because of the dynamic forces involved in operat-
ing the arbor press, we strongly recommend that
you mount it to a benchtop or other stable working
surface to prevent it from moving during operation
and causing accidental injury or damage.
The base of the arbor press has
3
⁄8" mounting
holes on each side of the upright (see Figure 3).
The strongest mounting option is a "Through
Mount" (see example below) where holes are
drilled all the way through the workbench—and
hex bolts, washers, and hex nuts are used to
secure the machine in place.
Figure 3. Mounting hole (1 of 2).
3
⁄8" Mounting Hole
(1 of 2)
Figure 4. Example of a "Through Mount" setup.
Machine Base
Workbench
Hex
Bolt
Flat Washer
Flat Washer
Lock Washer
Hex Nut
Figure 5. Example of a "Direct Mount" setup.
Machine Base
Workbench
Lag Screw
Flat Washer
Another option is a "Direct Mount" (see example
below) where the machine is secured directly to
the workbench with lag screws and washers.
Assembly
1. Remove cap at one end of sliding handle
assembly (see Figure 6).
Figure 6. Handle cap removed.
Cap
Cap
Screw
Handle

-4-
T26413/T26414/T26415 (Mfd. 9/13+)
2. Insert handle through handle hub and re-
install cap, as shown in Figure 7.
Figure 7. Sliding handle installed.
3. Thread handle lock knob bolt into hub, as
shown in Figure 7. When tightened, this knob
bolt secures handle in position relative to
hub.
4. Raise ram and insert table plate pin into base
(see Figure 8).
Figure 8. Table plate and dies.
Table
Plate
Dies
5. Insert included dies in provided storage holes
on base (see Figure 8).
Table Plate
Rotate table plate to align desired table opening
size under ram (see Figure 8).
Installing Dies/Tooling
The included dies or custom tooling is inserted
into the ram bore, which has a
1
⁄2" diameter,
1
⁄2"
depth, and a magnet at the bottom of the bore
to hold the tooling in place (see Figure 9 for an
example).
Figure 10. Hex bolts that secure front plate.
Hex
Bolts
Front
Plate
Handle
Hub
Flipping Ram
The ram can be flipped end-over-end, depending
whether the solid end or the end with the bore is
needed for the operation.
Tools Needed Qty
Wrench or Socket 10mm (T26413) .................... 1
Wrench or Socket 12mm (T26414, T26415) ...... 1
To flip the ram:
1. Remove hex bolts shown in Figure 10, then
remove front plate to access ram rack-and-
pinion (see Figure 11 on next page).
Handle Cap
Re-installed
Handle Lock Knob Bolt
Figure 9. Example photo of die installed in ram.
Die

T26413/T26414/T26415 (Mfd. 9/13+)
-5-
2. Remove the ram from press, then flip it end-
over-end as needed for operation.
3. Re-insert ram into housing and mesh ram
rack with pinion.
4. Re-install the front plate.
Adjusting Ram Play
Set screws on the front and left side of the ram
housing (see Figure 12) adjust the amount of ram
free-play. The ideal adjustment allows the ram to
move with very little play but not be overly stiff.
T26413 Tools Needed Qty
Wrench or Socket 10mm ................................... 1
Hex Wrench 3mm .............................................. 1
T26414-15 Tools Needed Qty
Wrench or Socket 14mm ................................... 1
Hex Wrench 4mm .............................................. 1
To adjust ram play:
1. Loosen hex nuts on set screws shown in
Figure 12.
Figure 12. Ram free-play adjustment controls.
2. Equally adjust each pair of set screws a
small amount in same direction (clockwise
to decrease free-play, counterclockwise to
increase free-play).
3. Use sliding handle to move ram up and down
a few times. Adjust set screws as necessary.
4. When you are satisfied with the amount of
ram free-play, retighten hex nuts without
moving set screws.
Figure 11. Ram rack and pinion.
Pinion
Ram
Rack

-6-
T26413/T26414/T26415 (Mfd. 9/13+)
Cleaning & Protecting
Wipe the arbor press down with a clean shop rag
and mineral spirits. When dry, protect the unpaint-
ed surfaces by applying a thin film of ISO 32 oil.
Lubrication
Ball Oilers
Oil Type ......Model T23963 or ISO 32 Equivalent
Oil Amount ......................................... 1–2 Pumps
Lubrication Frequency ...........8 Hrs. of Operation
Proper lubrication of the two ball oilers (see
Figure 13) is done with a pump-type oil can that
has a plastic or rubberized cone tip. We do not
recommend using metal needle or lance tips, as
they can push the ball too far into the oiler, break
the spring seat, and lodge the ball in the oil galley.
Push the tip of the oil can nozzle against the ball
oiler to create a hydraulic seal, then pump the oil
can once or twice. If you see sludge and contami-
nants coming out of the lubrication area, continue
pumping the oil can until the oil runs clear. Move
the components through the entire path of travel a
few times to distribute the oil. When finished, wipe
away the excess oil.
Rack & Pinion
Grease .......Model T23964 or NLGI#2 Equivalent
Grease Amount ................................. As Needed
Lubrication Frequency .........40 Hrs. of Operation
Tools Needed Qty
Wrench or Socket 10mm (T26413) .................... 1
Wrench or Socket 12mm (T26414, T26415) ...... 1
To lubricate rack and pinion:
1. Remove front plate to remove ram and
expose pinion (see Figure 14).
2. Use shop rags, stiff brush, and mineral spirits
to clean teeth of rack and pinion.
3. When dry, apply a light coat of grease to rack
and pinion teeth.
4. Re-install ram and front plate.
5. Use sliding handle to move ram up and down
several times to distribute the grease.
Figure 13. Locations of ball oilers.
Ball Oilers
Figure 14. Ram rack and pinion.
Pinion
Ram
Rack

T26413/T26414/T26415 (Mfd. 9/13+)
-7-
Parts
1
2
3
4
5
6
7
8
9
10
11
12
13
14
15
16
17
18
20
21
22
19
23
24
25
26 27
28
T26413 Parts List
REF PART # DESCRIPTION REF PART # DESCRIPTION
1 PT26413001 BODY 15 PT26413015 FRONT PLATE
2 PT26413002 SET SCREW M6-1 X 25 16 PT26413016 HEX BOLT M6-1 X 25
3 PT26413003 HEX NUT M6-1 17 PT26413017 SET SCREW M6-1 X 12
4 PT26413004 TABLE 18 PT26413018 HEX NUT M6-1
5 PT26413005 CAP SCREW M5-.8 X 12 19 PT26413019 HANDLE KNOB BOLT M8-1.25 X 10
6 PT26413006 HANDLE CAP 20 PT26413020 HEX WRENCH 3MM
7 PT26413007 SLIDING HANDLE 21 PT26413021 HEX WRENCH 4MM
8 PT26413008 SPLINE SHAFT 22 PT26413022 HEX WRENCH 5MM
9 PT26413009 SET SCREW M8-1.25 X 8 23 PT26413023 KEY 6 X 20
10 PT26413010 LOCK COLLAR 24 PT26413024 SET SCREW M8-1.25 X 10
11 PT26413011 RAM 25 PT26413025 HEX NUT M10-1.5
12 PT26413012 DIE-ROUND NOSE 26 PT26413026 HANDWHEEL HANDLE
13 PT26413013 DIE-SQUARE HEAD 27 PT26413027 SHOULDER SCREW M10-1.5 X 80
14 PT26413014 DIE-CONE POINT 28 PT26413028 HANDWHEEL
T26414-15 Parts List
REF PART # DESCRIPTION REF PART # DESCRIPTION
1 PT26414001 BODY (T26414) 11 PT26414011 RAM (T26414)
1 PT26415001 BODY (T26415) 11 PT26415011 RAM (T26415)
2 PT26414002 SET SCREW M8-1.25 X 30 12 PT26414012 DIE-ROUND NOSE
3 PT26414003 HEX NUT M8-1.25 13 PT26414013 DIE-SQUARE HEAD
4 PT26414004 TABLE (T26414) 14 PT26414014 DIE-CONE POINT
4 PT26415004 TABLE (T26415) 15 PT26414015 FRONT PLATE (T26414)
5 PT26414005 CAP SCREW M6-1 X 20 15 PT26415015 FRONT PLATE (T26415)
6 PT26414006 HANDLE CAP 16 PT26414016 HEX BOLT M6-1 X 30
7 PT26414007 SLIDING HANDLE 17 PT26414017 SET SCREW M8-1.25 X 30
8 PT26414008 SPLINE SHAFT (T26414) 18 PT26414018 HEX NUT M8-1.25
8 PT26415008 SPLINE SHAFT (T26415) 19 PT26414019 HANDLE KNOB BOLT M8-1.25 X 15
9 PT26414009 SET SCREW M8-1.25 X 8 21 PT26414021 HEX WRENCH 4MM
10 PT26414010 LOCK COLLAR (T26414) 22 PT26414022 HEX WRENCH 5MM
10 PT26415010 LOCK COLLAR (T26415)

-8-
T26413/T26414/T26415 (Mfd. 9/13+)
Accessories
Installing unapproved accessories may
cause machine to malfunction, resulting in
serious personal injury or machine damage.
To reduce this risk, only install accessories
recommended for this machine by Grizzly.
NOTICE
Refer to our website or latest catalog for
additional recommended accessories.
T23964—Armor Plate with Moly-D Multi-
Purpose Grease, 14.5 oz. (NLGI#2 Equivalent)
Armor Plate with Moly-D is a rich green moly
grease that provides excellent stability and unsur-
passed performance under a wide range of tem-
peratures and operating conditions. Armor Plate
grease is entirely unique due to the fact that the
moly in it is solubilized, which provides supe-
rior performance to other greases containing the
black solid form of molybdenum disulfide.
Figure 15. T23964 Armor Plate with Moly-D
Multi-Purpose Grease
order online at www.grizzly.com or call 1-800-523-4777
T23962—ISO 68 Moly-D Way Oil, 5 gal.
T23963—ISO 32 Moly-D Machine Oil, 5 gal.
Moly-D oils are some of the best we've found for
maintaining the critical components of machinery
because they tend to resist run-off and maintain
their lubricity under a variety of conditions—as
well as reduce chatter or slip. Buy in bulk and
save with 5-gallon quantities.
Figure 17. ISO 68 and ISO 32 machine oil.
T23962
T23963
High-Pressure Oil Can
H7615—Steel Nozzle
Whether you are lubricating cutting tools or main-
taining machinery in top operating condition, you
will appreciate this High-Pressure Oil Can. Can
holds 5 ounces of oil and has a trigger-activated,
high-pressure pump.
Figure 18. High-pressure oil can.
H7615
Figure 16. Cleaner/degreasers.
G2544—Solvent Cleaner & Degreaser
T23692—Orange Power Degreaser
Great products for removing shipping grease.
/