
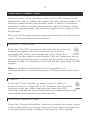
Manual v1.3
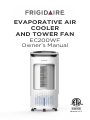
EVAPORATIVE AIR
COOLER
AND TOWER FAN
EC200WF
Owner’s Manual

2
READ AND SAVE THESE
INSTRUCTIONS
.
TABLE OF CONTENTS
Register Your Product Online ....................................................................... 3
Safety Information & Warnings ................................................................... 4
Parts List ................................................................................................................ 5
Features .................................................................................................................6
Operating Instructions ..................................................................................... 7
Cleaning And Maintenance ........................................................................... 11
Limited Manufacturer’s Warranty ............................................................. 13
SPECIFICATIONS
MODEL
NO
EC200WF
RATED VOLTAGE
120V
RATED FREQUENCY
60 Hz
RATED POWER
65W
NOISE
≤55dB
AIRFLOW
350 CFM
COVERAGE
250 square feet
DIMENSIONS
Depth: 12.7 in
Width: 12.8 in
Height: 31.4 in
Frigidaire is a registered trademark of Electrolux Home Products, Inc.
All rights reserved.
Manufactured under license by:
NewAir, LLC
6600 Katella Ave, Cypress, CA 90630
Comments/questions:

3
REGISTER YOUR PRODUCT ONLINE
Register Your Frigidaire Product Online Today!
Take advantage of all the benefits product registration has to
offer:
Service and Support
Diagnose troubleshooting and service issues faster and
more accurately
Recall Notifications
Stay up to date on safety notices, system updates, and
recall notifications
Special Promotions
Opt-in for NewAir promotions and offers.
Registering your product information online is safe &
secure and takes less than 2 minutes to complete:
Alternatively, we recommend you attach a copy of your sales
receipt below and record the following information, which can
be found on the manufacturer’s nameplate on the back of the
unit. You will need this information if it becomes necessary to
contact the manufacturer for service inquiries.
Date of Purchase:
___________________________________________
Serial Number:
____________________________________________
Model Number:
____________________________________________
newair.com/register

4
SAFETY INFORMATION & WARNINGS
In order to use the product safely and to avoid any
danger caused by incorrect operation, please pay
close attention to the warnings and instructions in this
manual.
• Please read all instructions carefully before using this
product.
• Before use, please check whether the operating voltage
matches the voltage on the label of the unit.
• Cleaning and user maintenance should not be done by
children without adult supervision.
• WARNING: Unplug or disconnect the appliance from the
power supply before servicing or cleaning.
• The appliance is exclusively for household and indoor use.
• This appliance has a polarized plug with one blade that is
wider than the other. To reduce the risk of electric shock, this
plug is intended to fit in a polarized outlet only one way. If
the plug does not fit fully in the outlet, reverse the plug. If it
still does not fit, contact a qualified electrician. Do not
attempt to override this safety feature.
• WARNING: To reduce the risk of fire or electric shock, do not
use this fan with any solid-state speed control device.
• WARNING: Chemical Burn Hazard. Keep batteries away
from children.
• This product contains a lithium button/coin cell battery. If a
new or used lithium button/coin cell battery is swallowed or
enters the body, it can cause severe internal burns and can
lead to death in as little as 2 hours. Always completely secure
the battery compartment. If the battery compartment does
not close securely, stop using the product, remove the
batteries, and store it away from children. If you think
batteries might have been swallowed or placed inside any
part of the body, seek immediate medical attention.

5
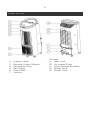
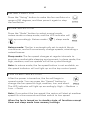
PARTS LIST
1. Top Cover
8. Remote Control
Storage
2. Display Panel
9. Rear Case
3. Remote Control Sensor
10. Air Intake/Filter
4. Decorative Ring
11. Cord Storage Brackets
5. Fan Outlet
12. Water Tank
6. Front Shell
13. Power Cord
7. Casters

6
FEATURES
1. Four fan speeds: quiet, low, medium, high
2. Three fan modes: normal, nature, and sleep mode
3. Four timer settings: 1h, 2h, 4h, 8h
4. Low water protection function
5. Wide angle fan oscillation
6. Remote control (maximum range 6m, left/right 60° from
sensor)
7. Fan-only mode
8. Power failure memory function
9. Touch screen controls
10. Automatic shutoff after 15 hours of continuous operation
11. Included ice packs for extra cooling power (Do not break
open or modify ice packs in any way—ice packs already
contain a freezing gel and do not need to be opened. Place
ice packs in the freezer overnight prior to use, for maximum
cooling effect. Frozen ice packs should be placed directly
into the water tank, on the left side, facing the back of the
unit. Ice packs must only be placed on the left side, or they
might obstruct or damage the water pump.)

7
OPERATING INSTRUCTIONS
Remove the product from the packaging and review the
instructions and other included accessories. The unit can be used
immediately after being removed and unpacked.
FILLING THE WATER TANK
We recommend filling your water tank first before operating the
unit, so that the evaporative cooling will be functional right
away. The water tank can be pulled out of the bottom of the
back of the unit, and filled up to the max fill line. Your unit comes
with ice packs, which will help the cooler put out even colder air.
(Do not break open or modify ice packs in any way—ice packs
already contain a freezing gel and do not need to be opened.
Place ice packs in the freezer overnight prior to use, for
maximum cooling effect. Frozen ice packs should be placed
directly into the water tank, on the left side, facing the back of
the unit. Ice packs must only be placed on the left side, or they
might obstruct or damage the water pump.)
Once the water tank is full, press the On/Off button. Then, press
the Cooler/Humidifer button to turn on the water pump. The
water pump will enable evaporative cooling, as it draws water up
and runs it through the cooling pad.
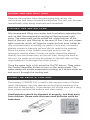
USING THE REMOTE CONTROL
One battery (CR2032 3V) is used in the remote control. Please
insert the battery into the remote control tightly based on the
direction of the polarity. If the remote will not be used for a long
time, please remove the battery and store safely.
Used batteries should be disposed of properly, and kept away
from children. Please note that even used batteries could be
hazardous.

8
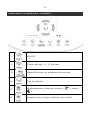
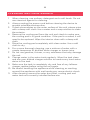
CONTROL & DISPLAY PANELS
1
On/Off
2
Timer setting: 1, 2, 4, 8 hours
3
Humidification, or evaporative cooling
4
Fan oscillation
5
Mode selection: Normal, nature ( ), sleep (
)
6
speed control: High, medium, low, silent

9
CONTROL PANEL USE
When the unit is first turned on with the On/Off button, it will
beep twice, the air outlet will rotate from the current angle to 0°,
and the system enters the standby state. If there is no button
operation within 1 minute, the indicator light will darken. If the
button is pressed again, the indicator light will turn back to full
brightness.
The unit can be operated by pressing the button on the control
panel. The instructions are as follows:
ON/OFF CONTROL
Press the “On/Off” button for the first time to enter the
normal fan speed—this will cause the air outlet to
automatically rotate out toward the front. Press the
“On/Off” button again to shut down—this will cause the fan to
stop running and hide the air outlet. At this point, the fan is in
standby mode. To completely turn off the fan, press the On/Off
button.
Note: In order to extend the life of the product, it is
recommended to completely power off the product after each
use
TIMER
Press the “Timer” button to select 1 hour, 2 hours, 4
hours or 8 hours. If the LED is off, it means that the timer
function is not set. After selecting the time, the LED
indicator will display the set time and will automatically shut
down after the selected time has elapsed.
COOLER/HUMIDIFIER
Press the “Cooler/Humidifier” button to enable the water pump.
If the water pump is running, water will flow down through the
cooling pad and offer cooler air than the fan-only setting.

10
SWING FUNCTION
Press the “Swing” button to make the fan oscillate at a
range of 50 degrees, and then press it again to stop
the oscillation.
MODE SELECTION
Press the “Mode” button to select normal mode,
nature mode or sleep mode, and the LED indicator will
light up accordingly: Nature mode ( ), sleep mode
( ).
Nature mode: The fan is automatically set to match the air
conditioner, and will occasionally change speeds, mimicking a
natural breeze.
Sleep mode: The fan speed changes at regular intervals to
provide a comfortable sleeping environment. In sleep mode, the
high, medium, and low speeds will all be cycled through.
Note: In nature mode, the fan speed button is not available, so
the speed indicator will not light up on the top control panel.
FAN SPEED SELECTION
After the power is turned on, the fan will begin in
normal mode. You can press the “Speed” button to
change the fan speed to high, medium, low, and silent.
The LED indicator will light up accordingly: High → Medium →
Low → Quiet
Note: If you select the low speed, the motor will start at medium
speed for a few seconds and then switch to low speed.
When the fan is turned on in standby state, all functions except
timer and sleep mode have memory settings.

11
CLEANING AND MAINTENANCE
1. When cleaning, use ordinary detergent and a soft brush. Do not
use chemical agents for cleaning.
2. Always unplug the power cord before cleaning the device to
prevent possible electrocution.
3. If dust accumulates on the outer surface of the unit, please wipe
with a damp soft cloth. Use a water and a soap mixture to clean
the exterior.
4. Remove the cooling pad from the unit and check to make sure
the cooling pad is in good condition. If the pad is cracked, it will
need to be replaced. Wipe the interior clean with a damp soft
cloth.
5. Rinse the cooling pad completely with clean water. Use a soft
cloth to dry.
6. For a more thorough cleaning, use a mixture of water with a
couple teaspoons of distilled white vinegar or lemon juice.
7. Do not use gasoline, thinner, or any substance that may damage
the unit
8. Change water in the water tank regularly. Wipe the tank clean
and use your diluted vinegar solution to remove any hard water
stains in the tank.
9. Make sure the tank is completely dry and free of any leftover
vinegar residue before using the unit again.
10. Be careful handling the appliance while cleaning, as working
around the appliance with wet hands may cause electric shock.
11. After cleaning, ensure the outer dust filter, cooling pad and
water tank are correctly installed before use.

12
CLEANING THE SURFACE OF THE UNIT
1. To clean the surface of the machine, wipe with a damp cloth. It
is strictly prohibited to rinse directly with water. Never
submerge the unit in water.
2. Do not use corrosive detergent or solvent.
3. When cleaning the body, be sure to turn off the power switch
and unplug the power cord, or else it may cause electric shock.
MAINTENANCE
1. When the product is not going to be used for an extended
period, unplug the power cord, package the product, and store
in a way that prevents dust buildup.
2. After packaging, store in a dry and well-ventilated location.

13
LIMITED MANUFACTURER’S WARRANTY
This appliance is covered by a limited manufacturer’s warranty.
For one year from the original date of purchase, the
manufacturer will repair or replace any parts of this appliance
that prove to be defective in materials and workmanship,
provided the appliance has been used under normal operating
conditions as intended by the manufacturer.
Warranty Terms:
During the first year, any components of this appliance found to
be defective due to materials or workmanship will be repaired or
replaced, at the manufacturer’s discretion, at no charge to the
original purchaser. The purchaser will be responsible for any
removal or transportation costs.
Warranty Exclusions:
The warranty will not apply if damage is caused by any of the
following:
• Power failure
• Damage in transit or when moving the appliance
• Improper power supply such as low voltage, defective
household wiring or inadequate fuses
• Accident, alteration, misuse or abuse of the appliance such
as using non-approved accessories, inadequate air circulation
in the room or abnormal operating conditions (extreme
temperatures)
• Use in commercial or industrial applications
• Fire, water damage, theft, war, riot, hostility or acts of God
such as hurricanes, floods, etc.
• Use of force or damage caused by external influences
• Adjustments to temperature by removal of stickers and/or
screws
• Partially or completely dismantled appliances
Obtaining Service:
When making a warranty claim, please have the original bill of
purchase with purchase date available. The purchaser will be
responsible for any removal or transportation costs.
Replacement parts and/or units will be new, remanufactured or
refurbished and are subject to the manufacturer’s discretion.
For technical support and warranty service, please email
support@newair.com
-
 1
1
-
 2
2
-
 3
3
-
 4
4
-
 5
5
-
 6
6
-
 7
7
-
 8
8
-
 9
9
-
 10
10
-
 11
11
-
 12
12
-
 13
13


Ask a question and I''ll find the answer in the document
Finding information in a document is now easier with AI
Related papers
-
NewAir EC300WFA User manual
-
NewAir EC400WF User manual
-
NewAir EC100WF User manual
-
-
NewAir EC111B-REF User manual
-
-
-
-
NewAir FEC350WH02 User manual
-
Other documents
-
Frigidaire EC200WF User manual
-
-
-
-
-
-
Matsui EC1000 User manual
-
Argo Husky Owner's manual
-
Igenix IG9850 Instructions For Use Manual
-