Page is loading ...

- 1 -
Product names listed herein are trademarks of AS America, Inc.
© AS America, Inc. 2020
Thank you for selecting American Standard...
the benchmark of fine quality for over 140 years.
To ensure that your installation proceeds smoothly-please read
these instructions carefully before you begin.
RECOMMENDED TOOLS
1
M985028 (3/20)
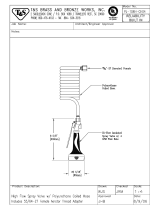
INSTALL FAUCET WITH OR WITHOUT DECK ESCUTCHEON
Saybrook
™
Filtered Kitchen Faucet
INSTALLATION
INSTRUCTIONS
4902330.XXX
Flashlight Adjustable Wrench Safety GlassesPhillips Screwdriver
Certied to comply with ANSI A112.18.1M
B (OPTIONAL)
A
SPOUT BASE
SINK OR
MOUNTING
SURFACE
SPOUT BASE
3
2
10
5
3
6
7
9
4
8
1
10
11
5
6
7
9
4
8
CAUTION
Turn off water at
main supply
NOTE: There are several different options to choose from on page 2. Pick according to your countertop hole conguration
and whether or not the lter will be above or below the countertop.
(A) Installation without DECK ESCUTCHEON
• Make certain the SEAL (10) is properly seated in bottom recess of the SPOUT (2). Insert supply HOSES (3), SPRAY HOSE (4)
and SHANK (5) through mounting hole and seat SPOUT BASE onto sink or mounting surface. Do not use putty.
• Insert HOSES (3) through RUBBER WASHER (6), BRASS WASHER (7), and threaded LOCKNUT (8) under sink or mounting
surface.
• Assemble RUBBER WASHER (6), BRASS WASHER (7), and threaded LOCKNUT (8) onto SHANK (5) from underside
of sink or mounting surface. Hand tighten LOCKNUT (8).
• Use a screwdriver to tighten SCREWS (9) on LOCKNUT (8). Work your way around LOCKNUT (8), tightening the screws
slightly each time until all are snug to ensure even pressure.
(B) Installation with DECK ESCUTCHEON (optional)
• Make certain the SEAL (10) is properly
seated in top recess of DECK
ESCUTCHEON (1) and SEAL (11) is
properly seated in bottom recess of
DECK ESCUTCHEON (1).
Do not use putty.
• Insert SUPPLY HOSES (3), SPRAY
HOSE (4) and SHANK (5) through
hole of DECK ESCUTCHEON (1),
and mounting surface.
• Follow mounting instructions above
to secure faucet to mounting surface.
1 Centennial Avenue Piscataway, NJ 08855

- 2 -- 2 -
M985028 (3/20)
FILTER IN COUNTERTOP
FILTER IN COUNTERTOP
2 Hole deck
plate 4902882
purchased
separately
FILTER IN COUNTERTOP
FILTER BELOW COUNTERTOP
FILTER BELOW COUNTERTOP
FILTER BELOW COUNTERTOP

- 3 -
2
M985028 (3/20)
3
FILTER OUTPUT CONNECTION
MAKE WATER SUPPLY CONNECTIONS
IMPORTANT: Do not
use sealent on threads
1
2
COLD
HOT
4
6
5
3
• Thread hose T-CONNECTOR (1) onto HOSE (2).
• Thread hose T-CONNECTOR (1) onto HOSE (4).
• Firmly push the WHITE HOSE (5) into hose END CAP (3).
2
4
5
3
1
• Turn off hot and cold water supplies.
• Thread RED SUPPLY HOSE (1) onto HOT WATER SUPPLY (3).
• Thread BLUE SUPPLY HOSE (2) onto T-CONNECTOR (4).
• Thread T-CONNECTOR (4) onto COLD WATER SUPPLY (5).
• Firmly push the BLUE HOSE (6) in to END CAP (4).
Note: If additional supply length is required, installer must
purchase additional parts separately.
Note: If SUPPLY HOSES (1, 2) are too long, loop as illustrated
to avoid kinking.
Note: Connection on fitting supplies are 3/8" compression.

- 4 -
2
- 4 -
4
M985028 (3/20)
FILTER INSTALLATION
3
2
6
7
5
4
INSTALL FILTER ON COUNTERTOP
• Insert FILTER (3) through mounting hole in countertop.
• Hand tighten MOUNTING NUT (2) to secure FILTER (3).
• Firmly push the WHITE HOSE (4) into PORT (5) labelled
“CONNECT TO FAUCET”.
• Firmly push the BLUE HOSE (6) into PORT (7) labelled
“CONNECT TO FILTER”.
NOTE: To remove plastic hose rmly push in the white
or blue collar at HOSE PORT (5) and pull the hose out.
1
3
2
7
5
4
6
INSTALL FILTER BELOW COUNTERTOP
• Secure FILTER SLEEVE (1) at a 45° degree angle below the
countertop with the four SCREWS (2) provided.
• Insert FILTER (3) into FILTER SLEEVE (1) and rotate
clockwise until tight.
• Firmly push the WHITE HOSE (4) into PORT (5) labelled
"CONNECT TO FAUCET".
• Firmly push the BLUE HOSE (6) into PORT (7) labelled
"CONNECT TO FILTER".
NOTE: Installing at a 45° angle helps to prevent drippage.
NOTE: To remove plastic hose rmly push in the
white or blue collar at HOSE PORT (5) and pull
the hose out.

- 5 -
5
M985028 (3/20)
6
INSTALL PULL-DOWN HOSE WEIGHT
• Install BATTERY PACK (1) below the countertop with velcro
on the back of BATTERY PACK (1). The BATTERY PACK (1)
should be close to the faucet and lter so that the wired
connections can be made.
OPTIONAL: Instead of Velcro the battery pack can be
hung from a nail or hook from LOOP (7).
• Connect FEMALE WIRE (2) to BATTERY PACK (1) as
illustrated by a dashed line.
NOTE: Secure this connection by installing inside
the CONNECTORS HOUSING (8) as shown.
• Connect MALE WIRE (3) to FILTER (4) as illustrated by a
dashed line.
NOTE: Secure this connection by installing inside
the CONNECTORS HOUSING (8) as shown.
• Connect THREADED WIRE (5) to FAUCET WIRE (6) as
illustrated by a dashed line.
• Insert batteries into battery pack.
• Two cable ties are provided for cable management.
BATTERY PACK CONNECTIONS
4
3
5
18"
1
2
• With HAND SPRAY (1) seated in SPOUT (2), install
WEIGHT (3) onto HOSE (4) 18" below the countertop,
secure with SCREW (5).
2
1
6
5
3
4
7
2
8

7
- 6 -
M985028 (3/20)
FILTER INSTALLATION
2
1
4
3
• Remove FILTER COVER (1) by pulling up.
• Unthread FILTER CAP (2) from FILTER HOUSING (4).
• Insert FILTER (3) into FILTER HOUSING (4).
• Thread FILTER CAP (2) onto FILTER HOUSING (4).
• Push FILTER COVER (1) onto FILTER CAP (2).

CHECK
CONNECTIONS
FOR LEAKS
1
2
3
5
4
• Move HANDLE (1) into “off” position.
• Turn on water supplies and check connections for leaks.
• With HANDLE (1) in “off” position, unthread AERATOR (4) from SPRAY HEAD (2) with AERATOR KEY (5).
• Operate HANDLE (1) up and down, left and right to ush water lines thoroughly.
• Thread AERATOR (4) onto SPRAYHEAD (2) with AERATOR KEY (5).
• Press and hold the FILTER ACTIVATION BUTTON (3) for approximately 5 seconds. The lter will run for 1 minute.
Check connections for leaks.
• This concludes the installation of your ltration faucet.
PREPARE FAUCET & CHECK CONNECTION FOR LEAKS
8
- 7 -
M985028 (3/20)

1
BATTERY AND FILTER LIFE INDICATORS
• FILTER BUTTON (1) illuminates indicating lter and
battery life as detailed below:
— Filter full (WHITE LED) (1)
— Fliter half full (WHITE LED) (2)
— Filter low 1/4 full (WHITE LED) (3)
— Filter very low (RED LED) (4)
— Filter empty (PULSING RED LED) (5)
— Battery low (YELLOW LED) (6)
— Filter counter Reset/Flush (PULSING
WHITE LED) (7)
Note: To replace filter refer to Maintenance &
Service section of this manual.
Note: Filter life is 300 gallons.
M985028 (3/20)
- 8 -
STREAM (AERATOR)
SPRAY
3
4
OPERATIONAL GUIDE
SPRAY OPERATION
• With FAUCET on, press TOGGLE BUTTON (4) on SPRAY (3)
to switch from stream to spray.
FILTER AND BATTERY OPERATION
• Position HANDLE (1) in the off position.
• Press BUTTON (2) to activate lter.
• Press BUTTON (2) to deactivate lter.
NOTE: The filter button is a toggle and therefore
does not need to be held down during operation.
1
2
(1) (2) (3) (4)
(5) (6) (7)
2
1
4
3
REPLACE FILTER
• Ensure no water is owing from lter.
• Remove FILTER COVER (1) by pulling up.
• Unthread FILTER CAP (2) from FILTER HOUSING (4).
Residual water may be present.
• Replace FILTER (3). The orientation of the lter is important.
• Thread FILTER CAP (2) onto FILTER HOUSING (4).
• Push FILTER COVER (1) onto FILTER CAP (2).
• Press and hold the lter activation button for 5 seconds to
reset lter count. The lter will run for 1 minute.

M985028 (3/20)
- 9 -
FAUCET DRIPS
• Turn VALVE to OFF position.
• Operate HANDLE several times from OFF to ON position. Do not apply excessive force.
• If drips persist call customer service 1 (800) 442-1902.
MAINTENANCE & SERVICE
• Clean with clear water, dry with a soft cotton annel cloth,
NOTE: Do not clean the product with acid, polish, abrasives, harsh cleaners, or a cloth with a coarse surface.
CLEANING:
LOW FLOW RATE
• Remove aerator and ush faucet.
• Turn off hot water supply.
• Unthread water supply hose.
• Check supply pipe and supply hose for debris.
• If low ow persist call customer service.
1
1
PULLDOWN HOSE NOT RETRACTING
• Check under countertop to see if the hose is
getting snagged.
• Check that the WEIGHT (1) is on the correct
side of the hose loop.
• Water Filtering System Specications
– Rated Service Life of 300 gallons (1136 L)
– Pressure: 20 – 125 psi (0.7 – 8.6 bar)
– Temperature: 35 - 95°F (2 - 35°C)
– Flow Rate: 0.65 gpm (2.46 L/min)
• The system and installation shall comply with applicable state and local regulations.
• System tested and certied by NSF International against NSF/ANSI Standard 42 for the reduction of chlorine,
taste and odor, Particulate Class I, and against NSF/ANSI Standard 53 for the reduction of lead.
• Do not use with water that is microbiologically unsafe or of unknown quality without adequate disinfection
before or after the system.
• Important Notice: Read the Manufacturer’s Performance Data Sheet.
• NOTE: Use only F50 Filter Cartridge with the Saybrook Filtered Kitchen Faucet – Purchased from americanstandard-us.com
• Water Filter System to be supplied with Cold Water Only.
System tested and certified by NSF
International against NSF/ANSI Standard
42 for the reduction of Chlorine, Taste and
Odor, Particulate Class I, and against
NSF/ANSI Standard 53 for the reduction
of Lead, and against CSA B483.1.
/