Page is loading ...

AVerVision M17-13M
Quick Start Guide
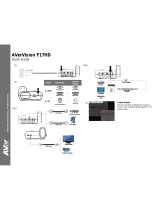
(1)
(2)

(3)
(4)-1
OR
Calibration
When DocCam is connected with interactive flat panel, go to OSD menu and select
Presentation > Annotation > Calibration. Then, follow the sequence on the screen for
calibration.
[Note] Please note the Annotation feature may not work with all Interactive Flat Panels. It
is designed specifically for the AVer Interactive Flat Panel.

(4)-2
OR
(5)
(6)
Output Display
Set the resolution to display the image on
screen. Press “Menu” button on remote
controller to call out Settings dialog and select
the resolution as needed.

Remote Controller
The remote controller requires two (2) “AAA” size batteries (supplied), make sure batteries are
installed properly before use.
Name
Name Function
(18)
(14)
(11)
(7)
(8)
(5)
(2)
(1)
(22)
(13)
(4)
(3)
(15)
(12)
(17)
(23)
(20)
(19)
(9)
(6)
(16)
(10)
(21)
(1) POWER
Turn the unit on/standby.
(2) CAMERA
Camera mode displays the video signal
from the built-in camera.
(3) RECORD
Start/Stop audio & video recording. Video
recording can only be saved either in a SD
memory card or a USB flash drive.
(4) CAPTURE
Capture still image in Camera mode. In
continuous capture mode, press this button
again to stop.
(5) VISOR
Cover part of the presentation screen and
allow presenter to reveal the material as
desire.
(6) ROTATE
Rotate the image by 0/180° in Camera
mode and Playback mode.
(7) MENU
Open and exit the OSD menu.
Show a thumbnail size captured
picture/video from the memory at the corner
of the screen in Camera mode.
(8)
▲,▼,◄, & ►
- Pan the image when image is above 10X
zoom in live mode or in playback
captured image mode.
- Move the selection in Playback mode and
in OSD menu.
- Use
& to increase and decrease the
video playback volume.
- Use
& to play the video backward
and forward.
- Move the Spotlight frame and Visor
screen cover.
(9) AUTO FOCUS
Adjust the focus automatically.
(10) ZOOM +/-
‐ Increase/decrease the image
magnification in camera and picture
playback mode.
‐ Use to easily page up and page down
16-thumbnail picture preview.
(11 ) ZOOM 1X
Reset zoom level to 100%.
(12) PLAYBACK
View the captured picture/video from the
memory in 16-thumbnail images.
(13) PC 1/2
PC mode displays the video signal from the
RGB/HDMI INPUT port of F17-13M
(14) FREEZE / STOP
- Freeze live images.
- Stop video playback.
(15) SPOTLIGHT
Call the Spotlight submenu. Spotlight
overlays a box frame on the presentation
screen. You can adjust the box size and
move it around.

Name Function
(16) SPLIT SCREEN
Divide the screen into two. One side displays the live image from the
built-in camera and the other side displays 8-thumbnail size picture/video
from the memory.
(17) MODE
Select from 3 type of modes:
Normal - adjust the gradient of image.
High frame rate mode - increase frame rate. Sufficient lighting is
required when using this mode.
Microscope - automatically adjust optical zoom for microscopic viewing.
(18) TIMER
Start/Pause/Stop the timer countdown and set the timer duration.
(19)
‐ Make a selection in Playback mode and OSD menu.
‐ Play/Pause video playback
(20) LAMP
Turn the overhead light on/off.
(21) BRIGHTNESS +/-
Adjust the brightness.
(22) DEFAULT
Reset at factory default setting.
(23) DEL
Delete the selected picture/video in Playback mode.
(1)
(21)
(9)(19)
(10)
(10)(8)(24)
(7)
(2)(13)
(14)
(12)
(4) (23)
(20)
(21)
(3)
Name Function
(14) Freeze/Stop
‐ Press it to switch to
annotation mode (The
image is still.). To exit
annotation mode, press
Freeze/Stop button again.
‐ Press it for 3 seconds to
switch to annotation mode
(The image is live). To exit
annotation mode, press
Freeze/Stop button for 3
seconds again.
(24) POWER LED
‐ Red: Standby
‐ Green: RGB/HDMI output
For User Manual and Software, please visit the link below.
Global: http://www.aver.com/download-center
US:http://averusa.com/classroom-technology/support/
For Warranty information, please visit the link below (US only).
http://www.averusa.com/classroom-technology/support/warranty.asp

Federal Communications Commission
NOTE: This equipment has been tested and found to comply with the limits for a Class A digital device,
pursuant to part 15 of the FCC Rules. These limits are designed to provide reasonable protection
against harmful interference when the equipment is operate din a commercial environment. This
equipment generates, uses, and can radiate radiofrequency energy and, if not installed and used in
accordance with the instruction manual, may cause harmful interference to radio communications.
Operation of this equipment in a residential area is likely to cause harmful interference in which case
the user will be required to correct the interference at his own expense.
FCC Caution: Any changes or modifications not expressly approved by the party responsible for
compliance could void the user's authority to operate this equipment.
This device complies with part 15 of the FCC Rules.
Operation is subject to the following two conditions:
(1) This device may not cause harmful interference, and
(2) this device must accept any interference received, including interference that may cause undesired
operation.
Warning:
This is a class A product. In a domestic environment this product may cause radio interference in which
case the user may be required to take adequate measures.
COPYRIGHT
©2019 AVer Information Inc. All rights reserved.
All rights of this object belong to AVer Information Inc. Reproduced or transmitted in any form or by any
means without the prior written permission of AVer Information Inc. is prohibited. All information or
specifications are subject to change without prior notice.
Contact Information
Global
AVer Information Inc.
www.aver.com
8F, No.157, Da-An Rd., Tucheng Dist.,
New Taipei City
Tai w a n
P/N: 300APM00-???
USA
AVer Information Inc.
www.averusa.com
668 Mission Ct
Fremont, CA 94539, USA
Toll-free: 1(877)528-7824
Local: 1(408)263-3828
Support.usa@aver.com
/