Page is loading ...

2432TX-2
Dual Path Dual Link DVI to Serial Converter
Instruction Manual
© Copyright 2014
EVERTZ MICROSYSTEMS LTD.
5288 John Lucas Drive,
Burlington, Ontario,
Canada L7L 5Z9
Phone: 905-335-3700
Tech Support: service@evertz.com Fax: 905-335-7571
Web Page:
http://www.evertz.com
Version 1.0, February 2014
The material contained in this manual consists of information that is the property of Evertz Microsystems and is intended solely for
the use of purchasers of the 2432TX-2 Series products. Evertz Microsystems expressly prohibits the use of this manual for any
purpose other than the operation of the device. Due to ongoing research and development, features and specifications in this
manual are subject to change without notice.
All rights reserved. No part of this publication may be reproduced without the express written permission of Evertz Microsystems
Ltd. Copies of this manual can be ordered from your Evertz dealer or from Evertz Microsystems.

This page left intentionally blank

INFORMATION TO USERS IN EUROPE
NOTE
CISPR 22 CLASS A DIGITAL DEVICE OR PERIPHERAL
This equipment has been tested and found to comply with the limits for a Class A digital device, pursuant
to the European Union EMC directive. These limits are designed to provide reasonable protection against
harmful interference when the equipment is operated in a commercial environment. This equipment
generates, uses, and can radiate radio frequency energy and, if not installed and used in accordance with
the instruction manual, may cause harmful interference to radio communications. Operation of this
equipment in a residential area is likely to cause harmful interference in which case the user will be
required to correct the interference at his own expense.
INFORMATION TO USERS IN THE U.S.A.
NOTE
FCC CLASS A DIGITAL DEVICE OR PERIPHERAL
This equipment has been tested and found to comply with the limits for a Class A digital device, pursuant
to Part 15 of the FCC Rules. These limits are designed to provide reasonable protection against harmful
interference when the equipment is operated in a commercial environment. This equipment generates,
uses, and can radiate radio frequency energy and, if not installed and used in accordance with the
instruction manual, may cause harmful interference to radio communications. Operation of this equipment
in a residential area is likely to cause harmful interference in which case the user will be required to correct
the interference at his own expense.
WARNING
Changes or Modifications not expressly approved by Evertz Microsystems Ltd. could void the user’s
authority to operate the equipment.
Use of unshielded plugs or cables may cause radiation interference. Properly shielded interface cables
with the shield connected to the chassis ground of the device must be used.

This page left intentionally blank

2432TX-2
Dual Path Dual Link DVI to Serial Converter
Revision 1.0 Page i
REVISION HISTORY
REVISION DESCRIPTION DATE
1.0 First Release Feb 2014
Information contained in this manual is believed to be accurate and reliable. However, Evertz assumes no responsibility for the use thereof, nor for the rights of third
parties, which may be affected in any way by the use thereof. Any representations in this document concerning performance of Evertz products are for informational
use only and are not warranties of future performance, either expressed or implied. The only warranty offered by Evertz in relation to this product is the Evertz standard
limited warranty, stated in the sales contract or order confirmation form.
Although every attempt has been made to accurately describe the features, installation and operation of this product in this manual, no warranty is granted nor liability
assumed in relation to any errors or omissions unless specifically undertaken in the Evertz sales contract or order confirmation. Information contained in this manual is
periodically updated and changes will be incorporated into subsequent editions. If you encounter an error, please notify Evertz Customer Service department. Evertz
reserves the right, without notice or liability, to make changes in equipment design or specifications.

2432TX-2
Dual Path Dual Link DVI to Serial Converter
Page ii Revision 1.0
This page left intentionally blank

2432TX-2
Dual Path Dual Link DVI to Serial Converter
TABLE OF CONTENTS Revision 1.0 Page iii
TABLE OF CONTENTS
1. OVERVIEW ................................................................................................................................... 1
2. INSTALLATION ............................................................................................................................. 3
2.1. POWER ................................................................................................................................ 3
2.2. DVI-I CONNECTORS ............................................................................................................ 3
2.3. BNC CONNECTORS ............................................................................................................ 4
2.4. FIBER CONNECTORS (OPTIONAL) .................................................................................... 4
2.5. DB9 CONNECTOR ............................................................................................................... 5
2.6. CARE AND HANDLING OF OPTICAL FIBER ...................................................................... 6
2.6.1. Safety ........................................................................................................................ 6
2.6.2. Handling and Connecting Fibers ................................................................................ 6
2.6.3. Making Sure the Optical Fibers are Clean.................................................................. 6
3. SPECIFICATIONS ......................................................................................................................... 7
4. STATUS LEDS .............................................................................................................................. 9
4.1. USER CONTROLS ............................................................................................................... 9
4.1.1. Dip Switches .............................................................................................................. 9
4.2. ACCESSING THE SERIAL PORT MENU ........................................................................... 10
4.3. SERIAL MENU ................................................................................................................... 10
4.3.1. Network Configuration ............................................................................................. 11
4.3.2. Hardware Version Information ................................................................................. 11
4.3.3. Video Utilities Menu ................................................................................................. 11
4.3.4. Video Standard Information ..................................................................................... 12
4.3.5. Set Analog Offsets ................................................................................................... 12
4.3.6. Lock Input Mode ...................................................................................................... 13
4.3.7. Enable HDCP Content Processing........................................................................... 13
4.3.8. EDID Configuration .................................................................................................. 14
4.3.9. Output Configuration Menu ...................................................................................... 17
4.3.10. Scaler Configuration Menu ...................................................................................... 18
4.3.11. SNMP Configuration ................................................................................................ 19
4.3.12. SNMP V3 Setup Menu ............................................................................................. 20
4.3.13. SNMP Version ......................................................................................................... 25
5. ENGINEERING MENU ................................................................................................................ 27
6. UPGRADING FIRMWARE........................................................................................................... 28
6.1. UPDATE PROCEDURE ...................................................................................................... 28
6.1.1. Part 1 – Configuring the Unit for Firmware Upgrades ............................................... 28

2432TX-2
Dual Path Dual Link DVI to Serial Converter
Page iv Revision 1.0 TABLE OF CONTENTS
6.1.2. Part 2 – Terminal Program Setup ............................................................................ 28
6.1.3. Part 3 – Uploading the New Firmware ..................................................................... 29
6.1.4. Part 4 – Completing the Upgrade ............................................................................. 29
6.2. FTP UPGRADE METHOD .................................................................................................. 30
7. 2432TX-2 CONFIGURATION USING VISTALINK
®
PRO ............................................................. 31
7.1. SNMP V1 ............................................................................................................................ 31
7.2. CONFIGURING VLPRO FOR SNMP V3 ............................................................................. 33
7.3. 2432TX-2 VISTALINK CONFIGURATION VIEW ................................................................ 36
7.3.1. General Tab............................................................................................................. 38
7.3.2. Monitor .................................................................................................................... 38
7.3.3. Control ..................................................................................................................... 39
7.3.4. Input Monitor ............................................................................................................ 39
7.3.5. Input Control ............................................................................................................ 40
7.3.6. Output Monitor ......................................................................................................... 42
7.3.7. Output Control ......................................................................................................... 42
7.3.8. Video Control ........................................................................................................... 43
7.3.9. Scaler Control .......................................................................................................... 44

2432TX-2
Dual Path Dual Link DVI to Serial Converter
TABLE OF CONTENTS Revision 1.0 Page v
FIGURES
Figure 1-1: 2432TX-2 Block Diagram ............................................................................................................... 1
Figure 2-1: 2432TX-2 Rear View ...................................................................................................................... 3
Figure 2-2: 2432TX-2 Rear View – DVI-I Connectors ...................................................................................... 4
Figure 2-3: 2432TX-2 Rear View – BNC Connectors ....................................................................................... 4
Figure 2-4: 2432TX-2 Rear View – Fiber Connectors ...................................................................................... 4
Figure 2-5: 2432TX-2 Front View – DB9 Connector ......................................................................................... 5
Figure 4-1: 2432TX-2 Status LEDs ................................................................................................................... 9
Figure 4-2: 2432TX-2 DIP Switches ............................................................................................................... 10
Figure 4-3: 2432TX-2 Serial Menu .................................................................................................................. 10
Figure 4-4: Network Configuration .................................................................................................................. 11
Figure 4-5: Hardware Version Information ...................................................................................................... 11
Figure 4-6: Video Utilities Menu ...................................................................................................................... 11
Figure 4-7: Video Standard Information .......................................................................................................... 12
Figure 4-8: Set Analog Offsets ........................................................................................................................ 12
Figure 4-9: Lock Input Mode ........................................................................................................................... 13
Figure 4-10: Enable HDCP Content Processing ............................................................................................. 13
Figure 4-11: EDID Configuration ..................................................................................................................... 14
Figure 4-12: Show Supported EDID Resolutions ........................................................................................... 15
Figure 4-13: Show EDID Contents .................................................................................................................. 16
Figure 4-14: Modify EDID Contents ................................................................................................................ 16
Figure 4-15: Output Configuration Menu ........................................................................................................ 17
Figure 4-16: Set Serial Digital Output Format ................................................................................................. 17
Figure 4-17: Set Maximum Bandwidth Limit ................................................................................................... 17
Figure 4-18: Set Scan Mode ........................................................................................................................... 18
Figure 4-19: Set Frame Rate .......................................................................................................................... 18
Figure 4-20: Scaler Configuration Menu ......................................................................................................... 18
Figure 4-21: SNMP Configuration ................................................................................................................... 19
Figure 4-22SNMP V1 Setup Menu ................................................................................................................. 19
Figure 4-23: SNMP V3 Setup Menu ............................................................................................................... 20
Figure 4-24: SNMP V3 User Setup ................................................................................................................. 20
Figure 4-25: Add/Edit SNMP V3 User ............................................................................................................. 21
Figure 4-26: Remove SNMP V3 User ............................................................................................................. 21
Figure 4-27: Show All SNMP V3 User ............................................................................................................ 22
Figure 4-28: SNMP V3 Access Control Setup ................................................................................................ 22
Figure 4-29: Add SNMP V3 Access Control ................................................................................................... 23
Figure 4-30: Remove SNMP V3 Access Control ............................................................................................ 23
Figure 4-31: Show All SNMP V3 Access Control ........................................................................................... 24
Figure 4-32: SNMP V3 Notification Setup....................................................................................................... 24
Figure 4-33: Add SNMP V3 Notification Destination ...................................................................................... 24
Figure 4-34: Remove SNMP Notification ........................................................................................................ 25
Figure 4-35: SNMP Version ............................................................................................................................ 25
Figure 4-36: SNMO Get Set Version Setup .................................................................................................... 25
Figure 4-37: SNMP Trap Version Setup ......................................................................................................... 26
Figure 7-1: Configuring VistaLINK
®
PRO ........................................................................................................ 31
Figure 7-2: Configuration Page for 2432TX-2 ................................................................................................. 32
Figure 7-3: Server SNMP Communications User ........................................................................................... 33
Figure 7-4: Add an SNMP Name for the SNMP V3 Role ................................................................................ 33
Figure 7-5: Add Authentication Password....................................................................................................... 34
Figure 7-6: Edit Username .............................................................................................................................. 34
Figure 7-7: SNMP V3 Group(s) Authentication ............................................................................................... 35
Figure 7-8: Configure 2432TX-2 with VistaLINK
®
Pro .................................................................................... 36
Figure 7-9: Main configuration Screen ............................................................................................................ 37
Figure 7-10: General Tab Menu ...................................................................................................................... 38
Figure 7-11: Control ........................................................................................................................................ 39
Figure 7-12: Input Monitor Menu ..................................................................................................................... 39

2432TX-2
Dual Path Dual Link DVI to Serial Converter
Page vi Revision 1.0 TABLE OF CONTENTS
Figure 7-13: Input Control Menu ..................................................................................................................... 40
Figure 7-14: Output Monitor Menu .................................................................................................................. 42
Figure 7-15: Output Control Menu .................................................................................................................. 42
Figure 7-16: Video Control Menu .................................................................................................................... 43
Figure 7-17: Scaler Control Menu ................................................................................................................... 44
TABLES
Table 2-1: DVI-I Input Connector ...................................................................................................................... 3
Table 2-2: DB9 Port Pin Out ............................................................................................................................. 5
Table 4-1: DIP Switch Functions ...................................................................................................................... 9
Table 4-2: Serial Port Terminal Settings ......................................................................................................... 10
Table 6-1: Serial Terminal Settings ................................................................................................................ 28
Table 6-2: Serial Terminal Settings ................................................................................................................ 30

2432TX-2
Dual Path Dual Link DVI to Serial Converter
OVERVIEW Revision 1.0 Page 1
1. OVERVIEW
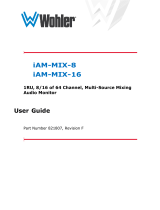
The 2432TX-2 is a versatile dual path dual-link DVI to serial digital converter. The 2432TX-2 is used as
extension of DVI over coax or fiber. The 2432TX-2 is used in combination with the 2431RX-2 dual path
dual-link DVI receiver. This self-contained unit accepts up to two simultaneous inputs (DVI, VGA or
Component), as well as 1 audio pair per video input, and transmits these inputs over coax (two cables per
input for Dual link DVI) and over fiber if SFP option install (two fibers per input for Dual link DVI). The
2432TX-2 can also be used in projects where conversion from DVI to serial digital is required. The
2431TX-2 unit is capable of scaling (best fit) input to SMPTE 259M, 292M or 424M and embeds audio.
2432TX-2 is HDCP complaint.
Features & Benefits:
• Supports two independent DVI, VGA or component inputs
• Provides serial digital outputs via coax as standard and via hot pluggable SFPs with the fiber optics
option installed
• Supports SMPTE standard serial digital outputs for applications where DVI, VGA or component
video conversion to SDI is required
• Configurable input scaling to best fit SMPTE 259M, 292M or 424M standard
• Full 24 bits-per-pixel color resolution
• Embedded audio (1 stereo pair per input)
• Supports single-mode and multi-mode fiber optic cable (contact factory for multi-mode applications)
• SNMP enabled for configuration.
• HDCP compliant
A Channel
Video / Audio
Processing
Block
INPUT 1
Dual Link DVI, VGA or
Component
INPUT 2
Dual Link DVI, VGA or
Component
CH1 Analog Audio input
CH2 Analog Audio input
B Channel
Video / Audio
Processing
Block
CH1 Analog Audio input
CH2 Analog Audio input
CPU
Optical SFP
Optical SFP
1A
2A
1B
2B
1A
1B
2A
2B
CONTROL /
MONITORING
SERAIL
COM
Dual Link DVI, VGA
or Component
Dual Link DVI, VGA
or Component
Genlock
Encryption
Encryption
Figure 1-1: 2432TX-2 Block Diagram

2432TX-2
Dual Path Dual Link DVI to Serial Converter
Page 2 Revision 1.0 OVERVIEW
This page left intentionally blank

2432TX-2
Dual Path Dual Link DVI to Serial Converter
INSTALLATION Revision 1.0 Page 3
2. INSTALLATION
The 2432TX-2 is a compact module that has two DVI-I input connector, four input BNC connector for 2
pair of analog audio (4x BNC to RCA connector supplied), four output BNC connectors and optional four
fiber optic connectors (2 per SFP) (all for connection are only needed for dual-link DVI inputs, One DB-9
serial connector for settings and one Ethernet connector for control and monitoring.
Figure 2-1: 2432TX-2 Rear View
2.1. POWER
The 2432TX-2 comes with an auto-ranging DC voltage adapter that automatically senses the input
voltage. Power need to be applied by connecting a 3-wire grounding type power supply cord to the power
entry module on the DC voltage adapter. The power cord needs to be minimum 18 AWG wire size type
SST marked VW-1, maximum 2.5m in length. The DC cable of the voltage adapter needs to be connected
to the DC power jack on the side panel. A green LED located beside the DIP switch connector will be
illuminated when power is applied to 2432TX-2.
2.2. DVI-I CONNECTORS
DVI-I connector is for digital video inputs. Below table lists pins in the DVI-I connector. (Support DVI-D
input only)
Pin
Signal
Pin
Signal
Pin
Signal
1
Data2-
9
Data1-
17
Data0-
2
Data2+
10
Data1+
18
Data0+
3
Data2/4 Shield
11
Data1/3 Shield
19
Data0/5 Shield
4
Data4-
12
Data3-
20
Data5-
5
Data4+
13
Data3+
21
Data5+
6
DDC Clock
14
+5V Power
22
Data5/Clock Shield
7
DDC Data
15
Ground
23
Clock+
8
Analog VSYNC
16
Hot Plug Detect
24
Clock-
C1
Analog RED
C2
Analog GREEN
C3
Analog BLUE
C4
Analog HSYNC
C5
Ground
Table 2-1: DVI-I Input Connector

2432TX-2
Dual Path Dual Link DVI to Serial Converter
Page 4 Revision 1.0 INSTALLATION
Figure 2-2: 2432TX-2 Rear View – DVI-I Connectors
2.3. BNC CONNECTORS
BNC connectors are used for serial digital outputs (4 BNC connectors) and analog audio input (4 BNC
connectors).
Figure 2-3: 2432TX-2 Rear View – BNC Connectors
2.4. FIBER CONNECTORS (OPTIONAL)
2 SFP’s (SFP3T-13-2) are used for serial digital output over fiber.
Figure 2-4: 2432TX-2 Rear View – Fiber Connectors

2432TX-2
Dual Path Dual Link DVI to Serial Converter
INSTALLATION Revision 1.0 Page 5
2.5. DB9 CONNECTOR
DB9 is a female 9 pin D connector used for connecting to a standard computer serial below table shows
the pin out of the female DB-9 connector.
Pin #
Name
Description
1
2
TxD
RS-232 Transmit Output
3
RxD
RS-232 Receive Input
4
5
Sig Gnd
RS-232 Signal Ground
6
7
8
9
Table 2-2: DB9 Port Pin Out
Figure 2-5: 2432TX-2 Front View – DB9 Connector

2432TX-2
Dual Path Dual Link DVI to Serial Converter
Page 6 Revision 1.0 INSTALLATION
2.6. CARE AND HANDLING OF OPTICAL FIBER
2.6.1. Safety
!
Never look directly into an optical fiber. Non-reversible damage to the eye can occur
in a matter of milliseconds.
The laser modules used in the Evertz 3000MVP modules are Class I, with a maximum output power of
7mW, and a wavelength of 1310 to 1610nm.
2.6.2. Handling and Connecting Fibers
Note: Never touch the end face of an optical fiber.
The transmission characteristics of the fiber are dependent on the shape of the optical core and therefore
care must be taken to prevent fiber damage due to heavy objects or abrupt fiber bending. Evertz
recommends that you maintain a minimum bending radius of 3 cm to avoid fiber-bending loss that will
decrease the maximum attainable distance of the fiber cable.
Fiber interconnections must be made securely. The Evertz fiber optical transmitters and receivers come
with SC interconnection housings built into the module. With this style of connector, the fiber assembly
and the housing assembly can only be connected in one way and with very good repeatability. The fiber
interconnect panel that is provided with each product can be ordered with optional SC/PC, ST/PC or
FC/PC connectors. The customer is required to provide the optical fiber with the correct connectors to
connect the modules together. SC/PC, ST/PC and FC/PC interconnection housing and connectors as well
as adapters are industry standards with many available sources.
2.6.3. Making Sure the Optical Fibers are Clean
Dust particles on the ends of the optical fiber greatly increase the signal loss at interconnections, and large
dust particles can even obscure light transmission altogether. To minimize the effects of dust
contamination at the interconnections, the fiber should be cleaned each time it is mated or unmated. When
using interconnection housings to mate two optical fibers it is good practice to remove dust particles from
the housing assembly with a blast of dry air or by wiping the end of the fiber connector with the pre-
moistened tissue you received with the optical module before mating it to the module. Whenever a fiber is
unmated it must be covered immediately. Most fiber manufacturers provide a plastic boot that fits over the
ferrule body for this purpose.

2432TX-2
Dual Path Dual Link DVI to Serial Converter
SPECIFICATION Revision 1.0 Page 7
3. SPECIFICATIONS
Video Inputs:
Number of Inputs: 2
Connectors: 28-pin DVI
Supported Input Format: DVI, VGA and Component
Supported Resolution: VESA: VGA, SVGA, XGA, WXGA, SXGA, SXGA+, UXGA, WSXGA+,
WUXGA, WQXGA (dual-link). CEA-861B: 480p, 576p, 720p, 1080i,
1080p
Color Resolution: 24 bits
Analog Audio Input:
Number of Inputs: 1 stereo pair per Video input (BNC to RCA connector included)
Connectors: BNC per IEC 60169-8 Amendment 2
Impedance: 25K ohms
Frequency Response: ±3dB (20Hz to 20kHz)
THD: < 0.5% (20Hz to 20KHz)
Channel Phase Difference: < ±1°
SNR: > 75 dB
Maximum Input Level: 2 dBu
Signal Quantization: 24 bits @ 48 kHz
Genlock:
Number of Inputs: 1
Connectors: BNC per IEC 60169-8 Amendment 2
Termination: 75 Ωinternal
SDI Output:
Number of Outputs: 2 (Total 4 BNCs are used if Dual link transmission mode is used)
Connectors: BNC per IEC 60169-8 Amendment 2
Standard: SMPTE 259M, 292M, 424M and Evertz proprietary 3GLINK
Optical Output:
Number of Outputs: 2 output on single SFP (2 SFP are used if Dual link transmission
mode is used)
Connector: Female LC/UPC
Wavelengths:
Standard: 1310nm
CWDM: 1270-1670nm
Output Power:
1310nm: -2dB ± 1dBm
CWDM: +1dBm ± 1dBm
Electrical:
Voltage: 12V DC, Auto ranging 100-240V AC 50/60Hz adapter included
Power: (Typ): 1.7A (20W)
(Max): 2A (24W)

2432TX-2
Dual Path Dual Link DVI to Serial Converter
Page 8 Revision 1.0 SPECIFICATION
Physical:
Dimensions: With flanges: 7.81”L x 5.63”W x 1.75”H
(199mm L x 143mm W x 45mm H)
Compliance:
Electrical Safety: Power supply UL listed
Complies with CE Low Voltage Directive
Laser Safety: Class 1 laser product
Complies with 24 CFR 1040.10 and 1040.11 IEC 60825-1
EMI/RFI: Complies with FCC Part 15, Class A EU EMC directive

2432TX-2
Dual Path Dual Link DVI to Serial Converter
STATUS LEDS Revision 1.0 Page 9
4. STATUS LEDS
The location of the status indicators are shown in below Figure 4-1.
PWR: When ON this LED indicates that the 2432TX-2 is receiving Power.
ERR: When Err/Fault LED is ON indicates that there is a problem with the unit.
1 When On this LED indicates that the 2432TX-2 is outputting a signal on Input 1A.
2 When On this LED indicates that the 2432TX-2 is outputting a signal on Input 2A.
3 When On this LED indicates that the 2432TX-2 is outputting a signal on Input 1B.
4 When On this LED indicates that the 2432TX-2 is outputting a signal on Input 2B.
Figure 4-1: 2432TX-2 Status LEDs
4.1. USER CONTROLS
4.1.1. Dip Switches
Note: DIP Switch settings are only valid with Version 1.X.X firmware. With firmware
version 2.X.X DIP switches are inactive due to functions being moved to serial menu
and SNMP for control.
DIP Switch Function
1 Output format: DOWN=SDI, UP=3G-GLink
2
Changes output bandwidth: DOWN=3G, UP=1.5G (effectively selects between 1080p
60 and 30)
3 Interlace Output: DOWN= Progressive Output, UP=Interlaced Output
4 Genlock: DOWN=Disable, UP=Enable
5&6
Output Frame Rate: [DOWN,DOWN]=59.94fps [UP,DOWN]=60fps [DOWN,UP]=50fps
7 Under Development, Leave Down
8 Under Development, Leave Down
Table 4-1: DIP Switch Functions

2432TX-2
Dual Path Dual Link DVI to Serial Converter
Page 10 Revision 1.0 STATUS LEDS
Figure 4-2: 2432TX-2 DIP Switches
4.2. ACCESSING THE SERIAL PORT MENU
Connect a serial cable to the UPGRADE port at the back of the unit. Do not connect any Ethernet cables
to the unit (failure to do this could cause unwanted network issues) until the initial configuration has been
completed. Connect the 9-pin D-type end of the serial cable to the serial port of your computer. Open a
terminal session and configure the port for the following configuration:
Table 4-2: Serial Port Terminal Settings
4.3. SERIAL MENU
Configure your terminal program to the above table settings and press the <enter> button. The session
should respond with the 2432TX-2 Main Menu.
Figure 4-3: 2432TX-2 Serial Menu
Bits per second
115200
Data Bits
8
Parity
None
Stop Bits
2
Flow Control
None
/