Page is loading ...

A C
E
F
B
D
1 cm
(0.4 in)
max.
min.
c
b
f
g
d
a
i
h
e
2.3 pick
UP
2.4 thermocontrol
A
➞
22
23
2
4
2
5
2
6
2
7
21
2
0
1
9
1
8
1
7
∞
C
25
24
25
26
2
7
2
8
2
9
23
22
21
2
0
1
9
∞
C
a
b
c
d
e
f
°C
22
2
3
2
4
25
2
6
2
7
2
1
20
19
1
8
1
7
∞
C
25
24
25
2
6
2
7
2
8
2
9
23
22
2
1
20
1
9
∞
C
°C
B
G
H
I

E
nglish
1.1 General safety Instructions
Before putting the aquarium into operation, be sure to carefully read through the entire Operating Instructions
and keep them handy for future reference. Check your Aquarium set for completeness and then start putting
the Aquarium into operation.
For indoor use only. For use with aquariums.
All electrical equipment in the water must be disconnected from the mains during care and maintenance work.
To protect against contact voltage being too high, the fixture must have a residual current device with a rated release
fault current not exceeding 30 mA. Ask your electrician.
The device’s power cable cannot be replaced. An external power cable or power supply unit must not be repai-
red. In case of cable damage, the device must no longer be used. If an external power cable or power supply
is damaged, they must always be replaced. Contact your specialised dealer or your EHEIM Service Centre.
Never carry the pump by the cable; do not bend the cable.
Never touch mains plug with wet hands!
For your own safety, we recommend to form a drip loop with the connection cable to prevent any water runn-
ing along the cable from intruding into the socket. When you use a multiple socket or an external power supply
must be placed above the lighting / heaters - filter power connections.
This equipment can be used by children above the age of 8 or by persons with reduced physical, mental or
sensory capacities or a lack of experience or knowledge, provided they are supervised or have received in-
struction in the safe use of the equipment and therefore understand the risks involved. Do not allow children
to play with this equipment. Do not allow children to clean or conduct user maintenance without supervision.
Do not clean the unit – or parts of it – in the dishwater. Not dishwater resistant!
Do not dispose of this product as normal household waste. Take it to your local refuse collection side.
The product has been approved of in accordance with the relevant nationals regulations and directives and
complies with the EU standards.
• When filled, the aquarium must not be transported or carried. • It may only be set up on level surfaces. Use a safety mat
or the self-adhesive rubber feet that come with it. Glass basin must be placed on even surfaces only. • While cleaning the
panes note that the adhesion does not damage. • Be careful while cleaning with razor blades. Danger of injury! • We re-
commend that the Aquarium is to be filled in a suitable environment as a test, and is checked for leakages.
1. EHEIM aquastar 54, EHEIM aquastar 54 LED
1.2 Additional security instructions for inner filter
The pump must be positioned beneath the surface of the water.

• Free the lower side of the aquarium floor as well as the upper surface of the furniture from foreign bodies like dirt and sand, etc.
• Place the Aquarium on the furniture. Do not use any mat/ place mats between the aquarium and the furniture.
• ONLY AQUASTAR 54 LED: It is to be noted, that the floor frame, in which the Aquarium is placed must lie completely over the
Furniture upper surface.
2.1 Assemble
Clean the inner surfaces of the aquarium thoroughly with warm water and a clean, disposable sponge. Chemical (as well
as Biological) cleaning agents are a strong taboo!!
2.2 Cleaning the Aquarium
• Unpack the aquarium carefully.
• Positioning: No radiation by the sun, not too much daylight. Keep away from heating elements. Place near a socket on a
level and sturdy surface.
• Furniture: In addition to stability the furniture must have a completely flat surface and be set up on a firm, sturdy floor - We
recommend the use of the EHEIM Aquarium under cabinets offered in stores. If necessary to the horizontal alignment, place the
furniture feet evenly below.
2. Positioning
Such items can cause electronic or mechanical interference or damage. This also applies to pace-
makers. The necessary safety distances can be found in the instruction manuals for such medical
equipment.
Attention: Maintenance work presents the risk of crushing th fingers due to high magnetic forces.
20 cm
1.3 Additional security instructions for heater control
Risk of burning: • Never switch on the heater outside the aquarium • Do not handle or touch the heater inside
the heating area • Switch off the heater before removing it from the water and let it cool down in the water •
After removing the heater put it on a non-flammable, heat resistant surface (no paper, cloth etc.)
Risk of overheating: Water level must never be be-low minimum mark
c
on the housing. Max. immersion
depth 0.5 m.
1.4 Additional security instructions for lighting
The distance between the underside of the light and the highest water level must be at least 15 mm.
Not a household light bulb; special luminaire for use in aquariums. Do not gaze into the lamp for longer periods
while it is on.
min. 15 mm
• Lights may not be operated under water. • Aquastar 54: (T8, 15 W) Typ 0520609 / 05206029: Only insert fluorescent lamps
with an output of 15 watts and length of 438 mm. • Aquastar 54 LED (LED, 12 W) Typ 0585125 / 0585126: The LED- Module
cannot be exchanged in the lights.
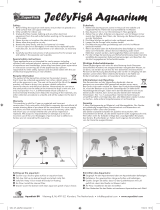
Prepare the filter as per the image for the installation in the Aquarium. So as to not impede the view, you should fix the inner
2.3 Inner filter installation

A Mount thermostatic heater with double suction cup holder
e
vertically in the aquarium, fixing it in a place where
water flow is brisk (filter outlets/ vents) so that the warmed water can be equally distributed in the tank.
Risk of overheating: Water level must never be be-low minimum mark
c
on the housing. Max. immersion depth
0.5 m.
• Before you start, set the heater in the aquarium water for 20-30 minutes without plugging it. • Check device for da-
mage • Fix suction cups
d
to double suction cup holder
e
and clip onto heater (not inside the heating zone and
close to the indicator lamp) • Mount thermostatic heater with double suction cup holder
e
vertically in the aquarium,
fixing it in a place where water flow is brisk (filter outlets/ vents) • Set temperature • Do not insert the power plug
yet! Caution: Do not use the unsecured heater in the Aquarium!
B Setting temperature: In an already installed / filled Aquarium, pull the power plug. Turn the temperature sel-
ector ring
a
to the desired temperature. Insert the power plug. “Red light”
f
= heater in operation
Recalibration: If, after a day or two in operation the setting scale does not correspond to the water temperature,
follow the following procedure to recalibrate the heater: • Switch off the heater and unplug it from the mains supply
• Measure the water temperature with an accurate thermometer • Turn indicator arrow (red)
b
to point to the mea-
sured temperature • Set the desired tank temperature with the temperature selector ring (blue)
a
. • Insert the power plug.
2.4 Heater installation
The thermometer can be mounted optionally in the cover (Aquastar 54 LED) or with the help of a supplied suction pad.
2.6 Thermometer Installation
2.5 Installing light cover
filter on the side wall of the tank in a corner area; here this can be later best “covered” by plants.
A
a
Filter cover
b
Output nozzle with diffusor, ±90° rotatable
c
Filter canister
d
Motor housing
e
4 suction
cups
f
Air regulating valve
g
Air hose
h
Back panel
i
2 x clips.
B Insert the 4 suction cups on the reverse side of the filter and attach device to the interior wall of the aquarium.
C On the rear of the motor housing there is a groove for the cable, which allows for 3 different cable laying possi-
bilities. The 2 included clips are for closing the unused apertures, to prevent fry or small fish from getting trapped
in them.
D The opening of the output nozzle should be placed min. 1cm (0.4 in.) below the water surface in order to achieve
good surface movement and optimum water circulation.
E After installation in the aquarium, the filter can be operated by connecting to the mains plug.
By pulling out or pushing in the output nozzle, the performance of the pump can be regulated for maximum or
minimum efficiency. The flow direction can be set within a range of ±90°.
F For additional oxygen enrichment, the enclosed air regulation valve can be used: push in the output nozzle and at-
tach the air hose with the air regulating valve. By turning the valve the quantity of air can be regulat-
G Do not insert the plug connection yet!
A Place the frame on the aquarium and lay the cable of the inner filter and heater through the cable opening
B The thermometer can be optionally inserted in the fixture or be fixed by means of a suction cup
C Place LED lights in the bracket.
During maintenance and care work the LED lights can also be placed in the reverse bracket in the Aquarium.
The permanent operation in the reverse system in a closed cover is not permitted!
D Lay the cable of the LED in the provided cable channel and fix under the latching
E - F Place the cover in the frames
G Open /close the cover
H For the use of an automatic feeding machine the grip plate may be removed.

3.2 Decoration
Stones (Rock) or stone wood make the underwater landscape and serve as a hiding place or comfy bottom for the fish. Do not
over place of them, whereby the plants and the fish get enough space!
When decorated with stones, you make sure that no heavy stones and pebbles lie between the bottom pane (Pressure point
load!). Eventually place a thin Styrofoam plate between the stone and the lower pane or ensure that there is a sufficient layer of
soil, (soil, fine sand) between the glass and stone.
3.3 Let some water flow
So the ground is heavy and soggy, let them run a little lukewarm water (tap water, approximately 24 ° C). Careful - best allow a
bowl or plate to lap over, so that the soil is not agitated.
3.4 Insert Plants
• Keep in mind that most of these plants are still growing.
• Place the bigger plants at the back and the smaller ones in the front.
• Press the stem and roots such as with a flat pair of tweezers vertically into the ground and then pull it up to the root collar.
3.5 Filling the Aquarium
When the devices are installed, refill the Aquarium; Lukewarm tap water (approx. 24-25 ° C), Water Purifier is to achieve the op-
timum water quality for your fish.
The permissible level of the water is minimum 3 cm from the upper edge of the glass. A smaller distance can cause condensation
problems / result in water leakage.
The distance between the underside of the light and the highest water level must be at least 15 mm.
Tip: EHEIM Advisor for installation, plants and Fish are available in the specialist shop or atwww.eheim.com
For the plants to become active and can establish bacterial culture operate the aquarium only as follows:
• Insert power plug for lights, inner filter and heater
• Switch on the lights and allow them to remain ON for 8-10 hours daily, alternatively programme a timer for 8-10 hours
lighting.
• Run filter in continuous operation (day and night); the heater also (automatically turns on / off when over / falling below
the set temperature).
4. Putting into operation
The plants need the right soil for root formation and food intake. Various species of fish like to “hunt” land search the ground
for food and algae.
TIP: The ground should be higher lightly at the back, so the dirt collects at the front better and can be easily removed.
3.1 Build bottom floor
3. Align Aquarium

G Disconnect the mains plug. Remove the filter canister by pulling upwards. By exerting with your finger a little pressure
on the top of the motor housing, you will prevent the suction cups from slipping. The complete motor housing remains
in the aquarium and does not have to be removed.
H Open the filter cover. Remove the cartridge and rinse lightly under lukewarm flowing water or replace (order no. for
2008: 2617080). The cart ridge can be used 2-3 times.
Attention: Never carry out water change and cleaning of the cartridge at the same time.
I The impeller should not be removed for cleaning. Vigorously rinse the canister and impeller and ensure free movement
of the im peller.
Install the cleaned cartridge back into place, close filter cover and insert the complete canister back into the motor
hous ing.
5.2 Interior filter
A change of the fluorescent tube (15 Watt, 438mm Long) is recommended every 2-3 years.
Disassembly/Assembly:
1. Pull power plug
2. Loosen fitting ring (Fig.1)
3. Push fitting ring over the pipes (Fig. 2)
4. Pull out the pipes without rotating forwards (Fig. 3).
The assembly is done in a reverse sequence. Note the correct positions of the pipes during the assembly and lightly lock the
fitting ring evenly by hand.
Change the starter:
Use only the starter, as per the Norm EN 60155. Screw cover of the Starter loose and insert new, suitable starter, then tighten
screw cap.
5.3 Cover Aqua Star 54 switching of the fluorescent tube
We provide the warranty on your aquarium lamp for the set Aqua Star 54 up to 24 months from date of purchase. The guarantee
covers all possible defects on integrated electronic parts (excl. fluorescent tubes). We provide the warranty on the aquarium
lamp for the set Aqua Star 54 LED up to 36 months from date of purchase. Damage due to intervention by the user is not co-
vered.
We provide the warranty on the aquarium, Inner filter heater controls up to 36 months from date of purchase, excluding glass
panes and manhandling. No liability is accepted for fish, plants and consequential damage in your flat – even during the guarantee
period. Please do not remove the label on the bottom of the base plate as otherwise the warranty claim will no longer apply.
Within the guarantee period our repairs are free of charge.
For recognition of the guarantee a dated purchase receipt, as well as compliance with the operating instructions is essentially
to be submitted to your dealer.
Guarantee
• Remove other visible waste and dead plant parts (EHEIM plant forceps).
• Every 3 to 4 weeks (depending on the stocking too often) perform partial water changes: exchange about 1/3 of water against
appropriately-tempered water; it immediately cleans the floor bottom (substrate cleaning kit); after changing the water, add
water treatment agents.
Occasionally (if necessary) clean panes, eliminate algae and chalk residues (with sponge, Screen wash). Clean floor with EHEIM
sludge cleaner. Control water quality.
• Clean the filter only, if the water flow is noticeably reduced.
5.1 Aquarium
5. Cleaning, Care and Maintenance
/