Panasonic PV-GS200PP Owner's manual
- Category
- Camcorders
- Type
- Owner's manual

o,0,_,oo,_o_0,_.o,,,_o_._o_0o._Panasonic _
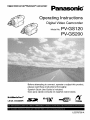
Operating Instructions
Digital Video Camcorder
Mode,NoPV-GS120
PV-GS200
MultiMediaCard"
LEICA DICDMAR
Before attempting to connect, operate or adjust this product,
please read these instructions thoroughly.
Spanish Quick Use Guide is included.
Gufa para r&pida consulta en espafiol est_ incluida.
RdB_I_
LSQT0799 A

Things You Should Know
Date of Purchase
Thank you for choosing Panasonic!
You have purchased one of the most
sophisticated and reliable products on the
market today. Used properly, we're sure it will
bring you and your family years of enjoyment.
Please take time to till in the information on the
right.
The serial number is on the tag located on the
underside of your Camcorder. Be sure to retain
this manual as your convenient Camcorder
information source.
Dealer Purchased From
Dealer Address
Dealer Phone No.
Model No.
Serial No.
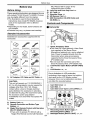
Safety Precautions
WARNING: TO PREVENT FIRE OR SHOCK HAZARD,
DO NOT EXPOSE THIS EQUIPMENT TO RAIN OR MOISTURE.
Your _|_'_ Camcorder is designed to record and play back in Standard Play (SP) mode and Long Play
(LP) mode
It is recommended that only cassette tapes that have been tested and inspected for use in Camcorder
with the _,oi|_, mark be used.
RISK OF ELECTRIC SHOCK
DO NOT OPEN
CAUTION: TO REDUCE THE RISK OF ELECTRIC SHOCK,
DO NOT REMOVE COVER (OR BACK)
NO USER-SERVICEABLE PARTS INSIDE
REFER SERVICING TO QUALIFIED SERVICE PERSONNEL
/_ This symbol warns the user
that uninsulated voltage within
the unit may have sufficient
magnitude to cause electric
shock.
Therefore, it is dangerous to
make any kind of contact with
any inside part of this unit.
This symbol alerts the user that
important literature concerning
the operation and maintenance
of this unit has been included.
Therefore, it should be read
carefully in order to avoid any
problems.
AC Adaptor
oThe rating plate ison the underside of the AC Adaptor.

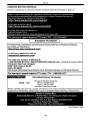
FCC Note: This equipment has been tested and found to comply with the limits for a Class B digital
device, pursuant to Part 15 of the FCC Rules. These limits are designed to provide reasonable
protection against harmful interference in a residential installation. This equipment generates, uses,
and can radiate radio frequency energy and, if not installed and used in accordance with the
instructions, may cause harmful interference to radio communications. However, there is no guarantee
that interference will not occur in a particular installation. If this equipment does cause harmful
interference to radio or television reception, which can be determined by turning the equipment off and
on, the user is encouraged to try to correct the interference by one or more of the following measures:
• Reorient or relocate the receiving antenna.
• Increase the separation between the equipment and receiver.
• Connect the equipment into an outlet on a circuit different from that to which the receiver is
connected.
• Consult the dealer or an experienced radio/TV technician for help.
FCC Caution: To assure continued compliance, follow the attached installation instructions and use
only shielded interface cables with ferrite core when connecting to computer or peripheral devices.
Any changes or modifications not expressly approved by the party responsible for compliance could
void the user's authority to operate this equipment.
Declaration of Conformity
Trade Name: Panasonic
Model NO.: PV-GS120, PV-GS20O
Responsible party: Matsushita Electric Corporation of America
One Panasonic Way, Secaucus, NJ 07094
Support Contact: Panasonic Consumer Electronics Company
1-800-211-PANA (7262)
This device complies with Part 15 of the FCC Rules. Operation is subject to the following two
conditions: (1)This device may not cause harmful interference, and (2) this device must accept
any interference received, including interference that may cause undesired operation.
CAUTION: TO PREVENT FIRE OR SHOCK HAZARD AND ANNOYING INTERFERENCE, USE THE
RECOMMENDED ACCESSORIES ONLY.
CAUTION: TO PREVENT ELECTRIC SHOCK, MATCH WIDE BLADE OF PLUG TO WIDE SLOT,
FULLY INSERT.
CAUTION: DANGER OF EXPLOSION IF BATTERY IS INCORRECTLY REPLACED. REPLACE
ONLY WITH THE SAME OR EQUIVALENT TYPE.
• Since this product gets hot during use, operate it in a well ventilated place; do not install this
equipment in a confined space such as a bookcase or similar unit.
V'!'_|W-'W-'1_11_[_1
AS WITH ANY SMALL OBJECT, SD CARDS CAN BE SWALLOWED BY YOUNG CHILDREN. DO
NOT ALLOW CHILDREN TO HANDLE THE SD CARD.
PV-GSI2U
Tested To Comply
With FCC Standards
FOR HOME OR OFFICE USE
PV-GS200
Tested To Comply
With FCC Standards
FOR HOME OR OFFICE USE
-3-

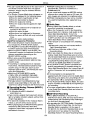
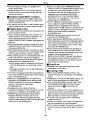
IMPORTANT SAFETY INSTRUCTIONS
1) Read these instructions.
2) Keep these instructions.
3) Heed all warnings.
4) Follow all instructions.
5) Do not use this apparatus near water.
6) Clean only with dry cloth.
7) Do not block any ventilation openings. Install in accordance with the manufacturer's instructions.
8) Do not install near any heat sources such as radiators, heat registers, stoves, or other apparatus
(including amplifiers) that produce heat.
9) Do not defeat the safety purpose of the polarized or grounding4ype plug. A polarized plug has two
blades with one wider than the other. A grounding type plug has two blades and a third grounding
prong. The wide blade or the third prong are provided for your safety. Ifthe provided plug does not
fit into your outlet, consult an electrician for replacement of the obsolete outlet.
10) Protect the power cord from being walked on or pinched particularly at plugs, convenience
receptacles, and the point where they exit from the apparatus.
11) Only use attachments/accessories specified by the manufacturer.
12) Use only with the cart, stand, tripod, bracket, or the table specified by the
manufacturer, or sold with the apparatus. When a cart is used, use caution
when moving the cart/apparatus combination to avoid injury from tip-over.
13) Unplug this apparatus during lightning storms or when unused for long
periods of time.
14) Refer all servicing to qualified service personnel. Servicing is required when the apparatus has
been damaged in any way, such as when the power-supply cord or plug is damaged, liquid has
been spilled or objects have fallen into the apparatus, the apparatus has been exposed to rain or
moisture, does not operate normally, or has been dropped.

Precautions eAVOID SUDDEN CHANGES IN
USE & LOCATION
oTO AVOID SHOCK HAZARD ... Your
Camcorder and power supply should not be
exposed to rain or moisture. Do not connect the
power supply or operate your Cemcorder if it
gets wet. Your Camcorder has been designed
for outdoor use, however it is not designed to
sustain direct exposure to water, rain, sleet,
snow, sand, dust, or a direct splashing from a
pool or even e cup of coffee. This action could
permanently damage the internal parts of your
Camcorder. Do not attempt to disassemble this
unit. There are no user serviceable parts inside.
Unplug your Camcorder from the power supply
before cleaning.
PrT
• DO NOT AIM YOUR CAMCORDER AT THE
SUN OR OTHER BRIGHT OBJECTS
• DO NOT LEAVE THE CAMCORDER WITH
THE EVF AIMED DIRECTLY AT THE SUN AS
THIS MAY CAUSE DAMAGE TO THE
INTERNAL PARTS OF THE EVF
• DO NOT EXPOSE YOUR CAMCORDER TO
EXTENDED HIGH TEMPERATURE ... Such
as, in direct sunlight, inside e closed car, next
to a heater, etc.- This action could permanently
damage the internal parts of your Camcorder.
TEMPERATURE ... If the unit is suddenly
moved from a cold place to a warm place,
moisture may form on the tape and inside the
unit.
eDO NOT LEAVE YOUR CAMCOBDEB OR
THE POWER SUPPLY TURNED ON WHEN
NOT IN USE.
eSTORAGE OF YOUR CAMCORDER .- Store
and handle your Camcorder ina manner that will
not subject it to unnecessary movement (avoid
shaking and striking). Your Camcorder contains
a sensitive pick-up device which could be
damaged by improper handling or storage.
CARE
=TO CLEAN YOUR CAMCORDER ... Do not use
strong or abrasive detergents when cleaning
your Camcorder body.
=TO PROTECT THE LENS ._ Do not touch the
surface of the lens with your hand. Use a
commercial Camcorder lens solution and lens
paper when cleaning the lens. Improper cleaning
can scratch the lens coating.
eTO PROTECT THE FINISH OF YOUR
CAMCORDEB ... Before handling your
Camcorder, make sure your hands and face are
free from any chemical products, such as suntan
lotion, as it may damage the finish.
Apparatus Claims of U.S. Patent Nos. 4,631,603, 4,577,216, and 4,819,098, licensed for limited
viewing.
This product incorporates copyright protection technology that is protected by method claims of certain
U.S. patents and other intellectual property rights owned by Macrovision Corporation and other rights
owners. Use of this copyright protection technology must be authorized by Macrovision Corporation,
and is intended for home and other limited viewing uses only unless otherwise authorized by
Macrovision Corporation. Reverse engineering or disassembly is prohibited.
This class B digital apparatus complies with CANADIAN ICES-O03, I
i U.S.AJCANADA CONSUMERS: ATTENTION: 1
A lithium ion/polymer batterythatis recyclable powerstheproduct
_, ..._..j_ you have purchased.Pleasecall 1-800-8-BATTERY for information
on howtorecycle thisbattery,
-5-

Before opening the CD-ROM package, please read the following.
End User License Agreement (for USB Driver, WebCam Driver
and DV STUDIO)
You ("Licensee") are granted a license for the Software defined in this End User Software Agreement
("Agreement") on condition that you agree to the terms and conditions of this Agreement. If Licensee
does not agree to the terms and conditions of this Agreement, promptly return the Software to
Matsushita Electric Industrial Co., Ltd. ("Matsushita'), its distributors or dealers from which you made
the purchase.
Article 1 License
Licensee is granted the right to use the software, including the information recorded or described on
the CD-ROM, instruction manuals, and any other media provided to Licensee (collectively "Software"),
but all applicable rights to patents, copyrights, trademarks and trade secrets in the Software are not
transferred to Licensee.
Article 2 Use by a Third Party
Licensee may not use, copy, modify, transfer or allow any third party, whether free of charge or not, to
use, copy or modify the Software, except as expressly provided for in this Agreement.
Article 3 Restrictions on Copying the Software
Licensee may make a single copy of the Software in whole or in part solely for back-up purpose.
Article 4 Computer
Licensee may only use the Software on a single computer at a single location.
Article 5 Reverse Engineering, Decompiling or Disassembly
Licensee may not reverse engineer, decompile, or disassemble the Software, except to the extent
either of them is permitted under law or regulation of the country where Licensee resides. Matsushita,
or its distributors or dealers will not be responsible for any defects in the Software or damage to
Licensee caused by Licensee's reverse engineering, decompiling, or disassembly of the Software.
Article 6 Limitation of Liability
The Software is provided "AS-IS" without warranty of any kind, either expressed or implied, including,
but not limited to, warranties of non-infringement, merchantability and/or fitness for a particular
purpose. Further, Matsushita does not warrant that the operation of the Software will be uninterrupted
or error free. Matsushita or any of its distributors or dealers will not be liable for any damage suffered by
Licensee arising from or in connection with Licensee's use of the Software.
Article 7 Export Control
Licensee agrees not to export or re-export to any country the Software in any form without the
appropriate export licenses under regulations of the country where Licensee resides, if necessary.
Article 8 Termination of License
The right granted to Licensee hereunder will be automatically terminated if Licensee violates any of the
terms and conditions of this Agreement. Upon such automatic termination, Licensee must destroy the
Software and related documentation together with all the copies thereof at Licensee's own expense.
-6-

Before opening the CD-ROM package, please read the following.
G.726 Audio Decoder End User License Agreement
YOU SHOULD CAREFULLY READ THE FOLLOWING TERMS AND CONDITIONS. THIS IS A
LEGAL DOCUMENT WHICH CONSTITUTES YOUR AGREEMENT AS END USER FOR THE USE
OF THE SOFTWARE IN THAT PACKAGE. BY INSTALLING THIS SOFTWARE, YOU INDICATE
YOUR ACCEPTANCE OF THIS LIMITED USE SOFTWARE LICENSE.
IF YOU DO NOT AGREE TO THE TERMS OF THIS AGREEMENT, PROMPTLY RETURN THE DISK
PACKAGE AND THE ACCOMPANYING ITEMS WITH YOUR SALES RECEIPT TO YOUR VENDOR.
LIMITED USE SOFTWARE LICENSE
You, the Licensee, are granted a non-exclusive software license to use the Software and related
documentation supplied herein. The terms of this license are as follows:
1) You may use the Software on a single computer at a single location.
2) Asyou, theLicensee, ownthephysicalmediaonwhichtheSoftwareisrecorded, theLicensorof
the Software retains title and ownership thereof, regardless of the form or media in or on which the
original and other copies may exist. This License is not a sale of the original Software or any copy
thereof.
3) You are required to protect the copyright of the Software. You may NOT distribute or otherwise
make the Software or documentation available to any third party without the prior written consent of
the Licensor. You may be held legally responsible for any copyright infringement that is caused or
encouraged by your failure to abide by the terms of this License.
4) You may NOT modify or alter the Software. Any portion of the Software that is merged into or used
in conjunction with other software will continue to be the property of the Licensor and will be subject
to the terms of this License.
5) You are permitted to copy the Software for exclusive use as your working copy. Any such copy
must contain the same copyright notice and proprietary marking as the original Software.
6) You may not transfer or assign the Software or this License to any other person without the prior
written consent of the Licensor. Any authorized transferee of the Software shall be bound by the
same terms and conditions of this License and, in such case your license isautomatically
terminated. In no event may you transfer, assign, rent, sell, or otherwise dispose of the Software on
a temporary or permanent basis except as expressly provided herein.
7) This License is effective until terminated. This License will terminate automatically without notice
from the Licensor if you fail to comply with any provision of this Agreement. Upon termination you
will destroy the Software together with all copies and modifications in any form.
8) The Software has been tested and the documentation has been reviewed. However, THE
LICENSOR MAKES NO WARRANTY OR REPRESENTATION INCLUDING THE IMPLIED
WARRANTIES OF MERCHANTABILITY AND FITNESS FOR USE, ALL OF WHICH ARE
EXCLUDED. Some states do not allow exclusion of implied warranties so the above disclaimer
may not apply to you.
9) The Licensor will not be liable or in any way responsible for any incidental or consequential
economic or property damage in connection with the Software or its documentation. Some states
do not allow the exclusion of incidental or consequential damages so the above exclusion may not
apply to you.
10) (Notice to U.S. Government End Users) The Software and Documentation are "Commercial Items",
as that term is defined at 48 C.ER. 2.10t, consisting of "Commercial Computer Software" and
"Commercial Computer Software Documentation", as such terms are used in 48 C.P.R. 12.212 or
48 C.ER. 227.7202, as applicable. Consistent with 48 C.ER. 12.212 or 48 C.ER. 227.7202-1
through 227.7202-4, as applicable, the Commercial Computer Software and Commercial Computer
Software Documentation are being licensed to U.S. Government end users (A) only as Commercial
Items and (B) with only those rights as are granted to all other end users pursuant to the terms and
conditions herein.
-7-

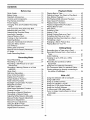
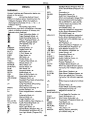
Contents
Before Use
Quick Guide ................................................... t0
Before Using .................................................. 12
Standard Accessories .................................... 12
Controls and Components ............................. 12
The Remote Controller .................................. 15
Power Supply ................................................ 16
Charging Time and Available Recording
Time ............................................................ 17
The One-touch Free Style Grip Belt .............. 17
Attaching the Lens Cap ................................. 18
Attaching the Shoulder Strap ......................... 18
Inserting a Cassette ....................................... 18
Using a Memory Card .................................... 19
Turning on the Camcorder ............................. 19
Selecting Modes ............................................ 19
Using the Viewfinder/LCD Monitor ................ 20
Using the Menu Screen ................................. 21
List of Menus ................................................. 22
Setting Date and Time ................................... 25
Internal Lithium Battery Recharge ................. 26
LP Mode ........................................................ 26
Audio Recording Mode .................................. 26
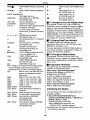
Recording Mode
About Recording ............................................ 27
Recording on a Tape ..................................... 27
Recording a Still Picture on a Card
(Photoshot) ................................................. 28
Recording a Moving Picture on a Card
(MPEG4) ..................................................... 30
Quick Start ..................................................... 31
Self-timer Recording ...................................... 31
Zoom In/Out Functions .................................. 31
Digital Zoom Function .................................... 32
Image Stabilizer Function .............................. 33
Fade In/Out Functions ................................... 33
Backlight Compensation Function ................. 33
MagicPix Functions ....................................... 34
Soft Skin Function ......................................... 34
Wind Noise Reduction Function .................... 34
Cinema Function ........................................... 35
Recording in Special Situations ..................... 35
Recording in Natural Colors .......................... 35
Adjusting White Balance Manually ................ 36
Manual Shutter Speed Adjustment ................ 37
Manual iris Adjustment .................................. 37
Manual Focus Adjustment ............................. 38
Using the Built-in Flash .................................. 38
Red Eye Reduction Function ......................... 39
Digital Effect Functions .................................. 39
Playback Mode
Playing Back a Tape ..................................... 42
Finding a Scene You Want to Play Back ....... 42
Slow Motion Playback ................................... 43
Still Playback!Still Advance Playback ............ 43
Index Search Functions ................................. 44
Playback Zoom Function ............................... 44
Playback Digital Effect Functions .................. 45
Playing Back a Card ...................................... 45
Slide Show .................................................... 46
Creating a Title .............................................. 47
Adding a Title ................................................ 47
Writing Printing Data on a Card ..................... 48
Protecting the Files on a Card ....................... 48
Deleting the Files Recorded on a Card ......... 49
Formatting a Card ......................................... 49
Enlarging a Movie Picture Size ..................... 50
Playing Back on Your TV .............................. 50
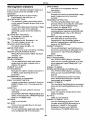
Editing Mode
Recording from a Tape onto a Card .............. 51
Recording Pictures from a Card onto a
Tape ............................................................ 51
Audio Dubbing ............................................... 51
Copying on an S-VHS (or a VHS)
Cassette ...................................................... 52
Recording the Contents of Other
Equipment ................................................... 53
Using the DV Cable for Recording ................ 53
PC Connection With DV Interface Cable ....... 54
Printing pictures by directly connecting to
the printer (PictBridge) ................................ 54
With a PC
Using the Software with a Computer ............. 56
Using USB Driver .......................................... 56
Using as a Web Camera ............................... 58
Using DV STUDIO 3,1E-SE .......................... 60
Using the G.726 Audio Decoder .................... 61
Using the ArcSoft Software ........................... 62
To disconnect USB cable safely .................... 64
If you no longer need software or driver
(Uninstall) .................................................... 65
Notes ............................................................. 65
-8-

Others
_ndicators ....................................................... 68
Initializing the Modes ..................................... 69
Warning/Alarm Indicators .............................. 70
Notes and Hints ............................................. 71
Cautions for Use ............................................ 78
Before Requesting Service (Problems and
Solutions) .................................................... 82
Explanation of Terms ..................................... 83
Specifications ................................................ 85
Camcorder Accessory System ...................... 88
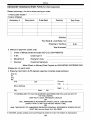
Camcorder Accessory Order Form
(For USA Customers) ................................. 89
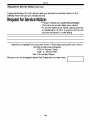
Request for Service Notice (USA Only) ......... 90
Limited Warranty (For USA Customers) ........ 91
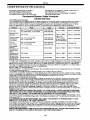
Customer Services Directory ......................... 92
Warranty (For Canadian Customers) ............ 93
Index .............................................................. 94
Spanish Quick Use Guide/
Gufa espaffola para el uso rapido ............... 96
-9-

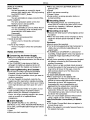
Before Use
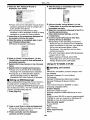
Quick Guide
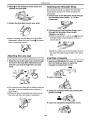
1 Attach the Battery to the AC Adaptor and
charge it.
eBefore use, fully charge the Battery.
eSince the Battery will not be charged when
the DC Cable is connected to the AC
Adaptor, disconnect it from the AC Adaptor.
eThe [CHARGE] Lamp lights up, and charging
starts.
eWhen the [CHARGE] Lamp goes off,
charging is completed.
2 Attach the charged Battery to the
Camcorder.
• Inserting a Cassette
1 Slide the [OPEN/EJECT] Lever O toward
the front and pull down to open the
Cassette Compartment Cover.
2 Insert a Cassette.
3 Close the Cassette Holder by pressing the
[PUSH] mark _.
4 Close the Cassette Compartment Cover.
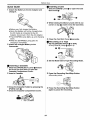
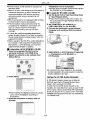
• Inserting a Card
1 Slide the [OPEN] Lever O to open the Card
Slot Cover _.
O
2 While holding the Memory Card with its cut
corner on top O, insert it into the Card Slot.
3 Close the Card Slot Cover O securely.
• Recording on a Tape
1 Set the [OFF/ON] Switch _ to [ON].
eThe [POWER] Lamp _ lights up.
O O
O
2 Set the Mode Dial to Tape Recording Mode.
3 Press the Recording Start/Stop Button.
• Recording starts.
4 Press the Recording Start/Stop Button
again to pause the recording.
-10-

Before Use
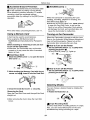
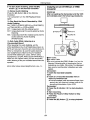
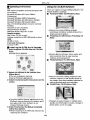
• Recording a Still Picture on a Card 4 Press the [1_] Button to start playback.
(Photoshot)
1 Set the Mode Dial to Card Recording Mode.
5 Press the [n] Button to Stop Playback.
2 Press the [PHOTO SHOT] Button.
• Recording a Moving Picture on a Card
(MPEG4) (PV-GS200 only)
1 Set the Mode Dialto Card RecordingMode.
2 Press the Recording Start/Stop Button.
3 Press the Recording Start/Stop Button
again to pause the recording.
• Playing Back a Tape
t Set the [OFF/ON] Switch O to [ON].
eThe ]POWER] Lamp O lights up.
O
o
2 Set the Mode Dial to Tape Playback Mode.
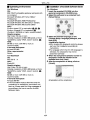
• Playing Back a Card
It plays back flies recorded on a Card,
1 Set the Mode Dial to Picture Playback Mode
or MPEG4 Playback Mode. (MPEG4
Playback Mode on PV-GS200 Model only)
2 Start Playback.
[PICTURE]:
I_: Starting the Slide Show
_-I_ : Playing back the next picture
41_1: Playing back the previous picture
II1: Stop the S)ide Show
III1: Pause the Slide Show
[MPEG4] (PV-GS2OO only):
I_: Playing back the File
_-I_ : Selecting the next file (When you tap this
button during playback, you can search the
next file, and when you keep pressing it, cue
playback is activated.)
41_1: Selecting the previous file (When you tap
this button during playback, you can search
the beginning of the file, and when you keep
pressing it, review playback is activated.)
II1: Stop playing back
IIII: Pause playing back
3 Press the [<1<] Button to rewind the tape.
-11-

Before Use
Before Use Mic, Please referto page -88-for
Before Using
These operating Instructions are designed for use
with models PV-GS120 and PV-GS2O0. Pictures
may be slightly different from the original.
eThe illustrations used in these Operating
Instructions show model PV-GS2O0, however,
parts of the explanation refer to different
models.
• Depending on the model, some functions are
not available.
• Features may vary, so please read carefully.
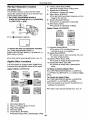
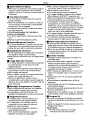
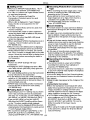
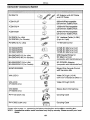
Standard Accessories
_llustrated are accessories supplied with the
Camcorder.
1)
pV DAC14D K2GJ2DZ00017 K2CA2EA00005
,,@
CR2025
CGA-DU14 V_B0470
(PV-GS200) (PV-GS120) N2QAGC000OI 8
N2QCBD000030
(PV-GS200) VYF2973 K2KC4CS00009
V_G3N16 VFA0425
1) AC Adaptor, DO Cable and AC Cable -,t_-
CAUTION:
This unit will operate on 110/120/220/240 V
AC. An AC plug adaptor may be required for
voltages other than 120 V AC. Please
contact either a local or foreign electrical
parts distributor for assistance in selecting
an alternate AC plug. We recommend using
the accessory power plug adaptor
(VJSS0070) in an area which has special AC
outlets.
2) Battery Pack-]_-
3) Remote Controller and Button-Type
Battery -t5-
4) Magic Wire Remote Control with Narration
Mic (PV*GS20O only) *]5-
•If you wish to operate PV-GSf 20 with a
Magic Wire Remote Control with Narration
replacement parts number.
5) Lens Cap and Lens Cap Cord -/'8-
6) AV Cable -50-
7) Shoulder Strap-ts-
8) SD Memory Card-t9-
9) USB Connection Kit (USB Cable and
CD-ROM) -5_-
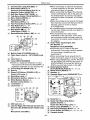
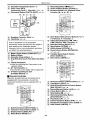
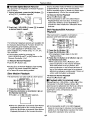
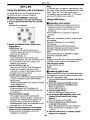
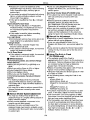
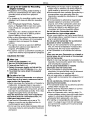
Controls and Components
• Camcorder
_1 Smart, Accessory Shoe
• The Video DC Light (optional), Video Flash
(not supplied) or the Stereo Zoom
Microphone (optional), ete, can be attached
here. Power is supplied directly from the
Camcorder when using an accessory
supported by the Smart Accessory Shoe.
(PV-GS2O0 only)
• Do not touch the connector part of the
Smart Accessory Shoe, (PV-GS200 only)
@ LCD Monitor Open Button [PUSH OPEN]
*2#-
(_; LCD Monitor-2o-, -,_t-
Due to limitations in LCD production
technology, there may be some tiny bright or
dark spots on the LCD Monitor screen.
However, this is net a malfunction and does
not affect the recorded picture.
(4 Card Slot Cover *]9-
(_ Card SIot-_#-
(s Card Slot Cover Open Lever [OPEN] -_9-
(71 Recording Check Button [[_]-27-
Recording Button [REC] .53.
_8 Backlight Button [BACK LIGHT]-33-,-53-
-12-

Before Use
Card Access Lamp [ACCESS] -19-
i_> Multi Button [MULTI] .40.
Picture-in-Picture Button [P-IN*P] .40.
MagicPix Button [MAGICPIX] .34.
Soft Skin Button [SOFT SKIN] .34-
1!_ Tele Macro Button [TELE MACRO]-32-
1!_ Menu Button [MENU]-21-
i_ Pause Button [I I] -43-
Still Button [STILL] -2s.
1!_ Fast Forward/Cue Button [1_1_] -42-,-45.
i_ Play Button [1_] .42.,-45-
Enter Button [ENTER] -2l-
Stop Button [11] .42., -45-
Fade Button [FADE] -33-
Rewind/Review Button [<1<i] -42-, .45.
Built-in Flash (PV-GS200 only) -38-
i_> Flash Open Lever [_--] (PV*GS20O only)
-38-
Lens Hood .8l.
Lens (LEICA DICOMAR)
eLEICA is a registered trademark of Leiea
microsystems IR GmbH and DICOMAR is a
registered trademark of Leica Camera AG.
i_ Focus Ring (PV*GS200 only) -38-
i_ Eyecup
i_ Power LCD Button [POWER LCD]-21-
Power LCD Lamp-21-
i_ Recording Lamp-27-
Microphone (built-in, stereo) -32-,-34-
White Balance Sensor-36-
Remote Control Sensor -Is-
Lock Button -1T-
Lock Cover -17-
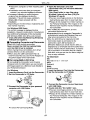
(i_ USB Jack [_ ] 47-
Jack for Magic Wire Remote Control with
Narration Mic [REMOTE] (PV-GS20O only)
-28-
Microphone Jack [MIC]
• When connecting an external microphone
or audio equipment to this jack, the built-in
microphone does not operate.
eWhen connecting the Magic Wire Remote
Control with Narration Mic to this jack and
the [TALK] Button is pressed, the built-in
microphone does not operate. (PV-GS200
only) -28-
eWhen connecting the pin plug of the Magic
Wire Remote Control with Narration Mic to
this jack, plug it in as far as it goes.
(PV-GS200 only)
eA compatible plug-in powered microphone
can be used. Please consult your dealer for
more information.
eThe microphone may make noises
depending on the type used. in this case,
we recommend using the battery with the
Camcorder to reduce noises instead of the
AC adaptor.
(3_,_Audio-Video Input/Output Jack
[AV IN/OUT] -5o-
Headphone Jack [PHONES]
eConneefing an AV Cable to this jack
activates the Camcorder's built-in speaker,
but connecting a headphone, etc.
deactivates it.
eWhen connecting the pin plug of the AV
Cable to this jack, plug it in as far as it goes.
eWhen using headphones, set [AV JACK] of
the [AV IN/OUT[ or ]INITIAL] sub-menu to
lOUT/PHONES]. If you set [AV JACK] to
[OUT], you may hear noises on the right.
(3-g_Mode Selector Switch
[AUTO/MANUAL/FOCUS] -27-, -33-, -38-
(_ Reset Button [RESET] .7o-
_'_ Speaker-42-
(3_ Cassette Eject Lever [OPEN/EJECT] -18-
d
(gg) Mode Dial -19-
(,ii_: Quick Start Recording Button
[QUICK START] -31-
Quick Start Recording Lamp-31-
_411Power Lamp [POWER] -I_-, .27., .42.
£4_ Recording Start/Stop Button -2?-, -50-
F43 Power Switch [OFF/ON] -/f_-,-27-, -42-, -?8-
£_ Cassette Holder
-13-

Before Use
Cassette Compartment Cover-!8-
Zoom Lever [W/T],
Volume/Jog Lever [-- VOL/J OG -4] -3t-, -42-
Photoshot Button [PHOTO SHOT] -28-, -sl-
(i_i Eyepiece Corr_tor Knob -2o-
(i_ili Viewfinder-2o-, -_-
Due to limitations in LCD production
technology, there may be some tiny bright or
dark spots on the Viewfinder screen.
However, this is not a malfunction and does
not affect the recorded picture.
Battery Eject Button [PUSH BATT] 46-
Battery Holder
Shoulder Strap Holders -18-
i_ Grip Belt (One-touch Free Style Grip Belt)
i_ Tripod Receptacle
eUsed for mounting the Camcorder on an
optional tripod.
i_ DV Terminal [DV] -53-
eConnect this to the digital video equipment.
i_ S-Video Input/Output Jack
[S-VIDEO IN/OUT] -5o-
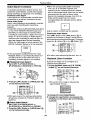
• Remote Controller
Using the wireless Remote Controller that is
supplied with the Cameorder, most of the
Camcorder functions can be operated from a
distance.
(gi Recording Button [OREC]-53-
(s2_ Audio Dubbing Button [A.DUB] -Sl-
(_i_ Direction Buttons for Playback Zoom
Function [A, _, >% Y] -45-
(64_ Slow Motion/Still Advance Buttons [*_1,I_]
(-l: Reverse, J_-:Forward) -4_-
(6s Index Search Buttons [ _, _ ]
( _ : Reverse, _ : Forward) -¢4-
(Sg_ Selection Button [SELECT]-45-
(s'i_ Store Button [STORE] -45-
(_ Off/On Button [OFF/ON] -45-
_s_i Zoom/Volume Button [ZOOM/VOL]
-31-_ -42-_-44-
(_ii: Variable Speed Search Button
[VAR. SEARCH] -43.
(_1_ Menu Button [MENU]-21-
,_7_=_
(7_ Photoshot Button [PHOTO SHOT] .28., -51-
(73_ Title Button [TITLE] -4s-
(741 Multi-Picture/Picture-in-Picture Button
[MULTI/P-IN-P] -4o-, -46-
('_ Rewind/Review Button [<<1] .42., -45-
(Ts Pause Button [I I] -43-, -45-
(_ Stop Button [M] .42., .45-
(_a Recording Start/Stop Button
[START/STOP] -27-, -3o-
(79_ Play Button [1_] .42., -45-
(_ Fast40rward/Cue Button [IH_]-42-, -_5.
(ai Playback Zoom Button [P.B. ZOOM] -44-
(a2 Enter Button [ENTER]-21-
Date/Time Button [DATE/TIME] .69.
Indication Output Button [OSD] -50-
Display Button [DISPLAY] -69-
i_ Reset Button [RESET]-84-
-14-

Before Use
• Magic Wire Remote Control with
Narration Mic (PV-GS200 only)
This controller allows the scene to be shot from
various angles, high to low, and is also
convenient when a Tripod is used. When the
controller is not in use, attach the clip to the Grip
Belt for convenience.
This controller makes it easier for left-handed
users to use the Camcorder.
87
Microphone [MIC] -28-
Recording Start/Stop Button [REC]
i_ Zoom Lever [W/T]
• Zoom speed changes in 2 stages.
i_ Photoshot Button [PHOTO SHOT]
I_Z Microphone Switch Button [TALK]-28-
• When the Magic Wire Remote Control with
Narration Mic is connected to [REMOTE]
Jack and the [TALK] Button is pressed, the
narration microphone is activated and the
built-in microphone on the Camcorder is
deactivated.
i_> Clip
• Insert the plug securely into the [REMOTE]
Jack as far as it will go. A loose connection
will affect normal operation.
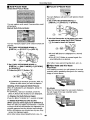
The Remote Controller
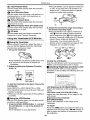
• Inserting a Button-type Battery
Before using the Remote Controller, insert the
supplied button-type battery.
1 While pressing the Lock Button O, pull out
the Battery Holder.
eWhen the button-type battery is exhausted,
replace it with a new CR2025 battery. (A battery
is normally expected to last about t year.
However, it depends on operation frequency.)
eMake sure to match the poles correctly when
inserting the battery.
Warning
Danger of explosion if battery is
incorrectly replaced.
Replace only with the same or equivalent
type recommended by the equipment
manufacturer. Discard used batteries
according to manufacturer's instructions.
Risk of fire, explosion and burns. Do not
recharge, disassemble, heat above 212°F
(t00°C) or incinerate. Keep the
Button-Type battery out of the reach of
children. Never put Button*Type battery
in mouth. If swallowed, call your doctor.
Replace battery with Panasonic PART NO.
CR2025 only. Use of another battery may
present a risk of fire or explosion.
Caution: Battery may explode if mistreated.
Dispose of used battery promptly. Keep
away from children.
Do not recharge, disassemble or dispose of
in fire.
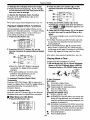
• Using the Remote Controller
t Direct the Remote Controller at the Remote
Control Sensor ii_ of the Camcorder and
press an appropriate button.
10°
2 Insert the button-type battery with the (+)
marking facing upwards.
3 Insert the Battery Holder into the Remote
Controller.
• Distance from the Camcorder: Within
approximately 15 feet (5 meters)
• Angle: Within approximately 10° in the
upward, and 15° in the downward and
horizontal directions from the central axis
• The above operating ranges are for indoor use.
Outdoors or under strong light, the Camcorder
may not operate properly even within the above
ranges.
• Within a 3 feet (t meter) range, you can also
use the Remote Controller on the LCD Monitor
side of the Camcorder.
-15-

Before Use
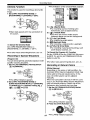
Selecting Remote Controller Modes
When 2 Camcorders are used simultaneously,
they can be operated individually by selecting
different Remote Controller Modes.
• If the Remote Controller Mode of the
Camcorder and that of the Remote Controller
do not match, [REMOTE] Indication is
disp{ayed.
Setup on the Camcorder."
Set [REMOTE] on the [INITIAL] Sub-Menu to the
desired Remote Controller Mode. (-2J-)
Setup on the Remote Controller:
[VCR1]: Press the [1_-]Button and [11] Button
simultaneously, 0
[VCR21:Press the [-,I]Buttonand [11]Button
simultaneously. 0
• When the battery in the Remote Controller is
replaced, the mode is automat{cally reset to
[VCR1] Mode.
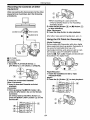
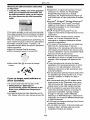
_Supp/y ..............................................................
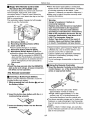
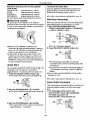
• Using the AC Adaptor
0
1 Connect the DO Cable to the Camcorder.
2 Connect the DO Cable to the AC Adaptor.
3 Connect the AC Cable to the AC Adaptor
and the AC Jack.
• The AC Cable's outlet plug does not fit
entirely into the AC Adaptor jack. A gap will
remain as shown O.
• Before connecting or disconnecting the
power supply, set the [OFF/ON] Switch on
the Camcorder to [OFF] and make sure that
[POWER] Lamp is not lit.
• Using the Battery
Before use, fully charge the Battery.
• We recommend using a Panasonic Battery.
• We cannot guarantee the quality of this
Camcorder when batteries from other
companies are used.
1 Attach the Battery to the AC Adaptor and
charge it.
• Since the Battery will not be charged when
the DC Cable is connected to the AC
Adaptor, disconnect it from the AC Adaptor.
• The [CHARGE] Lamp lights up, and charging
starts.
• When the [CHARGE] Lamp goes off,
charging is completed.
• When the battery is completely discharged,
the [CHARGE] lamp blinks at first, but the
battery is charged normally. When the
temperature of the battery is too high or low,
the [CHARGE] lamp blinks and the charging
time becomes longer than usual.
2 Attach the charged Battery to the
Camcorder.
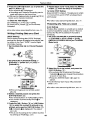
Disconnecting the Power Source
Set the [OFF/ON] Switch i_ to [OFF] and, while
pressing the [PUSH BATT] Button i_, slide the
Battery or DC Cable upward to disconnect it.
• For other notes concerning this item, see *Tt*.
-15-

Before Use
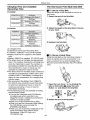
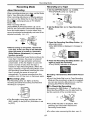
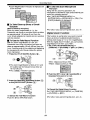
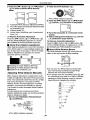
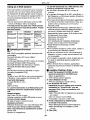
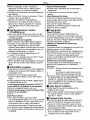
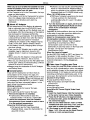
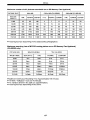
Charging Time and Available
Recording Time
PV-GS200
CGA-DU21 _ 3h55min,
3h45min.(3hf 5rain.)
CGA-DU07 _ lh30min,
lhf5min.(lh5min.)
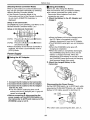
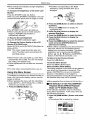
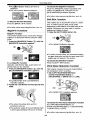
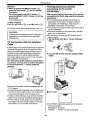
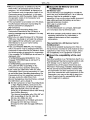
The One-touch Free Style Grip Belt
inTo Use as a Grip Belt
Adjust the length of the Grip Belt to the size of
your hand.
1 Detach the end of the Grip Belt.
PV-GS120
®
CGA-DUf4 _ 2h45min.
3h.(2h40min.)
CGA-DU21 _ 3h55min.
4h30min.(4h.)
CGA-DU07 _ lh30min.
lh3Omin.(f h20min.)
(_ Charging Time
® Maximum Continuous Recording Time
• "lh30min." indicates 1 hour and 30 minutes.
• Battery CGA-DU14 is supplied. (PV-GS200
only)
• Battery VSB0470 issupplied. (PV-GS120 only)
• The times shown in the table are approximate
times. The numbers indicate the recording time
when the Viewfinder is used. The numbers in
parentheses indicate the recording time when
the LCD Monitor is used. In actual use, the
available recording time may be shorter.
• The times shown in the table are for continuous
recording at a temperature of 68°F (25°C) and
humidity of 60%. If the Battery is charged at a
higher or lower temperature, the charging time
may be longer.
• We recommend the Battery Pack VSB0470
(PV-GS120 only), CGA-DU14 and CGA-DU2f
for long time recording (2 hours or more for
continuous recording, 1 hour or more for
intermittent recording).
• In the following cases, the available recording
time becomes shorter.
• You use the Viewfinder and LCD Monitor
simultaneously when using the 0 Lux
MagicPix function, rotating the LCD Monitor
forward to record yourself.
• When you set [EVF ON/AUTO] to [ON].
• When you use the Camcorder while lighting
the LCD Monitor up by pressing the
[POWER LCD] Button.
• When you use accessories applicable to the
Smart Accessory Shoe (Stereo Zoom
Microphone. Video DC Light, etc.).
(PV-GS200 only)
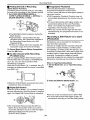
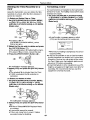
2 Adjust the length of the Grip Belt to the size
of your hand.
3 Reattach the Grip Belt.
• To Use as a Hand Strap
Using the Grip Belt as the hand strap makes it
easier to handle and carry a Camcorder. It is
more convenient to use with the Magic Wire
Remote Control with Narration Mic (PV-GS200
only).
1 Open the Lock Cover (13_ by holding the
tabs on both sides O, press the Lock
Button ii_' and detach the Grip Belt.
2 Detach the end of the Grip Belt.
-/7-

Before Use
3 Slide O in the direction of the arrow and
reattach the Grip Belt.
4 Attach the Grip Belt around your wrist.
oWhen returning the Grip Belt to the Grip Belt
Attachment, press the Lock Cover O to ensure
that it is securely locked.
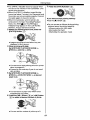
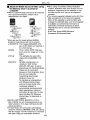
Attaching the Lens Cap
TO protect the Lens surface, attach the Lens Cap.
1 Pass the end of the Lens Cap Cord through
the hole in the Grip Belt Attachment part
and the Lens Cap through the Lens Cap
Cord.
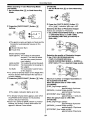
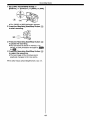
Attaching the Shoulder Strap
We recommend that you attach the Shoulder
Strap before going out to avoid dropping the
Cameorder.
1 Pull the end of the Shoulder Strap through
the Shoulder Strap Holder _2_; on the
Camcorder.
2 Fold the end of the Shoulder Strap, run it
through the Shoulder Strap Length
Adjuster, and pull it.
• Pull it out more than 1inch (2 cm) _ from the
Shoulder Strap Length Adjuster so that it
cannot slip off.
• Attach the other end of the Shoulder Strap to
the other Shoulder Strap Holder in the same
way.
Inserting a Cassette
1 Slidethe [OPEN/EJECT] Lever ii_ toward
the front and pull down to open the
Cassette Compartment Cover.
• The removed Lens Cap can be hooked onto the
Grip Belt. (it is not possible when using as a
hand strap.)
• When you are not recording, be sure to cover
the Lens with the Lens Cap for protection.
2 Insert a Cassette.
3 Close the Cassette Holder by pressing the
[PUSH] mark O-
4 Close the Cassette Compartment Cover.
-18-

Before Use
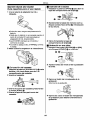
• Accidental Erasure Prevention
Opening the accidental erasure prevention slider
O on the cassette (by sliding it to the [SAVE]
arrow direction) prevents recording. To enable
recording, close the accidental erasure
prevention slider (by sliding it to the [REC] arrow
direction).
• For other notes concerning this item, see -Tt-.
Using a Memory Card
A Card can be used to record pictures.
• Use a genuine SD Memory Card or
MultiMediaCard manufactured by Panaeonic
only.
Before inserting or removing a Card, be sure
to turn off the Camcorder.
• Otherwise, the Camcorder may not function
properly or it may cause the loss of recorded
data in a Card.
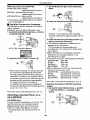
• Inserting a Card
1 Slide the [OPEN] Lever i_ to open the Card
Slot Cover
• [ACCESS] Lamp
While the Camcorder is accessing the Card
(reading, recording, playback or erasing), the
[ACCESS] Lamp lights up.
eWhile the [ACCESS] Lamp is on, never attempt
to open the Card Slot Cover, to pull out the
Card, to turn off the Camcorder. Such actions
will damage the Card, and recorded data, and
cause the Camcorder to malfunction.
Turning on the Camcorder
When the Camcorder is turned on with the Lens
Cap on, the Automatic White Balance Adjustment
may not function properly. Please turn on the
Camcorder after removing the Lens Cap.
• HOW to Turn on the Power
1 Set the [OFF/ON] Switch ii_' to [ON] while
pressing the button O.
• The [POWER] Lamp _41 lights up.
2 While holding the Memory Card with its cut
corner on top O, insert it into the Card Slot.
3 Close the Card Slot Cover (14 securely.
Removing the Card
Open the Card Slot Cover and then purl the Card
straight out.
• After removing the Card, close theCard Slot
Cover.
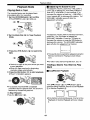
• How to Turn off the Power
1 Set the [OFF/ON] Switch ii_' to [OFF] while
pressing the button _.
_N
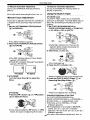
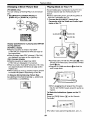
Selecting Modes
You can choose a desired mode by rotating the
Mode Dial.
1 Rotate the Mode Dial i139-
I_ :Tape Recording Mode
Use this mode when recording pictures on a tape.
Also, you can record still pictures on the card
simultaneously during recording on a tape.

BeforeUse
[] :Tape Playback Mode
Use this mode when playing back the recorded
scene on a tape.
I_l :Card Recording Mode
Use this mode when recording a still picture or a
moving picture on a card. (moving picture on
PV-GS200 Model only)
I_1 :Picture Playback Mode
Use this mode when playing back the recorded
still picture on a card.
I_ :MPEG4 Playback Mode (PV-GS200 only)
Use this mode when playing back the recorded
moving picture on a card.
r_ :PC Mode
Use this mode when you want to connect the
Camcorder to your Personal Computer.
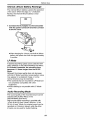
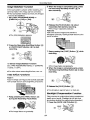
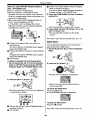
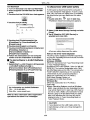
Using the Viewfinder/LCD Monitor
• Using the Viewfinder
Before using the Viewfinder, adjust the field of
view so that the displays inside the Viewfinder
become clear and easy to read.
I Tilt up the Viewfinder.
• The Viewfinder can also be pulled out for use.
• Do not pull on the Eyecup to extend the
Viewfinder.
2 Adjust by sliding the Eyepiece Corrector
Knob ii_'-
To Use the Viewfinder at the Same Time as the
LeD Monitor
Set [LCD/EVF] >> [EVF ON/AUTO] >> [ON].
• The Viewfinder does not turn off even if the LCD
Monitor is opened.
• When you turn the Camcorder off, this setting is
cancelled.
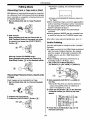
• Using the LeD Monitor
With the LCD Monitor open, you can also record
the picture while watching it.
I Press the [PUSH OPEN] Button i12 and pull
the LeD Monitor i13_ out in the direction of
the arrow.
• The Viewfinder is now deactivated.
• The LeD Monitor can be opened a maximum
of 120 °. If you open the LeD monitor to an
angle of 120°, it becomes easier to operate
menus or to play back pictures.
2 Adjust the LeD Monitor angle according to
the desired recording angle.
• The LCD Monitor can rotate a maximum of
180° O from the vertical position upwards
and a maximum of 90° O to the downward
direction. Forcefully rotating the LCD Monitor
beyond these ranges will damage the
Camcorder. You cannot rotate the LCD
Monitor when itis opened to an angle of 120°.
Therefore, do not rotate it forcibly.
0t8o o 090 °
Closing the LCD Monitor
Push the LCD Monitor until it is securely locked.
• Make sure the Card Slot Cover is closed.
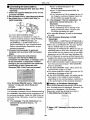
• Adjusting Brightness and Color Level
When {LCD/EVF SET] on the [LCD/EVF]
Sub-Menu is set to [YES], the following items are
displayed.
LC_/EVF _ETUF
LC_ COLOF_ LEVE_
[_]1_1_[+ I
EVE B_I_H_NE_S
I...................... I
LeD Brightness [LCD BRIGHTNESS]
Adjusts the brightness of the image on the LCD
screen.
LCD Color Level [LCD COLOR LEVEL]
Adjusts the color saturation of the image on the
LCD screen.
Brightness of the Viewfinder
[EVF BRIGHTNESS]
Adjusts the brightness of the image in the
Viewfinder.
To Adjust
Press the [I I/I] Button and select the item to be
adjusted, and then press the [<I<I/IH,,-] Button to
raise or lower the number of vertical bars in the
Bar Indication.
-20-
Page is loading ...
Page is loading ...
Page is loading ...
Page is loading ...
Page is loading ...
Page is loading ...
Page is loading ...
Page is loading ...
Page is loading ...
Page is loading ...
Page is loading ...
Page is loading ...
Page is loading ...
Page is loading ...
Page is loading ...
Page is loading ...
Page is loading ...
Page is loading ...
Page is loading ...
Page is loading ...
Page is loading ...
Page is loading ...
Page is loading ...
Page is loading ...
Page is loading ...
Page is loading ...
Page is loading ...
Page is loading ...
Page is loading ...
Page is loading ...
Page is loading ...
Page is loading ...
Page is loading ...
Page is loading ...
Page is loading ...
Page is loading ...
Page is loading ...
Page is loading ...
Page is loading ...
Page is loading ...
Page is loading ...
Page is loading ...
Page is loading ...
Page is loading ...
Page is loading ...
Page is loading ...
Page is loading ...
Page is loading ...
Page is loading ...
Page is loading ...
Page is loading ...
Page is loading ...
Page is loading ...
Page is loading ...
Page is loading ...
Page is loading ...
Page is loading ...
Page is loading ...
Page is loading ...
Page is loading ...
Page is loading ...
Page is loading ...
Page is loading ...
Page is loading ...
Page is loading ...
Page is loading ...
Page is loading ...
Page is loading ...
Page is loading ...
Page is loading ...
Page is loading ...
Page is loading ...
Page is loading ...
Page is loading ...
Page is loading ...
Page is loading ...
Page is loading ...
Page is loading ...
-
 1
1
-
 2
2
-
 3
3
-
 4
4
-
 5
5
-
 6
6
-
 7
7
-
 8
8
-
 9
9
-
 10
10
-
 11
11
-
 12
12
-
 13
13
-
 14
14
-
 15
15
-
 16
16
-
 17
17
-
 18
18
-
 19
19
-
 20
20
-
 21
21
-
 22
22
-
 23
23
-
 24
24
-
 25
25
-
 26
26
-
 27
27
-
 28
28
-
 29
29
-
 30
30
-
 31
31
-
 32
32
-
 33
33
-
 34
34
-
 35
35
-
 36
36
-
 37
37
-
 38
38
-
 39
39
-
 40
40
-
 41
41
-
 42
42
-
 43
43
-
 44
44
-
 45
45
-
 46
46
-
 47
47
-
 48
48
-
 49
49
-
 50
50
-
 51
51
-
 52
52
-
 53
53
-
 54
54
-
 55
55
-
 56
56
-
 57
57
-
 58
58
-
 59
59
-
 60
60
-
 61
61
-
 62
62
-
 63
63
-
 64
64
-
 65
65
-
 66
66
-
 67
67
-
 68
68
-
 69
69
-
 70
70
-
 71
71
-
 72
72
-
 73
73
-
 74
74
-
 75
75
-
 76
76
-
 77
77
-
 78
78
-
 79
79
-
 80
80
-
 81
81
-
 82
82
-
 83
83
-
 84
84
-
 85
85
-
 86
86
-
 87
87
-
 88
88
-
 89
89
-
 90
90
-
 91
91
-
 92
92
-
 93
93
-
 94
94
-
 95
95
-
 96
96
-
 97
97
-
 98
98


Panasonic PV-GS200PP Owner's manual
- Category
- Camcorders
- Type
- Owner's manual
Ask a question and I''ll find the answer in the document
Finding information in a document is now easier with AI
Related papers
-
Panasonic NV-GS70A User manual
-
-
-
-
-
-
-
-
Panasonic NVMX300 Owner's manual
-
Other documents
-
Sharp ViewCam-Slim VL-ME10S Operating instructions
-
-
 Cobra Digital DV500 User manual
-
Philips KEY019/17 User manual
-
JVC CU-V10E User manual
-
-
Xtreme PCA2-1013 User manual
-
-
 MFJ 117 User manual
-
 SolarFocus Technology Power+ Lighted Cover User manual


