Page is loading ...

DR
®
POWER WASHER
ASSEMBLY & OPERATING
INSTRUCTIONS
$5.00

And congratulations on your purchase of a new DR
®
Power Washer.
We have done our utmost to ensure that your DR
®
will be one of the
most trouble-free and satisfying pieces of equipment you have ever
owned.
Please let us know of any questions or problems you may have. We want
to answer or correct them as quickly as possible. (When you do call or
write, please have your serial number and/or order number handy - it
will speed things up!) We also hope to hear from you on how much you
like your new helper.
And please tell your friends about your new DR
®
Power Washer. Having
DR
®
Owners spread the word about our products and our way of doing
business is the best advertising we can have, and it's the best way to help
us provide even better service in the years to come.
Thanks once again!
for all of us at…
COUNTRY HOME PRODUCTS
®

DR
®
POWER WASHER Assembly & Operating Instructions 1
Table Of Contents
SAFETY INSTRUCTIONS 2
DRESS APPROPRIATELY . . . . . . . . . . . . . . . . . . . . . . . . . . . . . . . . . . . . . . . . . . . . . . . . . . . . . . . . . . . . . . . . . . . . . . . . . . 2
PREPARATION . . . . . . . . . . . . . . . . . . . . . . . . . . . . . . . . . . . . . . . . . . . . . . . . . . . . . . . . . . . . . . . . . . . . . . . . . . . . . . . . . . 2
OPERATING THE MACHINE SAFELY . . . . . . . . . . . . . . . . . . . . . . . . . . . . . . . . . . . . . . . . . . . . . . . . . . . . . . . . . . . . . . . . 2
SAFETY WITH GASOLINE-POWERED MACHINES . . . . . . . . . . . . . . . . . . . . . . . . . . . . . . . . . . . . . . . . . . . . . . . . . . . . 3
WARNING TO ALL CALIFORNIA AND OTHER USERS . . . . . . . . . . . . . . . . . . . . . . . . . . . . . . . . . . . . . . . . . . . . . . . . . 3
SETTING UP YOUR POWER WASHER 4
STEP 1 CHECK CONTENTS AND REMOVE POWER WASHER FROM CARTON . . . . . . . . . . . . . . . . . . . . . . . . . . . . . 4
REMOVE POWER WASHER FROM CARTON . . . . . . . . . . . . . . . . . . . . . . . . . . . . . . . . . . . . . . . . . . . . . . . . . . . . . . 4
POWER WASHER COMPONENTS . . . . . . . . . . . . . . . . . . . . . . . . . . . . . . . . . . . . . . . . . . . . . . . . . . . . . . . . . . . . . . . 5
STEP 2 CONNECT THE BATTERY WIRE (ELECTRIC START MODELS ONLY) . . . . . . . . . . . . . . . . . . . . . . . . . . . . . . 6
STEP 3 ADD OIL AND GAS . . . . . . . . . . . . . . . . . . . . . . . . . . . . . . . . . . . . . . . . . . . . . . . . . . . . . . . . . . . . . . . . . . . . . . . . 6
ADD ENGINE OIL . . . . . . . . . . . . . . . . . . . . . . . . . . . . . . . . . . . . . . . . . . . . . . . . . . . . . . . . . . . . . . . . . . . . . . . . . . . . 6
ADD GASOLINE . . . . . . . . . . . . . . . . . . . . . . . . . . . . . . . . . . . . . . . . . . . . . . . . . . . . . . . . . . . . . . . . . . . . . . . . . . . . . 6
STEP 4 CONNECT HIGH PRESSURE HOSE AND FILL CHEMICAL TANKS . . . . . . . . . . . . . . . . . . . . . . . . . . . . . . . . 7
FILL CHEMICAL TANKS . . . . . . . . . . . . . . . . . . . . . . . . . . . . . . . . . . . . . . . . . . . . . . . . . . . . . . . . . . . . . . . . . . . . . . 7
STEP 5 CONNECT TO WATER SUPPLY . . . . . . . . . . . . . . . . . . . . . . . . . . . . . . . . . . . . . . . . . . . . . . . . . . . . . . . . . . . . . . 8
STARTING AND OPERATION 9
STARTING THE ENGINE . . . . . . . . . . . . . . . . . . . . . . . . . . . . . . . . . . . . . . . . . . . . . . . . . . . . . . . . . . . . . . . . . . . . . . . . . . 9
ELECTRIC START (2500 & 3000 PSI UNITS) . . . . . . . . . . . . . . . . . . . . . . . . . . . . . . . . . . . . . . . . . . . . . . . . . . . . . . . 9
MANUAL START . . . . . . . . . . . . . . . . . . . . . . . . . . . . . . . . . . . . . . . . . . . . . . . . . . . . . . . . . . . . . . . . . . . . . . . . . . . . 10
STOPPING THE ENGINE . . . . . . . . . . . . . . . . . . . . . . . . . . . . . . . . . . . . . . . . . . . . . . . . . . . . . . . . . . . . . . . . . . . . . . . . . 10
ADJUSTING SPRAY PRESSURE . . . . . . . . . . . . . . . . . . . . . . . . . . . . . . . . . . . . . . . . . . . . . . . . . . . . . . . . . . . . . . . . . . . 10
ADJUSTING SPRAY PATTERN . . . . . . . . . . . . . . . . . . . . . . . . . . . . . . . . . . . . . . . . . . . . . . . . . . . . . . . . . . . . . . . . . . . . . 11
ACCESSORIES . . . . . . . . . . . . . . . . . . . . . . . . . . . . . . . . . . . . . . . . . . . . . . . . . . . . . . . . . . . . . . . . . . . . . . . . . . . . . . . . . . 12
OPERATING TIPS . . . . . . . . . . . . . . . . . . . . . . . . . . . . . . . . . . . . . . . . . . . . . . . . . . . . . . . . . . . . . . . . . . . . . . . . . . . . . . . 12
OPTIONAL ACCESSORIES . . . . . . . . . . . . . . . . . . . . . . . . . . . . . . . . . . . . . . . . . . . . . . . . . . . . . . . . . . . . . . . . . . . . . . . . 12
TURBO NOZZLE . . . . . . . . . . . . . . . . . . . . . . . . . . . . . . . . . . . . . . . . . . . . . . . . . . . . . . . . . . . . . . . . . . . . . . . . . . . . 12
HOSE REEL . . . . . . . . . . . . . . . . . . . . . . . . . . . . . . . . . . . . . . . . . . . . . . . . . . . . . . . . . . . . . . . . . . . . . . . . . . . . . . . . 12
POWER WASHING TECHNIQUE 13
POWER WASHER USES . . . . . . . . . . . . . . . . . . . . . . . . . . . . . . . . . . . . . . . . . . . . . . . . . . . . . . . . . . . . . . . . . . . . . . . . . . 14
MAINTENANCE 15
ENGINE MAINTENANCE . . . . . . . . . . . . . . . . . . . . . . . . . . . . . . . . . . . . . . . . . . . . . . . . . . . . . . . . . . . . . . . . . . . . . . . . . 15
ROUTINE MAINTENANCE . . . . . . . . . . . . . . . . . . . . . . . . . . . . . . . . . . . . . . . . . . . . . . . . . . . . . . . . . . . . . . . . . . . . . . . . 15
CHECK AND CLEAN INLET SCREEN . . . . . . . . . . . . . . . . . . . . . . . . . . . . . . . . . . . . . . . . . . . . . . . . . . . . . . . . . . . 15
CHECK HIGH PRESSURE HOSE . . . . . . . . . . . . . . . . . . . . . . . . . . . . . . . . . . . . . . . . . . . . . . . . . . . . . . . . . . . . . . . 15
CHECK CHEMICAL TANKS . . . . . . . . . . . . . . . . . . . . . . . . . . . . . . . . . . . . . . . . . . . . . . . . . . . . . . . . . . . . . . . . . . . 15
CHECK SPRAY GUN AND NOZZLE EXTENSION . . . . . . . . . . . . . . . . . . . . . . . . . . . . . . . . . . . . . . . . . . . . . . . . . 15
CHECK IN-LINE FILTER . . . . . . . . . . . . . . . . . . . . . . . . . . . . . . . . . . . . . . . . . . . . . . . . . . . . . . . . . . . . . . . . . . . . . . 16
PURGE PUMP OF AIR AND CONTAMINANTS . . . . . . . . . . . . . . . . . . . . . . . . . . . . . . . . . . . . . . . . . . . . . . . . . . . . . . . . 16
NOZZLE MAINTENANCE . . . . . . . . . . . . . . . . . . . . . . . . . . . . . . . . . . . . . . . . . . . . . . . . . . . . . . . . . . . . . . . . . . . . . . . . 16
O-RING MAINTENANCE . . . . . . . . . . . . . . . . . . . . . . . . . . . . . . . . . . . . . . . . . . . . . . . . . . . . . . . . . . . . . . . . . . . . . . . . . 18
BATTERY CARE (ELECTRIC START MODELS ONLY) . . . . . . . . . . . . . . . . . . . . . . . . . . . . . . . . . . . . . . . . . . . . . . . . . 18
BATTERY CHARGER . . . . . . . . . . . . . . . . . . . . . . . . . . . . . . . . . . . . . . . . . . . . . . . . . . . . . . . . . . . . . . . . . . . . . . . . 18
STORAGE 19
AFTER EACH USE . . . . . . . . . . . . . . . . . . . . . . . . . . . . . . . . . . . . . . . . . . . . . . . . . . . . . . . . . . . . . . . . . . . . . . . . . . . . . . 19
FLUSH SELECT-A-WASH SYSTEM . . . . . . . . . . . . . . . . . . . . . . . . . . . . . . . . . . . . . . . . . . . . . . . . . . . . . . . . . . . . . 19
STOW EQUIPMENT . . . . . . . . . . . . . . . . . . . . . . . . . . . . . . . . . . . . . . . . . . . . . . . . . . . . . . . . . . . . . . . . . . . . . . . . . . 19
STORING HOSE ON OPTIONAL HOSE REEL . . . . . . . . . . . . . . . . . . . . . . . . . . . . . . . . . . . . . . . . . . . . . . . . . . . . . . . . 19
OTHER . . . . . . . . . . . . . . . . . . . . . . . . . . . . . . . . . . . . . . . . . . . . . . . . . . . . . . . . . . . . . . . . . . . . . . . . . . . . . . . . . . . . . . . . 20
WINTER STORAGE . . . . . . . . . . . . . . . . . . . . . . . . . . . . . . . . . . . . . . . . . . . . . . . . . . . . . . . . . . . . . . . . . . . . . . . . . . . . . . 20
PROTECT FUEL SYSTEM . . . . . . . . . . . . . . . . . . . . . . . . . . . . . . . . . . . . . . . . . . . . . . . . . . . . . . . . . . . . . . . . . . . . . 20
PROTECT FROM FREEZING . . . . . . . . . . . . . . . . . . . . . . . . . . . . . . . . . . . . . . . . . . . . . . . . . . . . . . . . . . . . . . . . . . . 20
TROUBLESHOOTING 21
2500 & 3000 PSI UNITS - SCHEMATIC / WIRING DIAGRAM 23
2300 PSI UNIT - EXPLODED VIEW 24
2500 PSI UNIT - FRAME EXPLODED VIEW 26
2500 PSI UNIT - PARTS EXPLODED VIEW 27
3000 PSI UNIT - FRAME EXPLODED VIEW 30
3000 PSI UNIT - PARTS EXPLODED VIEW 31

2 DR
®
POWER WASHER Assembly & Operating Instructions
Safety Instructions
We want you to enjoy years of productive use from your DR® Power Washer. We don't want you to get
injured, so please take the time to read the following guidelines for safely operating your new machine.
This is the safety alert symbol. It is used to alert you to potential personal injury hazards.
Obey all safety messages that follow this symbol to avoid possible injury or death.
Dress Appropriately
• Always wear eye protection when you use your DR® Power Washer or when you are in the vicinity
where the equipment is in use. High pressure spray can cause paint chips or other particles to become
airborne and fly at high speeds.
• Always wear shoes with non-slip treads. Do Not operate the machine while barefoot or while wearing
open sandals.
• Do Not wear loose clothing, jewelry or anything that may be caught in the starter or other rotating parts.
Preparation
• For outdoor use only.
• Read these Assembly and Operating Instructions and the engine manufacturer's owner's manual before
you use your DR® Power Washer. Become familiar with the controls, engine and service
recommendations, and any hazards involved to ensure the best performance from your unit.
• The cleaning area should have adequate slopes and drainage to reduce the possibility of a fall due to
slippery surfaces. Do Not overreach or stand on unstable support. Keep good footing and balance at all
times.
• Keep operating area clear of all persons. Know how to stop the product and bleed pressure quickly.
• The spray gun is equipped with a SAFETY LATCH. Never exchange nozzles without locking the safety
latch on the trigger.
• Be extremely careful if you use the power washer from a ladder, scaffolding or any other relatively
unstable location. Pressure in a running washer builds as you climb. When you press the trigger, the
recoil from the initial spray could cause you to fall. The high pressure spray could also cause you to fall
if you are too close to the cleaning surface.
Operating the Machine Safely
• Always be certain the spray gun, trigger lock, nozzles and accessories are correctly attached and in
proper working order.
• Always disconnect spark plug wire and place wire where it cannot contact spark plug to prevent
accidental starting when setting up, transporting, adjusting or making repairs to your power washer.
• Always use both hands when spraying high pressure water to maintain complete control of the spray
gun. Failure to do so could result in an injury from a whipping spray gun. Do Not leave the spray gun
unattended while the machine is running. Stay alert; watch what you are doing.

DR
®
POWER WASHER Assembly & Operating Instructions 3
• To reduce the risk of injury, close supervision is necessary when product is used near children. Do Not
allow CHILDREN to operate the power washer at any time.
• Do Not by-pass any safety devices on this machine. Never operate units with broken or missing parts, or
without protective housing or covers.
• Do Not operate this product when fatigued or under the influence of alcohol or drugs.
• Never aim the spray gun at people, animals or plants. The high pressure stream of water that this
equipment produces can pierce skin and its underlying tissues, leading to serious injury and possible
amputation.
• Never move the machine by pulling on the high pressure hose. Use the handle provided on the unit.
• Water spray must never be directed towards any electric wiring or directly towards the power washer
machine itself or fatal electric shock may occur.
Safety With Gasoline-Powered Machines
WARNING! The engine exhaust from this product contains chemicals known to the State of
California to cause cancer, birth defects, or other reproductive harm.
• Gasoline is highly FLAMMABLE and its vapors are EXPLOSIVE. Do Not permit smoking, open
flames, sparks or heat in the vicinity while handling gasoline. Avoid spilling gasoline on a hot engine.
Allow unit to cool for 2 minutes before refueling. Comply with all laws regulating storage and handling
of gasoline.
• Check the fuel system for leaks or signs of deterioration, such as chafed or spongy hose, loose or
missing clamps, or damaged tank or cap. Correct all defects before operating the power washer.
• Never fill fuel tank indoors. Never fill fuel tank when engine is running or hot. Do Not smoke when
filling fuel tank.
• Never fill fuel tank completely full. Provide space for fuel expansion. Wipe away any fuel spillage from
engine and equipment and let residue evaporate before starting.
• Engine exhaust gases contain DEADLY carbon monoxide gas. This dangerous gas, if breathed in
sufficient concentrations, can cause unconsciousness or even death. Operate this equipment only in the
open air where adequate ventilation is available.
• Avoid prolonged or repeated skin contact with used motor oil. Used motor oil has been shown to cause
skin cancer in certain laboratory animals. Thoroughly wash exposed areas with soap and water. KEEP
OUT OF REACH OF CHILDREN. DON'T POLLUTE. CONSERVE RESOURCES. RETURN USED
OIL TO COLLECTION CENTERS.
Warning To All California And Other Users
Under California and Washington state laws, and the laws of some other states, you are not permitted to
operate an internal combustion engine using hydrocarbon fuels without an engine spark arrester. Failure of
the owner/operator to maintain this equipment in compliance with state regulations is a misdemeanor under
California law and may be in violation of other state and/or federal regulations. Contact your local fire
marshal or forest service for specific information in your area. You can order a spark arrester through
COUNTRY HOME PRODUCTS
®
.

4 DR
®
POWER WASHER Assembly & Operating Instructions
Setting Up Your Power Washer
Step 1 Check Contents and Remove Power Washer From Carton
The following parts are shipped loose with your power washer. Use the illustration on Page 5 to identify
components:
High Pressure Hose with Quick Connect fittings
Parts Box (includes items listed below)
Pull Handle (with 2500 PSI & 3000 PSI units)
Spray Gun
Single Nozzle Extension with Hi/Lo Adjustable Nozzle (with 2300 PSI & 2500 PSI units)
Dual Nozzle Extension with Quick Connect and four nozzles (with 3000 PSI unit)
Utility Brush
Brush Extension
Brush/Extension Adapter
Engine Oil
Six pouches of chemical concentrate (three pouches for 2300 PSI unit)
Owner's Manual
Engine Owner's Manual
Nozzle Cleaning Kit
"O"-Ring Maintenance Kit
Chemical Tank Labels
Become familiar with each piece before assembling the power washer. If any parts are missing or damaged,
call DR
®
at 1(800)DR-OWNER (376-9637).
Remove Power Washer From Carton
• Remove loose parts and parts box packed with your power washer.
• Slice two corners at handle end of carton from top to bottom so the carton panel can be folded down flat.
• For 2300 PSI unit, pivot handle up and ensure locking blocks engage top of frame posts.
For 2500 PSI and 3000 PSI units, attach pull handle, secure in place with lanyard pin.
• Roll the power washer out the open end of the carton.
• Check carton for additional loose parts.

Spray Gun
High Pressure Hose
Nozzle
Extension
Chemical and Rinse Tanks with
Internal Filter and Baffle
Oil Fill Cap
Air Filter
Select-A-Wash
Selector Knob
Pressure
Control
Water Supply
Inlet
Pull Handle
Gas Tank
Engine Controls
High Pressure
Outlet
Model Plate
Pump
Brush
Extension
Utility Brush
Brush/Extension
Adapter
DR
®
POWER WASHER Assembly & Operating Instructions 5
Power Washer Components
This illustration points out important features and accessories on the 2500 PSI unit. The other units have
similar features and accessories:
Air Filter – Dry type filter element limits the
amount of dirt and dust that gets in the engine.
Brush Extension – Used to extend reach of brush.
Brush/Extension Adapter – Used to attach utility
brush or extension to spray gun.
Chemical and Rinse Tanks with Internal Filter
and Baffle – Used to provide detergent or other
chemicals to the low pressure water stream.
Engine Controls – Consists of fuel shutoff valve,
engine rocker switch, choke lever.
Gas Tank – Fill gas tank with regular unleaded
gasoline here.
High Pressure Hose – Connect one end to the spray
gun, other to pump or control panel.
High Pressure Outlet – Connect high pressure hose
here.
Model Plate – Lists unit model number and serial
number. This information is needed if contacting
DR
®
.
Nozzle Extension – Always attached to spray gun.
Permits user to adjust spray pressure and spray
pattern.
Oil Fill Cap – Fill engine with oil here. See engine
owner’s manual for oil recommendations.
Pressure Control – Adjusts output water pressure.
Pull Handle – Used to maneuver power washer to
and from work area. Secured with lanyard pin.
Pump – Develops high water pressure.
Select-A-Wash Selector Knob – Selects any one of
three chemicals or the clean water system rinse.
Spray Gun – Controls the application of water onto
cleaning surface with trigger device. Includes safety
latch.
Utility Brush – Used to help dislodge encrusted
grime and dirt.
Water Supply Inlet – Connection for garden hose.

6 DR
®
POWER WASHER Assembly & Operating Instructions
Step 2 Connect the Battery Wire (Electric Start Models Only)
To prevent the battery from discharging during
shipment, all electric-start power washers are
shipped with the positive battery wire
disconnected.
Attach the RED wire to the POSITIVE battery
terminal (Figure 1) by aligning the yellow
connector with the terminal and pressing on
firmly.
Step 3 Add Oil And Gas
Add Engine Oil
A container of the correct oil is supplied with the unit and may contain more oil than the engine capacity.
• Place power washer on a level surface.
• See engine owner's manual to review oil fill instructions.
• Check engine oil level frequently to avoid possible damage from running low on oil.
Add Gasoline
Use regular unleaded gasoline with the power washer. See engine owner's manual for specific fuel fill
instructions. Fuel tank capacity for 2300 PSI & 2500 PSI units is 3 U.S. quarts, 3000 PSI unit is 4 U.S.
quarts.
WARNING! Never fill fuel tank indoors. Never fill fuel tank when engine is running or hot. Do Not
smoke when filling fuel tank.
CAUTION! Do Not overfill the fuel tank. Always leave room for expansion.
• Clean area around fuel cap, remove cap.
• Slowly add fuel to the fuel tank. Always leave room for fuel expansion.
IMPORTANT: Never mix oil with gasoline. Never use gasoline containing methanol.
• Install fuel cap and wipe up any spilled gasoline before starting.
CAUTION! THIS MACHINE IS SHIPPED WITHOUT OIL!
TRACES OF OIL MAY BE IN THE RESERVOIR FROM FACTORY TESTING, BUT YOU
MUST ADD OIL BEFORE STARTING THE ENGINE. FILL THE RESERVOIR SLOWLY,
CHECKING THE DIPSTICK FREQUENTLY TO AVOID OVERFILLING.
Figure 1 - Connect Positive Battery Wire, 2500 & 3000 PSI units

DR
®
POWER WASHER Assembly & Operating Instructions 7
Step 4 Connect High Pressure Hose And Fill Chemical Tanks
• Uncoil high pressure hose and attach quick connect end of hose
to the base of the spray gun (Figure 2). Pull down on the collar
of the quick connect, slide onto the spray gun and let go of
collar. Tug on hose to be sure of a tight connection.
• For 2300 PSI unit:
Attach the other end of the high pressure hose to the high
pressure outlet on the pump (Figure 3). Pull down on the collar
of the quick connect, slide onto the pump and let go of collar.
Pull on hose to be sure of a tight connection.
For 2500 PSI & 3000 PSI units:
Attach the other end of the high pressure hose to the HIGH
PRESSURE outlet (Figure 4) on the unit's control panel.
• Attach nozzle extension to spray gun.
NOTE: If it is necessary to extend the reach of the power washer,
the manufacturer recommends that additional inlet water garden
hose be used instead of an extension high pressure hose. Each
additional connector in the high pressure line will restrict water
flow and could disable the chemical application function.
• Place assembled spray gun on hooks attached to frame, as
shown on Page 5.
• For 3000 PSI unit:
Insert the multi-colored nozzles in the spaces provided
(Figure 4) on the control panel.
Fill Chemical Tanks
The unit’s chemical tanks are labeled “A”, “B”, and “C” (Figure 5).
These letters correspond to the lettering around the control panel’s
Select-A-Wash knob. The fourth tank is labeled “SYSTEM RINSE
WATER” and should be filled with fresh, clean water.
As many as three (3) different chemical solutions can be carried on
the power washer at the same time. To add chemical to a tank:
• Make sure the Select-A-Wash knob is in the “CHEMICAL
OFF” position (note that Select-A-Wash “CHEMICAL OFF”
position does not
turn off the engine).
• Snip off one corner of the desired chemical pouch and pour the contents into an empty tank. Use two
pouches per tank for the 2500 PSI and 3000 PSI unit’s. Fill that tank with fresh clean water to attain the
required chemical concentration. Repeat these instructions for each different chemical you wish to use.
• Supplied with the unit are white circular labels that can be placed around the appropriate tank neck. Use
these labels to identify each tank’s contents.
Figure 2 - Connect Hose to Spray Gun
Figure 3 - 2300 PSI High Pressure Outlet
Figure 4 - 3000 PSI Control Panel
Figure 5 - Chemical and Rinse Tanks
Attach High
Pressure Hose
Here
Water
Inlet
Quick Connect
Nozzle Storage
High Pressure
Outlet

8 DR
®
POWER WASHER Assembly & Operating Instructions
IMPORTANT: While DR
®
-approved chemicals are safe when used as instructed on package labeling, all
chemicals or detergents may be harmful if improperly used. Use caution when using chemicals.
Step 5 Connect to Water Supply
• Place the power washer in an area close enough to an outside household water source that can flow at a
rate of at least 4 gallons per minute. Use only cold water (less than 100°F). Connect a garden hose to the
water spigot.
IMPORTANT: Do Not siphon standing water for your water supply. Contaminated, brackish or dirty water
can damage the pump. Never use garden hose inlet to siphon detergent or wax.
CAUTION! There MUST be at least ten feet of unrestricted garden hose between the power washer inlet
and any flow shut off device, such as a 'Y' shut-off connector or other convenience-type water shut-off
valve. Damage to power washer resulting from disregarding this warning will not be covered by the
warranty.
• Check inlet screen on the water inlet at the pump for the
2300 PSI unit (Figure 6) or on the control panel fitting labeled
WATER SUPPLY for 2500 PSI and 3000 PSI units (see
Figure 4).
If the screen is dirty, clean before attaching a garden hose. If
the screen is damaged, Do Not connect the garden hose.
Replace with screen provided in the O-Ring Maintenance Kit
or call 1(800)DR-OWNER (376-9637) to order a replacement
inlet screen.
• Turn on the water at the source and let it run out of the garden
hose for 1-2 minutes to flush the hose of any debris or dirt. Turn off the water.
• Attach the garden hose to the water inlet.
• Turn on the water.
IMPORTANT: Do Not run pump without the water supply connected and turned on. You must follow this
caution or the pump will be damaged.
Figure 6 - 2300 PSI Water Connector
Inlet Water
Screen

DR
®
POWER WASHER Assembly & Operating Instructions 9
Starting And Operation
Read these instructions and learn how to use your DR® Power Washer before you attempt to start the unit. If
you have any problems operating your power washer, please call DR® at 1(800)DR-OWNER (376-9637).
Starting the Engine
IMPORTANT: You must attach all hoses before you start the engine. Starting the engine without all the
hoses connected and without the water turned ON will damage the pump.
The best way to start your power washer engine for the first time is to follow these instructions step-by-step.
This starting information also applies whenever you start the engine after you have let the power washer sit
idle for at least a day.
• Temporarily remove the nozzle extension from the spray gun.
• Make sure the inlet water supply is connected and turned ON. Pull the spray gun trigger and hold until a
steady stream of water appears.
• Engage the safety latch on the spray gun.
• Re-attach nozzle extension onto spray gun.
• Rotate fuel shut-off valve (Figure 7) fully
counterclockwise (1/4 turn).
• Move choke lever (Figure 7) fully to the right (the
“CHOKE” position).
NOTE: If restarting a warm engine after a short shutdown,
move choke lever fully to the left (the “RUN" position).
• Push engine rocker switch (Figure 7) to the "ON"
position.
NOTE: The Pressure Control lever (found on the unit’s
control panel) may be placed in any position during
starting.
Electric Start (2500 & 3000 PSI units)
• For electric start, press push-button start switch (Figure 8) until
engine cranks and starts. Limit electric start cycles to 5 seconds
of cranking each minute to prolong life of starter and starting
battery.
CAUTION!THIS MACHINE IS SHIPPED WITHOUT OIL!
TRACES OF OIL MAY BE IN THE RESERVOIR FROM FACTORY TESTING, BUT YOU MUST
ADD OIL BEFORE STARTING THE ENGINE. FILL THE RESERVOIR SLOWLY, CHECKING
THE DIPSTICK FREQUENTLY TO AVOID OVERFILLING.
Figure 7 - Engine Controls
Choke
Fuel
Shutoff
Rocker
Switch
Figure 8 - Electric Start button and
Battery Charge jack
Battery
Charge Jack
Electric Start
Push Button

10 DR
®
POWER WASHER Assembly & Operating Instructions
Manual Start
• For manual start, pull slowly on recoil handle until you feel some resistance. Then pull rapidly to start
engine. Return handle slowly. Do Not let it "snap back" against starter housing.
• Let the engine warm up. Move choke lever toward "RUN" position a short distance at a time over several
seconds in warm weather or over several minutes in cold weather. The engine should run smoothly
before each choke lever change.
If the engine fails to start, review instructions given in the engine owner's manual.
For maximum performance, operate the engine with the choke control in the "RUN" position.
Before starting the power washer in cold weather, check all parts of the equipment and be sure ice has not
formed. Never use power washer in icy conditions.
Stopping the Engine
• Push engine rocker switch (Figure 7) to the "OFF" position.
• Rotate fuel shut-off valve (Figure 7) fully clockwise (1/4 turn).
• Squeeze spray gun trigger to relieve pressure in the hose. A small amount of water will squirt out when
you release the pressure.
NOTE: Simply shutting off the engine will not release pressure in the system.
• Rotate the Select-A-Wash knob to the “CHEMICAL OFF” position to prevent chemical leakage. Note that
the Select-A-Wash “CHEMICAL OFF” position does not
turn off the engine or the inlet water supply.
CAUTION! The muffler and engine heat up during operation and remain hot immediately after
shutting it down.Avoid contact with a hot muffler or engine or you could be severely burned.
Adjusting Spray Pressure
This DR® Power Washer permits you to regulate output water pressure by
varying the engine speed using the PRESSURE CONTROL lever found
on the control panel (Figure 9). Typical pressure settings are:
Pressure Low High
Application Auto Concrete Paint removal
Boat Driveway Degreasing
Furniture Deck
Pushing the lever fully to the left provides low spray pressure - fully to the right is maximum pressure.
ALWAYS start washing with low pressure and increase it as needed to obtain desired cleaning action.
IMPORTANT: Damage may occur if you hold the spray nozzle too close to a surface. It is best to test for
damage by standing 3-4 feet away from the surface to be cleaned, turning on the high pressure spray, then
stepping closer to surface while moving the spray back and forth. You will find that the most effective
cleaning occurs when spray nozzle is between 8 to 24 inches away from surface being cleaned.
Figure 9 - Pressure Control

DR
®
POWER WASHER Assembly & Operating Instructions 11
Adjusting Spray Pattern
WARNING! Never put hands in front of the nozzle
when adjusting the spray. Use extreme care when
adjusting spray pattern while spraying.
The 2300 PSI and 2500 PSI units are equipped with a
yellow adjustable nozzle at the end of the nozzle extension.
Push the yellow portion forward (Figure 10) to apply
chemical. Pull the nozzle backward until it "snaps" into
place for cleaning. Twisting the nozzle (Figure 10) adjusts
the spray pattern from a narrow to a "fan" pattern.
Point the nozzle down toward a firm surface and press the
spray gun trigger to test the pattern (Figure 11).
CAUTION! The spray gun is equipped with a
SAFETY LATCH.You can engage this latch to keep
the washer from accidentally spraying while you are
changing the nozzle, the nozzle extension or when
moving the unit.
The 3000 PSI unit is equipped with a dual nozzle extension
(Figure 12) and four quick connect nozzles (Figure 13).
Chemical is dispensed only through the rubber-tipped
permanent nozzle when the dual nozzle extension handle is
twisted counterclockwise. This handle must be turned fully
clockwise to obtain high pressure spray.
To attach one of four supplied quick connect nozzles, pull
down on the collar of the quick connect fitting, slide in the
desired nozzle and let go of collar. Pull on the nozzle to be
sure of a tight connection.
For a relatively gentle washing action, select the white 40°
or green 25° nozzle. To scour the surface, select the yellow
15° or red 0° nozzle.
Figure 10 - 2300 and 2500 PSI Adjustable Nozzle
Slide nozzle backward
for cleaning.
Slide nozzle forward for
detergent application.
Twist nozzle
counterclockwise for
fan spray pattern.
Twist nozzle clockwise
for narrow spray
pattern.
Figure 11 - Test Adjustable Spray Pattern
Figure 13 - 3000 PSI Quick Connect Nozzles
Figure 12 - 3000 PSI Dual Nozzle Extension
Twist handle clockwise to
turn off
chemical spray

12 DR
®
POWER WASHER Assembly & Operating Instructions
Accessories
The Brush/Extension Adapter (Figure 14) is used to connect either the utility brush or the brush extension to
the spray gun. The Brush/Extension Adapter can be loosened to rotate and position the brush as desired.
The Utility Brush (Figure 14) is constructed of extremely
durable non-corrosive materials. It is used to help dislodge
encrusted grime and dirt when applying detergent or
degreaser. It should not be used when rinsing.
To attach the brush, remove the nozzle extension from the
spray gun. Thread the Brush/Extension Adapter into the
spray gun and tighten finger tight. Push the utility brush
fully into the adapter, then tighten it fully clockwise.
Push the brush extension fully into the brush/extension
adapter and tighten it fully clockwise. Install the utility
brush into the extension in the same manner.
Operating Tips
◆ Never use the garden hose inlet to siphon detergent or wax.
◆ If you hold the spray nozzle too far away from the object being cleaned, washing will not be as effective.
◆ High pressure spray may damage fragile items including glass. Do Not point spray gun at glass when
using high water pressure.
◆ Always store the power washer with the Select-A-Wash knob at the CHEMICAL OFF position.
◆ The power washer should NOT be covered during operation to permit free air circulation.
Optional Accessories
Optional power washer accessories will enhance the use of your DR
®
Power Washer. They may be obtained
through the DR
®
website or by calling 1(800)DR-OWNER (376-9637).
Turbo Nozzle
The optional turbo nozzle produces an extremely high pressure rotating spray action to improve cleaning
efficiency. It is capable of removing paint and damaging surfaces if held too close to the surface being
cleaned. Always make sure to test the high pressure spray in a hidden area.
To attach the turbo nozzle, remove the nozzle extension from the spray gun. Place the turbo nozzle's threaded
end into the spray gun and tighten finger tight, the same as the regular nozzle extension.
Hose Reel
If the optional hose reel is purchased, install it using the instructions packaged with it. Those instructions
also describe how to use the reel. To store your high pressure hose, slide one end of the hose into the hole on
the hose reel. Turn the hose reel with the provided handle and coil the hose onto the reel. Push the other end
of the hose into the clip on the side of the unit.
Figure 14 - Accessories
Brush
Extension
Utility Brush
Brush/Extension
Adapter

DR
®
POWER WASHER Assembly & Operating Instructions 13
IMPORTANT: You must take the hose off of the reel when operating the power washer. The reel is for hose
storage purposes only.
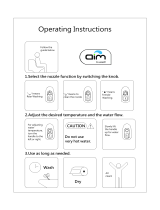
Power Washing Technique
This section describes a general process for completing a power wash. You will develop your own technique
as you use the system. Various uses for power washers are given later in this section.
1. Wet the surface to be cleaned with clear water to flush away loose debris and dirt.
CAUTION! Before removing any spray gun extension, be sure to lock the spray gun safety latch.You
could be injured if you try to remove an extension if the power washer is running and the trigger is
squeezed open.
2. Rotate the Select-A-Wash knob to the letter corresponding to the desired chemical tank.
3. Push the adjustable nozzle forward (for 2300 and 2500 PSI units) or rotate the dual nozzle extension
handle counterclockwise (for 3000 PSI unit) to apply chemical. Chemical cannot be applied in high
pressure mode.
4. Apply the selected chemical, starting at lower portion of area to be washed and work upward. Use long,
even overlapping strokes. Let the chemical 'soak in' for an appropriate time, but reapply as needed to
prevent surface from drying.
5. Pull the adjustable nozzle backward (for 2300 and 2500 PSI units) until it locks in place or rotate the
dual nozzle extension handle (for 3000 PSI unit) fully clockwise to obtain cleaning spray. Chemical will
not flow with the cleaning spray. Select and attach the red or yellow nozzle (for 3000 PSI unit). Scour
the surface with the high pressure water stream (Figure 15). Adjust PRESSURE CONTROL as described
on Page 10 to obtain desired water pressure.
CAUTION! Always test a small area of the surface to be cleaned. Make sure there is no damage caused by
the high pressure spray before proceeding.
6. Expand the spray pattern for a more gentle rinsing action by twisting the adjustable nozzle (for 2300 and
2500 PSI units) or selecting the white or green nozzles (for 3000 PSI unit). Start at top of area to be
rinsed, working down with same action as for cleaning. Use desired water pressure.
7. Flush the Select-A-Wash system after every use, as described on Page 19.
Figure 15 - Power Washing a Deck, a Vehicle, a Fence

14 DR
®
POWER WASHER Assembly & Operating Instructions
Power Washer Uses
There are many ways you can use your power washer, as listed here. We are interested to learn what other
power washer uses you may develop!
Agricultural - wash down cultivators to reduce tilled-acreage cross-contamination, disinfect animal habitat,
equipment maintenance, etc.
Awnings (vinyl, canvas & PVC) - cleaning and restoration
Barbecue and fire pit grills - cleaning
Bronze, metal, and statuary restoration and preservation
Decks, fences and pool surrounds made from wood, man-made materials, and masonry - cleaning or
refinishing & surface preparation
Drains - cleared or cleaned
Fund raising car wash - faster throughput with greatly-reduced water use
Gardening tools - cleaning and preparing for storage
House siding (wood, aluminum, vinyl) - cleaning or repainting & surface preparation
Hydraulic mining - small trenches or boring under sidewalks, etc. clear dirt from tree or bush roots when
replanting
Kennels, dog runs, pet walk areas - cleaning and sanitizing
Lawn, patio, and garden furniture & playground equipment - cleaning or refinishing & surface preparation
Log homes - cleaning or surface preparation for refinishing
Masonry Surfaces, such as floors, driveways, sidewalks, & swimming and wading pools made out of brick,
cement, stone, tile, etc. - cleaning
Outdoor power equipment, such as mowers, trimmers, tillers, trenchers, etc. - cleaning and maintenance
Overcoating operations or paint preparation - power scrubbing and paint removal
Slag & scale removal
Taxidermy
Teak furniture - cleaning
Trailers, such as boat, RV, ATV, snowmobile, etc. - cleaning
Untreated old wood - prepare surface for finishing
Vehicles, such as boats, cars, trucks, motorcycles, bicycles, skid loaders, etc. and Engines - cleaning
Always remember to test the high pressure spray on an object’s hidden area to ensure the process does not
damage the surface.

DR
®
POWER WASHER Assembly & Operating Instructions 15
Maintenance
Engine Maintenance
Refer to the engine owners manual for specific engine maintenance procedures, especially oil changes and
air filter service. Your engine will not run properly and may be damaged if you run it with a dirty air cleaner.
CAUTION! Disconnect spark plug wire from spark plug and keep wire away from spark plug
whenever performing engine maintenance.
Routine Maintenance
The power washer warranty does not cover items that have been subjected to operator abuse or negligence.
To receive full value from the warranty, the operator must maintain the power washer as instructed in this
manual and in the engine owner’s manual.
Once a year you should clean or replace the spark plug and replace the air filter. A clean spark plug and new
air filter assure proper fuel-air mixture and help your engine run better and last longer. You should also check
the spray gun and nozzle extension for wear.
This high pressure equipment is designed to be used with authorized parts only. If you use this equipment
with parts that do not comply with minimum specifications, the user assumes all risks and liabilities.
Check And Clean Inlet Screen
Examine inlet water connector screen. Clean if it is clogged or replace if it is torn.
Check High Pressure Hose
The high pressure hose can develop leaks from wear, kinking, abuse, etc. Water spraying from a leak is
capable of injecting material into skin. Inspect hose each time before using it. Check all hoses for cuts, leaks,
abrasions or bulging of cover, or damage or movement of couplings. If any of these conditions exist, replace
hose immediately.
WARNING! Never repair high pressure hose. Replace it with another hose that exceeds the
maximum pressure rating of your unit.
Check Chemical Tanks
Tank covers should snap cleanly onto tank. Ensure chemical labels correctly identify tank contents. Ensure
that the System Rinse Water tank is filled only with fresh clean water. Ensure that Select-A-Wash selector
knob rotates freely between each position. Examine the tanks and replace if integral filter is clogged.
Check Spray Gun And Nozzle Extension
Examine quick connect fitting on spray gun and make sure it operates properly. Test spray gun trigger by
pressing it and making sure it springs back into place when you release it. Engage safety latch. You should
not be able to press trigger. Replace spray gun immediately if it fails any of these tests.
Check nozzle extension for no loose parts and for unimpeded operation, especially the adjustable nozzle and
the quick connect mechanism.

16 DR
®
POWER WASHER Assembly & Operating Instructions
Check In-Line Filter
Refer to Figure 16 and service the in-line filter if it becomes clogged, as follows:
1. Detach spray gun from high pressure hose. Detach nozzle extension from spray gun.
2. Remove o-ring and screen from threaded end of nozzle
extension. Flush the screen, spray gun, and nozzle
extension with clean water to clear debris.
3. If the screen is damaged, the o-ring kit contains a
replacement in-line filter screen and an o-ring. If
undamaged, reuse screen.
4. Place the in-line filter screen into the threaded end of the nozzle extension. Direction does not matter.
Push the screen in with the eraser end of a pencil until it rests flat at the bottom of the opening. Take care
to not bend the screen.
5. Place the o-ring into the recess. Push the o-ring snugly against the in-line filter screen.
6. Assemble the nozzle extension to the spray gun, as described earlier in this manual.
Purge Pump Of Air And Contaminants
To remove air from the pump, follow these steps:
1. Connect and turn on the water supply.
2. Pull the spray gun trigger and hold until a steady stream of water appears.
To remove contaminants from the pump, follow these steps:
1. Connect and turn on the water supply.
2. Remove the nozzle extension from the spray gun.
3. Start the engine using instructions given previously.
4. Pull the spray gun trigger and hold.
5. When the water supply is steady and constant, engage the safety latch and refasten the nozzle extension.
Nozzle Maintenance
A pulsing sensation felt while squeezing the spray gun trigger may be caused by excessive pump pressure.
The principal cause of excessive pump pressure is a nozzle clogged or restricted with foreign materials, such
as dirt, etc. To correct the problem, immediately clean the nozzle using the tools included with your power
washer and follow these instructions:
1. Shut off the engine and turn off the water supply. Press spray gun trigger to release internal water
pressure.
2. Separate the nozzle extension from the spray gun.
Figure 16 - Check In-Line Filter
Screen
Nozzle Extension
O-Ring

DR
®
POWER WASHER Assembly & Operating Instructions 17
3. For the 2300 & 2500 PSI units supplied with the
adjustable nozzle:
a. Twist the nozzle clockwise to the stream position.
b. Using the supplied 2mm (5/64) Allen wrench,
remove the nozzle from the end of the nozzle
extension (Figure 17).
c. Remove the in-line filter from the other end of the
nozzle extension (see Figure 16, earlier).
d. Use the wire included in the kit or a small paper
clip (Figure 18) to free any foreign material
clogging or restricting the nozzle.
e. Using a garden hose, remove additional debris by
back flushing water (Figure 19) through the nozzle
extension. Back flush between 30 to 60 seconds.
Turn the adjustable nozzle to stream spray and
move the nozzle forward and back while flushing.
f. Reinstall the nozzle and in-line filter into the nozzle extension. Do Not overtighten the nozzle with
the Allen wrench.
4. For the 3000 PSI units supplied with the dual nozzle
extension:
a. Separate the quick connect nozzle from the nozzle
extension.
b. Remove the in-line filter from the other end of the
nozzle extension (see Figure 16, earlier).
c. Use the wire included in the kit or a small paper
clip (Figure 20) to free any foreign material
clogging or restricting all quick disconnect nozzles
and the dual nozzle extension chemical nozzle.
d. Using a garden hose, remove additional debris by
back flushing water (Figure 21) through the nozzle
extension. Back flush between 30 to 60 seconds.
Turn chemical valve handle in and out to backflush
both dual nozzle extension tubes.
e. Reinstall the in-line filter into the nozzle extension.
5. Reconnect the nozzle extension to the spray gun.
6. Reconnect the water supply, turn on the water, and start the engine.
7. Test the 2300 & 2500 PSI power washers by operating with adjustable nozzle in the high and in the low
positions.
8. Test the 3000 PSI unit with each of the Quick Connect nozzles.
Figure 18 - Use Wire to Remove Debris
Figure 19 - Backflush 2300 & 2500 PSI Extension
Figure 17 - Remove Nozzle
Figure 21 - Backflush 3000 PSI Extension
Figure 20 - Use Wire to Remove Debris

18 DR
®
POWER WASHER Assembly & Operating Instructions
O-Ring Maintenance
Through the normal operation of your power washer, o-rings, which keep the connections of the hoses and
spray gun tight and leak-free, may become worn or damaged.
Provided with your power washer is an O-Ring Maintenance Kit which includes replacement o-rings, rubber
washer and water inlet filter. Refer to the instruction sheet provided in the kit to service your unit's o-rings.
Note that not all of the parts in the kit will be used on your unit.
To remove a worn or damaged O-Ring, use a small flathead screwdriver to get underneath the o-ring and pry
it off.
Battery Care (Electric Start Models Only)
The starting battery is a sealed lead acid battery.
WARNING! If battery case cracks, Do Not permit smoking, open flame, sparks or any other source
of heat around battery.Wear protective goggles, rubber apron and rubber gloves when working
around battery. Battery electrolyte fluid is an extremely caustic sulfuric acid solution that can cause
severe burns. If spill or leakage occurs, flush area with clear water immediately.
Battery Charger
Use battery charger jack with the provided battery charger to keep the starting battery charged and ready for
use. Battery charging should on.y be done in a dry location, such as inside a garage.
• Lift the flap (Figure 22) covering the unit's "Battery
Charger" jack. Plug charger into jack. Plug battery
charger into a 120 Volt AC wall receptacle.
• Unplug the charger from the unit and the wall outlet
when power washer is being started and while it is in
operation.
Every 30 to 60 days, charge the battery for a 48 hour
period. Longer charge times will shorten battery life, so do not charge battery for longer than 48 hours.
Even though the battery and charger jack connections are protected with insulating compound to avoid
corrosion and prolong battery life, make sure the Battery Charger jack cover is closed whenever the unit is in
operation. It is good practice to keep the cover closed unless the battery is being charged.
Other than battery charging, described above, no maintenance is required for the battery. If you have
questions about battery use, call DR
®
at 1(800)DR-OWNER (376-9637).
Figure 22 - Connect Battery Charger
Battery
Charger jack
Electric Start
Button
/