Page is loading ...

DeutschEnglish Français Italiano Español Português Nederlands
Owner’s Manual

2
Look What You Can Do!
Personalize Your Piano
Adjust the keyboard touch
You can adjust the touch sensitivity of the keyboard to match
your own playing style.
Add reverberation
You can add reverberation (reverb) to create the sensation of
performing in a concert hall.
g p. 9
g p. 9
Play the Piano
Play using various sounds
This unit contains a wide variety of tones (sounds).
You can freely select and perform using these tones.
Sound a metronome
You can sound a metronome.
Play duets
You can divide the keyboard into left and right halves, playing
it as though it were two pianos.
g p. 7
g p. 7
g p. 8
Play and Record Songs
Play the built-in songs
This unit contains numerous built-in songs.
For the song titles, refer to “Internal Song List” (p. 19).
Play back individual parts
You can practice along with a song while listening to only the
right-hand or left-hand part play back.
Record your performance
You can record your own performances.
g p. 10
g p. 10
g p. 11
Adjust the brightness
You can adjust the tone quality of the sound, ranging from a
brilliant timbre to a mellow tone.
Shift the keyboard pitch
You can use the Transpose function to transpose the
keyboard in semitone steps.
g p. 9
g p. 13
3
DeutschEnglish Français Italiano Español Português Nederlands
Contents
Look What You Can Do! . . . . . . . . . . . . . . . . . . . . . . . . . . . . . . . . . . . . . . . . . . . . . . . . . . . . . . . . . . . . . . . . . . . . . .2
Panel Descriptions . . . . . . . . . . . . . . . . . . . . . . . . . . . . . . . . . . . . . . . . . . . . . . . . . . . . . . . . . . . . . . . . . . . . . . . . . .4
Front Panel . . . . . . . . . . . . . . . . . . . . . . . . . . . . . . . . . . . . . . . . . . . . . . . . . . . . . . . . . . . . . . . . . . . . . . . . . . . . . . . . . . 4
Rear Panel Connections . . . . . . . . . . . . . . . . . . . . . . . . . . . . . . . . . . . . . . . . . . . . . . . . . . . . . . . . . . . . . . . . . . . . . 5
Before You Play . . . . . . . . . . . . . . . . . . . . . . . . . . . . . . . . . . . . . . . . . . . . . . . . . . . . . . . . . . . . . . . . . . . . . . . . . . . . .6
Opening/Closing the Lid . . . . . . . . . . . . . . . . . . . . . . . . . . . . . . . . . . . . . . . . . . . . . . . . . . . . . . . . . . . . . . . . . . . . 6
Turning the Power On/O . . . . . . . . . . . . . . . . . . . . . . . . . . . . . . . . . . . . . . . . . . . . . . . . . . . . . . . . . . . . . . . . . . . 6
Performing . . . . . . . . . . . . . . . . . . . . . . . . . . . . . . . . . . . . . . . . . . . . . . . . . . . . . . . . . . . . . . . . . . . . . . . . . . . . . . . . .7
Selecting Tones . . . . . . . . . . . . . . . . . . . . . . . . . . . . . . . . . . . . . . . . . . . . . . . . . . . . . . . . . . . . . . . . . . . . . . . . . . . . . 7
Using the Metronome . . . . . . . . . . . . . . . . . . . . . . . . . . . . . . . . . . . . . . . . . . . . . . . . . . . . . . . . . . . . . . . . . . . . . . . 7
Changing the Tempo . . . . . . . . . . . . . . . . . . . . . . . . . . . . . . . . . . . . . . . . . . . . . . . . . . . . . . . . . . . . . . . . . . 7
Changing the Beat . . . . . . . . . . . . . . . . . . . . . . . . . . . . . . . . . . . . . . . . . . . . . . . . . . . . . . . . . . . . . . . . . . . . 7
Dividing the Keyboard in Two (Twin Piano) . . . . . . . . . . . . . . . . . . . . . . . . . . . . . . . . . . . . . . . . . . . . . . . . . . . 8
Disabling the Buttons (Panel Lock) . . . . . . . . . . . . . . . . . . . . . . . . . . . . . . . . . . . . . . . . . . . . . . . . . . . . . . . . . . . 8
Adjusting the Keyboard Sensitivity and the Sound . . . . . . . . . . . . . . . . . . . . . . . . . . . . . . . . . . . . . . . . . . . .9
Adjusting the Keyboard Sensitivity (Key Touch) . . . . . . . . . . . . . . . . . . . . . . . . . . . . . . . . . . . . . . . . . . . . . . . 9
Adding Reverberation to Sounds (Reverb Eect) . . . . . . . . . . . . . . . . . . . . . . . . . . . . . . . . . . . . . . . . . . . . . 9
Adjusting the Brilliance of the Sound . . . . . . . . . . . . . . . . . . . . . . . . . . . . . . . . . . . . . . . . . . . . . . . . . . . . . . . . 9
Playing Back Songs . . . . . . . . . . . . . . . . . . . . . . . . . . . . . . . . . . . . . . . . . . . . . . . . . . . . . . . . . . . . . . . . . . . . . . . 10
Playing Parts (Left/Right Hand) Separately . . . . . . . . . . . . . . . . . . . . . . . . . . . . . . . . . . . . . . . . . . . . . . . . . . 10
Sounding a Count Before Playback . . . . . . . . . . . . . . . . . . . . . . . . . . . . . . . . . . . . . . . . . . . . . . . . . . . . . . . . . . 10
Recording . . . . . . . . . . . . . . . . . . . . . . . . . . . . . . . . . . . . . . . . . . . . . . . . . . . . . . . . . . . . . . . . . . . . . . . . . . . . . . . . 11
Various Settings (Function Mode) . . . . . . . . . . . . . . . . . . . . . . . . . . . . . . . . . . . . . . . . . . . . . . . . . . . . . . . . . . 12
Basic Operation in Function Mode . . . . . . . . . . . . . . . . . . . . . . . . . . . . . . . . . . . . . . . . . . . . . . . . . . . . . . . . . . 12
Saving the Settings (Memory Backup) . . . . . . . . . . . . . . . . . . . . . . . . . . . . . . . . . . . . . . . . . . . . . . . . . . . . . . . 12
Function Settings . . . . . . . . . . . . . . . . . . . . . . . . . . . . . . . . . . . . . . . . . . . . . . . . . . . . . . . . . . . . . . . . . . . . . . . . . . 13
Changing the Key of the Keyboard (Transpose) . . . . . . . . . . . . . . . . . . . . . . . . . . . . . . . . . . . . . . . . 13
Matching the Pitch with Other Instruments (Master Tuning) . . . . . . . . . . . . . . . . . . . . . . . . . . . 13
Controlling Video Equipment (Visual Control Mode/Channel) . . . . . . . . . . . . . . . . . . . . . . . . . . 13
MIDI Transmit Channel Settings . . . . . . . . . . . . . . . . . . . . . . . . . . . . . . . . . . . . . . . . . . . . . . . . . . . . . . . 14
Preventing Double Notes when Working with a Sequencer (Local Control) . . . . . . . . . . . . . 14
Making the Power Automatically Turn O After a Time (Auto O) . . . . . . . . . . . . . . . . . . . . . . . . . . . . 15
Restoring the Settings to the Factory Condition (Factory Reset) . . . . . . . . . . . . . . . . . . . . . . . . . . . . . 15
Troubleshooting . . . . . . . . . . . . . . . . . . . . . . . . . . . . . . . . . . . . . . . . . . . . . . . . . . . . . . . . . . . . . . . . . . . . . . . . . . 16
Message List . . . . . . . . . . . . . . . . . . . . . . . . . . . . . . . . . . . . . . . . . . . . . . . . . . . . . . . . . . . . . . . . . . . . . . . . . . . . . . 17
Main Specications . . . . . . . . . . . . . . . . . . . . . . . . . . . . . . . . . . . . . . . . . . . . . . . . . . . . . . . . . . . . . . . . . . . . . . . 17
Tone List . . . . . . . . . . . . . . . . . . . . . . . . . . . . . . . . . . . . . . . . . . . . . . . . . . . . . . . . . . . . . . . . . . . . . . . . . . . . . . . . . 18
Internal Song List . . . . . . . . . . . . . . . . . . . . . . . . . . . . . . . . . . . . . . . . . . . . . . . . . . . . . . . . . . . . . . . . . . . . . . . . . 19
USING THE UNIT SAFELY . . . . . . . . . . . . . . . . . . . . . . . . . . . . . . . . . . . . . . . . . . . . . . . . . . . . . . . . . . . . . . . . . . . 20
IMPORTANT NOTES . . . . . . . . . . . . . . . . . . . . . . . . . . . . . . . . . . . . . . . . . . . . . . . . . . . . . . . . . . . . . . . . . . . . . . . 21
Assembling . . . . . . . . . . . . . . . . . . . . . . . . . . . . . . . . . . . . . . . . . . . . . . . . . . . . . . . . . . . . . . . . . . . . . . . . . . . . . . . 22
Index . . . . . . . . . . . . . . . . . . . . . . . . . . . . . . . . . . . . . . . . . . . . . . . . . . . . . . . . . . . . . . . . . . . . . . . . . . . . . . . . . . . . . 24
Before using this unit, carefully read the sections entitled: “USING THE UNIT SAFELY” (p. 20) and “IMPORTANT NOTES” (p. 21). These sections provide
important information concerning the proper operation of the unit. Additionally, in order to feel assured that you have gained a good grasp of every
feature provided by your new unit, Owner’s Manual should be read in its entirety. The manual should be saved and kept on hand as a convenient
reference.
Copyright © 2011 ROLAND CORPORATION
All rights reserved. No part of this publication may be reproduced in any form without the written permission of ROLAND CORPORATION.
4
Panel Descriptions
Rear side
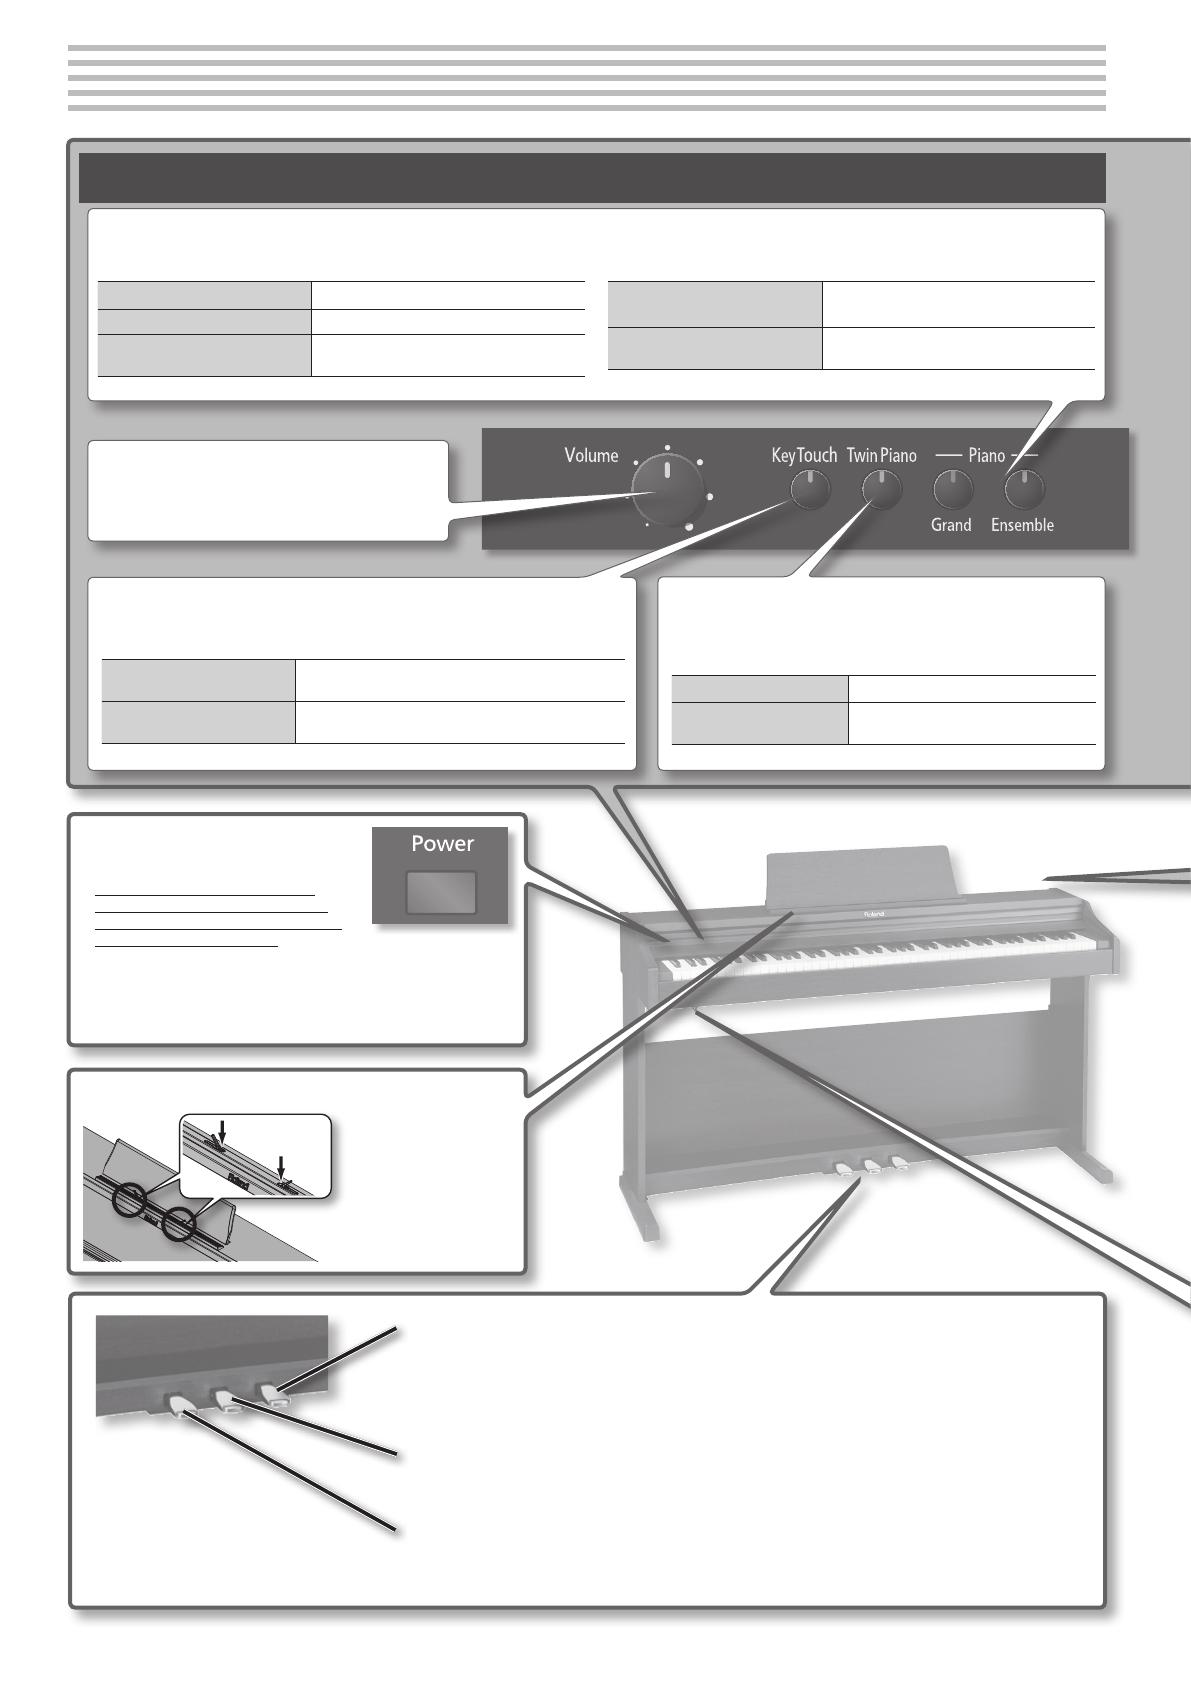
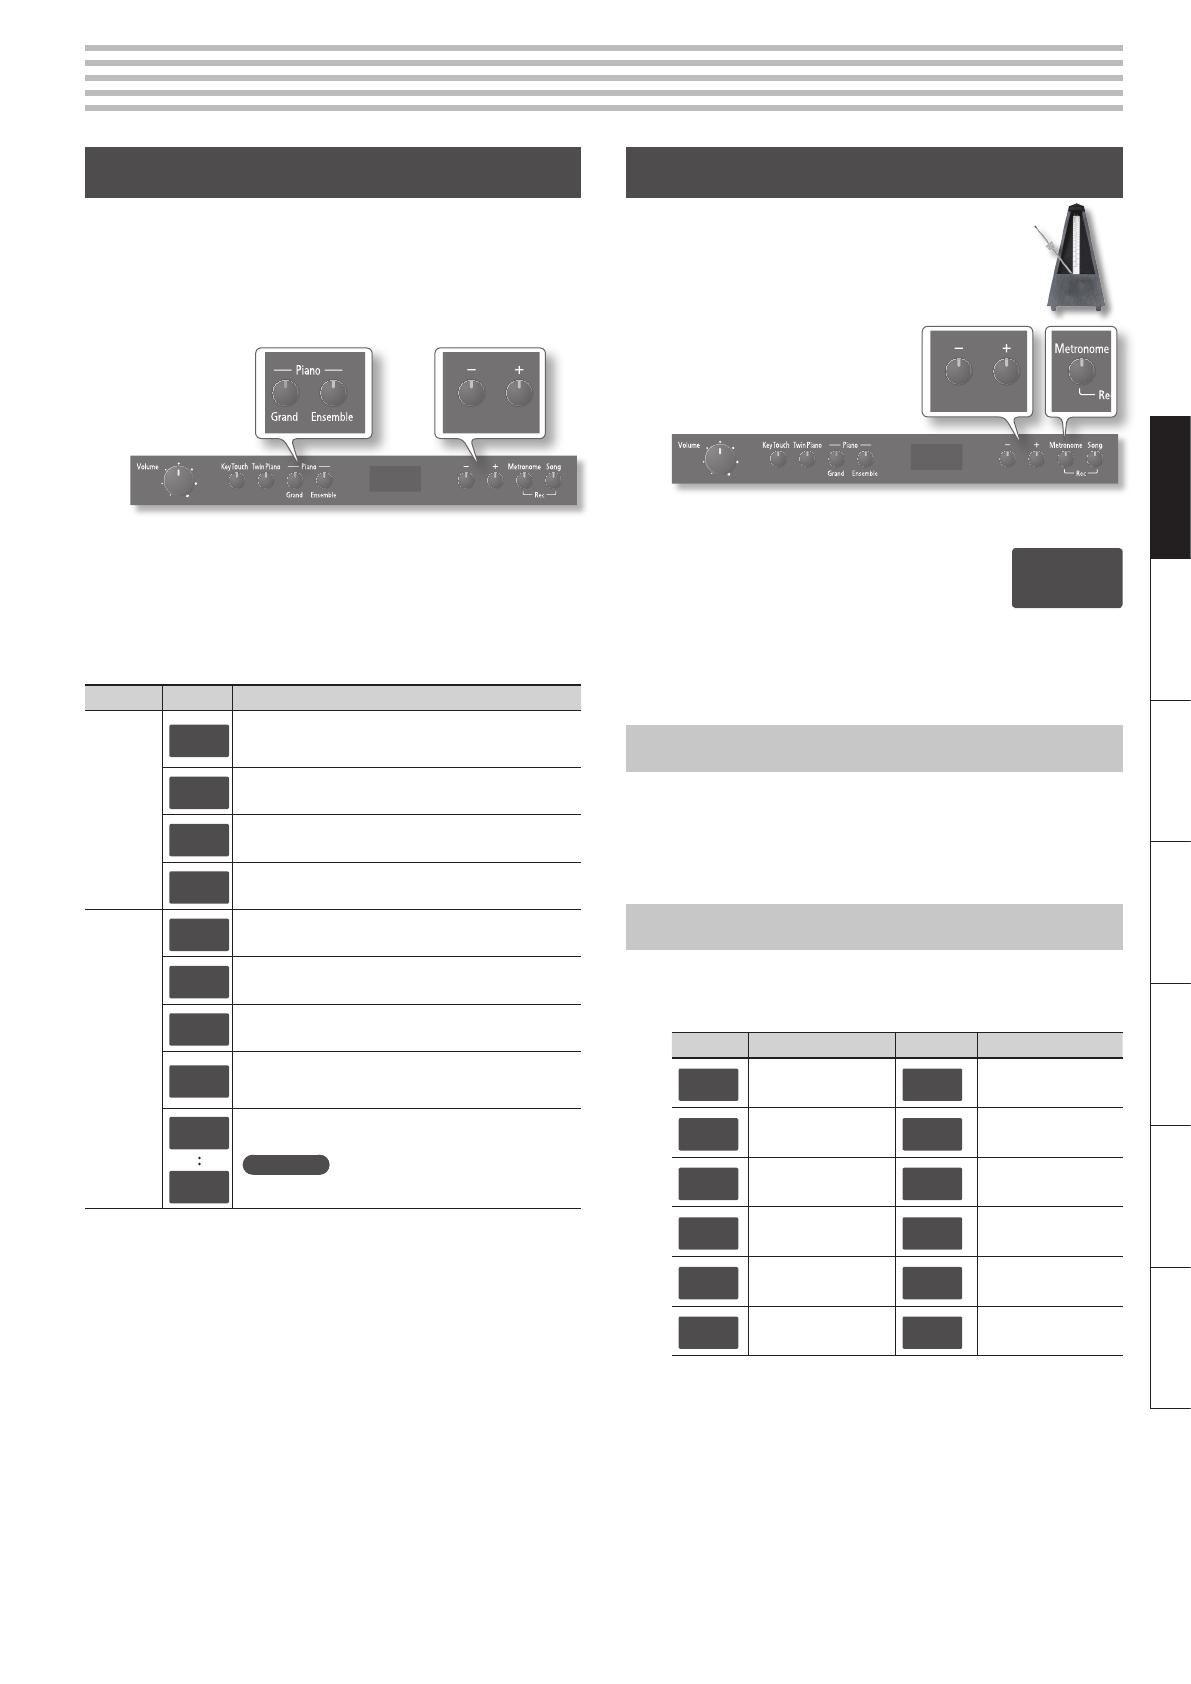
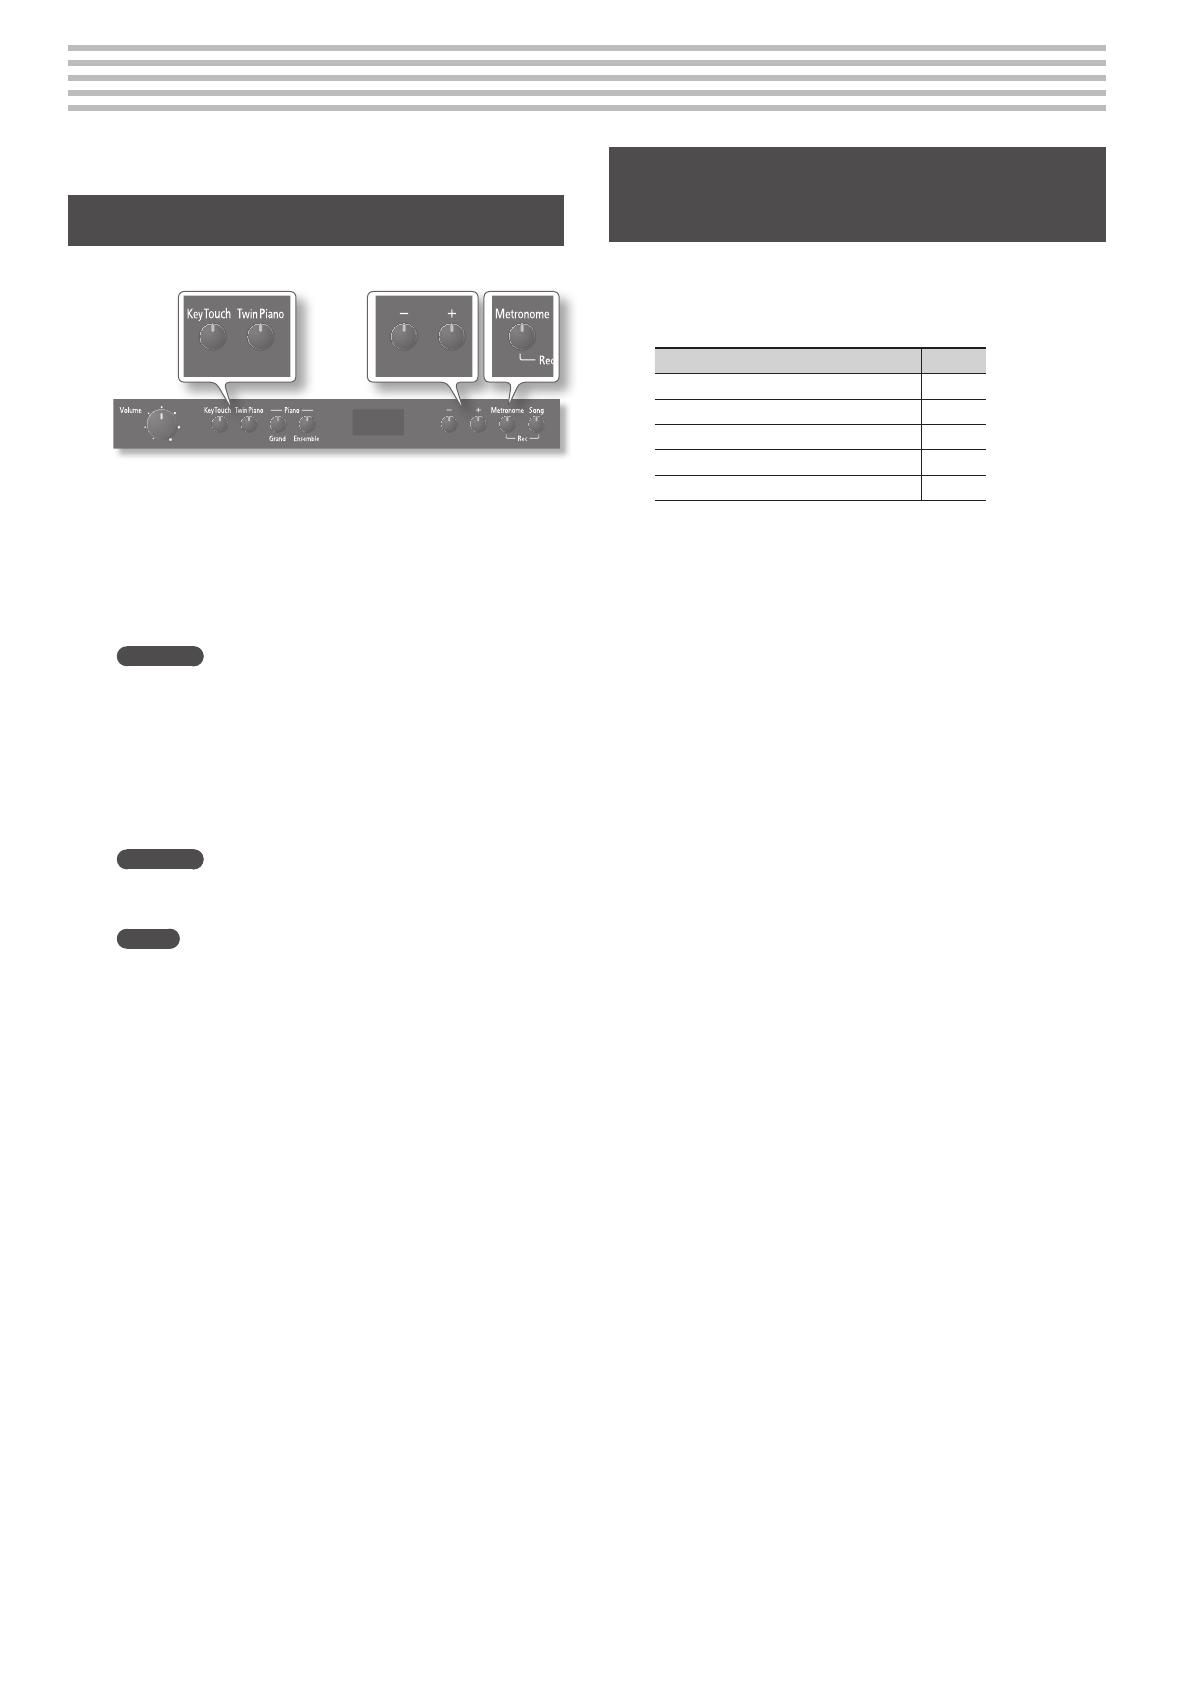
[Key Touch] button
This changes the touch sensitivity of the keyboard (p. 9).
To adjust the touch sensitivity
Hold down the [Key Touch] button and press the [–]
[+] buttons.
To select the standard touch
sensitivity
Turn o the [Key Touch] button.
[Twin Piano] button
This divides the keyboard into left and right sections so that two people
can play the same range of pitches (p. 8).
To enable Twin Piano mode Turn on the [Twin Piano] button.
To change how the sound is
heard (in Twin Piano mode)
Hold down the [Twin Piano] button and
press the [–] [+] buttons.
Front Panel
[Volume] knob
This adjusts the volume.
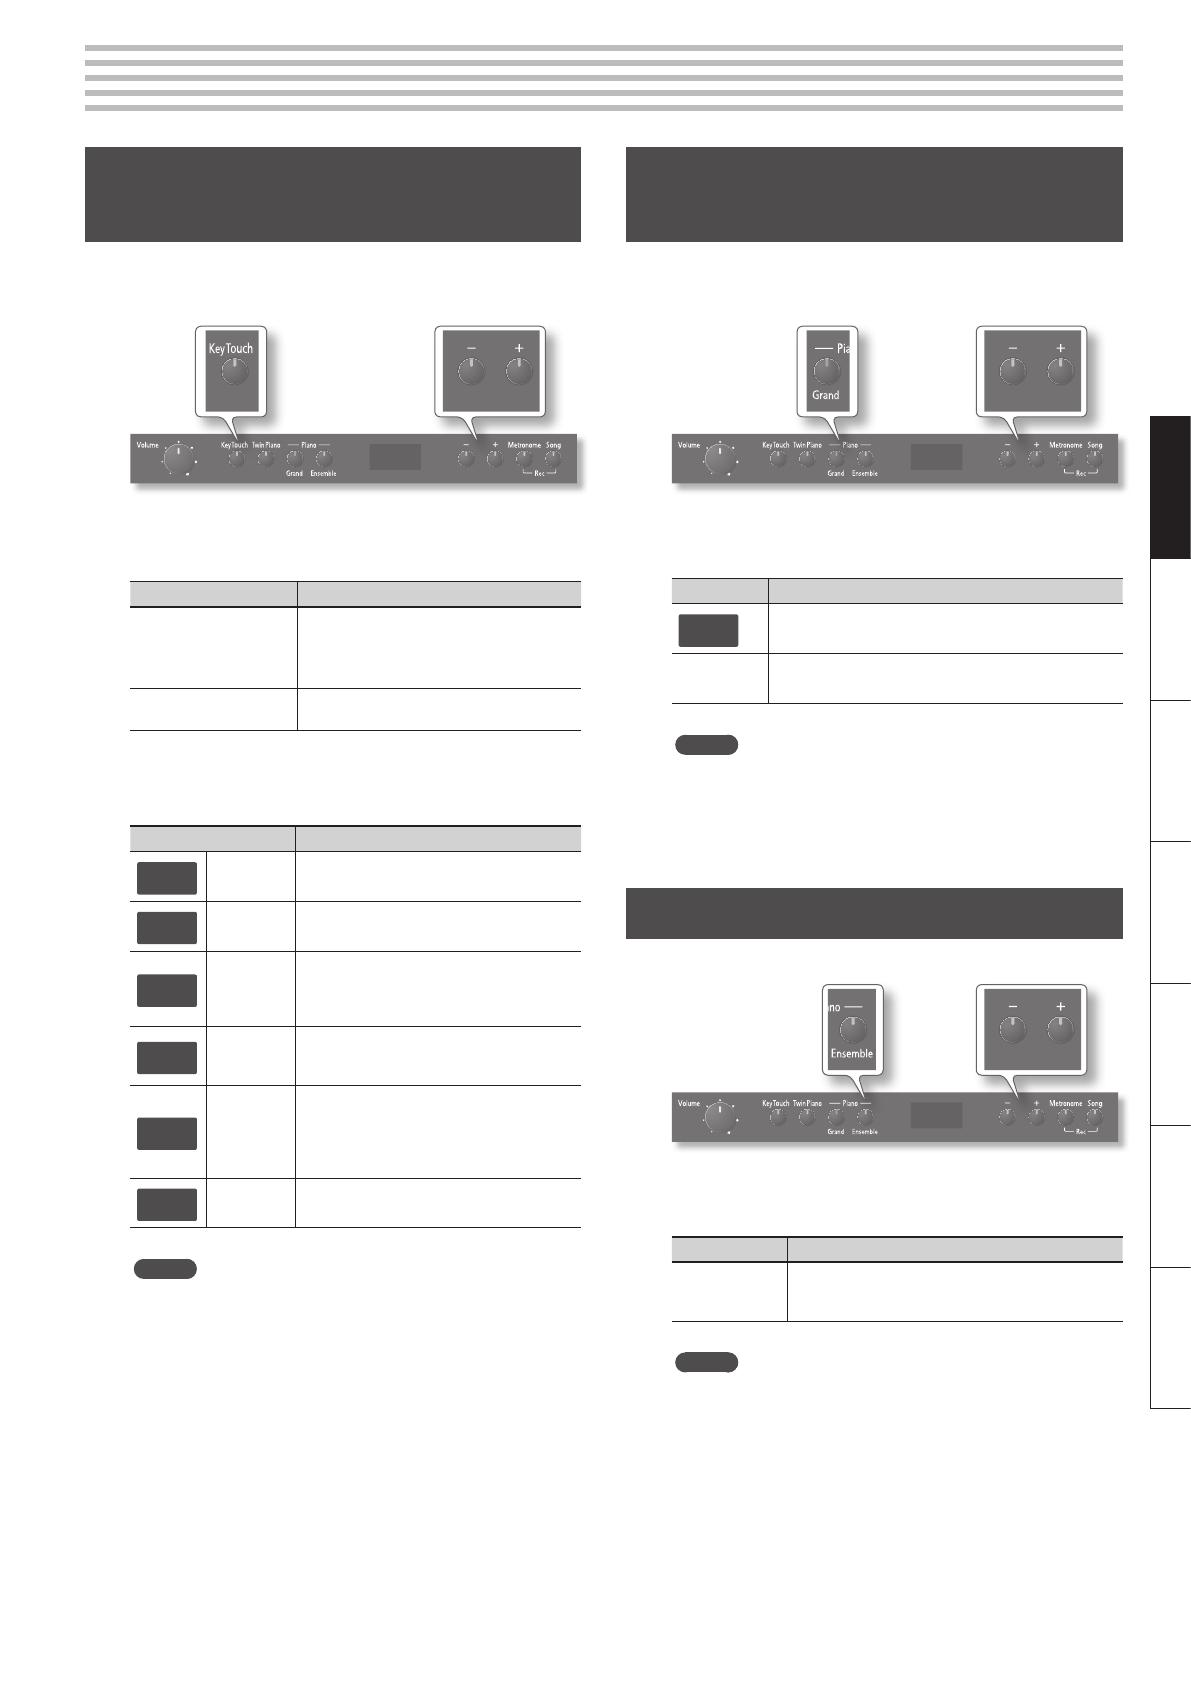
Piano [Grand], [Ensemble] buttons
Use these buttons to select tones (p. 7) or adjust the manner in which they are sounded (p. 9).
To adjust the reverberation
Hold down the [Grand] button and press the
[–] [+] buttons.
To adjust the brightness
Hold down the [Ensemble] button and press
the [–] [+] buttons.
To select a grand piano Press the [Grand] button.
To select various piano tones Press the [Ensemble] button.
To select other tones
Press [Grand] or [Ensemble] button, and then
press the [–] [+] buttons.
[Power] switch
This turns the power on/o (p. 6).
* With the factory settings, the unit’s
power will automatically be switched
o 240 minutes (4 hours) after you stop
playing or operating the unit.
If the unit’s power has been turned o automatically, you can use the
[Power] switch to turn the unit back on again.
If you don’t want the power to turn o automatically, change the “Auto
O” setting to “OFF” as described on “Making the Power Automatically
Turn O After a Time (Auto O)” (p. 15).
You can use the
holders to hold pages
in place.
When not using the
holders, leave them
folded down.
Music holders
Damper Pedal
Use this pedal to sustain the sound. While this pedal is held down, notes will be sustained for an extended time even
if you release your ngers from the keyboard. The length of the sustain will change subtly depending on how deeply
you press the pedal. On an acoustic piano, holding down the damper pedal will cause the strings for notes other
than the ones you actually play to vibrate in sympathy with what you’ve played, producing a rich resonance. This unit
simulates this sympathetic vibration (damper resonance).
Sostenuto Pedal
This pedal sustains only the notes of the keys that were already pressed when you pressed the pedal.
Soft Pedal
This pedal is used to make the sound softer. Playing with the soft pedal depressed produces a sound that is not
as strong as when otherwise played with the equivalent strength. This is the same function as the left pedal of an
acoustic piano. The softness of the tone can be varied subtly by the depth to which you press the pedal.
Panel Descriptions
5
DeutschEnglish Français Italiano Español Português Nederlands
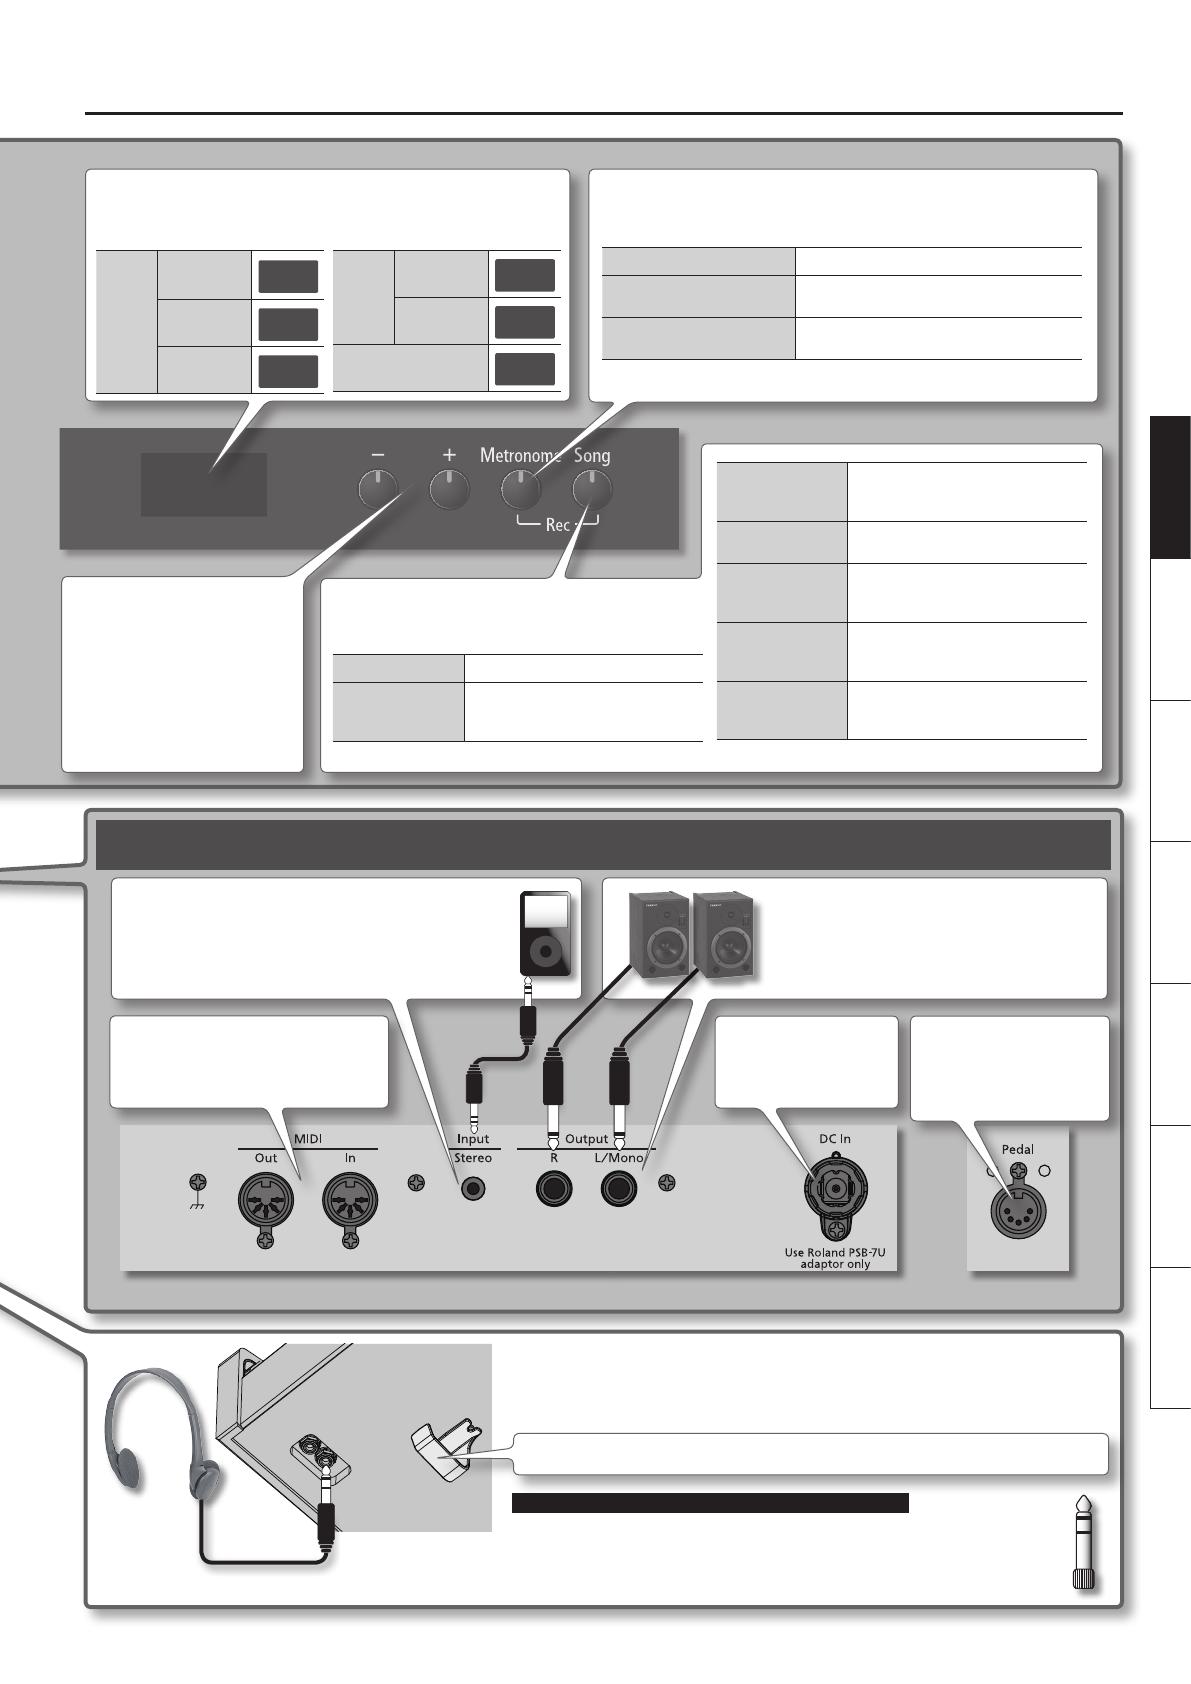
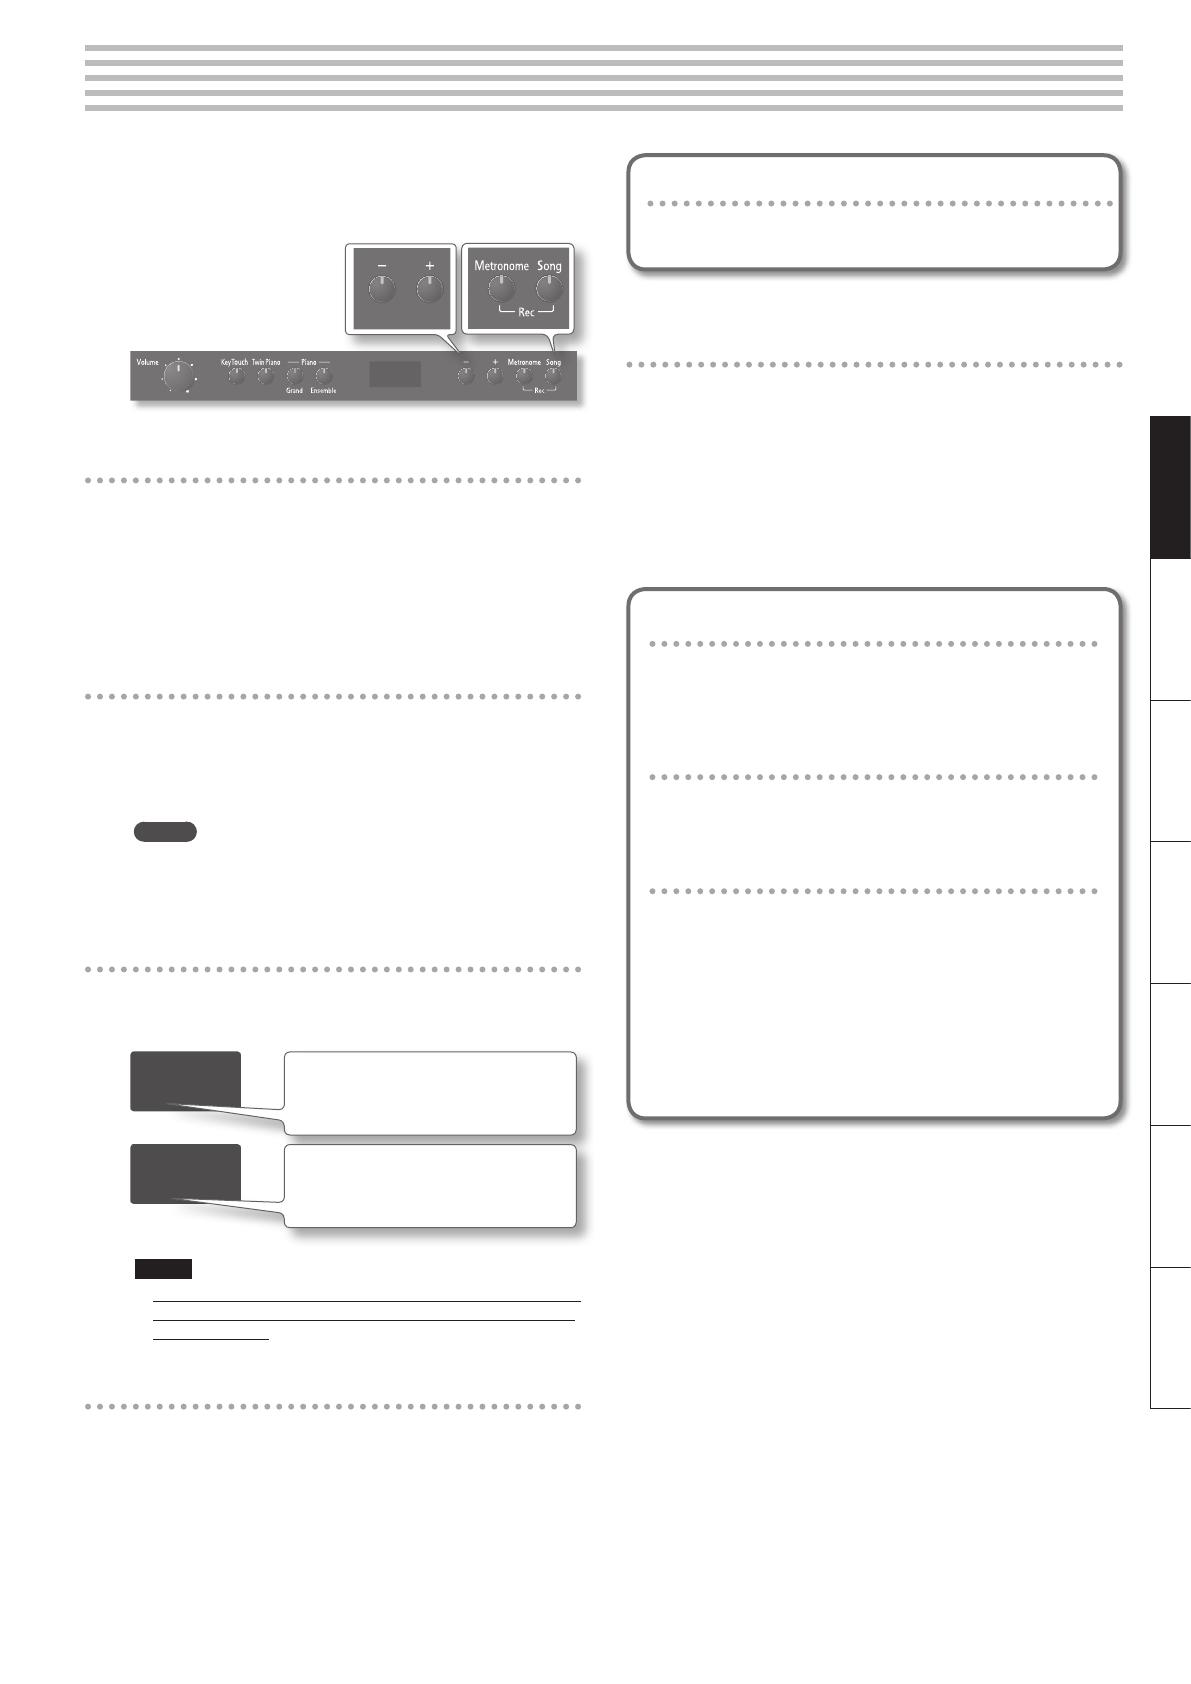
[–] [+] buttons
Use these buttons to select tone
variations or songs, or to edit various
settings. To make the value increase
quickly, hold down the [+] button
and press the [–] button. Conversely,
to make the value decrease quickly,
hold down the [–] button and press
the [+] button.
[Metronome] button
This sounds the metronome (p. 7).
To sound the metronome Turn on the [Metronome] button.
To change the tempo
Turn on the [Metronome] button to display the
tempo, and then press the [–] [+] buttons.
To change the time signature
Hold down the [Metronome] button and press
the [–] [+] buttons.
* To prevent malfunction and/or damage to speakers or other devices, always turn down the volume, and turn o the power on all devices before making any connections.
Input jack
If you use a cord with a stereo mini-plug to connect a audio
player or similar device, the sound of the connected device will
be heard through this unit. Use the controls of the connected
device (audio player) to adjust the volume.
MIDI connectors
For connecting MIDI device (p. 14).
Output jacks
If you connect these jacks to amplied speakers, the
sound of this unit will be heard through them.
Headphone jacks
Since this unit has two headphone jacks, two people can also use headphones simultaneously.
If you’re using only one set of headphones, you may connect them to either of the two headphone
jacks.
Don’t forget to remove your headphone adaptor plug!
If you leave a headphone adaptor plug inserted in the headphone jack, no sound will be
heard from the piano. If you don’t hear sound from the piano, check the headphone jacks.
Tone
number
Grand
piano
GP1
Various piano
tones
En1
Other
o
1
Song
number
Internal song
a.01
User
U.01
Tempo
108
DC In jack
Connect the included AC
adaptor here (p. 22).
To fast-forward/
fast-reverse
With the display showing the measure
number (the song playing), press the
[–] [+] buttons.
To play songs
consecutively
Hold down the Piano [Ensemble]
button and press the [Song] button.
To play back with
the right-hand part
muted
Hold down the [Song] button and
press the [+] button to switch it on/o.
To play back with
the left-hand part
muted
Hold down the [Song] button and
press the [–] button to switch it on/o.
To record
First, hold down the [Metronome]
button and press the [Song] button;
then press the [Song] button.
[Song] button
Use this button to play (p. 10) or record (p. 11) songs.
To play/stop a song Press the [Song] button.
To select a song
With the display showing the song
number (the song stopped), press the
[–] [+] buttons.
Rear Panel Connections
Display
This indicates the tone number, song number, measure number, tempo,
selected function, or value.
* Do not hang anything other than headphones on the headphone hook. Do not apply undue force to the hook. Otherwise, you risk damaging the hook.
Whenever you are not using the headphones, you can hang them on the headphone hook.
Pedal connector
Connect the pedal cord of
the dedicated stand here
(p. 22).
6
Before You Play
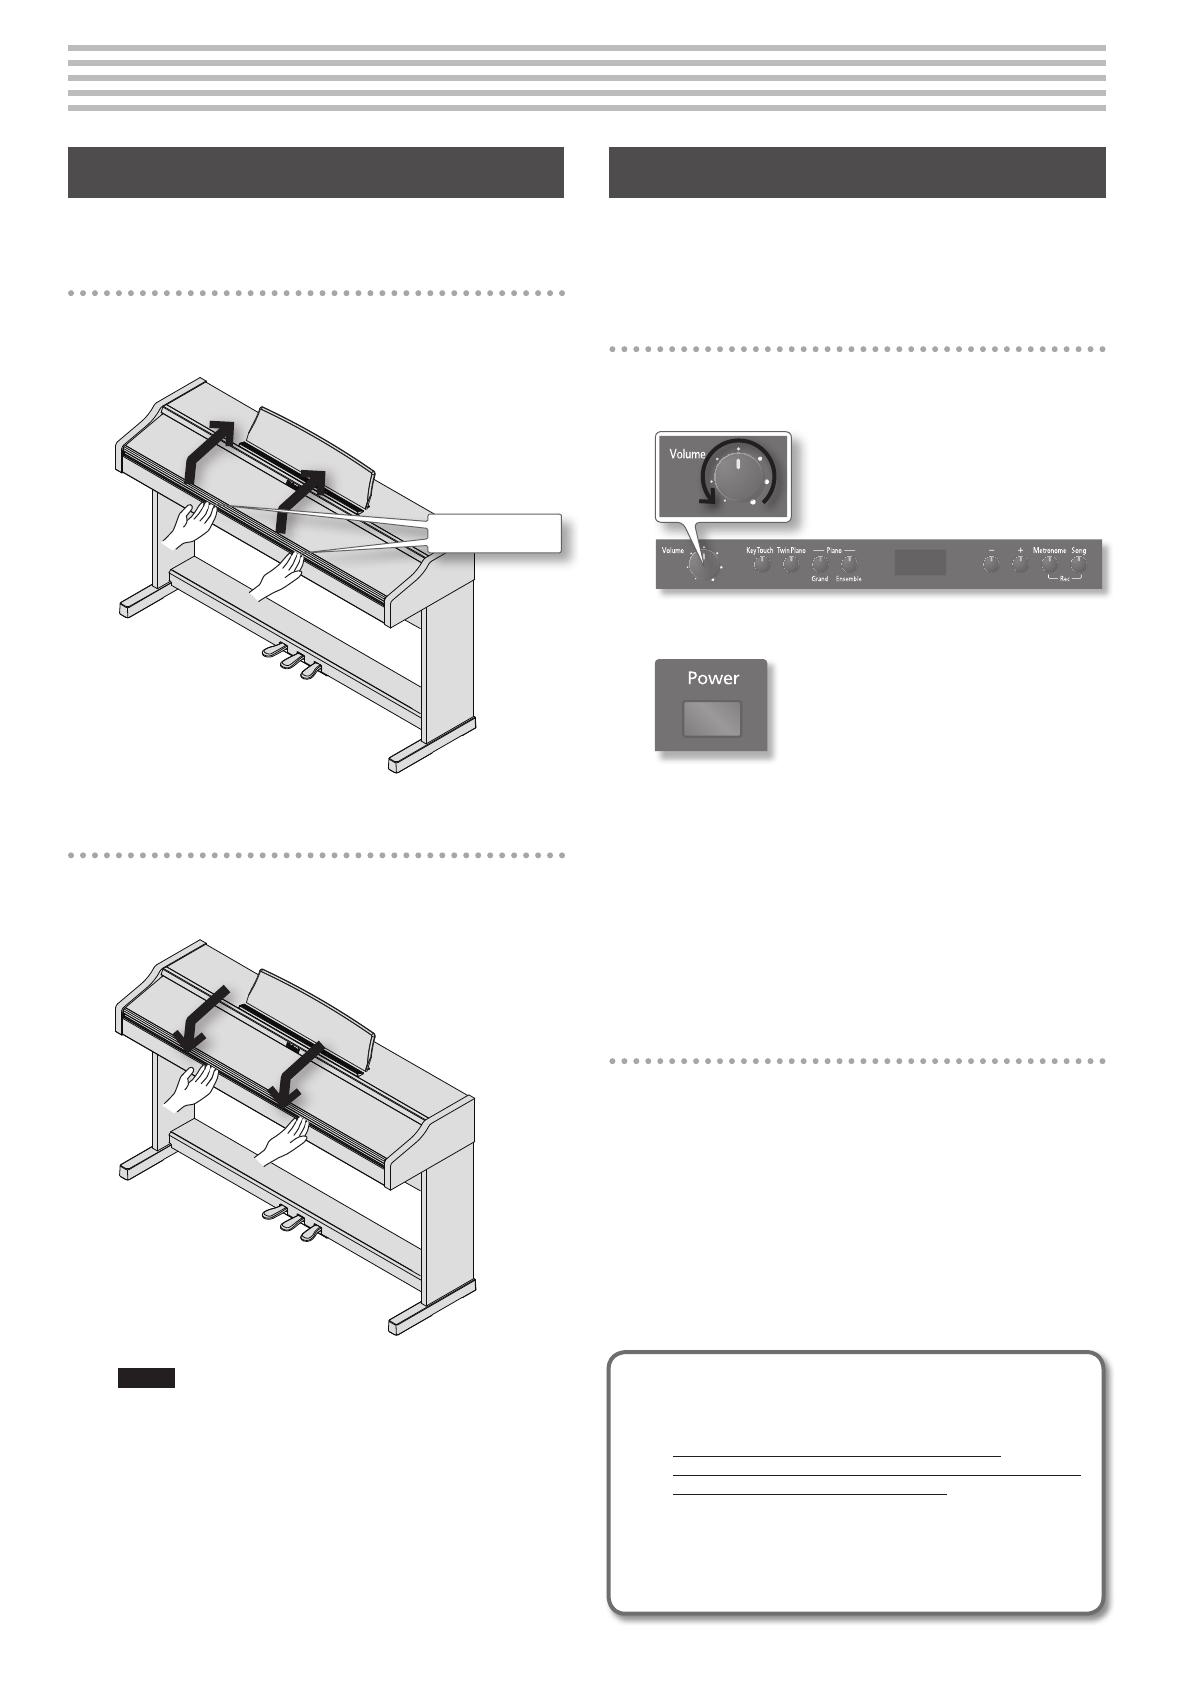
Opening/Closing the Lid
First, open the lid. You must use both hands to open or close the lid.
Turning the Power On/O
Once the connections have been completed (p. 22), turn on power to
your various devices in the order specied. By turning on devices
in the wrong order, you risk causing malfunction and/or damage to
speakers and other devices.
Turning the Power On
1. Turn the [Volume] knob all the way toward the left to
minimize the volume.
2. Turn the [Power] switch ON.
After a brief interval, you’ll be able to produce sounds by playing
the keyboard.
3. Use the [Volume] knob to adjust the volume.
* This unit is equipped with a protection circuit. A brief interval
(a few seconds) after power up is required before the unit will
operate normally.
* Before switching the power on/o, always be sure to turn the
volume down. Even with the volume turned down, you might
hear some sound when switching the power on/o. However,
this is normal and does not indicate a malfunction.
Turning the Power O
1. Turn the [Volume] knob all the way toward the left to
minimize the volume.
2. Turn the [Power] switch OFF.
If you don’t want the power to turn o
automatically, turn the “Auto O” setting o !
With the factory settings, the unit’s power will
automatically be switched o 240 minutes (4 hours) after
you stop playing or operating the unit.
If the unit’s power has been turned o automatically, you can
use the [Power] switch to turn the unit back on again.
If you don’t want the power to turn o automatically, change
the “Auto O” setting to “OFF” as described on “Making the
Power Automatically Turn O After a Time (Auto O)” (p. 15).
Opening the Lid
1. Use both hands to lift the edge of the lid, and push it away
from yourself.
Edge of lid
Closing the Lid
1. Grasp and gently lower the edge of the lid with both
hands.
NOTE!
• When opening and closing the lid, be careful not to let your
ngers get caught. If small children will be using the piano, adult
supervision should be provided.
• If you need to move the piano, make sure the lid is closed rst to
prevent accidents.
7
DeutschEnglish Français Italiano Español Português Nederlands
Performing
Selecting Tones
This unit contains numerous tones (sounds). The tones are
organized into two groups. The Piano [Grand] button is for the
grand piano tone group, and the [Ensemble] button is for group of
the piano combined with other tones such as strings or bass.
The Tone “Grand Piano 1” (
GP1) is selected when the instrument’s
power is turned on.
1. Press the Piano [Grand] or [Ensemble] button to select a
tone group.
2. Press the [–] [+] buttons to select the desired tone
variation from within the tone group.
The display shows the tone number.
Button Display Explanation
Piano
[Grand]
button
GP1
A splendid concert grand piano sound. This is the most
highly recommended tone; it can be used for any style of
music.
GP2
A more mellow grand piano sound. Appropriate for quiet
songs.
GP3
A brilliant grand piano sound. Appropriate when you
want the piano to stand out in the band.
GP4
A honky-tonk piano. Ideal for ragtime.
Piano
[Ensemble]
button
En1
GP1 layered with strings.
En2
GP1 layered with choir.
En3
GP1 layered with bell.
En4
The low range plays a bass and ride cymbal, and the mid
and high ranges play the GP1. Ideal for performing a
“piano trio” by yourself.
o 1
o22
These are various tones other than piano.
Reference
For details, refer to “Tone List” (p. 18).
Using the Metronome
You can perform while the metronome sounds.
You can adjust the tempo or beat of the
metronome.
If a song is playing, the metronome will sound at
the tempo and beat of that song.
1. Press the [Metronome] button so it’s lit.
The metronome will begin sounding and
the currently selected tempo value will be
displayed.
The [Metronome] button will blink in synchronization with the time
signature and tempo of the selected song.
To stop the metronome, press the [Metronome] button once again.
Changing the Tempo
1. Press the [Metronome] button to get the display to
indicate the current tempo.
2. Press the [–] [+] buttons to adjust the tempo.
Changing the Beat
1. Hold down the [Metronome] button and press the [–] [+]
buttons to select the beat.
Display Beat Display Beat
2.2
2/2
6.4
6/4
0.4
Only weak beats will be
sounded.
7.4
7/4
2.4
2/4
3.8
3/8
3.4
3/4
6.8
6/8
4.4
4/4 (default)
9.8
9/8
5.4
5/4
12.8
12/8
108
Performing
8
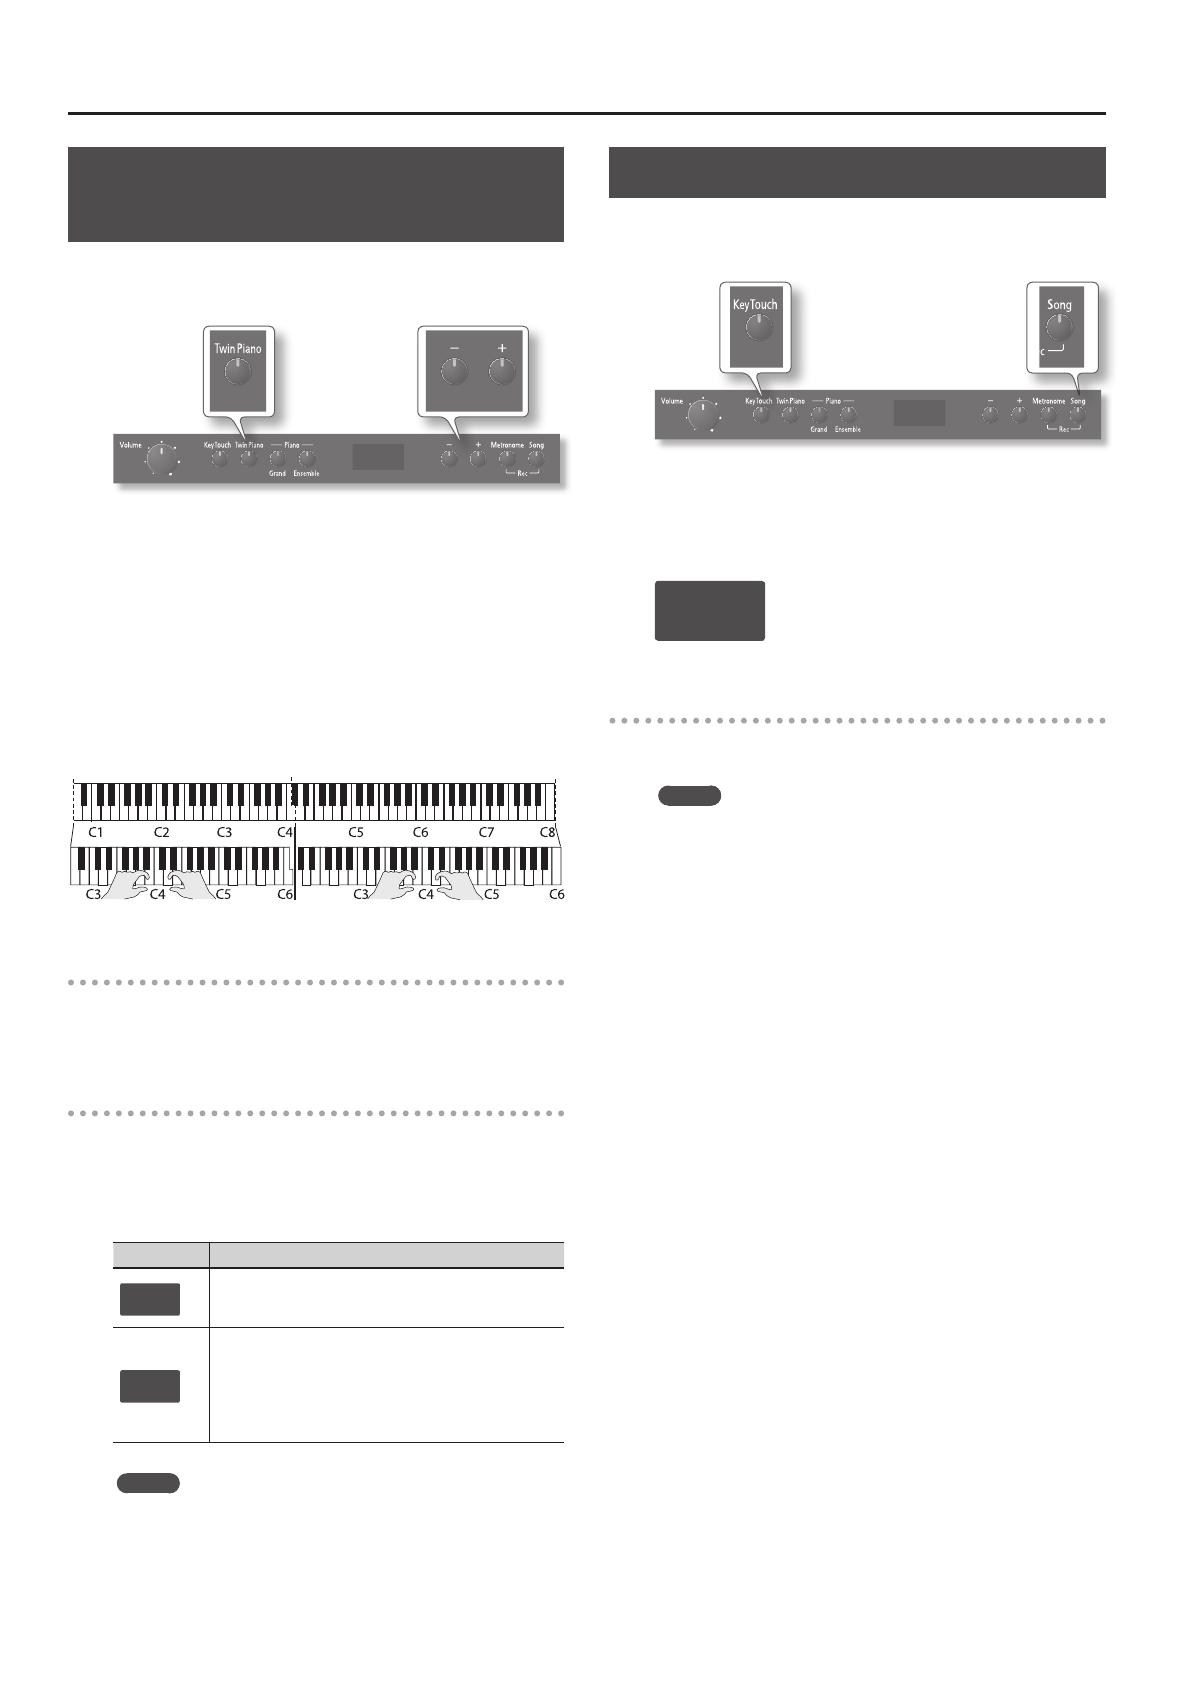
Dividing the Keyboard in Two (Twin
Piano)
You can divide the keyboard into left and right sections so that two
people can play the same pitch ranges. This function lets you use
the unit as though it were two pianos.
1. Press the [Twin Piano] button so it’s lit.
Twin Piano will turn on, and the following settings will be applied.
• The keyboard will be divided into left and right sections, with
“middle C” located in the center of each section.
• The left and right sections will have the same tone (Grand Piano
1).
• The right pedal (damper pedal) will be the damper pedal for the
right section, and the left pedal (soft pedal) will be the damper
pedal for the left section.
* Twin Piano will be cancelled if you choose a tone other than
Grand Piano 1 (GP1).
Canceling Twin Piano
Press the [Twin Piano] button once again so its light goes out.
Choosing how Twin Piano will sound
(Twin Piano Mode)
You can choose one of the following ways in which the sound will
be heard.
1. Hold down the [Twin Piano] button and use the [+] [–]
buttons to select the Twin Piano mode.
Value Explanation
1
The sound will be heard from the right as you play toward
the right of the keyboard, and from the left as you play
toward the left.
2
Notes played in the right area will be heard from the right
speaker, and notes played in the left area will be heard
from the left speaker.
If you’re using headphones, the sound of the right-side
section will be heard in the right ear, and the sound of the
left-side section will be heard in the left ear.
MEMO
When the power is turned o, this unit’s settings will return to
their default state. However, you can save this setting so that it
will still be available the next time the power is turned on. To
save the setting, proceed as described in “Saving the Settings
(Memory Backup)” (p. 12).
Disabling the Buttons (Panel Lock)
When you activate Panel Lock, all buttons will be disabled.
This prevents the tones or settings from being changed if you
inadvertently press a button.
1. Hold down the [Song] button and press the [Key Touch]
button.
Panel Lock will be activated. All buttons will be disabled.
The display will show the following.
---
Canceling the Panel Lock function
Once again hold down the [Song] button and press the [Key Touch]
button.
MEMO
Panel Lock will be cancelled when you turn o the power.
9
DeutschEnglish Français Italiano Español Português Nederlands
Adjusting the Keyboard Sensitivity and the Sound
Adjusting the Keyboard Sensitivity
(Key Touch)
Here’s how to change the way in which the sound responds to your
keyboard dynamics. You can adjust the response as appropriate for
your playing strength.
1. Press the [Key Touch] button so it’s lit.
Now you can adjust the key touch.
[Key Touch] button Explanation
OFF (unlit)
The key touch setting will be set to “medium.”
This sets the standard keyboard touch. You can
play with the most natural touch. This is the
closest to the touch of an acoustic piano.
ON (lit)
The key touch setting you selected in step 2
will be applied.
2. Hold down the [Key Touch] button and press the [–] [+]
buttons to adjust the keyboard touch.
Display/Value Explanation
F
Fixed
The sound plays at one set volume, regardless
of the force used to play the keys.
L2
Super Light
This setting produces the lightest keyboard
touch.
L1
Light
You can achieve fortissimo () play with a less
forceful touch than “medium,” so the keyboard
feels lighter. This setting makes it easy to play,
even for children.
N
Medium
This sets the standard keyboard touch. You can
play with the most natural touch. This is the
closest to the touch of an acoustic piano.
H1
Heavy
You have to nger the keyboard more
forcefully than “medium” in order to play
fortissimo (), so the keyboard touch feels
heavier. Dynamic ngering adds even more
feeling to what you play.
H2
Super Heavy
This setting produces the heaviest keyboard
touch.
MEMO
When the power is turned o, this unit’s settings will return to
their default state. However, you can save this setting so that it
will still be available the next time the power is turned on. To
save the setting, proceed as described in “Saving the Settings
(Memory Backup)” (p. 12).
Adding Reverberation to Sounds
(Reverb Eect)
You can apply a reverb eect to the notes you play on the keyboard.
With the reverb eect, you obtain a pleasant reverberation, making
it sound as if you were performing in a concert hall or similar space.
1. Hold down the Piano [Grand] button and press the [–] [+]
buttons to adjust the depth for the reverb eect.
Value Explanation
OFF
Reverb will not be applied.
1 – 10
(default:
5)
Adjust the reverb depth over ten levels. Higher values
produce deeper reverb.
MEMO
When the power is turned o, this unit’s settings will return to
their default state. However, you can save this setting so that it
will still be available the next time the power is turned on. To
save the setting, proceed as described in “Saving the Settings
(Memory Backup)” (p. 12).
Adjusting the Brilliance of the Sound
Here’s how to adjust the brilliance of the sound.
1. Hold down the Piano [Ensemble] button and press the [–]
[+] buttons to adjust the brightness of the sound.
Value Explanation
-10 – 0 – 10
(default: 0)
Adjust the brilliance of the sound. Positive (+) settings
brighten the tone, and negative (–) settings make it
more mellow.
MEMO
When the power is turned o, this unit’s settings will return to
their default state. However, you can save this setting so that it
will still be available the next time the power is turned on. To
save the setting, proceed as described in “Saving the Settings
(Memory Backup)” (p. 12).

10
Playing Back Songs
Let’s try listening to the internal songs and the songs recorded
in internal memory. For the titles of the internal songs, refer to
“Internal Song List” (p. 19).
Play back a song
1. Press the [Song] button so it’s lit.
The song will begin playing.
When the song has nished playing to the end, it will stop.
During playback, the display will indicate the currently playing
measure of the song.
2. 1.
Measure number and
dot shown
Fast-forward or fast-reverse the song
1. While the song is playing, press the [–] [+] buttons.
This allows you to fast-forward or fast-reverse the song.
The measure indication in the display will increase or decrease each
time you press the button.
By holding down a button, you can rapidly increase or decrease the
measure number.
Stop the song
1. Press the [Song] button so its light goes out.
The song will stop.
Select a song
While the song is stopped, the display will indicate the song
number.
a.01
• Song numbers beginning with “a, b, c” are internal
songs.
• Song numbers beginning with “
U” are songs you’ve
recorded in internal memory.
1. When the song number is displayed, press the [–] [+]
buttons.
This allows you to select a song. If you’ve stopped in the middle of
a song, you can press the [–] button to return to the beginning of
the song.
a.01 c.20U.10U.01
Recorded songs Internal songs
* The songs in internal memory (U.01 – U.10) will not be shown if
they have not been recorded.
* For the titles of the internal songs, refer to “Internal Song List”
(p. 19).
Play songs consecutively
1. Hold down the Piano [Ensemble] button and press the
[Song] button.
The songs will be played back successively.
When the currently playing song ends, the next song will play.
Playing Parts (Left/Right Hand)
Separately
You can select and play back the parts (left-hand or right-hand)
separately. This is a convenient way to practice by playing along
with a song one hand at a time.
1. Hold down the [Song] button and press the [–] [+] buttons
to select the part that you want to play back.
Button Lit/Unlit Explanation
[–] button
(left-hand part)
Lit Left-hand part will sound
Unlit
Left-hand part is muted
(or contains no performance data)
[+] button
(right-hand part)
Lit Right-hand part will sound
Unlit
Right-hand part is muted
(or contains no performance data)
* This setting will be cancelled if you select another song.
MEMO
The parts (left-hand / right-hand) are indicated as follows for the
internal songs (a, b, c) and the songs you’ve recorded (U).
Songs Left-Hand Part Right-Hand Part
Internal Songs (a, b, c) Left-hand part Right-hand part
Recorded
Songs (U)
Twin Piano (p. 8) Left-hand piano Right-hand piano
Split Tones (p. 18) Left-hand tone Right-hand tone
Others
No performance
data
All parts (both
hands)
Sounding a Count Before Playback
If you’re playing along with a song, it will be easier to synchronize
your playing with the song if a count is sounded before playback
begins.
1. Press the [Metronome] button to turn on the metronome
(p. 7).
2. Press the [Song] button to play back the song.
A two-measure count will sound before the song plays.
During the count, measure numbers “
-2” and then “-1” will appear
in the display.
11
DeutschEnglish Français Italiano Español Português Nederlands
Recording
You can record your performances.
You can play back a performance you have recorded to check what
and how you played, and play melodies on the keyboard along with
prerecorded accompaniment.
Getting ready to record
1. Select the tone that you want to play (p. 7).
2. Sound the metronome if desired.
Press the [Metronome] button.
While the metronome is sounding, specify the tempo and time
signature of the song (p. 7).
Entering recording-standby mode
3. Hold down the [Metronome] button and press the [Song]
button.
The [Song] button will blink; the unit will enter recording-standby
mode.
MEMO
If you decide not to record (i.e., if you want to exit recording-
standby mode), hold down the [Metronome] button once again
and press the [Song] button.
Selecting the song number to record
4. Press the [–] [+] buttons to select the song number (u01–
u10) that you want to record.
u01
A song with no recorded data (empty song)
• Song number shown with lowercase “
u”
• No dot shown
U.01
A song with recorded data
• Song number shown with uppercase “
U”
• Dot shown
NOTE!
If you select a song that already contains data (song number
with an uppercase “U”) and record, the previously recorded
data will be lost.
Starting recording
5. Press the [Song] button.
A two-measure count will sound, and then recording will start.
During the count, measure numbers “
-2” and then “-1” will appear
in the display.
If you don’t want a count to sound before recording
Recording will start automatically if you play the keyboard
while in recording-standby mode.
Stopping recording
6. Press the [Song] button.
Recording will stop.
The song will automatically be saved when you stop recording.
* While the song is being saved, an animation of a rotating “
o”
symbol will appear in the display for several seconds. Do not
turn o the power during this time. Doing so might cause
the saved song to be lost.
When saving has been completed, the [Song] button will go out.
Listening to the recorded song
After recording, you can press the [Song] button to
immediately play back the recorded song. For details on
song playback methods, refer to “Playing Back Songs” (p. 10).
If you want to re-do the recording
You can repeat the procedure from step 1 on this page to
re-record at the same song number.
If you want to erase the recorded song
You can erase a song by recording an empty song as follows.
• Repeat the procedure from step 3 on this page.
• In step 4 of the procedure, select the song number that
you want to erase.
• In step 5, press the [Song] button to hear the two-
measure count, and then press the [Song] button
without playing the keyboard.
A song containing no notes will be recorded; the song has
been erased.
12
Various Settings (Function Mode)
Function mode lets you make various settings for this unit.
Basic Operation in Function Mode
Here’s the basic procedure for making settings in Function mode.
1. Hold down the [Key Touch] button and press the [Twin
Piano] button.
The display will indicate “F01” (or F02 – F08); the unit is now in
Function mode.
2. Press the [–] [+] buttons to select the function setting (F01
– F08) that you want to change.
Reference
For details on each function setting (
F01 – F08), refer to
“Function Settings” (p. 13).
3. Press the [Metronome] button.
This conrms the function setting that you want to edit; the display
will indicate the value of that setting.
4. Press the [–] [+] buttons to edit the value of the setting.
Reference
For details on the values of each function, refer to “Function
Settings” (p. 13).
MEMO
By pressing the [Metronome] button you can return to the
function setting screen (
F01 – F08). If you want to edit other
function settings, repeat steps 2–4.
5. Press the [Key Touch] button or the [Twin Piano] button to
exit Function mode.
Saving the Settings (Memory
Backup)
When this unit’s power is turned o, it will return to its default
settings. However, if desired, you can save the following settings
so that they will be remembered even after the power is o. This is
called the “Memory Backup” function.
Settings saved by Memory Backup Page
Key Touch p. 9
Twin Piano Mode p. 8
Reverb p. 9
Brilliance p. 9
Master Tuning p. 13
1. Hold down the [Key Touch] button and press the [Twin
Piano] button.
The display will indicate “F01” (or F02 – F08); the unit is now in
Function mode.
2. Press the [+] button a number of times until “F08” is
shown in the display.
3. Press the [Metronome] button.
The display will indicate “Sur” (Sure?), and the [–] button and [+]
button will blink.
If you decide not to save the settings, press the [–] button.
4. To save the settings, press the [+] button.
When the memory backup has been completed, the display will
indicate “F08.”
5. Press the [Key Touch] button or the [Twin Piano] button to
exit Function mode.
Various Settings (Function Mode)
13
DeutschEnglish Français Italiano Español Português Nederlands
Function Settings
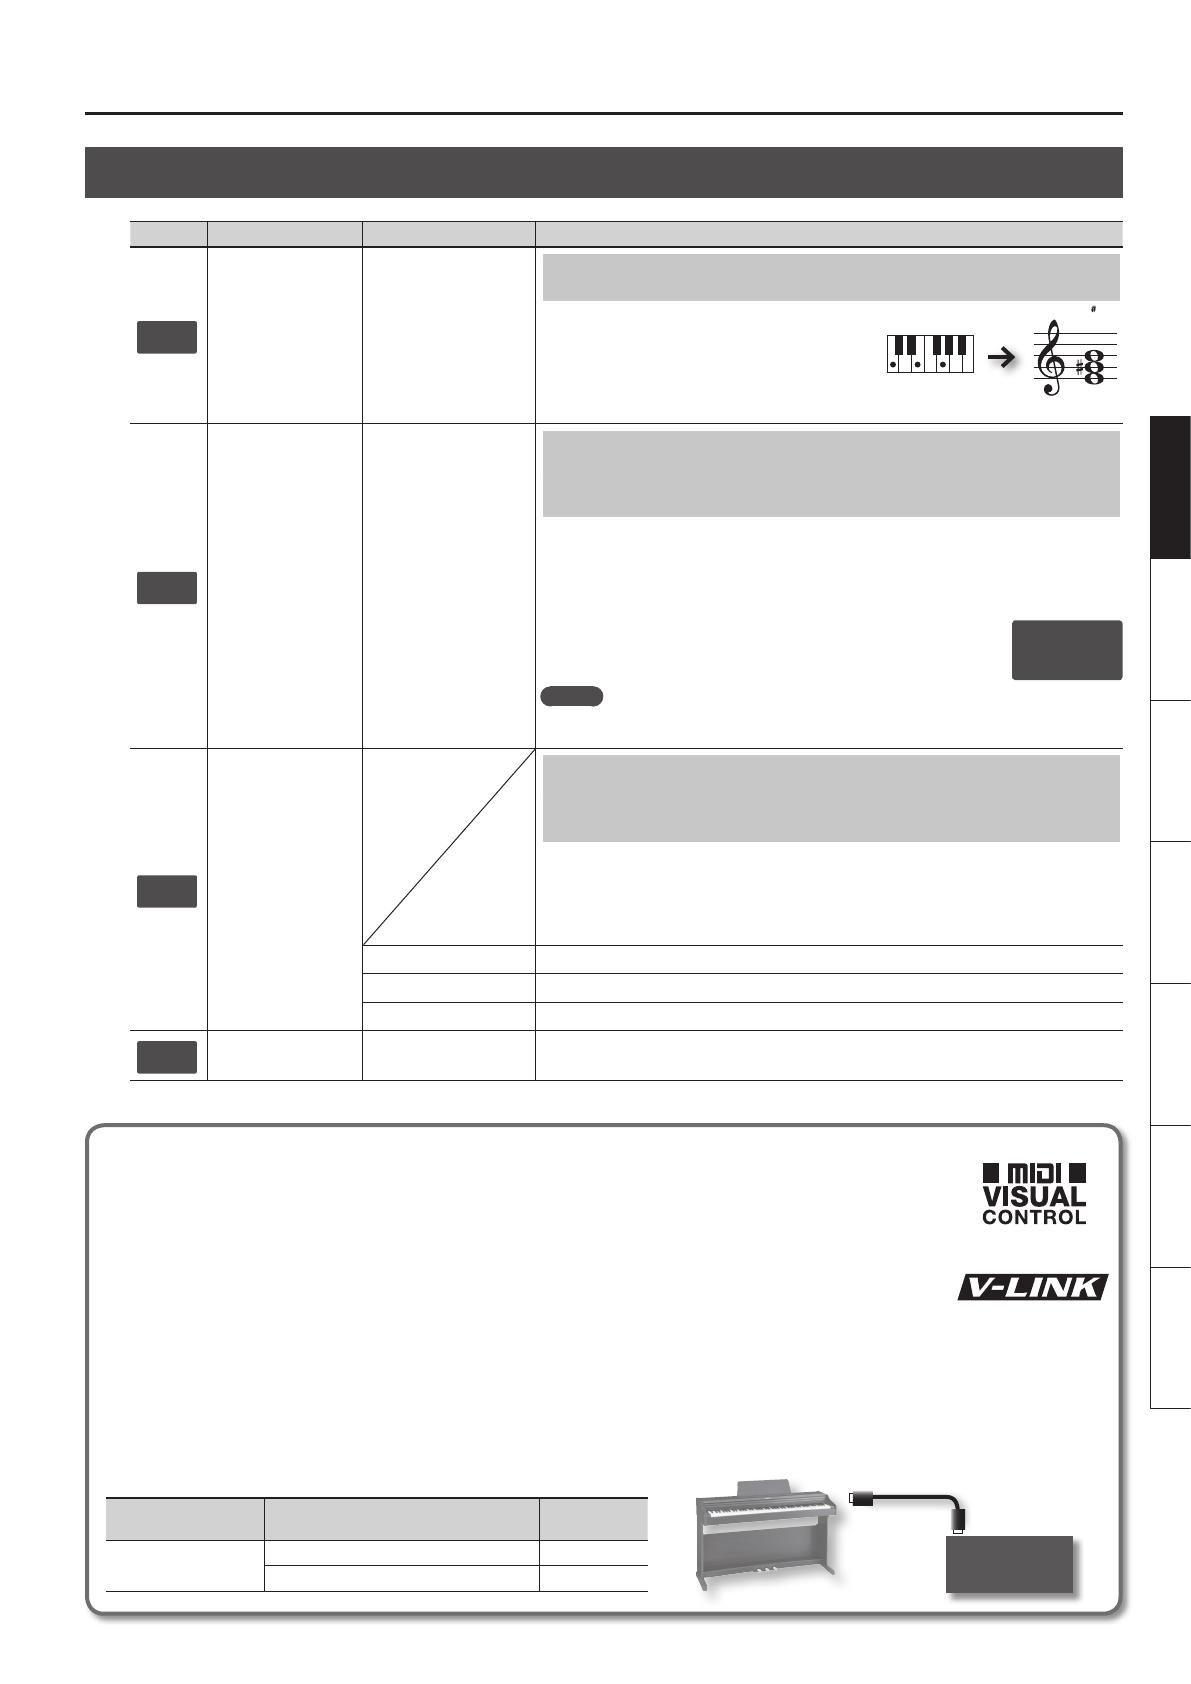
Display Function Setting Value Explanation
F01
Transpose
-6 – 0 – 5 (semitone
steps)
(default:
0)
Changing the Key of the Keyboard (Transpose)
You can use the Transpose function to transpose the
keyboard in semitone steps.
For example, if a song is in the key of E major, and
you want to play it with the ngering of C major, set
Transpose to a value of “4”.
F02
Master Tuning
15.3 – 40.0 – 66.2
(415.3 Hz–440.0 Hz–
466.2 Hz)
(default:
40.0)
Matching the Pitch with Other Instruments
(Master Tuning)
When playing ensemble with other instruments and in other such instances, you can match the
standard pitch to another instrument.
The standard pitch generally refers to the pitch of the note that’s played when you nger the
middle A key. For a cleaner ensemble sound while performing with one or more other instruments,
ensure that each instrument’s standard pitch is in tune with that of the other instruments.
In the display, the last two digits of the whole number and the digit to the
right of the decimal point are indicated. “440.0 Hz” is indicated in the gure
above.
MEMO
You can save this setting so that it will still be available the next time the power is turned on. To
save the setting, proceed as described in “Saving the Settings (Memory Backup)” (p. 12).
F03
Visual Control Mode
Controlling Video Equipment (Visual Control
Mode/Channel)
Visual Control is a function that lets you control images along with your performance. If you’ve set
Visual Control mode to 1 (MIDI Visual Control) or 2 (V-LINK), playing the keyboard of this unit will
control the images produced by the Visual Control device connected to this unit using a MIDI cable.
* By holding down the [Key Touch] button and pressing the Piano [Ensemble] button, you can
switch this setting between “OFF” and “1”.
OFF (default)
Visual Control is o.
1 (
MIDI Visual Control
)
MIDI Visual Control mode is selected.
2 (V-LINK)
V-LINK mode is selected.
F04
Visual Control Channel
1 – 16 (default: 10)
Species the MIDI channel used to transmit MIDI messages to the Visual Control device.
If you play C E G g It will sound E G B
40.0
What is MIDI Visual Control?
MIDI Visual Control is an internationally-used recommended practice that was added to the MIDI specication so that visual expression could be
linked with musical performance. Video equipment that is compatible with MIDI Visual Control can be connected to electronic musical instruments
via MIDI in order to control video equipment in tandem with a performance.
What is V-LINK?
V-LINK is Roland’s proprietary specication that allows visual expression to be linked with musical performance. Video equipment that is
compatible with V-LINK can be connected to electronic musical instruments via their MIDI ports, making it easy to enjoy a variety of visual
eects that are linked with the performance.
Connection Examples
Connect a MIDI cable from this unit’s MIDI Out connector (p. 5) to the MIDI In connector of your Visual Control compatible device.
* You’ll need a MIDI cable (sold separately) in order to connect this unit to a device that supports Visual Control.
Visual Control Function Chart
Playing the lowest 12 keys of this unit (A0–G#1) will transmit the following MIDI messages.
Visual Control function Transmitted MIDI message
This unit’s
operation
Switch images
CC 0 (Bank Select): 0–4 Play black keys
Program Change: 1–7 Play white keys
Visual Control
compatible video
equipment
MIDI In connector
MIDI Out connector

Various Settings (Function Mode)
14
Display Function Setting Value Explanation
F05
MIDI Transmit Channel
OFF, 1 – 16
(default:
1)
MIDI Transmit Channel Settings
This setting species the MIDI channel on which this unit will transmit.
MIDI uses sixteen “MIDI channels,” which are numbered 1 through 16. By connecting MIDI devices
and specifying the appropriate MIDI channel for each device, you can play or select sounds on
those devices. This unit will receive all sixteen channels (1–16).
F06
Local Control
Preventing Double Notes when Working with a
Sequencer (Local Control)
When you have a MIDI sequencer
connected, set this parameter to Local
O.
Since most sequencers have their Thru
function turned on, notes you play
on the keyboard may be sounded in
duplicate, or get dropped. To prevent
this, you can enable the “Local O”
setting so that the keyboard and internal
sound generator will be disconnected.
On (default)
Local Control is on.
The keyboard and internal sound generator are connected.
OFF
Local Control is o.
The keyboard and internal sound generator are disconnected. Playing the keyboard will not
produce sound.
F07
Auto O Refer to “Making the Power Automatically Turn O After a Time (Auto O)” (p. 15).
F08
Memory Backup Refer to “Saving the Settings (Memory Backup)” (p. 12).
MIDI
Sequencer
Local Control
Sound Generator
MIDI
In
MIDI
Out
What is MIDI?
MIDI, short for “Musical Instrument Digital Interface,” was developed as a universal standard for the exchange of performance data among electronic musical instruments
and computers.
This unit is equipped with MIDI connectors to let it exchange performance data with external devices. These connectors can be used to connect the unit to an external
device for even greater versatility.
Connection Examples
If you use a MIDI cable to connect this unit’s MIDI Out connector (p. 5) to the MIDI In connec-
tor of your external MIDI sound module, you’ll be able to produce sound on the external
MIDI sound module by playing this unit’s keyboard. As necessary, set the external MIDI sound
module’s receive channel to match this unit’s MIDI transmit channel.
External MIDI
sound module
MIDI In connector
MIDI Out connector

15
DeutschEnglish Français Italiano Español Português Nederlands
Restoring the Settings to the Factory Condition (Factory Reset)
The settings you’ve changed in Function mode can be restored to
their factory-set condition. This operation is called “Factory Reset.”
NOTE!
The “Factory Reset” operation will erase all settings stored by the
Memory Backup function, as well as all songs you’ve recorded in
internal memory.
1. While holding down the [Key Touch] button and the [Twin
Piano] button, turn on the power.
The display will indicate “Sur” (Sure?), and the [–] button and [+]
button will blink.
If you decide not to execute the Factory Reset operation, press the
[–] button.
2. To execute the Factory Reset, press the [+] button.
When the Factory Reset has been completed, the display will
indicate “End.”
* Never turn o the power before the display indicates “
End.”
3. Press the [Power] switch to turn the power o, then on
again.
With the factory settings, the unit’s power will automatically
be switched o 240 minutes (4 hours) after you stop playing or
operating the unit.
If you don’t want the power to turn o automatically, change the
“Auto O” setting to “OFF” as follows.
1. Hold down the [Key Touch] button and press the [Twin
Piano] button.
The display will indicate “F01” (or F02 – F08); the unit is now in
Function mode.
2. Press the [–] [+] buttons to select “F07.”
3. Press the [Metronome] button.
4. Press the [–] [+] buttons to select the Auto O setting.
If you don’t want the power to turn o automatically,
choose “OFF.”
Value Explanation
240 (default)
The power will automatically turn o when 240 minutes
(4 hours) have passed since you last played or operated
the unit.
OFF
The power will not turn o automatically.
5. Press the [Key Touch] button or the [Twin Piano] button to
exit Function mode.
MEMO
This setting is remembered even after the power is turned o.
Making the Power Automatically Turn O After a Time (Auto O)
16
Troubleshooting
Symptom Cause/Action Page
Even though you’re using head-
phones and the sound is muted,
a thumping sound is heard when
you play the keyboard
This unit uses a hammer action keyboard in order to simulate an acoustic piano’s playing touch as realistically as possible. For this
reason, you’ll hear the hammers thump when you play the keyboard, just as you would when playing an acoustic piano. Since this
unit allows you to adjust its volume, you might notice the sound of the hammers in certain situations, but this does not indicate
a malfunction. If vibration transmitted to the oor or walls is a concern, you may be able to minimize the vibration by moving the
piano away from the wall, or by laying down a commercially available anti-vibration mat designed for use with pianos.
—
Power turns o on its own
When 240 minutes (4 hours) have elapsed since you last played or operated this unit, the power will turn o automatically. (This is
the factory setting.)
If you don’t need the power to turn o automatically, turn the “Auto O” setting o.
p. 15
Power does not turn on Is the AC adaptor connected correctly? p. 22
Pedal does not work, or is “stuck”
Is the pedal connected correctly?
Plug the cord rmly into the pedal connector.
p. 22
If you disconnect the pedal cord from this unit while the power is on, the pedal eect may remain “stuck” in the On condition. You
must switch o the unit’s power before connecting or disconnecting the pedal cord.
—
Could Twin Piano be turned on?
If Twin Piano is on, the right pedal will apply only to the right-hand section of the keyboard, and the left pedal will apply only to
the left-hand section of the keyboard.
p. 8
The volume level of the instru-
ment connected to Input jack is
too low
Could you be using a connection cable that contains a resistor?
Use a connection cable that does not contain a resistor.
—
No sound/
No sound when you play back
a song
Could the unit’s volume or the volume of the connected equipment be turned down? —
Could headphones be connected?
Could there be a plug inserted in a headphone jack?
The speakers will not produce sound if headphones or plug are connected to the headphone jacks.
p. 5
Has Local Control been set to “O”?
When Local Control is set to O, no sound is produced by playing back a song. Set Local Control to On.
p. 14
No sound from the leftmost notes
of the keyboard
Could the Visual Control mode be set to MIDI Visual Control or V-LINK?
If the Visual Control mode is set to MIDI Visual Control or V-LINK, the lowest 12 keys of the keyboard (A0–G#1) are used to control
images; they will not produce sound.
p. 13
No sound (when a MIDI device is
connected)
Are all devices powered on? —
Are the MIDI cables connected correctly? p. 14
Do the MIDI channels of this unit and the connected device match? p. 14
Not all the notes you play are
sounded
The maximum simultaneous polyphony is 128 voices. If you’re using the Dual tone (p. 18), if you’re playing along with a song, or if
you’re making extensive use of the damper pedal, the performance data may exceed the available polyphony, possibly causing
some of the notes you play to drop out.
—
Pitch of the keyboard or song is
incorrect
Could you have made Transpose settings? p. 13
Is the Master Tune setting appropriate? p. 13
The notes of a piano are tuned using a unique method (stretched tuning), which makes upper-range notes slightly higher in
pitch, and lower-range notes slightly lower in pitch. For this reason, you might perceive the pitch as being incorrect, but this is the
way an acoustic piano should sound.
—
Sounds are heard twice (doubled)
when the keyboard is played
Could you have selected a dual tone? p. 18
When this unit is connected to an external sequencer, set the Local Control to o. Alternatively, the sequencer could be set so its
Soft Thru feature is O.
p. 14
Reverberation remains even if you
defeat the Reverb eect
The unit’s piano sound faithfully simulates the depth and resonance of an acoustic piano, and this may give the impression of
reverberation even if you’ve defeated the Reverb eect.
—
The sound of the higher notes
suddenly changes from a certain
key
On an acoustic piano, the approximately one and a half octaves of notes at the upper end of the keyboard will continue sounding
regardless of the damper pedal. These notes also have a somewhat dierent tonal character. This unit faithfully simulate this
characteristic of acoustic pianos. On this unit, the range that is unaected by the damper pedal will change according to the
transpose setting.
—
High-pitched ringing is heard
If you hear this in headphones:
Piano sounds that have a brilliant and crisp character contain substantial high-frequency components that may sound as though
a metallic ringing has been added. This is because the characteristics of an actual piano are being faithfully reproduced, and
is not a malfunction. This ringing is more obtrusive if the reverb eect is applied heavily, so you may be able to minimize it by
decreasing the reverb.
—
If you don’t hear this in headphones:
It is likely that there is some other reason (such as resonances within the unit). Please contact your dealer or the nearest Roland
service center.
—
Sound wrong, or are buzzy
If you set the volume to the maximum setting, the sound may be distorted depending on how you perform. If this occurs, turn
down the volume.
—
If you don’t hear this in headphones:
Performing at high volumes may cause the speakers or objects near the unit to resonate. Fluorescent lights or glass doors may
also resonate sympathetically. In particular, this is more likely to occur for lower notes and higher volumes. You can take the
following measures to minimize resonances.
• Locate this unit 10–15 cm (4–6 inch) away from walls or other surfaces.
• Keep the volume down.
• Move away from the objects that are resonating.
—
If you hear this in headphones:
It is likely that there is some other reason. Please contact your dealer or a nearby Roland service center.
—
17
DeutschEnglish Français Italiano Español Português Nederlands
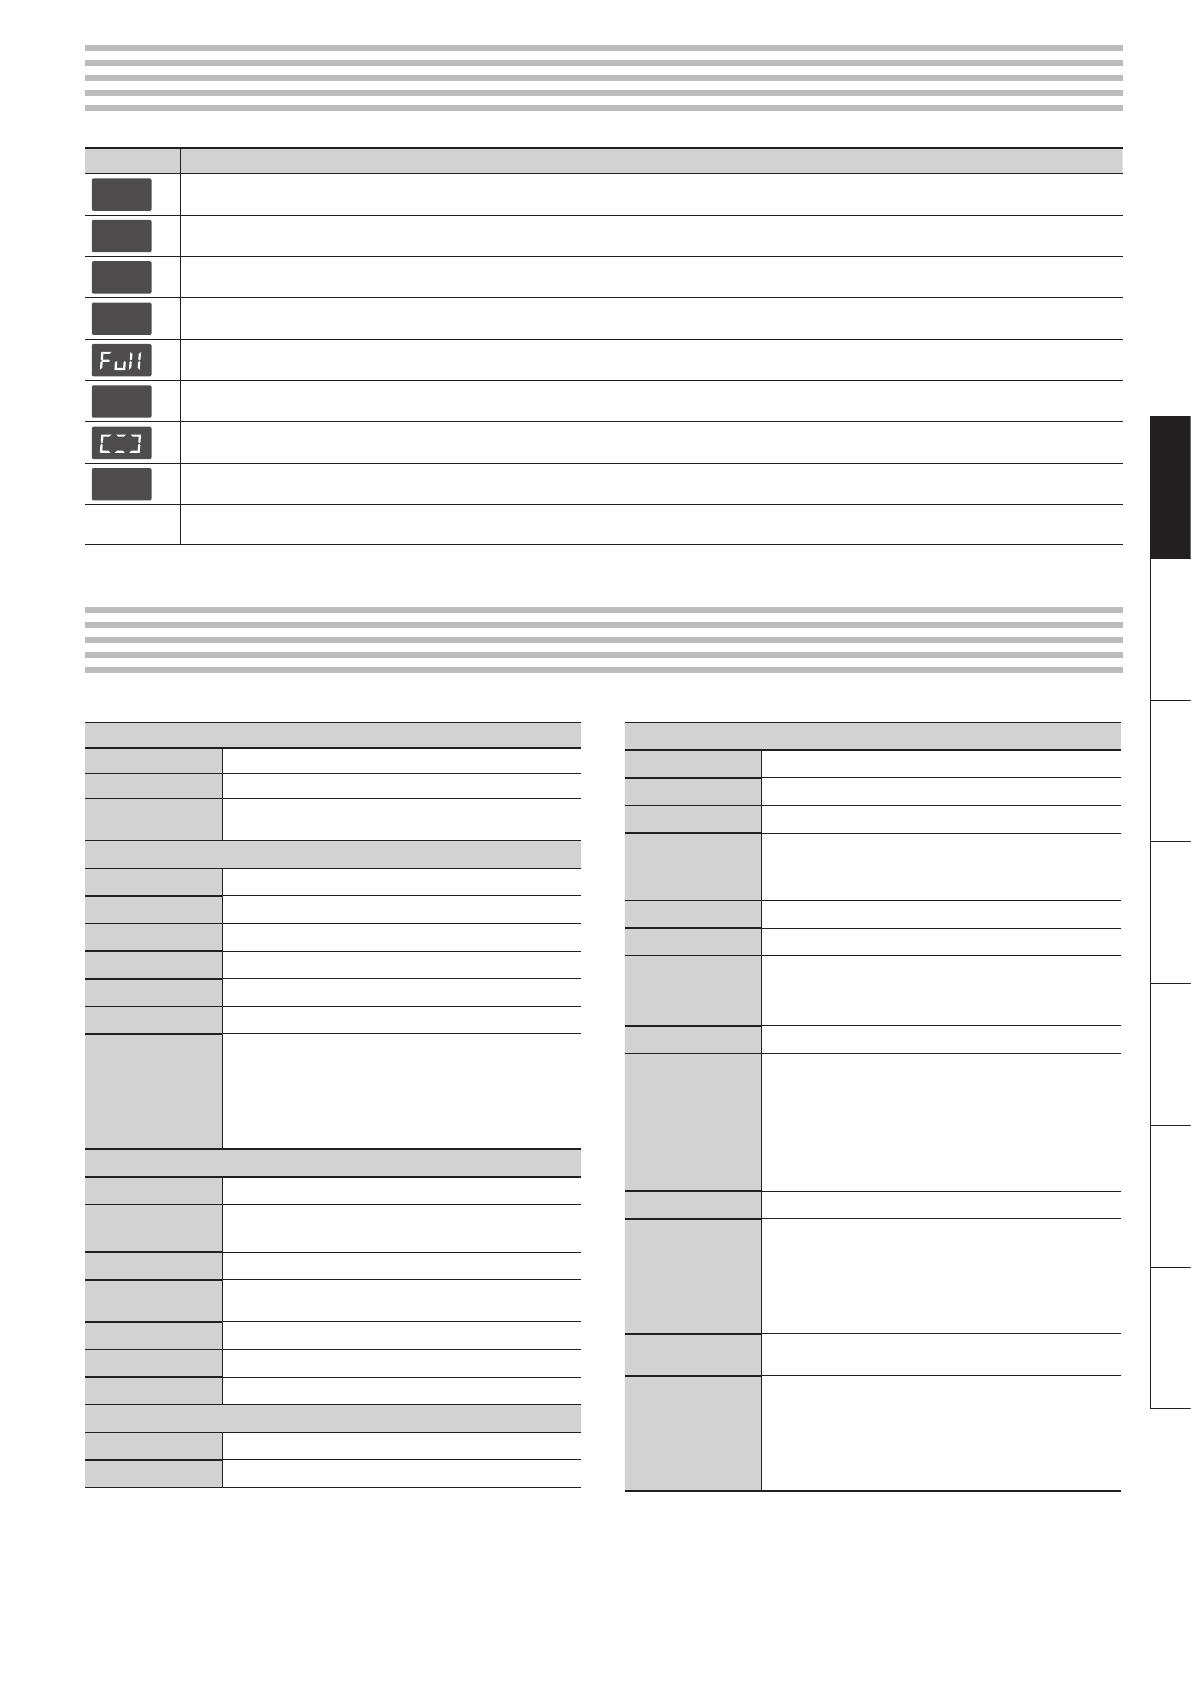
Message List
Indication Meaning
E.40
This unit cannot deal with the excessive MIDI data sent from the external MIDI device.
Reduce the amount of MIDI data sent to the unit.
E.41
A MIDI cable has been disconnected.
Connect it properly and securely.
E.43
A MIDI transmission error has occurred.
Check the MIDI cable and connected MIDI device.
E.51
There may be a problem with the system.
Repeat the procedure from the beginning. If it is not solved after you have tried a number of times, contact the Roland service center.
There is not sucient free memory for recording songs.
Delete unneeded les (p. 11), and try again.
---
The Panel Lock function is on (p. 8).
Visual Control mode is set to MIDI Visual Control or V-LINK.
PU
When playing back a song, this is shown if the song starts on an upbeat.
Blinking
number
When the Auto O function is activated, and there is between 30 minutes and 1 minute remaining before the power will be turned o, the remaining time (in
minutes) will blink in the display.
Main Specications
Keyboard
Keyboard 88 keys (Ivory Feel-G keyboard)
Touch Sensitivity 5 levels, Fixed Touch
Keyboard Modes
Whole
Twin Piano
Sound Generator
Piano Sound SuperNATURAL Piano Sound
Max. Polyphony 128 voices
Tones 30 tones
Stretch Tuning Always On
Master Tuning 415.3 Hz–466.2 Hz (adjustable in increments of 0.1 Hz)
Transpose -6–+5 (in semitones)
Eects
Reverb (O/1–10)
Brilliance (-10–0–10)
String Resonance (Always On, only for piano tones)
Damper Resonance (Always On, only for piano tones)
Key O Resonance (Always On, only for piano tones)
Recorder
Track 1 track
Songs
Recorder Section: 1 song
Internal Memory: Max. 10 songs
Note Storage Approx. 30,000 notes
Controls
Song Select, Play/Stop, Rec, Previous/Rewinding, Next/
Fast-forwarding, Track Mute, Tempo, All Song Play, Count-in
Tempo Quarter note = 10 to 500
Resolution 120 ticks per quarter note
Metronome Beat: 2/2, 0/4, 2/4, 3/4, 4/4, 5/4, 6/4, 7/4, 3/8, 6/8, 9/8, 12/8
Internal Memory
Songs Max. 10 songs
Song Save Format Standard MIDI Files (Format 0)
* In the interest of product improvement, the specications and/or appearance of this unit are subject to change without prior notice.
Other
Internal Songs 189 songs
Rated Power Output 12 W x 2
Speakers 12 cm x 2
Volume Level (SPL)
103 dB
* This value was measured according to the method that is
based on Roland’s technical standard.
Display 7 segments, 3 characters LED
Control Volume
Pedals
Damper (capable of continuous detection)
Soft (capable of continuous detection)
Sostenuto
Other Functions Panel Lock, MIDI Visual Control
Connectors
DC In jack
Pedal connector
Input jack: Stereo miniature phone type
Output jacks (L/Mono, R): 1/4-inch phone type
MIDI connectors (In, Out)
Headphone jacks x 2: Stereo 1/4-inch phone type
Power Consumption 24 W
Dimensions
(including dedicated
stand)
1,378 (W) x 424 (D) x 992 (H) mm /
54-1/4 (W) x 16-3/4 (D) x 39-1/16 (H) inches
(with music rest installed)
1,378 (W) x 424 (D) x 834 (H) mm /
54-1/4 (W) x 16-3/4 (D) x 32-7/8 (H) inches
(with music rest detached)
Weight (including
dedicated stand)
39 kg / 86 lbs
Accessories
Owner’s Manual
AC Adaptor
Power Cord (for connecting AC Adaptor)
Headphone Hook
Music Rest
Roland RP301: Digital Piano
18
Tone List
Piano [Grand] button
No. Name Explanation
GP1
Grand Piano 1 A splendid concert grand piano sound. This is the most highly recommended tone; it can be used for any style of music.
GP2
Grand Piano 2 A more mellow grand piano sound. Appropriate for quiet songs.
GP3
Grand Piano 3 A brilliant grand piano sound. Appropriate when you want the piano to stand out in the band.
GP4
Ragtime A honky-tonk piano. Ideal for ragtime.
Piano [Ensemble] button
No. Name Explanation
En1
Piano + Strings GP1 layered with strings.
En2
Piano + Choir GP1 layered with choir.
En3
Piano + Bell GP1 layered with bell.
En4
Piano / Bs+Cymbal The low range plays a bass and ride cymbal, and the mid and high ranges play the GP1. Ideal for performing a “piano trio” by yourself.
MEMO
• Tone names that include a “+” symbol are “dual tones,” which layer two dierent tones such as piano and strings.
• Tone names that include a “/” are “split tones” in which the left-hand and right-hand sections of the keyboard play dierent tones.
No. Name
o 1
E. Piano 1
o 2
E. Piano 2
o 3
Harpsichord 1
o 4
Harpsichord 2
o 5
Vibraphone
o 6
Celesta
o 7
Synth Bell
o 8
Church Organ 1
o 9
Church Organ 2
o10
Jazz Organ 1
o11
Jazz Organ 2
No. Name
o12
Accordion
o13
Strings 1
o14
Strings 2
o15
Jazz Scat
o16
Choir 1
o17
Choir 2
o18
Choir 3
o19
Synth Pad
o20
Harp
o21
Nylon-str. Gt
o22
Steel-str. Gt

19
DeutschEnglish Français Italiano Español Português Nederlands
Internal Song List
No. Song Name Composer
a.01
Valse, op.34-1 Fryderyk Franciszek Chopin
a.02
Polonaise op.53 Fryderyk Franciszek Chopin
a.03
Nocturne No.20 Fryderyk Franciszek Chopin
a.04
Die Forelle
Franz Peter Schubert,
Arranged by Franz Liszt
a.05
Reets dans l'Eau Claude Achille Debussy
a.06
La Fille aux Cheveux de Lin Claude Achille Debussy
a.07
La Campanella Franz Liszt
a.08
Scherzo No.2 Fryderyk Franciszek Chopin
a.09
Étude, op.10-12 Fryderyk Franciszek Chopin
a.10
Sonate No.15 Wolfgang Amadeus Mozart
a.11
Liebesträume 3 Franz Liszt
a.12
Étude, op.10-3 Fryderyk Franciszek Chopin
a.13
Je te veux Erik Satie
a.14
Valse, op.64-1 Fryderyk Franciszek Chopin
a.15
Golliwog's Cakewalk Claude Achille Debussy
a.16
Fantaisie-Impromptu Fryderyk Franciszek Chopin
a.17
Arabesque 1 Claude Achille Debussy
a.18
An der schönen, blauen Donau Johann Strauss, Sohn
a.19
Auf Flügeln des Gesanges Felix Mendelsshon
a.20
Mazurka No.5 Fryderyk Franciszek Chopin
a.21
Gymnopédie 1 Erik Satie
a.22
Étude, op.25-1 Fryderyk Franciszek Chopin
a.23
Clair de Lune Claude Achille Debussy
a.24
Étude, op.10-5 Fryderyk Franciszek Chopin
a.25
Dr. Gradus ad Parnassum Claude Achille Debussy
a.26
Grande Valse Brillante Fryderyk Franciszek Chopin
a.27
La prière d'une Vierge Tekla Badarzewska
a.28
Course en Troïka Peter Ilyich Tchaikovsky
a.29
To The Spring Edvard Hagerup Grieg
a.30
Valse, op.64-2 Fryderyk Franciszek Chopin
a.31
Radetzky Marsch Johann Baptist Strauss
a.32
Träumerei Robert Alexander Schumann
a.33
Moments Musicaux 3 Franz Peter Schubert
a.34
Prélude, op.28-15 Fryderyk Franciszek Chopin
a.35
Harmonious Blacksmith Georg Friedrich Händel
a.36
Ungarische Tänze 5 Johannes Brahms
a.37
Türkischer Marsch Ludwig van Beethoven
a.38
Nocturne No.2 Fryderyk Franciszek Chopin
a.39
Frühlingslied Felix Mendelsshon
a.40
Präludium Johann Sebastian Bach
a.41
Jägerlied Felix Mendelsshon
a.42
Passepied Claude Achille Debussy
a.43
Für Elise Ludwig van Beethoven
a.44
Türkischer Marsch Wolfgang Amadeus Mozart
a.45
Ständchen Franz Peter Schubert
a.46
Humoreske Antonín Dvořák
a.47
Blumenlied Gustav Lange
a.48
Alpenglöckchen Theodor Oesten
a.49
Menuett G dur Ludwig van Beethoven
a.50
Venezianisches Gondellied Felix Mendelsshon
a.51
Alpenabendröte Theodor Oesten
a.52
Farewell to the Piano Ludwig van Beethoven
a.53
Brautchor Wilhelm Richard Wagner
a.54
Forget-Me-Not Heinrich Lichner
No. Song Name Composer
a.55
Wiener Marsch Carl Czerny
a.56
Le Coucou Louis Claude Daquin
a.57
Menuett G dur Johann Sebastian Bach
a.58
Spinnerlied Albert Ellmenreich
a.59
Gavotte François Joseph Gossec
a.60
Heidenröslein Gustav Lange
a.61
Zigeuner Tanz Heinrich Lichner
a.62
La Cinquantaine Gabriel Marie
a.63
Csikos Post Hermann Necke
a.64
Dolly's Dreaming Awakening Theodor Oesten
a.65
La Violette Louis Streabbog
a.66
Fröhlicher Landmann Robert Alexander Schumann
a.67
Sonatine op.36-1 Muzio Clementi
a.68
Sonatine op.20-1 Friedrich Kuhlau
a.69
Sonatine No.5 Ludwig van Beethoven
b.01 –
b.99
Czerny 100 1–99 Carl Czerny
b._0
Czerny 100 100 Carl Czerny
c.01 –
c.20
Hanon 1–20 Charles Hanon
* All rights reserved. Unauthorized use of this material for
purposes other than private, personal enjoyment is a violation
of applicable laws.
* Musical scores are not included with this unit. You can purchase
musical scores from their respective publishers.
* No data for the music that is played will be output from MIDI
Out connector.
20
USING THE UNIT SAFELY
WARNING
Do not open or perform any internal
modications on the unit.
Do not attempt to repair the unit, or replace
parts within it (except when this manual
provides specic instructions directing you
to do so). Refer all servicing to your retailer,
the nearest Roland Service Center, or an
authorized Roland distributor, as listed on
the “Information” page.
Never install the unit in any of the following
locations.
• Subject to temperature extremes (e.g.,
direct sunlight in an enclosed vehicle, near
a heating duct, on top of heat-generating
equipment); or are
• Damp (e.g., baths, washrooms, on wet
oors); or are
• Exposed to steam or smoke; or are
• Subject to salt exposure; or are
• Humid; or are
• Exposed to rain; or are
• Dusty or sandy; or are
• Subject to high levels of vibration and
shakiness.
Make sure you always have the unit placed
so it is level and sure to remain stable. Never
place it on stands that could wobble, or on
inclined surfaces.
Be sure to use only the AC adaptor supplied
with the unit. Also, make sure the line
voltage at the installation matches the
input voltage specied on the AC adaptor’s
body. Other AC adaptors may use a dierent
polarity, or be designed for a dierent
voltage, so their use could result in damage,
malfunction, or electric shock.
Use only the attached power-supply cord.
Also, the supplied power cord must not be
used with any other device.
Do not excessively twist or bend the power
cord, nor place heavy objects on it. Doing
so can damage the cord, producing severed
elements and short circuits. Damaged cords
are re and shock hazards!
This unit, either alone or in combination with
an amplier and headphones or speakers,
may be capable of producing sound levels
that could cause permanent hearing loss.
Do not operate for a long period of time
at a high volume level, or at a level that
is uncomfortable. If you experience any
hearing loss or ringing in the ears, you
should immediately stop using the unit, and
consult an audiologist.
WARNING
Do not place containers containing liquid
(e.g., ower vases) on this product. Never
allow foreign objects (e.g., ammable
objects, coins, wires) or liquids (e.g., water
or juice) to enter this product. Doing so may
cause short circuits, faulty operation, or
other malfunctions.
Immediately turn the power o, remove the
AC adaptor from the outlet, and request
servicing by your retailer, the nearest Roland
Service Center, or an authorized Roland
distributor, as listed on the “Information”
page when:
• The AC adaptor, the power-supply cord, or
the plug has been damaged; or
• If smoke or unusual odor occurs
• Objects have fallen into, or liquid has been
spilled onto the unit; or
• The unit has been exposed to rain (or
otherwise has become wet); or
• The unit does not appear to operate
normally or exhibits a marked change in
performance.
In households with small children, an adult
should provide supervision until the child is
capable of following all the rules essential for
the safe operation of the unit.
Protect the unit from strong impact.
(Do not drop it!)
Do not force the unit’s power-supply cord
to share an outlet with an unreasonable
number of other devices. Be especially
careful when using extension cords—the
total power used by all devices you have
connected to the extension cord’s outlet
must never exceed the power rating (watts/
amperes) for the extension cord. Excessive
loads can cause the insulation on the cord to
heat up and eventually melt through.
Before using the unit in a foreign country,
consult with your retailer, the nearest Roland
Service Center, or an authorized Roland
distributor, as listed on the “Information”
page.
CAUTION
The unit and the AC adaptor should be
located so their location or position does not
interfere with their proper ventilation.
Always grasp only the plug on the AC adaptor
cord when plugging into, or unplugging
from, an outlet or this unit.
CAUTION
At regular intervals, you should unplug the
AC adaptor and clean it by using a dry cloth
to wipe all dust and other accumulations
away from its prongs. Also, disconnect the
power plug from the power outlet whenever
the unit is to remain unused for an extended
period of time. Any accumulation of dust
between the power plug and the power
outlet can result in poor insulation and lead
to re.
Try to prevent cords and cables from
becoming entangled. Also, all cords and
cables should be placed so they are out of the
reach of children.
Never climb on top of, nor place heavy
objects on the unit.
Never handle the AC adaptor or its plugs
with wet hands when plugging into, or
unplugging from, an outlet or this unit.
If you need to move the instrument, take note
of the precautions listed below. At least two
persons are required to safely lift and move
the unit. It should be handled carefully, all the
while keeping it level. Make sure to have a
rm grip, to protect yourself from injury and
the instrument from damage.
• Check to make sure the screws securing the
unit to the stand have not become loose.
Fasten them again securely whenever you
notice any loosening.
• Disconnect the power cord.
• Disconnect all cords coming from external
devices.
• Close the lid.
• Raise the adjusters on the stand (p. 22)
(RP301 only).
• Remove the music stand (RP301 only).
Before cleaning the unit, turn o the power
and unplug the AC adaptor from the outlet
(p. 22).
Whenever you suspect the possibility of
lightning in your area, disconnect the AC
adaptor from the outlet.
Be careful when opening/closing the lid so
you do not get your ngers pinched (p. 6).
Adult supervision is recommended whenever
small children use the unit.
To prevent accidental ingestion of the parts
listed below, always keep them out of the
reach of small children.
• Included/Removable Parts
Screws (p. 22)
If you remove the screw from the ground
terminal, be sure to replace it; don’t leave
it lying around where it could accidently
be swallowed by small children. When
refastening the screw, make that it is rmly
fastened, so it won’t come loose.
The area shown in the illustration may reach a
high temperature, so take care to avoid burns.
• Explanations noted as (F-120 only) or (RP301 only) are cautions that apply only to the corresponding model; the F-120 or the RP301. They do not apply to other models.
Used for instructions intended to alert the
user to the risk of injury or material
damage should the unit be used
improperly.
* Material damage refers to damage or
other adverse effects caused with
respect to the home and all its
furnishings, as well to domestic animals
or pets.
Used for instructions intended to alert the
user to the risk of death or severe injury
should the unit be used improperly.
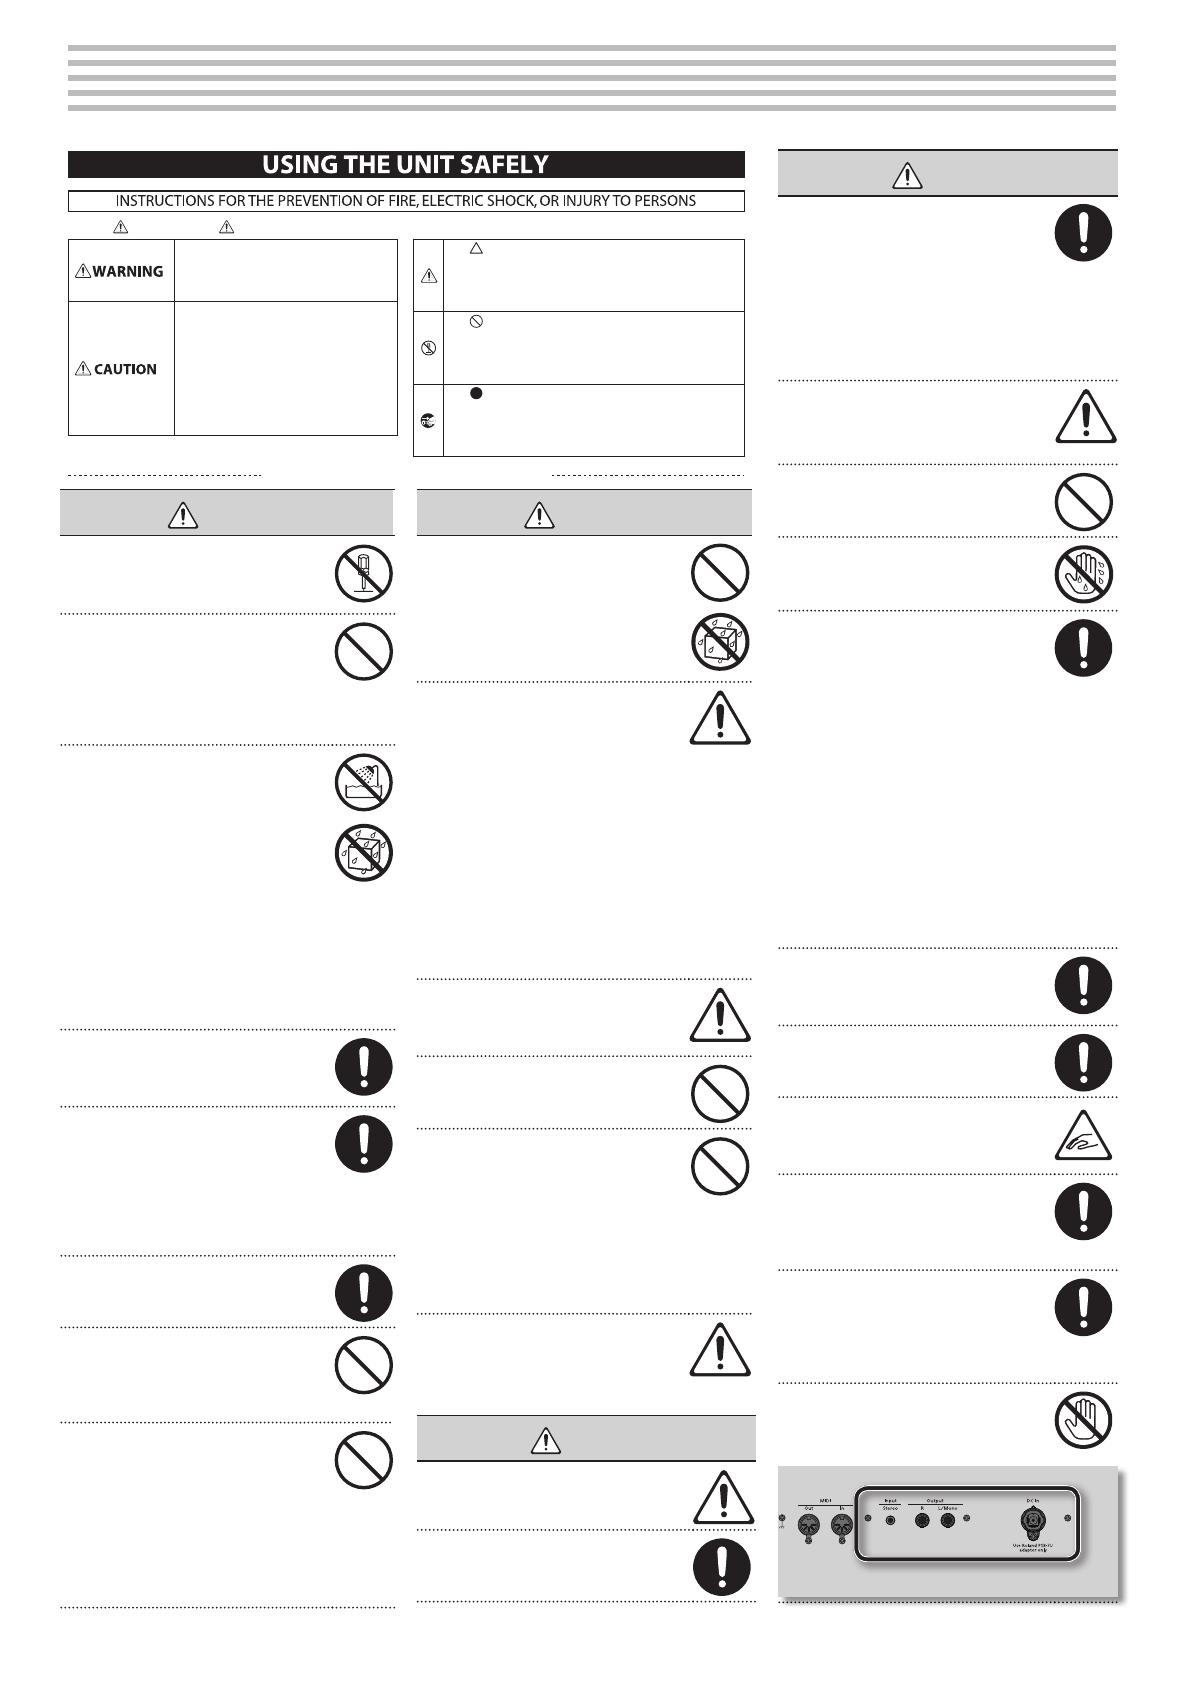
The symbol alerts the user to things that must be
carried out. The specific thing that must be done is
indicated by the design contained within the circle. In the
case of the symbol at left, it means that the power-cord
plug must be unplugged from the outlet.
The symbol alerts the user to important instructions or
warnings.The specific meaning of the symbol is
determined by the design contained within the triangle. In
the case of the symbol at left, it is used for general
cautions, warnings, or alerts to danger.
The symbol alerts the user to items that must never be
carried out (are forbidden). The specific thing that must
not be done is indicated by the design contained within
the circle. In the case of the symbol at left, it means that
the unit must never be disassembled.
About WARNING and CAUTION Notices
About the Symbols
ALWAYS OBSERVE THE FOLLOWING
/