
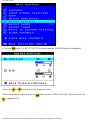
About This Electronic User's Manual
About This Guide • Other Documents You May Need • Notational Descriptions
About This Guide
This electronic user's guide is intended for anyone who uses the Philips Color Monitor. It describes the
monitor's features, setup, operation and all other information, which is the same exact information described
in our printed version.
The sections are as follows:
Safety and Troubleshooting Information provides tips and solutions for common problems, and other
related information you may need.
●
About This Electronic User's Manual gives overview of what information are included as well as
notation icon descriptions and other documentation you can refer to.
●
Product Information gives an overview of the monitor's features and as well as the technical
specifications for this monitor.
●
Installing Your Monitor describes the initial setup process and gives an overview of how to use the
monitor.
●
On Screen Display provides information on adjusting the settings on your monitor.●
Customer Care and Warranty is a list of worldwide Philips consumer information centers along with
the help desk phone numbers and information on the applicable warranty of your product..
●
Glossary provides more information for technical terms.●
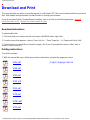
Download allows users to install the entire manual on their hard drive.●
Frequently Asked Questions provides answers to commonly asked questions.●
RETURN TO TOP OF THE PAGE
Other Documents You May Need
In addition to this Electronic User's Guide, you may need to refer to the following documentation:
Philips Color Monitor Quick Start Guide which summarizes the steps for setting up the monitor. This is
included with this product.
●
RETURN TO TOP OF THE PAGE
Notational Descriptions
About This Electronic User's Manual
file:///D|/rita/LF2/LF2/LFa1/multi_manual/english/107X/ABOUT/ABOUT.HTM (1 of 2) [10/3/2001 4:11:24 PM]

The following subsections describe notational conventions used in this document.
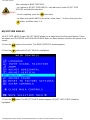
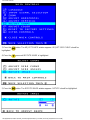
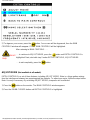
Notes, Cautions, and Warnings
Throughout this guide, blocks of text may be accompanied by an icon and printed in bold type or in italic type.
These blocks are notes, cautions, and warnings, and they are used as follows:
NOTE: This icon indicates important information and tips that help you make better
use of your computer system.
CAUTION: This icon indicates information that tells you how to avoid either potential
damage to hardware or loss of data.
WARNING: This icon indicates the potential for bodily harm and tells you how to
avoid the problem.
SMART HELP: This icon indicates helpful information when adjusting the On Screen
Display of your monitor.
Some warnings may appear in alternate formats and may be unaccompanied by an icon. In such cases, the
specific presentation of the warning is mandated by regulatory authority.
RETURN TO TOP OF THE PAGE
©2001 Koninklijke Philips Electronics N.V.
All rights reserved. Reproduction, copying, usage, modifying, hiring, renting, public performance, transmission and/or broadcasting in whole or in
part is prohibited without written consent of Philips Electronics N.V.
About This Electronic User's Manual
file:///D|/rita/LF2/LF2/LFa1/multi_manual/english/107X/ABOUT/ABOUT.HTM (2 of 2) [10/3/2001 4:11:24 PM]

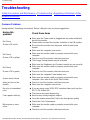
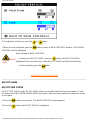
Safety and Troubleshooting Information
Safety Precautions and Maintenance • Troubleshooting • Regulatory Information • Other
Related Information
Safety precautions and maintenance
WARNING: Use of controls, adjustments, or procedures other than those
specified in this documentation may result in exposure to shock, electrical
hazards, and/or mechanical hazards.
Read and follow these instructions when connecting and using your computer monitor:
Disconnect the monitor from the power supply if the monitor is not to be used for an extended period
of time.
●
Do not attempt to remove the back cover, as you will be exposed to a shock hazard. The back cover
should only be removed by qualified service personnel.
●
Do not place objects on top of the monitor cabinet, objects could fall into vents or cover them and
prevent proper cooling of the monitor's electronic devices.
●
To avoid the risk of shock or permanent damage to the set, do not expose the monitor to rain or
excessive moisture.
●
Do not use alcohol or ammonia-based liquid to clean the monitor. If necessary, clean with a slightly
damp cloth. Disconnect the monitor from the power supply before cleaning.
●
When positioning the monitor, make sure the power plug and outlet are easily accessible.●
Consult a service technician if the monitor does not operate normally when operating instructions of this
manual are followed.
RETURN TO TOP OF THE PAGE
Safety & Troubleshooting
file:///D|/rita/LF2/LF2/LFa1/multi_manual/english/107X/safety/safety.htm [10/3/2001 4:11:39 PM]

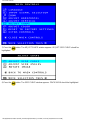
Product Information
Product Features • LightFrame™ for Windows • Technical Specifications • Automatic Power
Saving • Physical Specification • Pin Assignment • Product Views
Product Features
107X23
17-inch (16.0" VIS) design line color monitor with excellent front of screen performance for use with
MACs and PCs
●
Autoscan covers horizontal frequencies up to 71 kHz offering a maximum resolution of 1280 x 1024
with flicker free display of 1024 x 768 at up to 89 Hz.
●
Real Flat High Contrast CRT with high-resolution 0.25 mm dot pitch (0.21 hdp)●
LightFrame™ for brightest and sharpest display of movie and photo windows.●
FCC, CE (in selected countries only) and ISO9241, ISO14001 certified●
RETURN TO TOP OF THE PAGE
LightFrame™ for Windows
Introduction
Philips LightFrame™ feature enriches the experience of pictures and video on a Philips CRT (picture tube)
monitor. LightFrame™ will boost the brightness and sharpness of photos and videos on the monitor screen.
To control the LightFrame™ feature in your monitor, you have to install the LightFrame™ application which
you will find on this CD-ROM.
Note
Philips LightFrame™ will only work with monitors that have been built to use this software. Earlier Philips
monitors or other manufacturers monitors will not work with this special software. It is recommended that
you install this software only on a Philips monitor designed to use it. These monitors can be identified by the
LightFrame™ logo on the front of the monitor.
This software is not designed for use with LCD flat screen monitors.
LightFrame™ will work with true Windows-based programs and DOS-based programs that operate in a
Windows environment. It will not work with DOS-based programs operating only in a DOS environment.
107X Product Information
file:///D|/rita/LF2/LF2/LFa1/multi_manual/english/107X/product/product.htm (1 of 12) [10/3/2001 4:11:40 PM]

Language Selection
While English is the default language of LightFrame™, the User Interface can be set up to operate in Dutch,
French, German, Italian, Portuguese, Spanish, Simplified Chinese, Traditional Chinese or Korean.
Installation
1) To install LightFrame™, place the CD in the CD-ROM drive.
2) Next, when the menu of items on the CD appears on your screen, click on 'Install LightFrame™'.
3) Now, follow the on-screen prompts to properly install the program. The software checks to see if you
have a compatible monitor. You must agree to the license agreement terms for the software to install.
4) After installation, LightFrame™ automatically loads and the icon appears in the taskbar.
Notes
If LightFrame™ detects that your monitor is not LightFrame™ compatible, a message appears on the monitor
screen. If you see this message, you can select to abort or continue the installation. However, if you continue
the installation, LightFrame™ will probably not work on the monitor.
How to use LightFrame™
After installation, LightFrame™ starts up automatically whenever the computer is started.
For information about using LightFrame™ please refer to the help information which is available after
installation.
Compatibility
This version of LightFrame™ is compatible with
Windows 95
Windows 98
Windows Me (Millenium Edition)
Windows XP
Windows 2000 Professional Edition.
LightFrame™ 2 -- Frequently Asked Questions (and answers)
LightFrame™
Q. What is LightFrame™?
A. LightFrame™ is an exclusive Philips hardware/software technology for the brightest, highest
contrast-ever on-demand display of photos and video on a monitor. It enhances the display quality of photos
and videos in a selected window without impacting upon display of text-based applications.
107X Product Information
file:///D|/rita/LF2/LF2/LFa1/multi_manual/english/107X/product/product.htm (2 of 12) [10/3/2001 4:11:40 PM]

Q. What is LightFrame™ 2?
A. LightFrame2 is a second-generation software package that working in conjunction with factory installed
LightFrame™ hardware adds great new features to LightFrame™.
Q: How can I tell if my monitor comes with LightFrame™ 2?
A: All Philips LightFrame™ 2 monitors display this logo on their front bezel:
Q: How does LightFrame™ work?
A: LightFrame™ consists of a software application and an Integrated Circuit (IC) embedded in the monitor.
Together, they boost brightness and sharpness in a user defined window or screen area. Unique
LightFrame™ technology dramatically improves photo and video display quality.
Q: Is the size of the LightFrame™ screen limited?
A: No. You can select a single window or, using the drag mode, select the entire display area.The only
limitation is the visible screen area of your monitor. The minimum size of a LightFrame™ dragged area is 20
by 20 pixels.
Q: Will LightFrame™ shorten the life of a monitor? Is phosphor burn-in a potential problem?
A: No. Extensive testing has confirmed that LightFrame™ does not adversely effect monitor life. Todays
state-of-the-art Philips monitors employ improved phosphors and are designed for high light output.
LightFrame™ normally highlights photos and video. Though the peak brightness of the highlighted area is
strongly increased, the average brightness a determining factor for cathode deterioration is not normally
increased. In any case, a special Automatic Beam Limiter (ABL) circuit keeps a monitors maximum average
brightness within acceptable levels.
Upgrading to LightFrame™ 2
Q: How do I upgrade from LightFrame™ to LightFrame™ 2?
A: Its easy: Download LightFrame™ 2 software for any monitor equipped with LightFrame from the Philips
web site (www.pcstuff.philips.com). Remember the directory into which you saved the upgrade. When you
click on the downloaded program icon, LightFrame™ 2 scans your system, removes old versions and
upgrades automatically to LightFrame™ 2. But remember: Your monitor must have the LightFrame™
feature to upgrade to LightFrame™ 2.
107X Product Information
file:///D|/rita/LF2/LF2/LFa1/multi_manual/english/107X/product/product.htm (3 of 12) [10/3/2001 4:11:40 PM]

Q: Can I install LightFrame™ 2 over an older version? Must previous versions be uninstalled?
A: The LightFrame™ 2 installation program scans your system, removes old versions and upgrades
automatically to LightFrame™ 2. Heres how: If you downloaded the upgrade from the Philips Web site,
remember the directory into which you saved the upgrade. When you click on the Setup icon, LightFrame™
2 scans your system, removes old versions and upgrades automatically to LightFrame™ 2. To upgrade from
a CD-ROM disk, click on the Setup icon located in the \PC\LightFrame™ folder, select Install LightFrame™ 2
and follow on screen prompts.
Q: What will happen when my system is no longer connected to a LightFrame™-enabled monitor
for example, when I take my notebook on the road?
A: Philips exclusive LightFrame™ feature requires the combined operation of hardware that resides in your
monitor and software installed on your system. It only works when a monitor with built-in hardware receives
commands from system software. Without both the LightFrame™ hardware-equipped monitor and system
software, LightFrame™ does not function.
Q: Whats new in LightFrame™ 2?
A: LightFrame™ 2 is full of neat new features: Here are just a few:
- Automatic detection of photos and videos on Web pages.
- Full screen highlighting through a Windows keyboard shortcut.
- Improved compatibility with multimedia applications.
To experience these and other new features, start using LightFrame™ 2 today!
LightFrame™2 applications and operating systems
Q: Can I use LightFrame™2 in DOS mode?
A: Yes, but in DOS, LightFrame™ 2 highlights the entire screen and must be manually switched on from the
OSD menu. Heres how: Open your monitors OSD controls. Go to LIGHTFRAME in the EXTRA
CONTROLS menu. Press the left/right button to switch LightFrame™ on or off.
Q: Can I use LightFrame™ 2 with my favorite game?
A: Absolutely. LightFrame™ can be used with any Windows game. When a DOS game runs in a DOS
window, LightFrame™ must be manually switched on from the OSD menu. Heres how: Open your
monitors OSD controls. Go to LIGHTFRAME in the EXTRA CONTROLS menu. Press the left/right button
to switch LightFrame™ on or off.
Q: Does LightFrame™ 2 work on Mac computers?
A: Yes. Using drives that come with your monitor, LightFrame™ operates under MacOS8 or MacOS9. Due
to hardware limitations, LightFrame™ is activated manually on Mac computers and functions are limited.
Q: Can I use LightFrame™ on a computer running Unix, Linux or other operating system?
A: Presently no application software exists for Unix or Linux. Unix is predominately used for high-end
professional applications. Because their users seldom view photos or video, our high-end large screen
products do not support LightFrame™.
Q: Does LightFrame™ consume excessive system resources?
107X Product Information
file:///D|/rita/LF2/LF2/LFa1/multi_manual/english/107X/product/product.htm (4 of 12) [10/3/2001 4:11:40 PM]

A: Because the monitor handles LightFrame™ processing, the feature consumes no system resources when
a portion of the screen is highlighted. Installed on a PC, the small LightFrame™ application program is active
in the Windows system tray, but remains idle until a window is selected for highlighting. As soon as the
monitor receives the initiate command from this software, the application again becomes idle, consuming few
if any system resources. On rare occasions when a memory-hungry application pushes system resources to
their limit, LightFrame™ can be easily exited to free up additional resources.
Q: Can I highlight two or more areas in the screen at the same time?
A: No. Monitor hardware processes only a single rectangular area.
Q: I get a message warning that my monitor 'may not support LightFrame™. I am certain my
monitor does. What is wrong?
A: Only a Philips driver can determine if your monitor is equipped with LightFrame™; a generic Windows
driver cannot. Install the special Philips driver that came with your monitor. If the warning continues to appear
after your Philips driver is installed, ignore the message. LightFrame™ will function properly. You can avoid
seeing the message by checking Dont show this message again.
Q: Is LightFrame™ software or hardware-based?
A: LightFrame™ consists of two important components: a chip in the monitor and software to control this
chip. Therefore, LightFrame™ is a seamless interactive combination of both software and hardware.
LightFrame™ 2 and the Internet
Q: Can I use LightFrame™ to browse the Internet?
A: Yes. Integration with Internet Explorer is one of LightFrame™s neatest new features. Now when you
open a Web page, LightFrame™ 2 scans LightFrame™ scans the document for a photo or video and
highlights suitable material. Note: When more than one photo is displayed on a Web page, LightFrame™
highlights the largest. If multiple photos are the same size, LightFrame™ highlights top leftmost one. You
can select a different photo manually. Heres how: Click the LightFrame™ On/Off button. Then hold down
the left mouse button and drag a frame around the photo. When you release the mouse button, the selected
area is highlighted by LightFrame™.
Q: Can I use LightFrame™ with Netscape?
A: You can use LightFrame™ with Netscape, but its functions are limited to manually highlighting the entire
Netscape client window. Since LightFrame™ is specifically designed for bright, high contrast photo and video
display, highlighting an entire Web page -- including text -- is not recommended.
For best results, we recommend you use LightFrame™ with Microsoft Internet Explorer version 5.0 or higher.
You can downloaded Internet Explorer free of charge from the Microsoft website (www.microsoft.com). A
copy of Internet Explorer 5.5 is also included on the CD-ROM shipped with your monitor.
Q: Will the highlighted area remain highlighted when I open a cached Web page stored locally on my
computer?
A: Yes. When a Web page is loaded in Internet Explorer, LightFrame™ scans the document for a photo or
video and highlights suitable material. If LightFrame™ finds a photo or video in an online Web page, it will
highlight the same object when the page is opened from a local cache.
Q: On some Web pages, LightFrame™ activates automatically; on others, it doesnt. Why?
A: Computers are smart, but youre smarter! When a Web page loads, LightFrame™ automatically seeks
out photos or videos. Although the human eye has no problem picking out photos or videos on a busy
107X Product Information
file:///D|/rita/LF2/LF2/LFa1/multi_manual/english/107X/product/product.htm (5 of 12) [10/3/2001 4:11:40 PM]

Web page, some special backgrounds and borders confuse LightFrame™. Heres why: To comply with
the science of cathode ray tube design, LightFrame™ is trained to locate and highlight rectangular screen
areas. Sometimes a border or background prevents LightFrame™ from determining where a photo, for
example, ends and its border begins. To prevent distorted display when this happens, LightFrame™ will
ignore that photo.
The workaround? Highlight the photo manually. Heres how: Click the LightFrame™ On/Off button. Then
hold down the left mouse button and drag a frame around the photo. When you release the mouse button,
LightFrame™ the selected area is displayed in the LightFrame™ window.
Q: On some Web pages, LightFrame™ highlights an area that doesnt contain a photo. What should I
do?
A: Just as LightFrame™ may occasionally miss a photo, it sometimes is fooled into highlighting a
non-photo screen area. In both cases, its about borders and backgrounds that prevent LightFrame™ for
determining what is and what isnt a photo.
The workaround? Click the LightFrame™ Off button to deactivate LightFrame™ in the highlighted area.
Then highlight a photo youd like to display by again clicking the LightFrame™ On/Off button and holding
down the left mouse button to drag a frame around the photo. When you release your mouse button,
LightFrame™ activates around the selected area.
Using LightFrame™
Q: Can I activate LightFrame™ on my entire screen?
A: Yes. Heres how: To activate LightFrame™ in its full screen mode from your keyboard, simultaneously
press the Windows and letter L keys. (Location of the Windows key varies with keyboards and languages.
On most keyboards, its to the right of the Control key.) To customize the keyboard shortcut for activating
LightFrame™ in the full screen mode, go to the LightFrame™ applet in the Windows Control Panel.
An alternative: You can also activate LightFrame™ in its full screen mode from your monitors OSD. Here
s how: Open your monitors OSD controls. Go to LIGHTFRAME in the EXTRA CONTROLS menu. Press
the left/right button to switch LightFrame™ on or off.
Q: Why must I install the application to use LightFrame™?
A: Selectivity is the key to LightFrame™s effectiveness. Increased brightness and sharpness enhances
photos and video display, but deteriorates text and detailed lines. Using LightFrame™ in a full screen mode
all the time would degrade display of regular Windows applications. Using LightFrame™ selectively delivers
outstanding photo and video display as well as top quality display text for Windows applications. The
software provides interface between the chip in the monitor and the user.
Q: Can I use LightFrame™ at various resolutions?
A: Yes. LightFrame™ will operate at any resolution supported by the monitor. When changing monitor
resolution, a highlighted area is dimmed and the icon switches back to idle. After the new resolution becomes
active, LightFrame™ software has to be exited and restarted to load the new resolution .
Q: Can I use LightFrame" with a non-LightFrame™ equipped monitor?
A: No. Philips exclusive LightFrame™ feature requires the combined operation of hardware that resides in
your monitor and software installed on your system. It only works when a monitor with built-in hardware
receives commands from system software. Without the LightFrame™ hardware-equipped monitor,
LightFrame™ does not function.
Q: How can I remove the LightFrame™ software from my system?
107X Product Information
file:///D|/rita/LF2/LF2/LFa1/multi_manual/english/107X/product/product.htm (6 of 12) [10/3/2001 4:11:40 PM]

A: Software can be easily uninstalled with the Windows Add/remove software function in Control Panel or
through the Uninstall feature in the Philips LightFrame program group. From the Control Panel Add/remove
software screen, select Philips LightFrame™. Then select Add/remove. Alternatively, open the Start
menu and select Philips LightFrame from Programs. Select Uninstall and follow the steps of the uninstall
feature.
Q: How can I quickly check to see if my Philips monitor has LightFrame™ or LightFrame™2?
A: Every monitor equipped with LightFrame™ has a logo on the front. The logo looks like this:
If your monitor came with LightFrame™2, than you will find a 2 with the logo. If your monitor doesnt have a
LightFrame™2 logo, you can still use the LightFrame™2 software.
Q: Is LightFrame™ software as well as hardware driven? If it is software driven, what happens when
a monitors is switched? How will the system react when a monitor with LightFrame™ is substituted
for monitor without LightFrame™?
A: The LightFrame™ feature is a combination of both hardware and software and will not function without
both components in place. During installation, the software will check if the monitor is LightFrame™ enabled.
Afterwards the computer cannot detect whether the monitor has been exchanged with one without
LightFrame™. Without a LightFrame™ monitor, LightFrame™ will not function; however, the system will
otherwise operate normally.
Q: Does LightFrame™ effect moving images or just still images?
A: LightFrame™ can be used on both still pictures and movies.
A: The principle behind LightFrame™ makes use of a luminance reserve that is normally present in a CRT
monitor. Because the brightness reserve degrades display of text and other native computer documents,
it is normally not used. As a rule, LCD monitors do not feature brightness reserve. In LCDs, brightness is
normally set at the maximum level.
Q: What models support LightFrame™?
A: Following models support LightFrame™: 105B2x, 107S2x, 107T2x, 107B2x, 107B3x, 107P2x, 107X2x,
109S2x and 109B2x
Q: What computer configuration is required to run the feature?
A: LightFrame™s main component is embedded in the monitor and as such is not dependant on your
system configuration.The LightFrame™ software that controls the hardware in the monitor is available for
Windows 95, Windows 98, Windows Millenium Edition (Windows Me), Windows 2000 Professional, Windows
XP
®
, MacOS8 and MacOS9.
All the applications use little to no system resources and therefore don't put higher demands to your system
configuration than the operating system does.
Q: Does the feature effect my colored printout quality?
A: No. LightFrame™ is a feature that only effects the on-screen display. The enhancement is "enclosed"
within the monitor and has no influence whatsoever on the quality of printouts.
Q: How can I change settings for LightFrame™?
A: Its easy: Open the Windows control panel by clicking Settings | Control Panel from your Start panel. In
Control Panel, double click on the LightFrame™ icon. Youll see a list of the settings that can be
107X Product Information
file:///D|/rita/LF2/LF2/LFa1/multi_manual/english/107X/product/product.htm (7 of 12) [10/3/2001 4:11:40 PM]

customized. To learn more about customization options, check out the LightFrame™ help file by pressing
the help button in the control panel.
Q: In the OSD menu, what does "LightFrame On/Off" mean?
A: You can switch LightFrame™ on or off from the OSD menu of any LightFrame™ 2 monitor. This is a
handy feature when you use DOS applications or other operating systems not supported by the
LightFrame™ software.
Heres how: Open your monitors OSD controls. Go to LIGHTFRAME in the EXTRA CONTROLS menu.
Press the left/right button to switch LightFrame™ on or off.
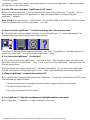
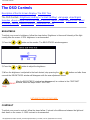
Q: How do I use the LightFrame™ 2 control bar that appears at the top my screen?
A: The control bar is another upgrade that helps you run all LightFrame™ 2s neat, new features. The
illustration below describes the tasks each button performs.
Accustomed to working with the original LightFrame™ tray icon? No problem: Its still there and can be
used to turn LightFrame™ on or off and check LightFrame™ status.
Q: Can I move the LightFrame™ 2 control bar?
A: The screen location of the LightFrame™ control bar is fixed. If the control bar blocks your view of an
application, you can exit LightFrame™. Heres how: Click once on the LightFrame™ logo and select Exit
from the pop-up menu.
When you reboot your system, LightFrame™ will restart automatically. You can also reload LightFrame™
from the Start menu by clicking LightFrame 2 in the Philips LightFrame™menu under Programs.
Q: When is LightFrame™ automatically switched off?
A: To avoid less than optimum display even when LightFrame™ is manually activated from the OSD screen,
it will automatically switch off when:
- A mode change occurs: for example, when the monitor changes resolution or refresh rate.
- The monitor enters sleep mode.
- The monitor is powered off and on again.
Q: Can LightFrame™2 highlight simultaneously highlight multiple screen areas?
A: No. LightFrame™ 2 operates in a single rectangular screen area.
107X Product Information
file:///D|/rita/LF2/LF2/LFa1/multi_manual/english/107X/product/product.htm (8 of 12) [10/3/2001 4:11:40 PM]

RETURN TO TOP OF THE PAGE
Technical Specifications*
CRT
• Size and deflection 17 inch / 41 cm ; 90° deflection angle
• Dot pitch 0.25 mm
• Horizontal pitch 0.21 mm
• Tube type
Shadow mask, Real Flat, high contrast, anti-glare, anti-static, anti
reflection, light transmission 45%
• Phosphor P22
• Recommended display area 12.0" x 9.0" / 306 x 230 mm
• Maximum display area 12.8" x 9.6" / 325 x 244 mm
SCANNING
• Horizontal scanning 30 - 71 KHz
• Vertical scanning 50 - 160 Hz
VIDEO
• Video dot rate 108 MHz
• Input impedance
- Video 75 ohm
- Sync 2.2 kOhm
• Input signal levels 0.7 Vpp
• Sync input signal
Separate sync
Composite sync
• Sync polarities Positive and negative
WHITE COLOR TEMPERATURE
Chromaticity CIE coordinates:
• at 9300 K degrees x = 0.283 / y = 0.297
• at 6500 K degrees x = 0.313 / y = 0.329
* These information are subject to change without notice.
107X Product Information
file:///D|/rita/LF2/LF2/LFa1/multi_manual/english/107X/product/product.htm (9 of 12) [10/3/2001 4:11:40 PM]

RETURN TO TOP OF THE PAGE
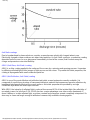
Automatic Power Saving
If you have VESA's DPMS compliance display card or software installed in your PC, the monitor can
automatically reduce its power consumption when not in use. And if an input from a keyboard, mouse or
other input device is detected, the monitor will automatically "wake up". The following table shows the power
consumption and signaling of this automatic power saving features:
Power Management Definition
VESA's
Mode
Video H-sync V-sync Power Used
Power Saving
(%)
LED color
ON Active Yes Yes < 73W 0 % Green
Stand-by Blanked No Yes < 3W 96% Yellow
Suspend Blanked Yes No < 3W 96% Yellow
OFF Blanked No No < 3W
96%
Yellow
This monitor is ENERGY STAR
®
compliant. As an ENERGY STAR
®
Partner, PHILIPS has
determined that this product meets the
ENERGY STAR
®
guidelines for energy efficiency.
RETURN TO TOP OF THE PAGE
Physical Specifications
• Dimensions
16.1" x 17.5" x 17.1" / 410.2 x 443.5 x 435 mm (including base)
• Weight 18.0 kg
• Power supply 90 - 264 VAC, 50/60Hz
• Temperature (operating) 0° to 40°C / 32° to 104°F
• Temperature (storage) -25° to +65°C / -13° to +149°F
• Relative humidity 5% to 95%
* Resolution 1280 x 1024, standard size, contrast max., brightness 50%, 9300°, full white pattern.
107X Product Information
file:///D|/rita/LF2/LF2/LFa1/multi_manual/english/107X/product/product.htm (10 of 12) [10/3/2001 4:11:40 PM]

* These information are subject to change without notice.
RETURN TO TOP OF THE PAGE
Pin Assignment
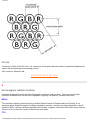
The 15-pin D-sub connector (male) of the signal cable (IBM systems):
Pin
No.
Assignment
Pin
No.
Assignment
1 Red video input 9 No pin
2 Green video input 10 Logic ground
3 Blue video input 11
Identical output - connected
to pin 10
4
Identical output - connected
to pin 10
12 Serial data line (SDA)
5 Ground 13 H. Sync / H+V
6 Red video ground 14 V. Sync (VCLK for DDC)
7 Green video ground 15 Data clock line (SCL)
8 Blue video ground
RETURN TO TOP OF THE PAGE
Views
Follow the links to see various views of the monitor and its components.
Front View
Rear View
107X Product Information
file:///D|/rita/LF2/LF2/LFa1/multi_manual/english/107X/product/product.htm (11 of 12) [10/3/2001 4:11:40 PM]


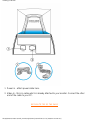
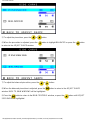
Installing your Monitor
Front View • Rear View
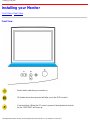
Front View
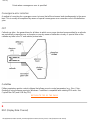
Power button switches your monitor on.
OK button which when pressed will take you to the OSD controls
Contrast hotkey. When the UP arrow is pressed, the adjustment controls
for the CONTRAST will show up.
Installing your Monitor
file:///D|/rita/LF2/LF2/LFa1/multi_manual/english/Install_5/Install.htm (1 of 3) [10/3/2001 4:11:41 PM]

UP and DOWN buttons are used when adjusting the OSD of your monitor
Brightness hotkey. When the RIGHT arrow is pressed, the adjustment
controls for BRIGHTNESS will show up.
LEFT and RIGHT buttons, like the UP and DOWN buttons, are also used
in adjusting the OSD of your monitor.
RETURN TO TOP OF THE PAGE
Rear View
Installing your Monitor
file:///D|/rita/LF2/LF2/LFa1/multi_manual/english/Install_5/Install.htm (2 of 3) [10/3/2001 4:11:41 PM]

Power in - attach power cable here.1.
Video In - this is a cable which is already attached to your monitor. Connect the other
end of the cable to your PC.
2.
RETURN TO TOP OF THE PAGE
Installing your Monitor
file:///D|/rita/LF2/LF2/LFa1/multi_manual/english/Install_5/Install.htm (3 of 3) [10/3/2001 4:11:41 PM]

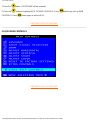
On-Screen Display
Description of the On-Screen Display • The OSD Tree • The OSD Controls
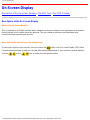
Description of the On Screen Display
What is the On-Screen Display?
This is a feature in all Philips monitors which allows an end-user to adjust screen performance of monitors
directly though an on-screen instruction window. The user interface provides user-friendliness and
ease-of-use when operating the monitor.
Basic and simple instruction on the control keys.
On the front controls of your monitor, once you press the
button, the On Screen Display (OSD) Main
Controls window will pop up and you can now start making adjustments to your monitor's various features.
Use the
or the keys to make your adjustments within.
On-Screen Display
file:///D|/rita/LF2/LF2/LFa1/multi_manual/english/OSD/Osddesc.htm (1 of 4) [10/3/2001 4:11:41 PM]

RETURN TO TOP OF THE PAGE
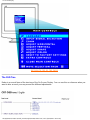
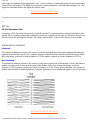
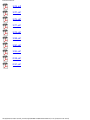
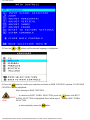
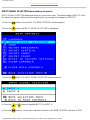
The OSD Tree
Below is an overall view of the structure of the On-Screen Display. You can use this as reference when you
want to later on work your way around the different adjustments.
On-Screen Display
file:///D|/rita/LF2/LF2/LFa1/multi_manual/english/OSD/Osddesc.htm (2 of 4) [10/3/2001 4:11:41 PM]
Page is loading ...
Page is loading ...
Page is loading ...
Page is loading ...
Page is loading ...
Page is loading ...
Page is loading ...
Page is loading ...
Page is loading ...
Page is loading ...
Page is loading ...
Page is loading ...
Page is loading ...
Page is loading ...
Page is loading ...
Page is loading ...
Page is loading ...
Page is loading ...
Page is loading ...
Page is loading ...
Page is loading ...
Page is loading ...
Page is loading ...
Page is loading ...
Page is loading ...
Page is loading ...
Page is loading ...
Page is loading ...
Page is loading ...
Page is loading ...
Page is loading ...
Page is loading ...
Page is loading ...
Page is loading ...
Page is loading ...
Page is loading ...
Page is loading ...
Page is loading ...
Page is loading ...
Page is loading ...
Page is loading ...
Page is loading ...
Page is loading ...
Page is loading ...
Page is loading ...
Page is loading ...
Page is loading ...
Page is loading ...
Page is loading ...
Page is loading ...
Page is loading ...
Page is loading ...
Page is loading ...
Page is loading ...
Page is loading ...
Page is loading ...
Page is loading ...
Page is loading ...
Page is loading ...
Page is loading ...
Page is loading ...
Page is loading ...
Page is loading ...
Page is loading ...
Page is loading ...
Page is loading ...
Page is loading ...
Page is loading ...
Page is loading ...
Page is loading ...
Page is loading ...
Page is loading ...
Page is loading ...
Page is loading ...
Page is loading ...
Page is loading ...
-
 1
1
-
 2
2
-
 3
3
-
 4
4
-
 5
5
-
 6
6
-
 7
7
-
 8
8
-
 9
9
-
 10
10
-
 11
11
-
 12
12
-
 13
13
-
 14
14
-
 15
15
-
 16
16
-
 17
17
-
 18
18
-
 19
19
-
 20
20
-
 21
21
-
 22
22
-
 23
23
-
 24
24
-
 25
25
-
 26
26
-
 27
27
-
 28
28
-
 29
29
-
 30
30
-
 31
31
-
 32
32
-
 33
33
-
 34
34
-
 35
35
-
 36
36
-
 37
37
-
 38
38
-
 39
39
-
 40
40
-
 41
41
-
 42
42
-
 43
43
-
 44
44
-
 45
45
-
 46
46
-
 47
47
-
 48
48
-
 49
49
-
 50
50
-
 51
51
-
 52
52
-
 53
53
-
 54
54
-
 55
55
-
 56
56
-
 57
57
-
 58
58
-
 59
59
-
 60
60
-
 61
61
-
 62
62
-
 63
63
-
 64
64
-
 65
65
-
 66
66
-
 67
67
-
 68
68
-
 69
69
-
 70
70
-
 71
71
-
 72
72
-
 73
73
-
 74
74
-
 75
75
-
 76
76
-
 77
77
-
 78
78
-
 79
79
-
 80
80
-
 81
81
-
 82
82
-
 83
83
-
 84
84
-
 85
85
-
 86
86
-
 87
87
-
 88
88
-
 89
89
-
 90
90
-
 91
91
-
 92
92
-
 93
93
-
 94
94
-
 95
95
-
 96
96


