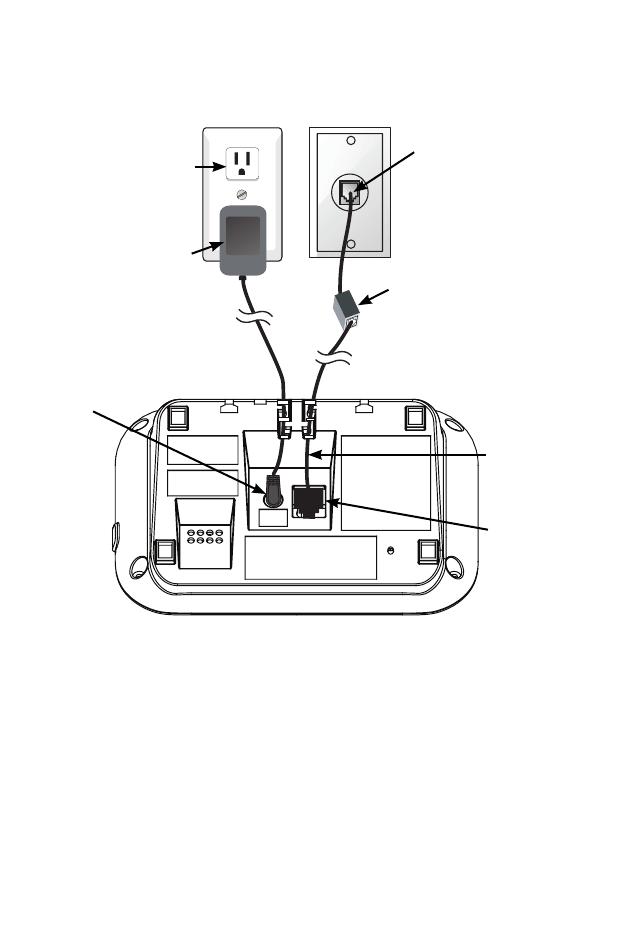
VTech SN6127 User manual

Category
Telephones
Type
User manual

This manual is also suitable for

CareLine
www.vtechphones.com
+
Models:
SN6127/SN6127-2/
SN6187
Abridged user’s manual
This Abridged user’s manual provides you with
basic installation and operation instructions. A limited
set of features are described in abbreviated form.
Please refer to the online Complete user’s manual
for a full set of installation and operation instructions
at www.vtechphones.com.
Before using this VTech product, please read
Important safety instructions on pages 93-95 of
this manual.
The ENERGY STAR
®
program
(www.energystar.gov) recognizes and
encourages the use of products that save
energy and help protect our environment.
We are proud to mark this product with the
ENERGY STAR
®
label indicating it meets
the latest energy efficiency guidelines.
T
Compatible with
Hearing Aid T-Coil
TIA-1083
Telephones identified with this logo have
reduced noise and interference when
used with most T-coil equipped hearing
aids and cochlear implants. The TIA-1083
Compliant Logo is a trademark of the
Telecommunications Industry Association.
Used under license.
Register online to get an additional
3-month warranty!
Visit www.vtechphones.com.
Registration
Register your product online for enhanced
warranty support.
Product news
Learn about the latest VTech products.
Parts checklist
Cordless handset
(1 for SN6127)
(2 for SN6127-2)
Handset charger
and charger adapter
(1 for SN6127-2)
Battery compartment
cover
(1 for SN6127)
(2 for SN6127-2)
Battery
(1 for SN6127)
(2 for SN6127-2)
Telephone base
power adapter
Telephone line cord
Quick start guide
Abridged
user’s manual
Quick start guide
Abridged user’s manual
Your telephone package contains the following
items. Save your sales receipt and original
packaging in case it is necessary to ship your
telephone for warranty service.
SN6127/SN6127-2
Telephone base
Parts checklist
SN6187
Cordless handset
Handset charger
and charger adapter
Pendant charger
and charger adapter
Battery compartment
cover
Pendant
belt clip
Battery
Telephone base
power adapter
Telephone line cord Quick start guide
Abridged
user’s manual
Pendant with
lanyard
Telephone base
Quick start guide
Abridged user’s manual
Table of contents
Getting started ...........1
Telephone base installation
... 1
Handset battery installation
... 2
Handset charger
installation ........................ 3
Pendant charger
installation ........................ 4
Pendant attachment ............ 5
Battery backup..................... 7
Handset battery charging .... 8
Pendant battery charging .... 9
Are you a new cable or
VoIP subscriber? ............ 10
Did you subscribe to
voicemail service from
your telephone service
provider? ........................ 11
Expand your telephone
system ............................ 12
Add and register a
handset ........................... 12
Add and register a
pendant .......................... 14
Deregister devices ............. 15
Telephone base layout ...... 16
Pendant layout................... 18
Handset layout................... 20
Telephone settings
...24
Using the menu ................. 24
Speed dial for pendant ...... 24
Store a speed dial entry..... 25
Edit a speed dial entry ....... 25
Delete a speed dial entry ... 26
Ringer volume ................... 27
Ringer tone ........................ 27
Set date and time .............. 28
Voice Announce
caller ID .......................... 29
LCD language.................... 30
Talking digit ....................... 30
Voicemail number .............. 31
Clear voicemail indicators
... 31
Rename handset ............... 32
Key tone ............................ 32
Use caller ID to automatically
set date and time ............ 33
Home area code ................ 33
Dial mode .......................... 34
Quiet mode ........................ 35
Happy message................. 36
Voice command ................. 36
Table of contents
Telephone operation
...
37
Make, answer and
end a call ........................ 37
Speakerphone ................... 38
Equalizer............................ 38
Audio Assist ..................... 39
Volume control................... 40
Mute................................... 40
Call waiting ........................ 41
Temporary ringer
silencing ......................... 41
Redial ................................ 42
Temporary tone dialing ...... 42
Check voicemail ................ 42
Chain dialing ...................... 43
Transfer a call .................... 44
Find handset/pendant ........ 45
Multiple handset
use ..........................46
Join a call in progress ........ 46
Intercom............................. 47
Phonebook ...............48
Add a phonebook entry ..... 48
Review phonebook entries
... 48
Alphabetical search ........... 49
Edit a phonebook entry...... 49
Delete a phonebook entry
... 49
Caller ID ....................50
Missed call indicator .......... 50
Review the caller ID log ..... 51
View dialing options ........... 51
Save a caller ID log entry
to the phonebook............ 52
Reminder ..................53
About the reminder ............ 53
Add a reminder .................. 53
Review reminders .............. 54
Add and review reminders
remotely .......................... 54
Answering system
settings ..................55
Answering system ............. 55
Announcement .................. 55
Record your own
announcement................ 56
Answer on/off..................... 57
Call screening .................... 58
Number of rings ................. 58
Remote access code ......... 59
Message alert tone ............ 60
Message recording time .... 60
Table of contents
Answering system
operation................61
Answering system and
voicemail ........................ 61
Using the answering
system and voicemail
together .......................... 62
Message capacity .............. 63
Call screening .................... 63
Call intercept...................... 64
Temporarily turn off the
message alert tone ......... 64
Message playback ............. 65
Delete all old messages .... 67
Record, play and delete
memos ............................ 68
Remote access .................. 69
Voice command .......71
About voice command ....... 71
Use voice command .......... 71
Appendix ..................75
Handset battery ................. 75
Pendant battery ................. 77
Troubleshooting ................. 78
Important safety
instructions ..................... 93
Precautions for users
of implanted cardiac
pacemakers .................... 96
Operating range................. 97
ECO mode ......................... 97
Maintenance ...................... 98
About cordless
telephones ...................... 99
The RBRC
®
seal .............. 100
Limited warranty .............. 102
FCC, ACTA and IC
regulations .................... 106
Technical specifications... 111
Index .......................112
Getting started
1
Telephone base installation
Getting started
Telephone
line cord
Plug the DSL filter
into the telephone
wall jack.
Telephone base
power adapter
Electrical outlet
not controlled by
a wall switch
Telephone
wall jack
Telephone
line jack
Power
cord jack
CAUTION:
If you subscribe to telephone service from a cable
company or a VoIP service provider, contact your cable/
VoIP service provider for more information.
Getting started
2
Getting started
Plug the battery
connector securely
into the socket.
1. Place the battery with
the label THIS SIDE
UP facing up and the
wires inside the battery
compartment.
2.
Slide the battery compartment cover towards the
center of the handset until it clicks into place.
3.
Handset battery installation
Getting started
Getting started Getting started
3
Electrical outlet
not controlled
by a wall switch
Handset charger
power adapter
IMPORTANT:
Check for a dial tone by pressing . If you hear a dial
tone, the installation is successful.
If you do not hear a dial tone:
Make sure the installation procedures described
above are properly done.
It may be a wiring problem. If you have changed
your telephone service to digital service from a cable
company or a VoIP service provider, the telephone
line may need to be rewired to allow all existing
telephone jacks to work. Contact your cable/VoIP
service provider for more information.
Handset charger installation
Install the charger
as below.
1. Place the handset in
the handset charger
to charge.
2.
Getting started
4
Getting started
Pendant charger
power adapter
Electrical outlet
not controlled
by a wall switch
Install the pendant
charger as shown
below.
1.
Pendant charger installation
Read this section only if you have a pendant.
Switch on the
pendant.
2.
Place the pendant in the pendant charger
to charge.
3.
Getting started
Getting started Getting started
5
Pendant lanyard:
The pendant lanyard is already attached to the
pendant. You can adjust the length of the lanyard
for comfortable wearing, or remove the necklace
when necessary.
Press down on the
push button slider
to adjust the length
of the lanyard for
comfortable wearing.
Necklace
Pendant attachment
Read this section only if you have a pendant.
Press down
the tabs on
both sides of
the lanyard clip
to remove the
necklace of the
lanyard.
Getting started
6
Getting started
Pendant attachment
Read this section only if you have a pendant.
Pendant belt clip:
Remove the necklace of the pendant lanyard or the
whole pendant lanyard before you use the pendant
belt clip.
Push the pendant into the belt clip until it clicks
in place.
Getting started
Getting started Getting started
7
When there is a power failure, all
handsets display Put HS on base
to power base. Put a charged
handset in the telephone base to
back up the telephone base power
for some basic phone operations
for a short period of time. During
this period, you cannot use the
answering system. If you have a
pendant, you cannot use its voice
command feature.
When a handset is put in the telephone base, it
displays Powering base... Don’t pick up. At this
time, use other handsets for some basic phone
operations. You may use the handset which is put
in the telephone base for making or answering calls
via the handset speakerphone, but do not pick up
the handset while using it.
When the cordless handset you put in the base
does not have enough charge to back up the
telephone base power, the handset displays
Not enough batt to base power.
Put HS on base
to power base
Powering base...
Don’t pick up
Battery backup
Getting started
8
Getting started
Handset battery charging
Once you have installed the battery, the handset
indicates the battery status. If necessary, place the
handset in the telephone base or handset charger to
charge. The battery is fully charged after 11 hours of
continuous charging.
Battery indicators Battery status Action
The screen is blank,
or displays Place
in charger and
flashes.
The battery has
no or very little
charge. The
handset cannot
be used.
Charge without
interruption
(about
30 minutes).
The screen displays
Low battery and
flashes.
The battery has
enough charge
to be used for a
short time.
Charge without
interruption
(about
30 minutes).
The screen
displays
HANDSET X.
The battery is
charged.
To keep the
battery charged,
place it in the
telephone base
or handset
charger when
not in use.
Getting started
Getting started Getting started
9
Pendant battery charging
Read this section only if you have a pendant.
The pendant status light indicates the battery status. If
necessary, place the pendant in the pendant charger
to charge. The battery is fully charged after 3 hours of
continuous charging.
Battery indicators Battery status Action
The pendant status
light flashes red. You
hear Low battery”
when there is only 30
minutes talk time left.
You hear an alert
tone every minute.
The battery
has very little
charge.
Charge without
interruption.
The pendant status
light is solid red.
The battery has
enough charge
to be used for a
short time.
Charge without
interruption.
Getting started
10
Getting started
Are you a new cable or VoIP subscriber?
If your answer is yes, the existing telephone jacks
in your home may no longer work. Your cable/
VoIP service provider uses a different connection,
separate from your old traditional telephone service,
to connect the modem/router/terminal adapter
installed in your home.
To allow all existing telephone jacks to work, contact
your telephone service provider for solutions, such
as rewiring services (fees may apply).
If your answer is no, your existing telephone jacks
will continue to work as normal.
Conventional
telephone line jack
Modem/Router/
Terminal adapter
Main
landline
OLD
Cable or
Internet
NEW
Getting started
Getting started Getting started
11
Did you subscribe to voicemail service
from your telephone service provider?
Your telephone has a built-in answering system
and supports voicemail feature offered by your
telephone service provider (subscription is required,
and fees may apply). Refer to Answering system
and voicemail on page 61 for more information.
To use the built-in answering system:
Refer to this Abridged user’s manual on how
to record your outgoing announcement, retrieve
messages and other related operations. You may
also view the online Complete user’s manual at
www.vtechphones.com for complete instructions.
To use the voicemail:
To retrieve your voicemail messages, you typically
dial an access number provided by your telephone
service provider, and then enter a security code.
Contact your telephone service provider for
instructions on how to configure the voicemail
settings and listen to messages.
Getting started
12
Getting started
The handsets/pendant in the product package are
already registered. The telephone base can support
up to 12 handsets/pendants. Each device must be
registered to the telephone base before use.
You can add new handsets (SN6107, purchased
separately) and new pendants (SN6166/SN6167,
purchased separately) to your telephone base.
Additional handsets are assigned numbers in the
sequential order.
Add and register a handset
When first purchased, each expansion handset
shows To register HS, see manual. The new
handset should be charged without interruption
for at least 30 minutes before registering it to the
telephone base.
Make sure the handset is out of the telephone base
or the handset charger. Make sure the handset
shows To register HS, see manual before you
begin registration.
Expand your telephone system
  • Page 1 1
  • Page 2 2
  • Page 3 3
  • Page 4 4
  • Page 5 5
  • Page 6 6
  • Page 7 7
  • Page 8 8
  • Page 9 9
  • Page 10 10
  • Page 11 11
  • Page 12 12
  • Page 13 13
  • Page 14 14
  • Page 15 15
  • Page 16 16
  • Page 17 17
  • Page 18 18
  • Page 19 19
  • Page 20 20
  • Page 21 21
  • Page 22 22
  • Page 23 23
  • Page 24 24
  • Page 25 25
  • Page 26 26
  • Page 27 27
  • Page 28 28
  • Page 29 29
  • Page 30 30
  • Page 31 31
  • Page 32 32
  • Page 33 33
  • Page 34 34
  • Page 35 35
  • Page 36 36
  • Page 37 37
  • Page 38 38
  • Page 39 39
  • Page 40 40
  • Page 41 41
  • Page 42 42
  • Page 43 43
  • Page 44 44
  • Page 45 45
  • Page 46 46
  • Page 47 47
  • Page 48 48
  • Page 49 49
  • Page 50 50
  • Page 51 51
  • Page 52 52
  • Page 53 53
  • Page 54 54
  • Page 55 55
  • Page 56 56
  • Page 57 57
  • Page 58 58
  • Page 59 59
  • Page 60 60
  • Page 61 61
  • Page 62 62
  • Page 63 63
  • Page 64 64
  • Page 65 65
  • Page 66 66
  • Page 67 67
  • Page 68 68
  • Page 69 69
  • Page 70 70
  • Page 71 71
  • Page 72 72
  • Page 73 73
  • Page 74 74
  • Page 75 75
  • Page 76 76
  • Page 77 77
  • Page 78 78
  • Page 79 79
  • Page 80 80
  • Page 81 81
  • Page 82 82
  • Page 83 83
  • Page 84 84
  • Page 85 85
  • Page 86 86
  • Page 87 87
  • Page 88 88
  • Page 89 89
  • Page 90 90
  • Page 91 91
  • Page 92 92
  • Page 93 93
  • Page 94 94
  • Page 95 95
  • Page 96 96
  • Page 97 97
  • Page 98 98
  • Page 99 99
  • Page 100 100
  • Page 101 101
  • Page 102 102
  • Page 103 103
  • Page 104 104
  • Page 105 105
  • Page 106 106
  • Page 107 107
  • Page 108 108
  • Page 109 109
  • Page 110 110
  • Page 111 111
  • Page 112 112
  • Page 113 113
  • Page 114 114
  • Page 115 115
  • Page 116 116
  • Page 117 117
  • Page 118 118
  • Page 119 119
  • Page 120 120
  • Page 121 121
  • Page 122 122
  • Page 123 123

VTech SN6127 User manual

Category
Telephones
Type
User manual
This manual is also suitable for

Ask a question and I''ll find the answer in the document

Finding information in a document is now easier with AI