Page is loading ...

User’s Guide
H101 / H102 / H103 / H104 / H105
DECT 6.0 Digital Cordless Phone
Warning
Use only the adapter and telephone line cord provided
in the box.

• 30 name and number phonebook.
• A Caller ID that shows who is calling, along with a detailed call list of the last 30 callers.*
• Register up to 5 handsets to a single base.
• Make internal calls, transfer external calls, or hold 3-way conversation between two internal callers and an external caller.
*You must subscribe to your network provider's Caller ID or Call Waiting service for these features to work.
Please note that this equipment is not designed for making emergency telephone calls when the power fails.
Alternative arrangements should be made if emergency telephone call is necessary.
Welcome...
to your new Motorola Phone!
Please retain your original dated sales receipt for your records. For warranty service of your Motorola product, you will need to
provide a copy of your dated sales receipt to confirm warranty status. Registration is not required for warranty coverage.
For product related questions, please call:
US and Canada: 1-888-331-3383
On the Web: www.motorola.com
This ENERGY STAR
®
program (www.energystar.gov) recognizes and encourages the use of products that save
energy and help protect our environment. We are proud to mark this product with the ENERGY STAR
®
label
indicating it meets the latest energy efficiency guidelines.

IMPORTANT
Only use the telephone line cord supplied.
This equipment is not designed to make emergency telephone calls during power failures. Alternative arrangements should be
made for access to emergency services.
Got everything?
• Handset
• Base
• NiMH rechargeable battery pack
• Battery door
• Power adapter
• Telephone line cord
• User’s Guide
• Quick Start Guide
In multihandset packs, you will find one or more additional handsets, chargers with power adapter units, additional
rechargeable battery packs and battery doors.
This User’s Guide provides you with all the information you need to get the
most from your phone.
Before you make your first call you will need to set up your phone.
Follow the simple instructions in 'Getting Started', on the next few pages.

4
1. Getting started ...................................................................5
1.1 Connecting the base ................................................................ 5
1.2 Installing and charging the handset battery pack..................... 6
1.3 Setting the display language.................................................... 7
1.4 Setting date and time ............................................................... 7
2. Getting to know your phone .............................................8
3. Using the phone...............................................................11
3.1 Making a call .......................................................................... 11
3.2 Speed dial calling................................................................... 11
3.3 Answering a call ..................................................................... 11
3.4 Ending a call .......................................................................... 11
3.5 Adjusting volume.................................................................... 11
3.6 Muting a call ........................................................................... 11
3.7 Dialing from the redial list....................................................... 12
3.8 Dialing from the calls list ........................................................ 12
3.9 Adding an entry to the phonebook ......................................... 12
3.10 Storing a phonebook entry as a one touch number ............... 12
3.11 Dialing from the phonebook ................................................... 12
3.12 Caller ID ................................................................................. 13
3.12.1 Calls List .................................................................. 13
3.12.2 Viewing the calls list ................................................ 13
3.12.3 Saving a number from the calls list to the
phonebook............................................................... 13
3.12.4 Deleting a calls list entry.......................................... 14
3.12.5 Deleting entire calls list............................................ 14
3.13 Personal Settings ................................................................... 15
3.14 Intercom ................................................................................. 16
3.14.1 Calling another handset........................................... 16
3.14.2 Transferring an external call to another handset ..... 16
3.14.3 Three-party conference call..................................... 16
3.15 Setting the dial mode ............................................................. 16
3.16 Setting the flash time ............................................................. 17
3.17 Setting the area code ............................................................. 17
3.18 Registration............................................................................ 17
3.19 To reset all settings................................................................ 17
3.20 Paging/Find handset .............................................................. 17
4. Help................................................................................... 18
5. General information ........................................................ 19

Getting started 5
1. Getting started
WARNING
Do not place your phone in the bathroom or other humid areas.
Location
When choosing a location for your new phone, here are some important
guidelines you should consider:
• Avoid sources of noise and heat, such as motors, fluorescent lighting,
microwave ovens, heating appliances and direct sunlight.
• Avoid areas of excessive dust, moisture, and low temperature.
• Avoid other cordless telephones or personal computers.
• Never install telephone wiring during a lightning storm.
• Never install telephone jacks in wet locations unless the jack is
specifically designed for wet locations.
• Never touch non-insulated telephone wires or terminals unless the
telephone line has been disconnected at the network interface.
• Use caution when installing or modifying telephone lines.
HANDSET RANGE
Optimal range is reached when there are no other electrical appliances
working within the range area. Any obstruction between the base and
handset will also reduce the range significantly.
SIGNAL STRENGTH
When out of range of the base, the screen shows
SEARCHING....
If you are
on a call, the line will disconnect. Move back within in range of the base.
The handset will automatically re-connect to the base.
Setting up
IMPORTANT
The base must be plugged into an electrical outlet at all times. Do not
connect the telephone line cord into a power outlet until the handset is fully
charged. Only use the power adapter and telephone line cord supplied with
the product.
WHICH POWER ADAPTER
The power adapter with the smaller pin is for the base unit and the power
adapter with the larger pin is for the charger unit (only for multi-handset packs).
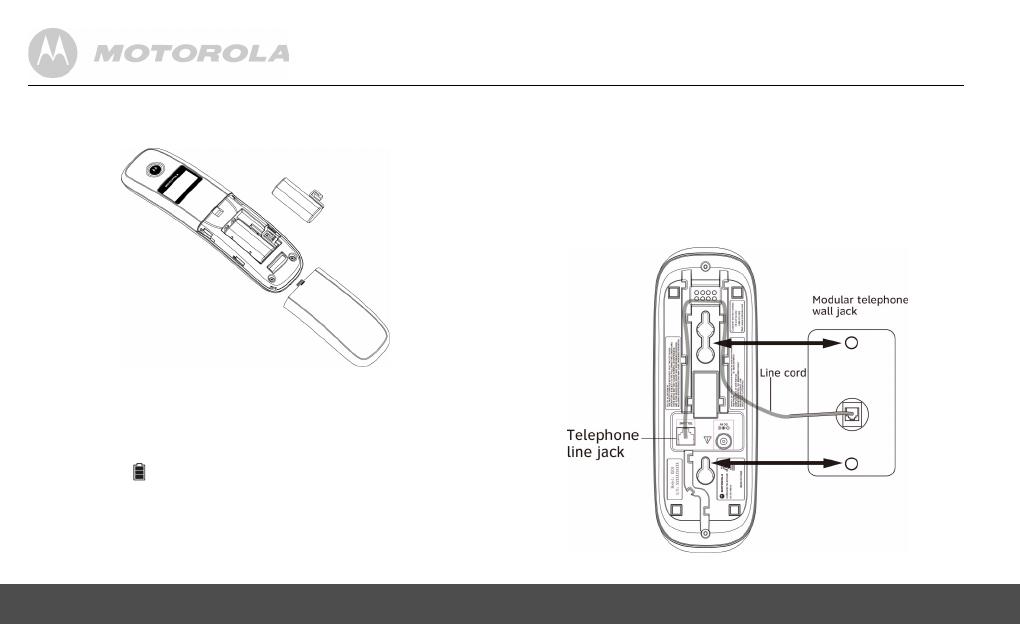
1.1 Connecting the base
1.
Plug the power adapter with the smaller round pin plug and telephone
line cord into the base. The power adapter with the larger round pin is
for the charger (only in multi-handset packs).
2.
Plug the other end of the power adapter and telephone line cord into a
power outlet.
3.
Use only the provided power adapter.
6 Getting started
1.2 Installing and charging the handset battery
pack
1.
Slide off the battery compartment cover to remove it. Place the
supplied rechargeable battery pack in the battery compartment, with
the battery connector plugged in, as shown.
2.
Slide the battery compartment cover back on.
3.
Put the handset on the base to charge for at least 24 hours. Once
charged, the (battery icon) will indicate that the handset is fully
charged.
IMPORTANT
Use only the rechargeable battery pack provided with the product.
Note the alert tone to ensure the handset is charging in the base or the
charger successfully.
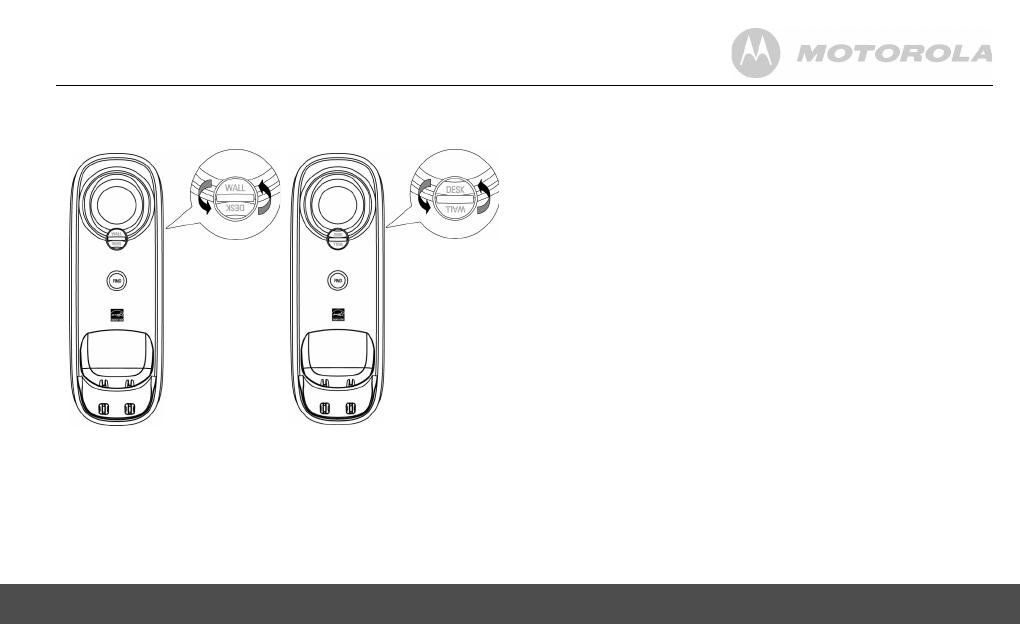
Wall mounting on base
This phone can be mounted on any standard wall plate.
1.
Plug the power adapter with smaller pin plug & telephone line cord
into the base.
2.
Plug the other end of the power adapter & telephone line cord into the
power outlet.
3.
Align the mounting slots on the base with the mounting posts on the
wall. Then push in and down until the phone is firmly seated.
Getting started 7
4.
On the base's front, there is a rotatable knob near the speakerphone.
When you mount it on the wall, rotate the knob to "wall" so that the
handset will sit properly in the base, as shown below.
NOTE
Do not use a power outlet controlled by a wall switch.
Make sure the wall is capable of supporting the weight of the phone, and
use the proper type of anchoring device for the wall material.
1.3 Setting the display language
1.
Press MENU and then VOL+ or REDIAL/VOL- to select
SETUP HS
.
2.
Repeat to select
LANGUAGE
.
3.
Repeat to select language.
4.
Press MENU to save.
1.4 Setting date and time
1.
Press MENU to select
DATE & TIME
. If you're a subscriber to your
network's Caller ID service, date and time is automatically set when a
call is received.
2.
Repeat to edit the year and date.
3.
Press VOL+ or REDIAL/VOL- to move between the input fields
YEAR
and
DATE
.
4.
Press MENU and then edit the time in 12hr format. Press VOL+ or
REDIAL/VOL- to toggle
AM
/
PM
settings.
5.
Press MENU to save the settings.
Your phone is now ready for use.
Wall mounting
status
Desk status

8 Getting to know your phone
2. Getting to know your phone
Overview of your handset front
Get acquainted with the following buttons on your handset front and their
multi-function tasks.
1 Menu / Select
a) In idle mode: Press to access menu list.
b) In menu/editing mode: Press to confirm and save the settings.
c) During a call: Press to transfer a call to a second handset.
d) In calls list entry: Press to save the entry to the phonebook.
e) In phonebook entry: Press to go to phonebook editing mode.
2 Scroll up / Volume up
a) In menu mode: Press to scroll up.
b) In editing mode: Press to move cursor to the left.
c) During a call: Press to increase volume.
d) Calls list/phonebook/redial list entry: Press to scroll up the list.
3 Right / Calls list
a) In idle mode/during a call: Press to access calls list.
b) In editing mode: Press to move the cursor to the right.
4 Scroll down / Volume down / Redial list
a) In idle/pre-dial mode: Press to access redial list.
b) In menu mode: Press to scroll down.
c) In editing mode: Press to move cursor to the right.
d) During a call: Press to decrease volume.
e) Calls list/phonebook/redial list entry: Press to scroll down the list.

Getting to know your phone 9
5 Talk off / Back
a) In menu/editing mode/phonebook entry: Press to exit to previous
level.
b) In pre-dial mode/calls list/redial list entry: Press to exit to idle.
c) During ringing: Press to silent the incoming ringer temporarily.
d) During a call: Press to end a call.
6 Alphanumeric keypad
a) In idle/pre-dial/editing mode/during a call: Press to enter characters/
numbers. Press and hold to activate speed dial.
7 # / Pause / ABC / Format
a) In idle/pre-dial/number editing mode/during a call: Press to insert a
#, press and hold to insert a space.
b) In name editing mode: Toggle ABC/abc.
c) In calls list entry: Press to toggle between 7, 10 and 11 digit formats
when returning calls from Caller ID list.
d) In phonebook list entry: If the number is more than 15 digits, press to
view the next page of remaining digits.
8 Intercom
a) In idle mode/during a call: Press to initiate an intercom call.
9 Microphone
10 Speaker
a) In idle/menu/pre-dial mode/during a call: Press to turn on/off the
speakerphone.
b) Call List/phonebook/redial list entry: Press to make a call with
speakerphone.
c) During ringing: Press to answer a call with the speakerphone.
11 * / Tone
a) In idle/pre-dial/editing mode: Press to insert a *.
b) During a call: Press to switch from pulse to tone dialing temporarily if
pulse mode was selected before. After the call has ended, the dial mode
will change back to pulse.
c) In phonbook list entry: If the number is more than 15 digits, press to
view the previous page of remaining digits.
12 Talk on/ Flash
a) In idle/menu/pre-dial mode: Press to make a call.
b) Call List/phonebook/redial list entry: Press to make a call to the
selected entry.
c) During an incoming call: Press to answer the call.
d) During a home call: Press flash to switch to another call.
13 Left/ Phonebook
a) In idle mode/during a call: Press to access the phonebook.
b) In editing mode: Press to move the cursor to the left.
14 Mute/ Clear/ X
a) In pre-dial/editing mode: Press to delete one character/digit. Long
press to delete all characters/digits.
b) During a call: Press to mute/unmute the call.
c) In calls list/phonebook entry: Press to delete the entry.
10 Getting to know your phone
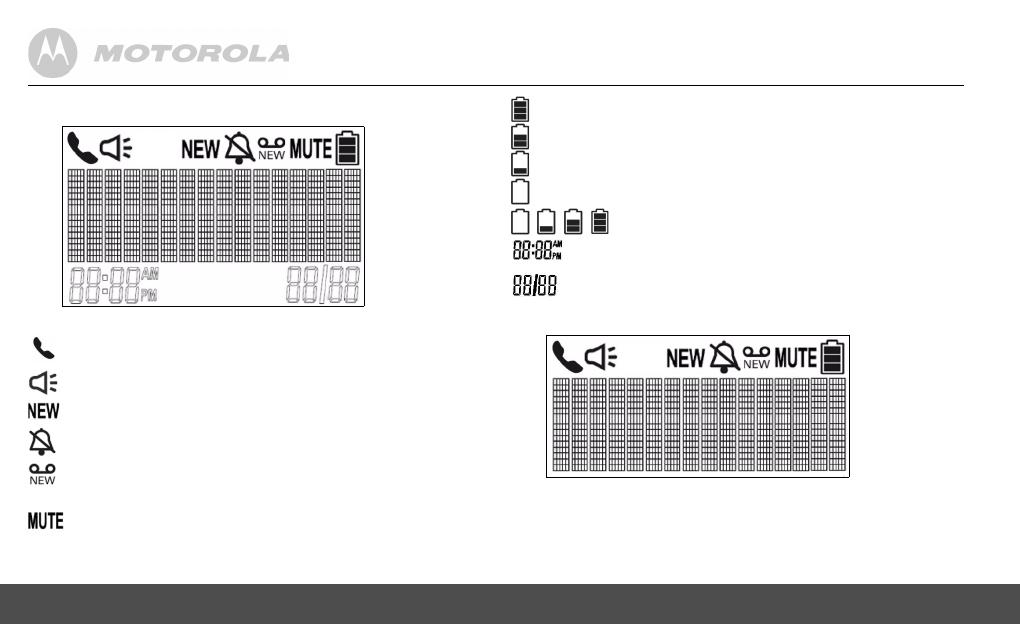
Handset front LCD display
Display Icons
On when the line is in use.
Flashes when there is an incoming call.
On when speakerphone is turned on.
Indicates that a new call has been received.
Off after all new calls have been reviewed.
Indicates that the ringer volume is off.
If a voice mail service is being used, this icon indicates that there is
a new voice mail message. The icon is off after all new voice mails
have been reviewed.
On when a call is muted.
Full battery power level.
2/3 battery power level.
1/3 battery power level.
Flashes when low battery level is detected, needs charging.
Animation in motion. Battery is charging.
In idle mode, the current time is displayed.
In Caller ID mode, the time of call is displayed.
In idle mode the current date is displayed.
In Caller ID mode, the date of the call is displayed.
Handset back LCD display
All display icons behavior and description in the handset back LCD are the
same as front LCD display, except the date/time stamp.
Using the phone 11
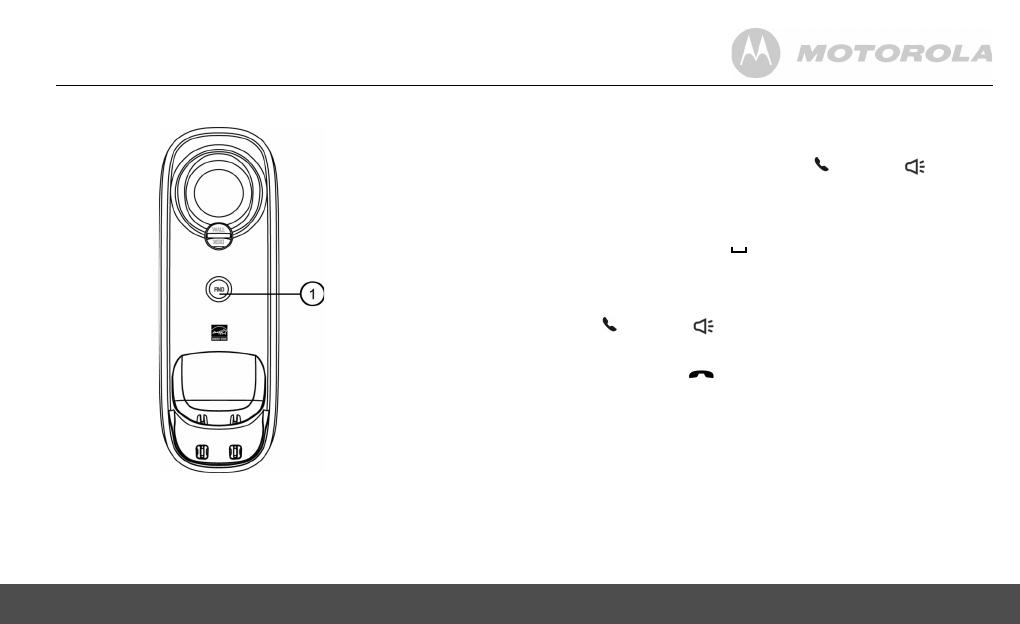
Overview of the base
1FIND
Press to find/page all registered handsets. Press the button again, or any
key on the handset, to turn off page signal.
3. Using the phone
3.1 Making a call
1.
Enter the phone number and then press /FLASH or /
SPEAKER to dial the phone number.
3.2 Speed dial calling
1.
Press and hold a key from /1 to WXYZ/9 until the number is
displayed and dialed.
3.3 Answering a call
1.
Press /FLASH or /SPEAKER to answer the incoming call.
3.4 Ending a call
1.
During a call, press /BACK or put the handset on the base.
3.5 Adjusting volume
1.
During a call, press VOL+ or REDIAL/VOL- to adjust the volume.
3.6 Muting a call
1.
During a call, press MUTE to mute the microphone, so that you can
talk to someone else in the room without your caller hearing you.
2.
Press MUTE again to unmute.
12 Using the phone
3.7 Dialing from the redial list
1.
Press REDIAL/VOL- and then scroll VOL+ or REDIAL/VOL- to the
entry you want to redial.
2.
Press /FLASH or /SPEAKER to dial the number from line.
3.8 Dialing from the calls list
1.
Press CID and then scroll VOL+ or REDIAL/VOL- to the entry you
want to dial.
2.
Toggle #/ /PAUSE/FORMAT key to format the dialing number.
3.
Press /FLASH or /SPEAKER to dial the number.
3.9 Adding an entry to the phonebook
1.
Press and then press MENU to select
ADD
.
2.
Press MENU and then enter the name.
3.
Press MENU and then enter the number.
4.
Press MENU to save.
NOTE
Numbers can be up to 24 digits long and names up to 16 characters long.
Entries are stored in alphabetical order.
3.10 Storing a phonebook entry as a one touch
number
1.
Press .
2.
Press MENU and then VOL+ or REDIAL/VOL- to select
SPEED DIAL
.
3.
Press MENU and then VOL+ or REDIAL/VOL- to select the speed
dial key from /1 to WXYZ/9.
4.
Press MENU and then VOL+ or REDIAL/VOL- to scroll to the entry to
want.
5.
Press MENU to save.
3.11 Dialing from the phonebook
1.
Press and then scroll VOL+ or REDIAL/VOL- to select the entry
you want to dial.
2.
Press /FLASH or /SPEAKER to dial the number from line.
TIPS
Instead of scrolling to browse the phonebook entries, press the numeric
key corresponding to the first letter of the entry you wish to locate. For
example, pressing 2 will show the entries starting with A. Pressing 2 again
will show the entries starting with B, etc.

Using the phone 13
3.12 Caller ID
If you have subscribed to Caller ID, and provided the identity of the caller
is not withheld, the number of the caller will be displayed together with the
date and time of the call (if provided by the network).
NOTE
• If the telephone number is not available for incoming calls, the handset
will display
UNAVAILABLE
.
• If the incoming call is from a withheld telephone number, the handset
will display
PRIVATE
.
• Information about incoming calls will vary by country and network
operator. Some operators may charge a subscription for their Caller ID
service.
3.12.1 Calls List
The calls list contains details of missed and received calls. Details include
the date and time of the call. Entries are displayed in chronological order
with the most recent call at the top of the list.
NOTE
• When the calls list is full, a new call replaces the oldest one in the list.
• The received and missed calls log holds details of up to 30 calls.
• If you receive more than one call from the same number, only the most
recent call is kept in the calls list. When you have missed calls
(incoming calls that you haven't answered) the icon will be
displayed in the display on all handsets registered to the base. If one
handset is used to view the calls log, the icon on the other handsets
remains on (For multi-pack use only).
3.12.2 Viewing the calls list
1.
Press CID to enter the calls list.
2.
Scroll VOL+ or REDIAL/VOL- through the calls list.
NOTE
• When reviewing an entry from the calls list, press #/ /PAUSE/
FORMAT repeatedly to display the number in a different format.
For example, if a caller number is displayed as
888-331-3383, the various formats will be:
331-3383
1-331-3383
888-331-3383
1-888-331-3383
User can choose the desired number format for local and long distance
numbers before dialing or saving it into the phonebook.
• The icon is removed once the new call has been viewed.
3.12.3 Saving a number from the calls list to the phonebook
1.
Press CID to enter the calls list.
2.
Press VOL+ or REDIAL/VOL- to the entry you want.
3.
Press MENU and then enter the name.
4.
Press MENU and then edit the number.
5.
Press MENU to save.

14 Using the phone
3.12.4 Deleting a calls list entry
1.
Press CID to enter the calls list.
2.
Press VOL+ or REDIAL/VOL- to scroll to the entry you want.
3.
Press MUTE to delete the entry.
3.12.5 Deleting entire calls list
1.
Press CID to enter the calls list.
2.
Press and hold MUTE.
DELETE ALL CALL LOG ENTRIES?
is displayed.
3.
Press MENU to confirm. All entries will be deleted.
NOTE
You need to review the call list before you delete any entry or all entries
from the call list.

Using the phone 15
3.13 Personal Settings
Menu map
MAIN MENU DATE & TIME PHONEBOOK SETUP HS SETUP BS RESET SETTINGS
SUB MENU DATE
TIME
VIEW
ADD
EDIT
DELETE
DELETE ALL
PB CAPACITY
SPEED DIAL
RINGER TONE
RINGER VOLUME
KEY TONE
LOW BATT TONE
OUT RANGE TONE
HANDSET NAME
LANGUAGE
LCD CONTRAST
REGISTRATION
DIAL MODE
FLASH TIME
AREA CODE
CLR VOICE MAIL
ALL SETTINGS

16 Using the phone
1.
Press MENU.
2.
Press VOL+ or REDIAL/VOL- to scroll through the menu.
3.
Press MENU to open a sub-menu or validate an option.
Press /BACK to go back to the previous menu level or cancel an action.
If you do not press any button on the handset for 30 seconds, the display
will automatically return to standby. It will also return to standby when the
handset is placed on the base or charger.
3.14 Intercom
This feature is only available when there are at least two registered
handsets. It allows you to make internal calls, transfer external home calls
from one handset to another and use the conference option.
3.14.1 Calling another handset
1.
Press INT and then VOL+ or REDIAL/VOL- to select the handset you
want to call.
2.
Press MENU to call the handset. If there are only two handsets
registered, press INT will call the other handset directly.
3.
Press /BACK to hang up.
NOTE
If the handset is not within the valid operation range, this function may not
be available.
During intercom call, you will hear an alert tone if there is an incoming
external call. You need to press /BACK to hang up the intercom call
before answering the incoming external call.
3.14.2 Transferring an external call to another handset
1.
During an external home call, press MENU or INT.
- Your caller is put on hold.
2.
Press VOL+ or REDIAL/VOL- to select the handset you want to call.
3.
Press MENU to call the handset. If there are only two handsets
registered, press INT will call the other handset directly.
4.
When the other handset answers by pressing /FLASH or /
SPEAKER, press /BACK to transfer the call. If the other handset
does not answer, press MENU or INT to talk to your caller again.
3.14.3 Three-party conference call
1.
During an external home call, press MENU or INT.
- Your caller is put on hold.
2.
Press VOL+ or REDIAL/VOL- to select the handset you want to call.
3.
Press MENU to call the handset. If there are only two handsets
registered, press INT will call the other handset directly.
4.
When the other handset answers the intercom call, press MENU on
the calling handset to set up the conference call.
5.
Press /BACK on any handset to hang up three-party conference
and leave the other handset in external line with the caller.
3.15 Setting the dial mode
The default dialing mode is suitable for your country and network operator.
It is unlikely that you should need to change this setting unless advised to
do so.
1.
Press MENU and then VOL+ or REDIAL/VOL- to select
SETUP BS
.
2.
Press MENU to select
DIAL MODE
.
3.
Press MENU and VOL+ or REDIAL/VOL- to select
TONE
or
PULSE
.
4.
Press MENU to save.

Using the phone 17
NOTE
If pulse mode is selected, press TONE/* to switch from pulse to tone dialing
temporarily when dialing out. After the call is ended, the dial mode will
change back to pulse.
3.16 Setting the flash time
The default flash time is
600MS
. It is unlikely that you should need to change
this setting unless advised to do so.
1.
Press MENU and then VOL+ or REDIAL/VOL- to select
SETUP BS
.
2.
Press MENU and then VOL+ or REDIAL/VOL- to select
FLASH TIME
.
3.
Press MENU and then VOL+ or REDIAL/VOL- to the flash time you
want. (8 options are available:
90
,
100
,
110
,
250
,
300
,
400
,
600
and
700MS
)
4.
Press MENU to save.
3.17 Setting the area code
1.
Press MENU and then VOL+ or REDIAL/VOL- to select
SETUP BS
.
2.
Press MENU and then VOL+ or REDIAL/VOL- to select
AREA CODE
.
3.
Press MENU and enter the area code.
4.
Press MENU to save.
3.18 Registration
Up to 5 handsets can be registered to one base. The original handset is
pre-registered to use. Additional handsets must be registered to the base
before you can use them.
To register an additional handset,
1.
Press MENU and then VOL+ or REDIAL/VOL- to select
SETUP HS
.
2.
Press MENU and then VOL+ or REDIAL/VOL- to select
REGISTRATION
.
3.
Press MENU and then VOL+ or REDIAL/VOL- to select
YES
or
NO
.
4.
Select
YES
and press MENU to enter the registration procedure as
below:
1.
Press and hold FIND for 4 seconds on base, and then release.
2.
Place the unregistered cordless handset on the charger.
3.
A confirmation tone is generated if registration is successful.
HANDSET X
is displayed where
X
denotes the number of handsets and
the phone goes back to idle.
To register an originally unregistered handset, follow steps 1 through 3
above.
3.19 To reset all settings
1.
Press MENU and then VOL+ or REDIAL/VOL- to select
RESET
SETTINGS
.
2.
Press MENU and then VOL+ or REDIAL/VOL- to select
ALL SETTINGS
.
3.
Press MENU to select
YES
. Then all the personalized settings will be
reset to default.
NOTE
All of your phonebook entries, calls list and redial list will remain
unchanged.
3.20 Paging/Find handset
Press FIND on the base. All handsets registered to the base will ring.
To stop the paging, press FIND again, or press any key on the handset, or
place the handset on the base.

18 Help
4. Help
The icon is not scrolling when the handset is placed on the
base
• Incomplete battery contact - adjust the handset on the base unit.
• Dirty contact - clean the battery contact by wiping with an alcohol
moistened cloth.
• Battery is full - charging is not necessary at this time.
No dial tone
• If there is no base power, check the connections. Reset the phone by
unplugging then plugging it back into an electrical outlet.
• If the handset batteries are empty, recharge the battery pack for at
least 24 hours.
• Move the handset closer to the base if it is too far away.
• Be sure to use the provided telephone cords.
Poor audio quality
• If the base is too close to electrical appliances, reinforced concrete
walls, or metal door frames, move the base from these areas.
No ring tone
• The ring tone may be deactivated.
• The volume may need to be increased.
Caller ID does not work
• Check your subscription with your network operator.
• If you subscribe to high-speed internet service (Digital Subscriber
Line - DSL) through your telephone lines, you must install a DSL filter
between the telephone base and the telephone wall jack. The filter
will prevent noise and caller ID problems caused by DSL
interference. Please contact your DSL service provider for more
information about DSL filters.
A phonebook entry cannot be stored
• The phonebook is full. Delete an entry to free some memory.
No display
• Try recharging or replacing the rechargeable battery pack.
• Reset the base. Unplug the unit from the electrical outlet, then plug it
back in.
• If the LED is not lit up, then try to unplug the unit's electrical power, and
then plug it back in.
If the handset disconnects from the base during a phone call
• Check that the power cord is connected properly into the base.
• Check that the power adapter is connected properly into the electrical
outlet.
• Move the handset closer to the base. It may be out of range.
• Reset the base by unplugging the unit's electrical power. Wait for
around 15 seconds and then re-plug the power again. Allow up to one
minute for the handset to synchronize with the registered base again.
Noise interference on your radio or television
• Your base or charger may be too close. Move it as far away from these
objects as possible.

General information 19
5. General information
If your product is not working properly...
1.
Read this User's Guide.
2.
Visit our website: www.motorola.com
3.
Contact Customer Service in the US and Canada at
1-888-331-3383.
To order a replacement battery pack contact customer service or visit our
website.
Important safety instructions
Follow these safety precautions when using your phone to reduce the risk
of fire, electric shock, and injury to persons or property:
1.
Keep all vents and openings of the phone unblocked. Do not set the
phone on a heating register or over a radiator. Ensure that proper
ventilation is provided at the installation site.
2.
Do not use while wet or while standing in water.
3.
Do not use this product near water (for example, near a bath tub,
kitchen sink, or swimming pool).
4.
Do not allow anything to rest on the power cord. Place the power cord
so that it will not be walked on.
5.
Never insert objects of any kind into the product vents as that may
result in fire or electric shock.
6.
Unplug this product from the electrical outlet before cleaning. Do not
use liquid cleaners or aerosol cleaners. Use a damp cloth for cleaning.
7.
Do not disassemble this product. If service or repair work is required,
contact the customer service helpline found in this User's Guide.
8.
Do not overload wall outlets and extension cords.
9.
Avoid using during an electrical storm. Use a surge protector to
protect the equipment.
10.
Do not use this phone to report a gas leak, especially if you are in the
vicinity of the gas line.
CAUTION
To reduce the risk of fire, use only No. 26 AWG or larger UL Listed or CSA
Certified Telecommunication Line Cord.
Unplug this cordless phone immediately from an
outlet if:
• The power cord or plug is damaged or frayed.
• Liquid has been spilled on the product.
• The product has been exposed to rain or water. Do not retrieve the
handset or base until after you have unplugged the power and phone
from the wall. Then retrieve the unit by the unplugged cords.
• The product has been dropped or the cabinet has been damaged.
• The product exhibits a distinct change in performance.
Installation Guidelines
1.
Read all instructions and save them for future reference.
2.
Follow all warnings and instructions marked on the product.
3.
Do not install this product near a bath tub, sink, or shower.
4.
Operate this phone using only the power source that is indicated on
the marking label. If you are unsure of the power supply to your home,
consult with your dealer or local power company.
5.
Do not place this product on an unstable cart, stand, or table. This
product may fall, causing serious damage to the product.

20 General information
6.
Adjust only those controls that are covered by the operating
instructions. Improper adjustment of other controls may result in
damage and will often require extensive work to restore the product to
normal operation.
7.
Clean this product with a soft, damp cloth. Do not use chemicals or
cleaning agents to clean this phone.
8.
Use only the power supply that came with this unit. Using other power
supplies may damage the unit.
9.
Because this phone operates on electricity, you should have at least
one phone in your home that operates without electricity in case of a
power outage.
10.
To avoid interference to nearby appliances, do not place the base of
the phone on or near a TV, microwave oven, or VCR.
CAUTION
To maintain compliance with the FCC's RF exposure guidelines, place the
base unit at least 20 cm from nearby persons.
Battery Safety Instructions
• Do not burn, disassemble, mutilate, or puncture the battery. The
battery contains toxic materials that could be released, resulting in
injury.
CAUTION
There is a risk of explosion if you replace the battery with an incorrect
battery type. Use only the battery pack that came with your phone or an
authorized replacement recommended by the manufacturer.
• Keep battery packs out of the reach of children.
• Remove battery packs if storing over 30 days.
• Do not dispose of battery packs in fire, which could result in explosion.
• The rechargeable battery packs that power this product must be
disposed of properly and may need to be recycled. Refer to the battery
label for battery type. Contact your local recycling center for proper
disposal methods.
SAVE THESE INSTRUCTIONS
Consumer Products and Accessories purchased in
the United States or Canada
What Does this Warranty Cover?
Subject to the exclusions and limitations contained below, Binatone
Electronics International LTD. warrants the Motorola branded consumer
products that it manufactures ("Products") and the Motorola branded or
certified accessories sold for use with these Products that it manufactures
("Accessories") to be free from defects in materials and workmanship
under normal consumer usage for the period(s) outlined below. This
limited warranty is a consumer's exclusive remedy, and only applies as
follows to new Motorola branded Products and Accessories manufactured
by Binatone Electronics International LTD., and purchased by consumers
in the United States or Canada, which are accompanied by this written
warranty:
Who is covered?
This warranty covers only the first consumer purchaser, and is not
transferable.
/