Page is loading ...

Pedelec Operating Instructions
Pedelec handleiding
Pédélec manuel

2
Introduction ( GB )
Dear Customer,
congratulations on the purchase of your new KETTLER Pedelec Cycle. These instructions will help you to operate and maintain your Pedelec.
Please read them carefully before using your cycle and familiarise yourself well with the functioning of the system.
Please also read the notes in the enclosed KETTLER general instructions for assembly and operation.
Introduction
Pedelec (Pedal Electric Cycle)
The motor responds to the force which you exert on the pedals. The motor power is adjusted automatically to your muscle strength by means of
a torque sensor. The pedalling assistance is reduced gradually as your speed increases and switched off as soon as it reaches 25 km/h or when
you stop pedalling altogether.
Legal provisions
Your Pedelec has a maximum rated continuous power of 250 W and therefore qualifies as a bicycle according to European Standard.
In Germany and most other EU countries, Pedelecs are approved for use without minimum age requirement, safety helmet or insurance
registration.
Your cycle is identified as a Pedelec by a marking on the saddle column and fulfils all the requirements of the EU Guideline 89/336/EEC
governing electromagnetic compatibility.
These Operating Instructions are not intended as a comprehensive repair or maintenance manual.
For all questions concerning service, repair and maintenance please contact your KETTLER dealer.

3
Contents
Introduction 2
Table of contents 3
General diagram 4
Charging the battery 5 - 6
Operation and control 7
Assistance mode / range 8
Technical data 9 - 12
Care and maintenance 13
Troubleshooting 14
Guarantee / general notes 15

4
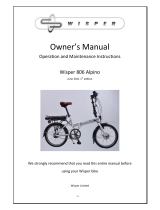
Pedelec General Diagram
Pedelec General Diagram
1. Operating unit
2. Motor unit with power sensor on bottom bracket
3. Battery
4. Battery lock
5. Charging unit
a
b
e
c
d

5
Charging the Battery
Before using it for the first time, the battery must be charged for at least four hours. When deli-
vered, the battery is in the uncharged state and is in sleeping mode.
The battery can be charged in any state i.e. at any charge level.
Removing the battery
To charge the battery, it first has to be removed from the cycle.
1. To release the lock, turn the key to the left in anticlockwise direction.
2. Hold the charger by the handle and tilt it 45° to the side.
3. Lift the battery out of its rack.
IMPORTANT: For safety reasons, always remove the key.
Charging process
1. Place the battery in the holder in the charging unit.
2. Connect the charging unit to the power supply by inserting the plug into a 220 V socket.
3. The battery is fully charged when all 5 LEDs light up. The current status of the charging
process is always displayed during charging.
4. Remove the plug from the power socket and then take the battery out of the charging unit.
Charging the Battery

6
Note:
1. The length of the charging process depends on the capacity and the level of the charge.
2. Charge the battery at room temperature only. As soon as the ambient temperature of the
battery is less than 0° or more than 40° the battery cannot be charged and the charging
unit remains in standby mode.
3. Please observe the safety notes on the charging unit and battery on page 11.
Mounting the battery on the Pedelec
1. Insert the battery into the rack at an angle of 45°.
2. Tilt the battery back until it clicks into the lock.
Before cycling
Always check the level of the battery charge before departing on a cycling run.
To check the battery charge, press the red button PUSH and the remaining charge in the
battery will be displayed.
Each LED corresponds to a level of approx. 20%.
Charging the Battery

7
Operation and Control
Operating Unit
The operating unit is for switching the system on and off, selecting the desired assistance level
and displaying the amount of charge remaining in the battery.
Switching on
Press the Power button on the operating unit on your handlebars.
All the LEDs light up for 2 seconds.
Important: Do not put any pressure on the pedals during these 2 seconds because the
torque-measurement system is being set automatically.
The LEDs of the battery-level display and the selected assistance mode then light up. The
system is now active.
Note:
Do not activate the system when applying force to the pedals. If the LEDs do not light up after
you have pressed the Power button, ensure that the battery is correctly mounted and charged.
Cycling
When force is applied to the pedals the system becomes active and motor assistance is available. The magnetic torque sensor measures your
force and automatically controls the level of motor assistance according to your prior assistance setting. The amount of pedalling force you
require is reduced by between 60 and 30% depending on the mode selected. If possible start with a low gear to avoid unnecessary stress to the
battery. The power assistance is reduced gradually from a speed of approx. 16 km per hour upwards, and switches off at a speed of over 25 km
per hour.
Stopping
After stopping, press the Power button to switch the system off.
Auto Power Off
The system switches off automatically after a few minutes. To re-activate the system, press the Power button.

8
Assistance Mode, Range
Selecting degree of assistance
With the Mode button on the operating unit you can select one of three different assistance modes at any time.
Press the Mode button until you arrive at the mode you require.
The best amount of assistance and the consequent range of the battery depend on a number of factors which are best determined by trial and
error.
Always cycle in as high a gear as possible because no more assistance is given if the pedalling rhythm is too high.
The assistance system is switched off automatically when you are not pedalling.
Range
The range achieved by a fully charged battery depends on a number of factors, e.g. the Assistance Mode selected, your own physical fitness,
your use of the gears, your body weight, luggage weight, tyre pressure, road surface, topography, air temperature, or whether you are cycling in
the town (i.e. frequently starting and stopping) or the country.
Thus, for the same battery power, you may be able to cycle over 50 km or only 20 km depending on circumstances.
Maximum assistance
Standard
Minimum assistance

9
Motor
Bottom-bracket motor
Brushless DC motor
Power output: 250 W
Weight: approx. 3.5 kg
Control by means of frictionless magnetic torque sensor
Overload
When the motor is overloaded, the LEDs on the operating unit flash in the following pattern
Overheating
When the motor is overheated, the LEDs on the operating unit flash in the following pattern
Life span
The life span of the motor depends on the amount of use of the Pedelec. When used normally, this should be between 10 and 20 years.
Technical Data
One mode diode
Reduce the maximum
motor load
Reduce the level of
assistance
Reduce the motor
temperature by cooling
Reduce the level of
assistance
Flashing LEDs Flash interval: one space equals 0.5 sec
One mode diode
Flashing LEDs Flash interval: one space equals 0.25 sec

10
Technical Data
Battery
Battery power: 260 Wh, 26 V 10 Ah, removable and rechargeable
Type: Panasonic lithium, ions, manganese
Model: Li-ion battery Ni-Li NKY224B01 10 Ah
Charging time: approx. 3 h., initial charge 4 h.
Weight: 2.4 kg
Accumulator status
At the side of the battery there is a display which indicates the charge status and the capacity
of the battery. To read these values, press the button "Push".
When the battery is fully charged, all 5 LEDs light up. The LEDs go out one after the other as the
capacity diminishes, until only one remains lit up. When the last LED begins to flash at 2-second
intervals, only 10% of the charge remains. When the last LED flickers at a rate of twice per second, it is fully discharged and the motor switches
off. However, you can continue to cycle without assistance from the motor.
The battery is fixed to the frame by a lock to prevent theft. However, the lock is not designed to withstand extreme force.
The battery can be charged at any charge level. Li-ion batteries have no memory effect. To achieve the maximum range from your Pedelec, you
should fully re-charge the battery.
The time required for a charge depends on the charge level at the start of the re-charging process. The charging process can be interrupted at
any time.
Because of its physical characteristics, the battery functions less effectively at temperatures under -5° C. Under such conditions it cannot be
completely discharged.

11
Technical Data
Battery Sleeping Mode
In its original state and at the first start-up the battery is in sleeping mode. For this reason the battery has to be fully charged before it is used
for the first time.
If the charge level drops below 50% and it is not charged for more than two weeks, it goes into sleeping mode automatically.
The sleeping mode prevents total discharge.
To cancel the sleeping mode, charge the battery on the charging unit for more than 5 sec.
Life Span
The battery can be 100 per cent charged and discharged approximately 500 times. After this, the capacity declines and it is only possible to
achieve a 60% charge, thereby reducing the range of the Pedelec. The battery should then be replaced.
At the end of its life span, the battery should be taken to an official collection point for recycling.
Safety notes
• To charge the battery, use only the charging unit supplied by the manufacturer.
• Use the battery only for your Pedelec.
• If it is used for other types of battery, these may explode.
• Do not expose the battery to temperatures over 60° C, e.g. radiators, heaters, direct sunlight etc. Do not leave it inside an overheated car.
• Do not expose the battery to water.
• Do not try to dismantle or modify the battery.
• Do not subject the battery to pressure from heavy objects.
• Do not continue to use the battery if it heats up during use, charging or storage, or if it smells or changes its appearance or behaves
differently in any way.
• Do not use the battery if the housing is damaged.
• Do not dispose of the battery with standard household waste.
• Do not allow small children to play with the battery.
• If the battery or the system are used by children, they must be taught to handle them correctly.

12
Technical Data
Charging Unit
The charging unit type NKJ38 is supplied with the cycle.
Weight of charging unit: 530 g
Power supply: 220 V (50 Hz) AC
Power: 62 W
A charging unit is supplied with the cycle. To charge it, take the unit out of the box and remove the plastic foil. Failure to remove the foil may
cause damage to the unit through overheating. Store the unit in a dry place.
Safety notes
• Never join the contacts of the charging unit
• Do not attempt to modify or dismantle the charging unit
• Do not use the charging unit in damp surroundings or at temperatures over 60° C or under 0° C.
• Do not continue to use a charging unit which is damaged (plug, housing, power cable).
• Keep the unit out of the reach of children. Electric-shock hazard!
• Always keep the plug and the contacts of the charging unit clean, dry and free of dust.
• Connect the charging unit to a power plug of 230 - 220 V only.
• During the charging operation, avoid touching the charging unit as it may heat up to approx. 40 - 60° C.
• Do not cover the charging unit or place objects on it during charging as this may cause it to overheat. Fire hazard!

13
Care and Maintenance
Inspection
Follow the instructions in the enclosed KETTLER Instructions for Assembly and Operation
Tyre Pressure
The tyre pressure has an important influence on the performance of the Pedelec. To ensure that the range of the battery is not affected, ensure
that the tyre pressure is always between 3 and 4 bar. Check the tyre pressure regularly.
Longer periods of disuse
If the cycle is not in use for longer periods, ensure that the battery is charged and stored in dry conditions.
After about 4 months, the battery switches to sleeping mode.
Recommended storage temperature: 20 - 30° C.
Cleaning
Do not use compressed air or high-pressure water jet to clean the Pedelec.
Before cleaning the Pedelec remove the battery.
Use only a soft cloth and water or neutral cleaning agent to clean the plastic parts and the battery. Non-neutral cleaning agents may cause
discolouration, warping, scratches or other unsightly defects.
When your Pedelec is not in use, always store it in a sheltered place to protect it from wind and weather (snow, rain, sunlight etc.).
Follow the instructions in the enclosed KETTLER Instructions for Assembly and Operation

14
Troubleshooting
Do not attempt to repair the electric drive system, control system or battery. For any necessary service or repair work, always contact your
KETTLER dealer who has the necessary information and expertise to carry out repairs.
Reset: Errors in the sensor torque measurement
In case of incorrect measurement by the torque sensor, the LEDs on the operating unit flash according to the following pattern:
Two power diodes
All three mode diodes
Two power diodes
All three mode diodes
Flashing LEDs Flash interval: one space equals 0.5 sec.
Flashing LEDs Flash interval: one space equals 0.5 sec.
Failure of motor
In case of motor failure, the LEDs on the operating unit flash according to the following pattern:
To reset the sensor, remove any pressure from the pedals and switch the Power button off and then on again.
Should the error persist, take your Pedelec to a KETTLER dealer.
To reset the motor, remove any pressure from the pedals and switch the Power button off and then on again.
Should the error persist, take your Pedelec to a KETTLER dealer.

15
Guarantee / General Notes
Battery
Batteries are subject to wear and tear. It is therefore normal for the capacity of the battery to decline with increasing age, use, and frequency of
charging.
For other guarantee provisions, please refer to the KETTLER Instructions for Assembly and Operation.
Ground clearance
Because of the position of the motor unit, the clearance between the lowest point of the frame and the ground in the area of the bottom bracket
is about 5 cm less than for a standard cycle.
Please exercise due care when cycling over uneven ground.
Spare key for battery lock
Your Pedelec is supplied with two keys for the battery lock. In case of emergency, we recommend that you keep one of the keys in a safe place.
Spare keys can be made by a qualified locksmith service.
Transport on cycle rack
If you are transporting your Pedelec by car on a cycle rack, remove the battery first and transport it inside the car. When transporting it on a rack
at the rear of the car, observe the maximum load on the trailer hitch. The Pedelec weighs between 22 and 24 kg.
Batteries in hand luggage
It is prohibited to carry batteries in hand luggage on flights. Please consult your travel agent on the current regulations and possible methods of
transporting the battery.
/