
CLUB SERIES
ELLIPTICAL USER’S GUIDE
FOR MODELS :
CSE3.6
CSE4.6
2
4
6
8
10
12
18
20
14
16
ST OP / PA U SE
HOL D
T
O R E SE
T
ST AR T
QUI
CK S
TAR T
SPEE D/ L EV E
L
CAL/ PU L
SE
DIST AN CE
TIME
DATE
CLO
CK


BEFORE
YOU BEGIN
ASSEMBLYASSEMBLY
3
INTRODUCTION
IMPORTANT
PRECAUTIONS
ELLIPTICAL
OPERATION
CONDITIONING
GUIDELINES
TROUBLESHOOTING
& MAINTENANCE
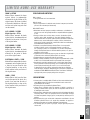
LIMITED
WARRANTY
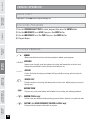
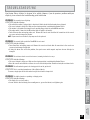
INTRODUCTION
CONGRATULATIONS and THANK YOU for your purchase of this Club Series elliptical!
Whether your goal is to win races or simply enjoy a fuller, healthier lifestyle, a Club Series elliptical can
help you attain it – adding club-quality performance to your at-home workouts, with the ergonomics
and innovative features you need to get stronger and healthier, faster. Because we're committed to
designing fitness equipment from the inside out, we use only the highest quality components. It's a
commitment we back with one of the strongest frame-to-brake warranty packages in the industry.
You want exercise equipment that offers the most comfort, the best reliability and the highest quality
in its class.
The Club Series delivers.
INTRODUCTION
TABLE OF CONTENTS
Important Precautions
Assembly
Before You Begin
Elliptical Operation
Conditioning Guidelines
Troubleshooting & Maintenance
Limited Warranty
CONTACT INFORMATION
4
5
17
18
31
35
39
Back Panel

BEFORE
YOU BEGIN
4
INTRODUCTION ASSEMBLY
BEFORE
YOU BEGIN
ELLIPTICAL
OPERATION
LIMITED
WARRANTY
TROUBLESHOOTING
& MAINTENANCE
CONDITIONING
GUIDELINES
ASSEMBLY
IMPORTANT
PRECAUTIONS
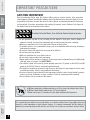
SAVE THESE INSTRUCTIONS
Read all instructions before using this elliptical. When using an electrical product, basic precautions
should always be followed, including the following: Read all instructions before using this elliptical. It is the
responsibility of the owner to ensure that all users of this elliptical are adequately informed of all warnings
and precautions. If you have any questions after reading this manual, contact Customer Tech Support at
the number listed on the back panel of this manual.
IMPORTANT PRECAUTIONS
At NO time should pets or children under the age of 12 be closer to the elliptical than 10 feet.
At NO time should children under the age of 12 use the elliptical.
Children over the age of 12 should not use the elliptical without adult supervision.
It is essential that your elliptical is used only indoors, in a climate controlled room. If your elliptical has been
exposed to colder temperatures or high moisture climates, it is strongly recommended that the elliptical is
warmed up to room temperature before first time use. Failure to do so may cause premature electronic failure.
To reduce the risk of burns, fire, electrical shock or injury to persons:
• If you experience any kind of pain, including, but not limited to chest pains, nausea, dizziness, or
shortness of breath, stop exercising immediately and consult your physician before continuing.
• Maintain a comfortable pace. Do not sprint above 80 rpms on this machine.
• To maintain balance, it is recommended to keep a grip on the handlebars while exercising, mounting or
dismounting the machine.
• Do not wear clothes that might catch on any part of the elliptical.
• Do not turn pedal arms by hand.
• Make sure handlebars are secure before each use.
• Do not insert or drop any object into any opening.
• Unplug elliptical before moving or cleaning it. To clean, wipe surfaces down with soap and slightly damp
cloth only; never use solvents. (See MAINTENANCE)
• This elliptical should not be used by persons weighing more than 275 pounds on the CSE3.6 and 300
pounds on the CSE4.6. Failure to comply will void the warranty.
• This elliptical is intended for in-home use only. Do not use this elliptical in any commercial, rental, school
or institutional setting. Failure to comply will void the warranty.
• Do not use elliptical in any location that is not temperature controlled, such as but not limited to garages,
porches, pool rooms, bathrooms, car ports or outdoors. Failure to comply may void the warranty.
• Use the elliptical only as described in this manual.
WARNING

BEFORE
YOU BEGIN
ASSEMBLY
5
INTRODUCTION
ELLIPTICAL
OPERATION
CONDITIONING
GUIDELINES
TROUBLESHOOTING
& MAINTENANCE
LIMITED
WARRANTY
ASSEMBLY
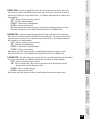
IMPORTANT: READ THESE SAFETY INSTRUCTIONS BEFORE USE!
There are several areas during the assembly process of a elliptical that special attention must be paid. It is
very important to follow the assembly instructions correctly and to make sure all parts are firmly tightened.
If the assembly instructions are not followed correctly, the elliptical could have frame parts that are not
tightened and will seem loose and may cause irritating noises. To prevent damage to the elliptical, the
assembly instructions must be reviewed and corrective actions should be taken.
UNPACKING
Unpack the product where you will be using it. Place the product on a level flat surface. It is recommended
that you place a protective covering on your floor. During each assembly step, ensure that ALL nuts and
bolts are in place and partially threaded in before completely tightening any ONE bolt.
NOTE: A light application of grease may aid in the installation of hardware. Any grease, such as lithium
bike grease is recommended.
Before proceeding, find your elliptical’s serial number
located on the front stabilizer tube and enter it in the
space provided below. Also locate the model name
which is located on the side cover badge.
ENTER YOUR SERIAL NUMBER AND
MODEL NAME IN THE BOxES BELOW:
SERIAL NUMBER :
MODEL NAME:
* Refer to the SERIAL NUMBER and MODEL NAME when calling for service.
* Also enter this serial number on your Warranty Card.
45"35
3&4&5
4&-&$ 5
4501
WARNING
IMPORTANT
PRECAUTIONS

BEFORE
YOU BEGIN
6
INTRODUCTION
IMPORTANT
PRECAUTIONS
ASSEMBLY
BEFORE
YOU BEGIN
ELLIPTICAL
OPERATION
LIMITED
WARRANTY
TROUBLESHOOTING
& MAINTENANCE
CONDITIONING
GUIDELINES
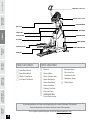
TOOLS INCLUDED PARTS INCLUDED
c 5mm Allen Wrench
c 6mm Allen Wrench
c Phillips Screw Driver
c 13/15mm Flat Wrench
c 1 Console
c 1 Console Mast
c 1 Front Stabilizer Tube
c 2 Upper Handlebars
c 2 Lower Handlebars
c 2 Lower Link Arms
c 2 Pivoting Foot Pads
c 2 Top Side Covers
c 1 HORIZON FITNESS
12-volt Power Supply
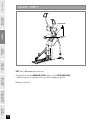
CONSOLE (CSE4.6 shown)
UPPER HANDLEBAR
MAIN FRAME
LOWER HANDLEBAR
LOWER LINK ARM
FRONT STABILIZER TUBE
GRIP PULSE
CONSOLE MAST
ACCESSORY TRAY
PIVOTING FOOT PAD
PEDAL ARM
c 6 Hardware Bags
c 1 Accessory Tray
c 3 Stabilizer Covers
c 2 Handlebar Covers
c 2 Elbow Covers
HAND GRIPS (CSE4.6 only)
If you have questions or if there are any missing parts, contact Customer Tech Support.
Contact information is located on the back panel of this manual.
For a complete exploded diagram, visit us at www.horizonfitness.com
TOP COVERS
2
4
6
8
10
12
18
20
14
16
S T O P / P A U S
E
HO L
D
T O
R
ES
ET
S T A R T
QU
IC
K
STA R
T
SPE ED /L E
VEL
CAL /P UL S
E
DIS TA NC E
TIM E
D
ATE
C
LOC
K

BEFORE
YOU BEGIN
ASSEMBLY
7
INTRODUCTION
IMPORTANT
PRECAUTIONS
ELLIPTICAL
OPERATION
CONDITIONING
GUIDELINES
TROUBLESHOOTING
& MAINTENANCE
LIMITED
WARRANTY
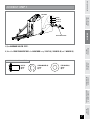
'30/545"#*-*;&356#&
#0-5"
8"4)&3#
8"4)&3$
."*/'3".&
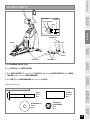
ASSEMBLY STEP 1
A) Open HARDWARE BAG FOR STEP 1.
B) Attach the FRONT STABILIZER TUBE to the MAIN FRAME using 2 BOLTS (A), 2 WASHERS (B) and 2 WASHERS (C).
#0-5"
NN
2UZ
413*/(8"4)&3#
NN
2UZ
'-"58"4)&3$
NN
2UZ
HARDWARE BAG FOR STEP 1 CONTENTS :

BEFORE
YOU BEGIN
8
INTRODUCTION
IMPORTANT
PRECAUTIONS
ASSEMBLY
BEFORE
YOU BEGIN
ELLIPTICAL
OPERATION
LIMITED
WARRANTY
TROUBLESHOOTING
& MAINTENANCE
CONDITIONING
GUIDELINES
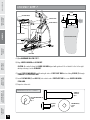
ASSEMBLY STEP 2
MAIN FRAME
CONSOLE WIRES
CONSOLE MAST
BOLT (A)
SPRING WASHER (B)
FLAT WASHER (C)
CONSOLE
MAST
GROMMET
A) Open HARDWARE BAG FOR STEP 2.
B)
Carefully pull the CONSOLE WIRES through the CONSOLE MAST using the twist tie located inside the
CONSOLE MAST.
C) Attach the CONSOLE MAST to the MAIN FRAME using 4 BOLTS (A), 4 SPRING WASHERS (B) and 4 FLAT
WASHERS (C).
BOLT (A)
20 mm
Qty: 4
SPRING WASHER (B)
18 mm
Qty: 4
FLAT WASHER (C)
20 mm
Qty: 4
SCREW (K)
10 mm
Qty: 2
HARDWARE BAG FOR STEP 2 CONTENTS :

BEFORE
YOU BEGIN
ASSEMBLY
9
INTRODUCTION
IMPORTANT
PRECAUTIONS
ELLIPTICAL
OPERATION
CONDITIONING
GUIDELINES
TROUBLESHOOTING
& MAINTENANCE
LIMITED
WARRANTY
MAIN FRAME
CONSOLE
MAST
GROMMET
SCREWS (K)
TOP SIDE COVERS
ACCESSORY TRAY
D) Insert the left TOP SIDE COVER, followed by the right TOP SIDE COVER and snap them together.
E) Insert ACCESSORY TRAY and secure it using 2 SCREWS (K) as shown.
F) Slide CONSOLE MAST GROMMET down to seal the console mast hole.
ASSEMBLY STEP 2 B

BEFORE
YOU BEGIN
10
INTRODUCTION
IMPORTANT
PRECAUTIONS
ASSEMBLY
BEFORE
YOU BEGIN
ELLIPTICAL
OPERATION
LIMITED
WARRANTY
TROUBLESHOOTING
& MAINTENANCE
CONDITIONING
GUIDELINES
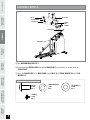
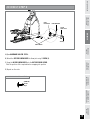
ASSEMBLY STEP 3
A) Open HARDWARE BAG FOR STEP 3.
B) Attach REAR STABILIZER COVER using 2 BOLT (L).
C) Attach FRONT STABILIZER COVERS using 4 SCREWS (M).
BOLT (L)
20 mm
Qty: 2
SCREW (M)
10 mm
Qty: 4
HARDWARE BAG FOR STEP 3 CONTENTS :
REAR STABILIZER COVER
FRONT STABILIZER COVER
BOLTS (L)
SCREWS (M)

BEFORE
YOU BEGIN
ASSEMBLY
11
INTRODUCTION
IMPORTANT
PRECAUTIONS
ELLIPTICAL
OPERATION
CONDITIONING
GUIDELINES
TROUBLESHOOTING
& MAINTENANCE
LIMITED
WARRANTY
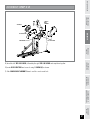
ASSEMBLY STEP 4
CONSOLE MAST
LOWER HANDLEBAR
PRE-ATTACHED
BOLT & WASHER
UPPER HANDLEBAR
PRE-ATTACHED
SET SCREWS
NOTCH
TAB
NOTE: There is NO hardware bag for this step. All hardware is pre-installed.
A) Remove PRE-ATTACHED BOLT & WASHERS from CONSOLE MAST.
B) Slide LOWER HANDLEBARS onto CONSOLE MAST and attach by re-inserting PRE-ATTACHED BOLT & WASHERS.
C) Slide UPPER HANDLEBARS onto LOWER HANDLEBARS and align NOTCH with TAB making sure handlebars are
joined together completely. Secure UPPER HANDLEBARS to LOWER HANDLEBARS using PRE-ATTACHED SET
SCREWS.
After handlebars are assembled they will rotate freely – be cautious. Until the
machine is fully assembled, do not grab the handlebars for support.
WARNING

BEFORE
YOU BEGIN
12
INTRODUCTION
IMPORTANT
PRECAUTIONS
ASSEMBLY
BEFORE
YOU BEGIN
ELLIPTICAL
OPERATION
LIMITED
WARRANTY
TROUBLESHOOTING
& MAINTENANCE
CONDITIONING
GUIDELINES
ASSEMBLY STEP 5
HANDLEBAR
COVERS
UPPER HANDLEBAR
NOTE: There is NO hardware bag for this step.
A) Snap the front and back HANDLEBAR COVERS together onto the UPPER HANDLE BARS.
Note the position of the snap tabs on the covers before snapping into position.
B) Repeat on other side.

BEFORE
YOU BEGIN
ASSEMBLY
13
INTRODUCTION
IMPORTANT
PRECAUTIONS
ELLIPTICAL
OPERATION
CONDITIONING
GUIDELINES
TROUBLESHOOTING
& MAINTENANCE
LIMITED
WARRANTY
ASSEMBLY STEP 6
GUIDE RAIL
TEFLON WASHERS (F)
LOWER HANDLEBAR
NUT (H) BOLT (E)
LOWER LINK ARM
SPACER (G)
LOWER LINK ARM
SPACER
TEFLON WASHERS
LOWER
HANDLEBAR
A) Open HARDWARE BAG FOR STEP 6.
B) Slide SPACER (G) into LOWER LINK ARM.
C) Place TEFLON WASHERS (F) on either side of SPACER (G). While holding TEFLON WASHERS (F) slide LOWER
LINK ARM into bottom end of LOWER HANDLEBAR.
D) Insert BOLT (E) into LOWER HANDLEBAR and secure using NUT (H).
C) Repeat on other side.
NYLON NUT (H)
INSIDE DIAMETER:
8 mm
Qty: 2
BOLT (E)
60 mm
Qty: 2
SPACER (G)
44 mm axis
Qty: 2
TEFLON WASHER (F)
28 mm
Qty: 4
HARDWARE BAG FOR STEP 6 CONTENTS :

BEFORE
YOU BEGIN
14
INTRODUCTION
IMPORTANT
PRECAUTIONS
ASSEMBLY
BEFORE
YOU BEGIN
ELLIPTICAL
OPERATION
LIMITED
WARRANTY
TROUBLESHOOTING
& MAINTENANCE
CONDITIONING
GUIDELINES
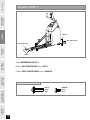
ASSEMBLY STEP 7
LOWER LINK ARM
PEDAL ARMS
SPACER (F)
BOLT (G)
FLAT WASHER (C)
TEFLON WASHER (E)
FOOTPLATE TUBE
TEFLON WASHER (E)
U BRACKET
A ) Open HARDWARE BAG FOR STEP 7.
B) Align LOWER LINK ARM with U BRACKET.
CAUTION:
Be careful to keep the LOWER LINK ARM aligned with guide rail. Do not twist it to the left or right
while positioning it on the U BRACKET.
C) Insert 2 TEFLON WASHERS (E) on left and right sides of FOOT PLATE TUBE before sliding SPACER (F) through
U BRACKET and FOOTPLATE TUBE.
D) Insert FLAT WASHER (C) and BOLT (G) into outside end of FOOTPLATE TUBE to secure LOWER LINK ARM to
PEDAL ARM.
E) Repeat on other side.
BOLT (G)
15 mm
Qty: 2
SPACER (F)
70 mm axis
Qty: 2
FLAT WASHER (C)
35 mm
Qty: 2
SPLIT TEFLON WASHER (E)
28 mm
Qty: 4
HARDWARE BAG FOR STEP 7 CONTENTS :
#0-5(
'-"58"4)&3$
'0051-"5&56#&
41"$&3'
5&'-0/8"4)&3&
6#3"$,&5
5017*&80'-&'5'0051"%
*/4&35
41"$&3
5)*4
%*3&$5*0/

BEFORE
YOU BEGIN
ASSEMBLY
15
INTRODUCTION
IMPORTANT
PRECAUTIONS
ELLIPTICAL
OPERATION
CONDITIONING
GUIDELINES
TROUBLESHOOTING
& MAINTENANCE
LIMITED
WARRANTY
SCREW (A)
10 mm
Qty: 2
HARDWARE BAG FOR STEP 8 CONTENTS :
ASSEMBLY STEP 8
LOWER HANDLEBAR
LOWER LINK ARM
INSIDE
ELBOW COVER
OUTSIDE
ELBOW COVER
SCREW (L)
A) Open HARDWARE BAG FOR STEP 8.
B) Attach the OUTSIDE ELBOW COVER to elbow joint using 1 SCREW (L).
C) Snap the INSIDE ELBOW COVER onto the OUTSIDE ELBOW COVER.
Note the position of the snap tabs before snapping into position.
D) Repeat on other side.

BEFORE
YOU BEGIN
16
INTRODUCTION
IMPORTANT
PRECAUTIONS
ASSEMBLY
BEFORE
YOU BEGIN
ELLIPTICAL
OPERATION
LIMITED
WARRANTY
TROUBLESHOOTING
& MAINTENANCE
CONDITIONING
GUIDELINES
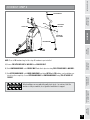
ASSEMBLY STEP 9
CSE3.6
CONSOLE
CSE4.6 CONSOLE
CONSOLE MAST
CONSOLE WIRES
PRE-ATTACHED
SCREWS
2
4
6
8
10
12
18
20
14
16
S T O P / P A U S
E
HO L
D
T O
R
ES E
T
S T A R T
QU
IC
K
STA R
T
SPE ED /L E
VEL
CAL /P UL S
E
DIS TA
NCE
TIM E
D
A
TE
C
LOC
K
NOTE: There is NO hardware bag for this
step. All hardware is pre-installed.
A) Attach the CONSOLE MAST wires to the
CONSOLE wires .
B) Carefully tuck the CONSOLE MAST wires
into the CONSOLE MAST before attaching
the CONSOLE.
C) Attach CONSOLE to the CONSOLE MAST
using the 4 PRE-ATTACHED SCREWS
(screws will have to be removed from
the console first).
DO NOT PINCH WIRES!
YOU’RE FINISHED!
2
4
6
8
10
12
18
20
14
16
ST O P / P A U S E
HOL D
T
O R E S E
T
ST A R T
QUI
CK S
TART
SPEE D/ LE VE
L
CAL/P U L
SE
DISTA NC E
TIME
DATE
CLO
CK
CSE4.6
CSE3.6
Ex-22

BEFORE
YOU BEGIN
ASSEMBLY
17
INTRODUCTION
IMPORTANT
PRECAUTIONS
ELLIPTICAL
OPERATION
CONDITIONING
GUIDELINES
TROUBLESHOOTING
& MAINTENANCE
LIMITED
WARRANTY
BEFORE
YOU BEGIN
ASSEMBLY
BEFORE YOU BEGIN
CONGRATULATIONS! on choosing your elliptical. You’ve taken an important step in developing and
sustaining an exercise program! Your elliptical is a tremendously effective tool for achieving your personal
fitness goals. Regular use of your elliptical can improve the quality of your life in so many ways.
HERE ARE JUST A FEW OF THE HEALTH BENEFITS OF EXERCISE:
• Weight Loss
• A Healthier Heart
• Improved Muscle Tone
• Increased Daily Energy Levels
The key to reaping these benefits is to develop an exercise habit. Your new
elliptical will help you eliminate obstacles that prevent you from exercising.
Inclement weather and darkness won't interfere with your workout when you
use your elliptical in the comfort of your home. This guide provides you with
basic information for using and enjoying your new machine.
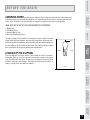
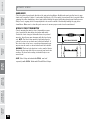
LOCATION OF THE ELLIPTICAL
Place the elliptical on a level surface. There should be 6 feet of clearance
behind the elliptical, 3 feet on each side and one foot in front for the power
cord (See diagram to the right). Do not place the elliptical in any area that
will block any vent or air openings. The elliptical should not be located in a
garage, covered patio, near water or outdoors.
GFFU
GFFU
GFFU
GPPU

BEFORE
YOU BEGIN
18
INTRODUCTION
IMPORTANT
PRECAUTIONS
ASSEMBLY
BEFORE
YOU BEGIN
ELLIPTICAL
OPERATION
LIMITED
WARRANTY
TROUBLESHOOTING
& MAINTENANCE
CONDITIONING
GUIDELINES
ASSEMBLY
ELLIPTICAL
OPERATION
POWER
Your programmable elliptical is powered by a power supply. The power must be plugged into the power jack,
which is located in the front of the machine near the STABILIZER TUBE. Make sure the console power switch is
in in the ON position. Note: Not all units have an ON/OFF switch on the console.
Do not operate the elliptical if the power cord or plug is damaged.
If the elliptical appears to not be working properly, do not use the elliptical.
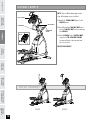
MOVING
Your elliptical has a pair of transport wheels built
into the FRONT STABILIZER TUBE. To move, first
remove the power supply and firmly grasp the
CONSOLE MAST, carefully tilt and roll.
Our ellipticals are well built and heavy, weighing up to 200 lbs! Use care and
additional help if necessary when moving.
FOOT POSITIONING
Your elliptical offers a variety of foot positions. Moving your foot to the forward most position of the foot pad
increases your step height, which will create a feel similar to a step machine. Placing your foot toward the back
of the foot pad decreases your step height and creates more of a gliding feel, similar to a smooth walk or run.
Your elliptical also allows you to pedal both forward and backwards to offer a variation to your workout and to
focus on other major leg muscle groups such as your hamstrings and calves.
ELLIPTICAL OPERATION
WARNING
WARNING

BEFORE
YOU BEGIN
ASSEMBLY
19
INTRODUCTION
IMPORTANT
PRECAUTIONS
ELLIPTICAL
OPERATION
CONDITIONING
GUIDELINES
TROUBLESHOOTING
& MAINTENANCE
LIMITED
WARRANTY
ELLIPTICAL
OPERATION
ASSEMBLY
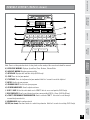
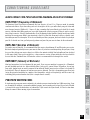
Note: There is a thin protective sheet of clear plastic on the overlay of the console and should be removed.
A) LED DISPLAY WINDOWS: Displays: Speed/Level, Time, Distance, Calories/Pulse.
B) LARGE LED WINDOW: Displays program profiles.
C) DATE/CLOCK: Displays date and time of day (CSE4.6 only).
D) START: Press to start your workout.
E) STOP/PAUSE: Press to start/pause/end your workout. Hold for 2 seconds to reset the elliptical.
F) ENTER: Used to set your program.
G) PROGRAM SELECT: Used to select your program.
H) UP/DOWN ARROW KEYS: Used to adjust resistance.
I) USER 1 / USER 2: Used to select which user’s eTRAK™ data to access and update (CSE4.6 only).
J) RESISTANCE KEYS: Used to reach desired resistance more quickly (CSE3.6 =5 keys, CSE4.6=10 keys).
K) eTRAK™ PERFORMANCE TRACKING BUTTON: Used to activate eTRAK™. Also used to scroll through
accumulated personal data.
L) READING RACK: Holds reading material.
M) TRIP (not shown): Functions similar to a vehicle trip odometer. Hold for 5 seconds to reset trip (CSE3.6 only).
CONSOLE DISPLAY (CSE4.6 shown)
2
4
6
8
10
12
18
20
14
16
S T O P / P A U S E
H O L D T O R E S E T
S T A R T
Q U I C K S T A R T
WE EKLY TOTA L
MO NTHLY TOTAL
L IFET IME TOTAL
CU RREN T WO RKOU T
AVERAGE WORK OUT
LA ST W ORKO UT
S P E E D / LE V E L
C A L / P U LS E
D I S T A N C E
T I M E
P R E S S T O S W I T C H
D ATE
C L O C K
L
H
B
F
J
H
I
G
K
C
A
ED

BEFORE
YOU BEGIN
20
INTRODUCTION
IMPORTANT
PRECAUTIONS
ASSEMBLY
BEFORE
YOU BEGIN
ELLIPTICAL
OPERATION
LIMITED
WARRANTY
TROUBLESHOOTING
& MAINTENANCE
CONDITIONING
GUIDELINES
ASSEMBLY
ELLIPTICAL
OPERATION
Simply press the START key to begin working out.
CONSOLE OPERATIO N
QUICK START
SELECTING PROGRAMS
1) Use the PROGRAM SELECT KEYS to select programs then press the ENTER button.
2) Use the ARROW KEYS to set LEVEL then press the ENTER button.
3) Use the ARROW KEYS to set the TIME then press the ENTER button.
4) Program Begins.
."/6"-
*/5&37"-4
30--*/(
8&*()5-044
(0-'$0634&
3"$&
$6450.
$6450.
5)3;0/&
5)3;0/&
7"--&:
5063
3&7&34&53"*/
3"/%0.
803,065$"-&/%"3
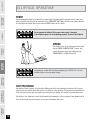
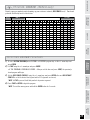
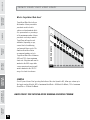
MANUAL
Allows you to adjust the resistance level to your preference, without a preset program.
."/6"-
*/5&37"-4
30--*/(
8&*()5-044
(0-'$0634&
3"$&
$6450.
$6450.
5)3;0/&
5)3;0/&
7"--&:
5063
3&7&34&53"*/
3"/%0.
803,065$"-&/%"3
INTERVALS
Improves your strength, speed and endurance by raising and lowering the resistance levels
through-out your workout to involve both your heart and muscles.
ROLLING
Creates the feeling of moving up and down hills by gradually increasing and decreasing the
resistance.
WEIGHT LOSS
Promotes weight loss by raising and lowering the resistance level, while keeping you in your fat
burning zone.
."/6"-
*/5&37"-4
30--*/(
8&*()5-044
(0-'$0634&
3"$&
$6450.
$6450.
5)3;0/&
5)3;0/&
7"--&:
5063
3&7&34&53"*/
3"/%0.
803,065$"-&/%"3
REVERSE TRAIN
Program cues you to pedal forward and backwards for an exciting and challenging workout.
."/6"-
*/5&37"-4
30--*/(
8&*()5-044
(0-'$0634&
3"$&
$6450.
$6450.
5)3;0/&
5)3;0/&
7"--&:
5063
3&7&34&53"*/
3"/%0.
803,065$"-&/%"3
RANDOM (CSE4.6 only)
Provides even more workout variety by mixing up your resistance intervals in no particular order.
."/6"-
*/5&37"-4
30--*/(
8&*()5-044
(0-'$0634&
3"$&
$6450.
$6450.
5)3;0/&
5)3;0/&
7"--&:
5063
3&7&34&53"*/
3"/%0.
803,065$"-&/%"3
CUSTOM 1 & 2 (USER PROGRAMS) (CUSTOM 2=CSE4.6 only)
Design and store your own custom exercise program.
PROGRAM PROFILES
."/6"-
*/5&37"-4
30--*/(
8&*()5-044
(0-'$0634&
3"$&
$6450.
$6450.
5)3;0/&
5)3;0/&
7"--&:
5063
3&7&34&53"*/
3"/%0.
803,065$"-&/%"3
."/6"-
*/5&37"-4
30--*/(
8&*()5-044
(0-'$0634&
3"$&
$6450.
$6450.
5)3;0/&
5)3;0/&
7"--&:
5063
3&7&34&53"*/
3"/%0.
803,065$"-&/%"3
Page is loading ...
Page is loading ...
Page is loading ...
Page is loading ...
Page is loading ...
Page is loading ...
Page is loading ...
Page is loading ...
Page is loading ...
Page is loading ...
Page is loading ...
Page is loading ...
Page is loading ...
Page is loading ...
Page is loading ...
Page is loading ...
Page is loading ...
Page is loading ...
Page is loading ...
Page is loading ...
-
 1
1
-
 2
2
-
 3
3
-
 4
4
-
 5
5
-
 6
6
-
 7
7
-
 8
8
-
 9
9
-
 10
10
-
 11
11
-
 12
12
-
 13
13
-
 14
14
-
 15
15
-
 16
16
-
 17
17
-
 18
18
-
 19
19
-
 20
20
-
 21
21
-
 22
22
-
 23
23
-
 24
24
-
 25
25
-
 26
26
-
 27
27
-
 28
28
-
 29
29
-
 30
30
-
 31
31
-
 32
32
-
 33
33
-
 34
34
-
 35
35
-
 36
36
-
 37
37
-
 38
38
-
 39
39
-
 40
40


Horizon Fitness CSE3.6 User manual
- Type
- User manual
- This manual is also suitable for
Ask a question and I''ll find the answer in the document
Finding information in a document is now easier with AI
Related papers
-
Horizon Fitness CSE4.6 User manual
-
-
-
-
-
-
-
-
-

