Page is loading ...

ARZ1205 / ARZ605
INSPECTION CAMERAS
PRODUCT INFORMATION MANUAL
Manuel informations du produit
Manual información del producto
English
Français
Español
THIS MANUAL CONTAINS IMPORTANT INFORMATION REGARDING SAFETY,
OPERATION, MAINTENANCE AND STORAGE OF THIS PRODUCT.
CE MANUEL CONTIENT DES INFORMATIONS IMPORTANTE CONCERNANT LA
SECURITE, L'OPERATION, LA MAINTENANCE ET LE STOCKAGE DE CE
PRODUIT.
ESTE MANUAL CONTIENE INFORMACIÓN IMPORTANTE ACERCA DE LA
SEGURIDAD, FUNCIONAMIENTO, MANTENIMIENTO Y ALMACENAMIENTO DE
ESTE PRODUCTO.
DO NOT ATTEMPT TO OPERATE THE TOOL UNTIL YOU HAVE READ AND UNDERSTOOD ALL
INSTRUCTIONS AND SAFETY RULES CONTAINED IN THIS MANUAL. FAILURE TO COMPLY
MAY RESULT IN ACCIDENTS INVOLVING FIRE, ELECTRIC SHOCK, OR SERIOUS PERSONAL
INJURY. SAVE THIS OWNER’S MANUAL FOR FUTURE REFERENCE AND REVIEW IT
FREQUENTLY FOR SAFE OPERATION.
NE PAS TENTER D'OPERER L'OUTIL TANT QUE VOUS N'AVEZ PAS LU ET COMPRIS TOUTES
LES INSTRUCTIONS ET REGLES DE SECURITE CONTENUES DANS CE MANUEL. SINON VOUS
RISQUEZ DES ACCIDENTS TELS QU'UN INCENDIE, UNE ELECTROCUTION, OU DES
BLESSURES CORPORELLES GRAVES. CONSERVEZ CE MODE D'EMPLOI EN CAS DE BESOIN ET
RELISEZ-LE SOUVENT POUR UTILISER VOTRE OUTIL EN TOUTE SECURITE.
NO UTILICE ESTA HERRAMIENTA HASTA HABER LEÍDO Y COMPRENDIDO TODAS LAS
INSTRUCCIONES Y NORMAS DE SEGURIDAD CONTENIDAS EN ESTE MANUAL. SI NO LO
HACE PODRÍA PROVOCAR ACCIDENTES CON FUEGO, DESCARGA ELÉCTRICA O LESIONES
PERSONALES SERIAS. GUARDE ESTE MANUAL DE INSTRUCCIONES PARA SU CONSULTA EN
EL FUTURO Y REVÍSELO FRECUENTEMENTE PARA UN USO SEGURO.
40732423-NA

1English1
English -1
THANKS FOR CHOOSING THIS PRODUCT
ACDelco provides you with products at an affordable price, and we would like you to
be fully satisfied with this product and our technical support. If any help or advice is
needed, please kindly contact us.
INTENDED USE
This tool is intended for personal use only.
This inspection camera is a digital platform that allows you to perform videos of visual
inspections in hard-to-reach areas. Recommend use it indoor.
GENERAL SAFETY RULES
READ AND UNDERSTAND ALL INSTRUCTIONS.
Failure to follow all instructions listed below may result in
electric shock, fire and/or serious injury. The term "power tool" in all of the warnings
listed below refers to your mains-operated (corded) power tool or battery-operated
(cordless) power tool.
SAVE THESE INSTRUCTIONS FOR FUTURE REFERENCE
RECOGNIZE SAFETY SYMBOLS, WORDS AND LABELS
The safety instructions provided in this manual are not intended to cover all possible
conditions and practices that may occur when operating, maintaining and cleaning
power tools.
Always use common sense and pay particular attention to all the DANGER,
WARNING, CAUTION and NOTE statements of this manual.
This is the safety alert symbol. It is used to alert you to potential
personal injury hazards. Obey all safety messages that follow this
symbol to avoid possible injury or death.
DANGER indicates an imminently hazardous situation which, if
not avoided, will result in death or serious injury.
WARNING indicates a potentially hazardous situation which, if
not avoided, could result in death or serious injury.
CAUTION indicates a potentially hazardous situation which, if
not avoided, may result in minor or moderate injury.
NOTE provides additional information that is useful for proper
use and maintenance of this tool. If a NOTE is indicated make
sure it is fully understood.
DANGER
NOTE
CAUTION
WARNING
WARNING

1English1
English -2
WARNING LABEL IDENTIFICATION
Read Manuals Before Operating Product.
Wear Eye Protection.
Keep body stance balanced and firm. Do not overreach when operating this
tool.
The risk of hands, fingers or other body parts being caught or wrapped in
gear or other moving parts.
The risk of electrical shock.
Federal Communications Commission.
IMPORTANT SAFETY RULES
When using power tools, always prevent exposure and breathing of harmful
dust and particles.
WARNING: Some dust created by power sanding, sawing, grinding, drilling and
other construction activities contains chemicals known to the State of California to
cause cancer, birth defects or other reproductive harm.
Some examples of these chemicals are:
• Lead from lead-based paints.
• Crystalline silica from bricks and cement and other masonry products, and
arsenic and chromium from chemically-treated lumber.
Your risk from these exposures varies, depending on how often you do this type of
work. To reduce your exposure to these chemicals: work in a well ventilated area,
and work with approved safety equipment, such as dust masks that are specially
designed to filter out microscopic particles.
WARNING: Handling the power cord on corded products may expose you to lead, a
chemical known to the State of California to cause cancer and birth defects or other
reproductive harm. Wash hands after handling.
DANGER

1English1
English -3
WORK AREA
Keep work area clean and well lit. Cluttered and dark areas invite accidents.
Do not operate power tools in explosive atmospheres, such as in the presence of
flammable liquids, gases or dust. Power tools create sparks which may ignite the
dust or fumes.
Do not operate power tool in an area where it could contact electrical wiring or
an electrically charged object. Contact with a “live” wire or object will make
exposed metal parts of the tool “live” and shock the operator.
Do not operate power tool near moving machinery. The cable can be tangled in
moving parts, pulling in the power tool and your hands and arms.
Do not use near any heat sources such as radiators, heat registers, stoves, or other
apparatus (including amplifiers) that produce heat.
Keep children and bystanders away while operating a power tool. Distractions
can cause you to lose control.
ELECTRICAL SAFETY
Do not expose power tools to rain or wet conditions. Water entering a power tool
will increase the risk of electric shock. Dry hands before turning tool on or off and
before removing or installing the battery pack.
PERSONAL SAFETY
Stay alert, watch what you are doing and use common sense when operating a
power tool. Do not use a power tool while you are tired or under the influence of
drugs, alcohol or medication. A moment of inattention while operating power tools
may result in serious personal injury.
Use personal safety equipment. Always wear eye protection. Safety equipment
such as dust mask, non-skid safety shoes, hard hat, or hearing protection used for
appropriate conditions will reduce personal injuries.
Do not overreach. Keep proper footing and balance at all times. This enables
better control of the power tool in unexpected situations.
WARNING
WARNING
WARNING

1English1
English -4
POWER TOOL USE AND CARE
This Visual Inspection Camera is not intended for medical use or personal
inspection.
Store idle power tools out of the reach of children and do not allow persons
unfamiliar with the power tool or these instructions to operate the power tool.
Power tools are dangerous in the hands of untrained users.
Maintain power tools. Check for misalignment or binding of moving parts,
breakage of parts and any other condition that may affect the power tool
operation. Do not use if power tool smokes or gives off fumes. If damaged, have
the power tool repaired before use. Many accidents are caused by poorly
maintained power tools.
Use the power tool and accessories in accordance with these instructions, taking
into account the working conditions and the work to be performed. Use of the
power tool for operations different from those intended could result in a hazardous
situation. Only use accessories specifically recommended for this tool. Others may be
hazardous.
Clean only with dry cloth. Certain cleaning agents and solvents are harmful to
plastics and other insulated parts. Some of these include: gasoline, turpentine, lacquer
thinner, paint thinner, chlorinated cleaning solvents, ammonia and household
detergents containing ammonia. Clean dust and debris from vents. Keep the
apparatus handle clean, dry and free of oil or grease.
Always remove the battery pack before cleaning.
CAUTION

1English1
English -5
BATTERY TOOL USE AND CARE
This tool is designed to be powered by a certain battery pack. Do not attempt to
use with any other voltage or power supply.
Recharge only with the charger specified by the manufacturer. A charger that is
suitable for one type of battery pack may create a risk of fi re when used with another
battery pack.
Use power tools only with specifically designated battery packs. Use of any other
battery packs may create a risk of injury and fire.
When battery pack is not in use, keep it away from other metal objects like
paper clips, coins, keys, nails, screws, or other small metal objects that can make
a connection from one terminal to another. Shorting the battery terminals together
may cause burns or a fire.
Under abusive conditions, liquid may be ejected from the battery, avoid contact.
If contact accidentally occurs, flush with water. If liquid contacts eyes,
additionally seek medical help. Liquid ejected from the battery may cause irritation
or burns.
SERVICE
Tool service must be performed only by qualified repair personnel. Service or
maintenance performed by unqualified personnel may result in a risk of injury.
When servicing a tool, use only identical replacement parts. Follow instructions
in the Maintenance section of this manual. Use of unauthorized parts or failure to
follow Maintenance Instructions may create a risk of shock or injury.
CAUTION

1English1
English -6
SPECIFIC SAFETY RULES AND SYMBOLS
Do not immerse the handle or the display unit in water. Such measures reduce the
risk of electric shock and damage. The imager head and the cable are water resistant
when the unit is fully assembled, but the video display is not.
Do not place the inspection camera anywhere that may contain a live electrical
charge. This increases the risk of electrical shock.
Do not place the inspection camera an
y
where that ma
y
contain movin
g
parts.
This increases the risk of entanglement injuries.
Always use appropriate personal protective equipment while handling and using
the inspection camera. Drains and other areas may contain chemicals, bacteria and
other substances that may be toxic, infectious, cause burns or other issues.
Appropriate personal protective equipment always includes safety glasses and
gloves, and may include equipment such as latex or rubber gloves, face shields,
goggles, protective clothing, respirators and steel toed footwear.
Practice good hygiene. Use hot, soapy water to wash hands and other exposed body
parts exposed to drain contents after handling or using the inspection camera to
inspect drains and other areas that may contain chemicals or bacteria. Do not eat or
smoke while operating or handling the inspection camera. This will help prevent
contamination with toxic or infectious material.
Do not operate the inspection camera if operator or tool is standing in water.
Operating an electrical tool while in water increases the risk of electrical shock.
SYMBOLS
The label on your tool may include the following symbols. The symbols and their
definitions are as follows:
SYMBOL NAME EXPLANATION
V Volts Voltage (potential)
kg Kilograms Weight
Direct Current Type of Current
CAUTION

1English1
English -7
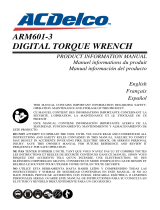
FUNCTIONAL DESCRIPTION
CONTROLS AND COMPONENTS:
1. Camera Head 2. LED Illumination
3. Camera Cable 4. Camera Cable Connector
5. LCD Screen 6. USB Port
7. Function Keys 8. Video Out Port
9. SD Card Slot 10. Adjustable Bracket with Hook
3
1
2
8
9
1
0
6
4
5
7

1English1
English -8
SPECIFICATIONS
Model Number ARZ1205 ARZ605
Voltage 12 Vdc 6 Vdc
LCD Display 3" High Resolution Color
Display Resolution 320 x 240
Camera Head Diameter Optional (Ø3.9 mm / Ø4.5 mm / Ø5.5 mm / Ø 8 mm)
Camera Cable Length Optional (3ft. (1m) / 6ft. (2m))
Adjustable Image Zoom Setting 1.0x ɦ 1.1x ɦ 1.2x ɦ 1.3x ɦ 1.4x ɦ 1.5x ɦ 1.6x ɦ
1.7x ɦ 1.8x ɦ 1.9x ɦ 2.0x ɦ 2.5x
View Flip Setting 0Ʊ ɦ 180Ʊ
LED Brightness Setting Off ɦ 25% ɦ 50% ɦ 75% ɦ Full
Run Time Up to 12 hours Up to 5 hours
Working Temperature 32°F~140°F (0°C to 60°C)
Memory Card (SD Card) 4 GB (Capacity Up to 32 GB)
Water Resistance Cable (with camera head)
Battery AB1242L
Li-ion Battery Pack
Alkaline
AA Battery x 4
Tool Weight 1.58 lbs (0.72 kg) 1.50 lbs (0.68 kg)
ASSEMBLY
Recharge only with the charger specified for the battery. For
specific charging instructions, read the operator’s manual supplied with your charger
and battery pack.
INSTALLING OR REMOVING BATTERY PACK (AB1242L/AB642A)
TO REMOVE BATTERY PACK: Depress the battery release button, and pull battery
pack out of tool.
TO INSTALL BATTERY PACK: Align rails, on the tool with the four tabs on the
battery pack, and push battery pack onto tool until it locks in place.
WARNING
Release
Button

1English1
English -9
LOADING THE BATTERIES (ONLY FOR AB642A)
1. Remove the cartridge.
2. Insert four AA batteries, as shown.
3. Loading the cartridge.
CAMERA CABLE INSTALLATION INSTRUCTIONS
1. When installing a -camera cable, anchor the lens as shown in the picture and insert
the cable into the connector. Tighten the sleeve until it is stable.
2. To remove the-cable, loosen the sleeve and pull out the cable.
Installation
Orientation Point
Cartridge
Cartridge Base

1English1
English -10
INSTRUCTIONS FOR THE ADJUSTABLE BRACKET WITH HOOK
You may adjust the hook between 0° and 360°, and place the adjustable bracket by 8
positions.
OPERATION
To reduce the risk of injury, wear safety goggles or glasses with
side shields. Always remove battery pack before changing accessories or making
adjustments.
WARNING
360° Rotation
Photo or Video Mode
LED Brightness Setting
View Flip (0 or 180 )
Power Indicator
Zoom Ratio (x1.0 – x2.5)
8 Positions

1English1
English -11
POWER INDICATOR DESCRIPTION
The fuel gauge is displayed in the upper right corner of the LCD while the tool is on.
Full power
2/3 power
1/3 power
Low power (recommend to charge battery pack immediately)
DESCRIPTION OF THE FUNCTION KEYS
Power On / Off button
Hold down the power button for 3 seconds to turn on the screen.
Hold down the power button for 1 seconds to turn off the screen.
LED brightness Setting button
LED brightness is divided into five settings; pressing the brightness setting button
will adjust the brightness of the LED.
Brightness
setting display:
Brightness flow:
off (the light
turns off after
1.5 seconds)
gentle
brightness medium
brightness
medium to
high
brightness
full
brightness

1English1
English -12
Screen zoom button
Press the screen zoom button . Magnification Cycles from
1.0Æ1.1Æ1.2Æ1.3Æ1.4Æ1.5Æ1.6Æ1.7Æ1.8Æ1.9Æ2.0Æ2.5Æ1.0,
a total of 11 magnification settings.
View Flip button
Press the View Flip button to rotate the image in a 0°Æ180°Æ0° cycle for
a total of 2 rotation settings.
Function settings button
1. Time setting – select the settings button , enter the settings menu and
select the Time Setting , via the left and right buttons & and press
OK to set up the Date & Time.
2. Screen brightness adjustment – select the settings button , enter the
settings menu and select the Screen brightness , via the left and right buttons
& to adjust the brightness of the screen.
3. Memory Capacity display – select the settings button , enter the
settings menu and choose to Memory Capacity Display .
4. Microphone On / Off – select the settings button , enter the settings
menu and select the microphone On / Off , via the left and right buttons &
to select Microphone On or Off and press OK to exit.
5. Format memory card – select the settings button , enter the settings
menu and choose to format memory card , then using the left button move
the red frame to YES and press OK to confirm formatting.

1English1
English -13
6. Restore factory settings – select the settings button , enter the settings
menu and then choose restore factory settings , then using the left button
move the red frame to YES and press OK to confirm. Select the time settings
button and the screen will display DATE 1/1/11 to show that factory settings
have been restored.
Photo Mode button – point the objective and press the Photo button to
enter Photo mode, press OK to take a photo.
Video Mode button – press the Video Mode button to enter the Video
mode and press OK to begin recording. After recording is complete, press OK
again to save the video.
Play button
1. File mode & images mode – select the play button to enter the file mode, then
press the play button again to enter the image preview mode. Use the left and
right buttons & to select the file you want to play.
2. Play Mode – select the play button , then use the left and right buttons &
to choose the file you want to play, and press OK to enter the Play mode:
enter & options, select Play Mode and press OK to confirm to
view the photo or the video.
3. Delete Mode – select the play button , using the left right buttons &
choose the file you want to delete, press OK to enter the Play mode: enter
& options, select Delete Mode and press OK to confirm the
deletion.
AUTOMATIC SHUTDOWN
Automatic shutdown after five minutes of standby (under video mode will not shut
down automatically).

1English1
English -14
VIDEO OUT PORT
Connect the Video Out Port to output what the camera is looking at into any displays.
Output Video format: NTSC
USING THE VISUAL INSPECTION CAMERA
1. Adjust the cable to best fit the opening.
2. After checking the workspace for hazards, insert the cable and adjust the zoom and
lighting as necessary.
3. Prepare the camera for inspection. The camera cable may need to be pre-formed or
bent to properly inspect the area. Do not try to form bends less than 2” radius. This
can damage cable. If inspecting a dark space, turn the LEDs on before inserting the
camera or cable.
4. Do not use excessive force to insert or withdraw the cable. This may result in
damage to the electrical device or inspection area. Do not use the cable or imager
head to modify surroundings, clear pathways or clogged areas, or as anything other
than an inspection device. This may result in damage to the electrical device or
inspection area. Do not insert the camera or cable into any space that will require less
than a 2” bend radius. Tight bends could damage the cable.
5. When the inspection is complete, carefully withdraw the camera and cable from the
inspection area.
To reduce the risk of explosion, electric shock and property
damage, always check the work area before beginning a job. Do not allow cable to
contact electrical, chemical, or moving hazards.
Behind Walls: Shut off circuit breakers to the entire area.
Inside Pipes: Ensure there is no electrical charge to the pipes before beginning
inspection. Do not allow liquid to flow down cable and into tool.
Auto Use: Turn off the engine and allow cooling before beginning inspection.
Do not allow the visual inspection camera or cable to contact oil, gas, or other
corrosive materials.
To reduce the risk of damage to the tool, do not use excessive
force or "kink" the cable. Do not use in areas where visual inspection camera and
cable will contact corrosive or oily substances. Do not use the cable to clear clogs or
move obstructions. This is not a drain cleaner!
CAUTION
WARNING

1English1
English -15
MAINTENANCE
Remove batteries before cleaning.
CLEANING
Always clean the imager head and cable after use with mild detergent.
Gently clean the LCD with a clean dry cloth. Avoid rubbing too hard on the LCD.
Use only alcohol swabs to clean the connections.
Wipe the hand held display unit down with a clean dry cloth.
STORAGE
The inspection camera must be stored in a dry secure area between 0°C (32°F) and
50°C (122°F). Store the tool, battery packs, charger and all cables in its carrying case in
a locked area out of the reach of children and people unfamiliar with visual inspection
equipment.
CHARGER CLEANING INSTRUCTIONS
Dirt and grease may be removed from the exterior of the charger using a cloth or soft
non-metallic brush. DO NOT use water or any cleaning solutions.
Disconnect the charger from the AC outlet before performing any
cleaning of the charger.
Remove the batteries and refer to servicing to qualified service
personnel under any of the following conditions:
z If liquid has been spilled or objects have fallen into product.
z If product does not operate normally by following the operating instructions.
z If the product has been dropped or damaged in any way.
z When the product exhibits a distinct change in performance.
CAUTION
WARNING
WARNING

1English1
English -16
ACCESSORIES
Use only accessories that are recommended by the manufacturer for your model.
Accessories that may be suitable for one tool may become hazardous when used on
another tool.
Recommended accessories for use with your tool are available at extra cost from your
local service center.
IMPORTANT: To assure product SAFETY and RELIABILITY, repairs, maintenance
and adjustments should be performed by certified service centers or other qualified
service organizations, always using identical replacement parts.
PROTECTING THE ENVIRONMENT
Before disposing of damaged, check with your state Environmental Protection Agency
to find out about special restrictions on the disposal of tool or return them to a certified
service center for recycling.
ACDelco, ACDelco Emblem and the ACDelco related graphics are General Motors
Trademarks used under license to Mobiletron Electronics Co., Ltd.

1Français1
Français -1
MERCI D'AVOIR CHOISI CE PRODUIT
ACDelco offre des produits à des prix abordables et nous espérons que ce produit et
notre support technique vous satisferont pleinement. Si vous avez besoin d'assistance,
n'hésitez pas à nous contacter.
UTILISATION PREVUE
Cet outil est uniquement prévu pour une utilisation personnelle.
Cette caméra d'inspection est une plateforme numérique qui vous permet d'enregistrer
des inspections visuelles dans des zones difficiles d'accès. Utilisation recommandée en
extérieur.
RÈGLES GÉNÉRALES DE SÉCURITÉ
LISEZ ET COMPRENEZ TOUTES LES
INSTRUCTIONS. Le non respect des instructions
listées ci-dessous risquera d'engendrer une électrocution, un incendie et/ou des
blessures graves. Le terme « outil électrique » dans tous les avertissements ci-dessous
réfère à votre outil électrique branché sur le secteur (avec cordon) ou à votre outil
électrique alimenté par une batterie (sans cordon).
CONSERVEZ CES INSTRUCTIONS EN CAS DE BESOIN FUTUR
SACHEZ RECONNAITRE LES SYMBOLES, LES MOTS, ET LES AVIS DE SECURITE
Le but des instructions de sécurité fournies dans ce manuel n'est pas de couvrir tous les
cas possibles pouvant se présenter pendant le fonctionnement, la maintenance et le
nettoyage des outils.
Faites toujours preuve de bon sens et faites particulièrement attention aux instructions
marquées DANGER, AVERTISSEMENT, ATTENTION et AVIS dans ce manuel.
C'est le symbole d'alerte de sécurité. Il est utilisé pour vous
avertir d'un risque de dommages corporels. Obéissez à tous les
messages de sécurité qui suivent ce symbole pour éviter tous
risques de dommages corporels.
DANGER indique une situation dangereuse imminente qui, si
elle n'est pas évitée, risque d'entraîner la mort ou des dommages
corporels graves.
AVERTISSEMENT indique une situation potentiellement
dangereuse qui, si elle n'est pas évitée, risque d'entraîner la mort
ou des dommages corporels graves.
ATTENTION indique une situation potentiellement dangereuse
qui, si elle n'est pas évitée, risque d'entraîner des dommages
corporels mineurs ou modérés.
AVIS fournit des informations supplémentaires utiles pour
DANGER
REMARQUE
ATTENTION
AVERTISSEMENT
AVERTISSEMENT

1Français1
Français -2
l'utilisation et la maintenance de cet outil. Assurez-vous de
comprendre parfaitement les AVIS indiqués.
IDENTIFICATION D'ÉTIQUETTE D'AVERTISSEMENT
Lisez les manuels avant d'utiliser le produit.
Port de protection oculaire.
Positionnez votre corps de manière bien équilibrée et stable. Ne jouez pas
au plus malin lorsque vous utilisez cet outil.
Il y a un risque que vos mains, vos doigts ou d'autres parties de votre corps
soient prises ou s'enroulent autour de la boîte de vitesse ou d'autres
éléments en mouvement.
Risque de choc électrique.
Commission fédérale des communications (FCC en anglais).
RÈGLES IMPORTANTES DE SÉCURITÉ
Lors de l'utilisation d'outils électriques, évitez toujours de vous exposer et de
respirer des particules ou de la poussière nocives.
AVERTISSEMENT: La poussière générée par le ponçage, sciage, broyage, forage
et d'autres activités de construction contient des composants chimiques connus (par
l'État de Californie) pour causer le cancer, des anomalies congénitales ou d'autres
problèmes de reproduction.
Voici quelques-uns de ces composants chimiques:
Le plomb provenant des peintures à base de plomb.
La silice cristallisée provenant des briques et du ciment et d'autres
produits de maçonnerie, et l'arsenic et le chrome provenant des pièces en
bois traitées chimiquement.
Votre risque d'exposition dépend de votre fréquence de travail. Pour réduire votre
exposition à ces composants chimiques: Travaillez dans un endroit bien ventilé et
travaillez avec des équipements de sécurité certifiés, comme des masques anti-
poussière spécialement conçus pour filtrer les particules microscopiques.
AVERTISSEMENT: La manipulation de cordon d'alimentation vous expose à du
plomb, un composant chimique connu par l'État de Californie pour causer le cancer,
des anomalies congénitales ou d'autres problèmes de reproduction. Lavez-vous les
mains après manipulation.
DANGER

1Français1
Français -3
ESPACE DE TRAVAIL
Gardez votre espace de travail propre et bien éclairé. Le désordre et le manque
d'éclairage sont des conditions propices aux accidents.
N'utilisez pas les outils électriques dans des atmosphères explosives, comme en
présence de liquides inflammables, gaz ou poussière. Les outils électriques
génèrent des étincelles risquant d'enflammer la poussière ou la fumée.
N'utilisez pas l'outil électrique dans une zone où il peut être en contact avec des
câbles électriques ou des objets électriquement chargés. Le contact avec des
câbles sous tension mettra les pièces métalliques exposées de l'outil également sous
tension et électrocutera l'opérateur.
Utilisez l'outil électrique et les accessoires conformément aux instructions
données, en tenant compte des conditions de travail et des tâches à effectuer.
Utiliser l'outil électrique pour des opérations différentes de celles initialement
prévues est dangereux. N'utilisez que les accessoires spécifiquement recommandés
pour cet outil. L'utilisation d'autres accessoires est dangereuse.
Outros acessórios podem ser perigosos.N'utilisez pas l'outil à proximité des
sources de chaleur comme des radiateurs, des bouches de chaleur, des fours ou
d'autres appareils (y compris les amplificateurs) qui produisent de la chaleur.
Gardez les enfants et les spectateurs hors d'atteinte pendant le fonctionnement
d'un outil électrique. Des distractions peuvent vous faire perdre le contrôle.
SÉCURITÉ ÉLECTRIQUE
N'exposez pas les outils électriques à la pluie ou à l'humidité. Toute pénétration
d'eau à l'intérieur de l'outil augmentera les risques de choc électrique. Séchez-vous
les mains avant d'allumer/éteindre l'outil et avant d'installer/désinstaller la batterie.
AVERTISSEMENT
AVERTISSEMENT
/