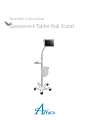
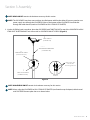
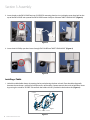
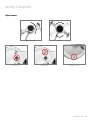
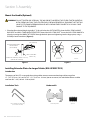
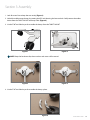
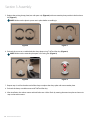
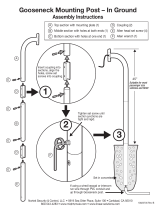
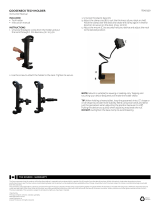
Amico Gooseneck is a versatile and durable tablet stand designed to enhance your workflow in various settings. It offers:
-
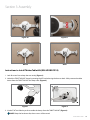
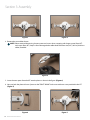
Flexible positioning: The gooseneck's adjustable arm allows you to effortlessly position your tablet at the desired height and angle, reducing strain and improving ergonomics.
-
Compatibility: The Gooseneck is compatible with a wide range of tablets, accommodating devices with dimensions ranging from 11" to 15.5" and thicknesses up to 0.8 inches.
-
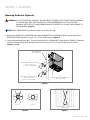
Secure hold: The locking tablet holder ensures your device remains securely in place, preventing accidental drops or slips, even during adjustments.
Amico Gooseneck is a versatile and durable tablet stand designed to enhance your workflow in various settings. It offers:
-
Flexible positioning: The gooseneck's adjustable arm allows you to effortlessly position your tablet at the desired height and angle, reducing strain and improving ergonomics.
-
Compatibility: The Gooseneck is compatible with a wide range of tablets, accommodating devices with dimensions ranging from 11" to 15.5" and thicknesses up to 0.8 inches.
-
Secure hold: The locking tablet holder ensures your device remains securely in place, preventing accidental drops or slips, even during adjustments.


-
 1
1
-
 2
2
-
 3
3
-
 4
4
-
 5
5
-
 6
6
-
 7
7
-
 8
8
-
 9
9
-
 10
10
-
 11
11
-
 12
12
-
 13
13
-
 14
14
-
 15
15
-
 16
16
-
 17
17
-
 18
18
-
 19
19
-
 20
20


Amico Gooseneck is a versatile and durable tablet stand designed to enhance your workflow in various settings. It offers:
-
Flexible positioning: The gooseneck's adjustable arm allows you to effortlessly position your tablet at the desired height and angle, reducing strain and improving ergonomics.
-
Compatibility: The Gooseneck is compatible with a wide range of tablets, accommodating devices with dimensions ranging from 11" to 15.5" and thicknesses up to 0.8 inches.
-
Secure hold: The locking tablet holder ensures your device remains securely in place, preventing accidental drops or slips, even during adjustments.
Ask a question and I''ll find the answer in the document
Finding information in a document is now easier with AI
Related papers
-
Amico Powered Cart User guide
-
Amico LCD AIO Powered Cart User manual
-
Amico Hummingbird Lite User manual
-
-
-
-
-
Amico Alert-3 LCD v2.3 Operating & Maintenance Manual
-
-
Other documents
-
 Mighty Mule FM100 Installation guide
-
JONARD TOOLS MF-5-25 Operating instructions
-
CTA ADD-GVESAB2 Owner's manual
-
-
-
-
 Gooseneck 8091350 User manual
-
CTA PAD-AFSVP User manual
-
-

