Page is loading ...

Part Description
Quantity
A Crossbar
1pc.
2pcs.
2pcs.
2pcs.
B
C
D
E
F
HexNut
LockWasher
PackageContents
Quoizel,Inc.
6CorporateParkway
GooseCreek,SC
29445
CustomerService
Phone631.273.2700
Fax631.231.7102
www.quoizel.com
WarningsandCautions
Turnoffelectricityatcircuitbreakerormainfuseboxbeforeinstallation.Consultalicensedelectricianifindoubt.
Theseinstructionsareprovidedforyoursafety.Itisveryimportantyoureadthemcompletelybeforeinstalling
thefixture.Westronglyrecommendthatalicensed,professionalelectricianperformtheinstallation.
Disconnectfixturefrompowersourcebeforereplacingbulbs.Makesurebulbsaregivensufficienttimetocool
beforeremoval.Donotsubjectglasspartstoanyshockwhileinoperationorshatteringmayresult.
ThankyouforpurchasingaQuoizelproduct.
Needassistancewithpartsorassembly?CallQuoizelcustomerserviceat1-631-273-2700
orvisituson-lineatwww.quoizel.com
A
B
C
D
E
MountingScrew
AssemblyInstructionSheet#IS-SNN8406PN
ForStyleSNN8406PN
1of6
ToolsRequired:Flatheadscrewdriver,Phillipsscrewdriver,pliers,wirecutters,wire
strippers,electricaltape,safetyglasses.
EstimatedAssemblyTime:20-30minutes
Preparation:Identifyandinspectallpartsbeforebeginninginstallation.Checkpackage
contentlistanddiagramsbelowtobesureallpartsarepresent.Ifanypartsaremissing
ordamaged,donotattempttoassemble,install,oroperatethefixture.Contactcustomer
serviceforreplacementparts.
6CORPORATEPARKWAY
GOOSECREEKSC29445
wwwquoizelcom
,.
..
F
1pc.
2pcs.
LockBall
FixtureBody
2013QuoizelInc.
October2013
BulbRecommended: (1)MediumBase100WMaximum

SNN8406PN
1
PARTNUMBER
G3727PA
NOTE:ALLDIMENSIONSAREROUNDEDUPTOTHENEAREST1/2"
REPLACEMENTPARTDESCRIPTION
PANELGLASSBENTWATER
REQ.
4
NO.
2of6
FINISH:PALLADIANBRONZE
GND
2.4mm
13Ga
QUOIZEL
R
(1)100WMedium
BaseBulb
(NotSupplied)
7.5”
1
4”
6.5”
10.5”
4.5”
6.5”

ThankyouforpurchasingaQuoizelproduct.
Needassistancewithpartsorassembly?CallQuoizelcustomerserviceat1-631-273-2700
orvisituson-lineatwww.quoizel.com
3of6
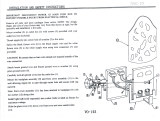
STEP2- AttachCrossbartoOutletBox
A.AttachtheCrossbar(A)toOutletBoxandsecureby
threadingOutletBoxScrews(notsupplied)intothe
MountingHolesontheOutletBox.Tightenuntilsnug.
Crossbar
Outlet
Box
OutletBox
Screw
Mounting
Hole
Figure2
AssemblyInstructionSheet#IS-SNN8406PN
ForStyleSNN8406PN
Figure1
Crossbar
Mounting
Screw
LockWasher
HexNut
Backplate
STEP1- AttachMountingScrews,Lock
WashersandHexNutstoCrossbar
A.LineupasetofholesontheCrossbar(A)andHoleson
theBackplateoftheFixtureBody(F).
B.ThreadMountingScrews(B)intotheholesonthe
Crossbar(A),passLockWashers(C)andthreadHex
Nut(D)ontotheMountingScrews(B).Handtighten
untilsnug.
6CORPORATEPARKWAY
GOOSECREEKSC29445
wwwquoizelcom
,.
..
Fixture
Body
2013QuoizelInc.
October2013

ThankyouforpurchasingaQuoizelproduct.
Needassistancewithpartsorassembly?CallQuoizelcustomerserviceat1-631-273-2700
orvisituson-lineatwww.quoizel.com
4of6
AssemblyInstructionSheet#IS-SNN8406PN
ForStyleSNN8406PN
STEP3MakeWireConnections-
A.Usestandardwireconnectorstomakeallwire
connections.(Connectorsarenotincludedwithfixture.)
Stripandpreparewireendsaccordingtoinstructions
suppliedwithconnectors.
B.ConnectWhiteSupplyWirefromtheOutletBoxtoWhite
Wirefromfixture.
C.ConnectBlack(orRed)SupplyWirefromtheOutletBox
toBlackWirefromfixture.
D.ConnectGroundWirefromtheOutletBoxtoGround
Wirefromfixture.
E.Twistconnectorsuntilwiresaretightlyjoinedtogether.
F.Wrapeachconnectionwithapprovedelectricaltapeand
carefullystuffalltheconnectedwiresintotheOutletBox.
Figure4
Whitewirefromsupply Whitewirefromfixture
Blackwirefromsupply
(orRed)
Blackwirefromfixture
Groundwirefromsupply Groundwirefromfixture
Figure5
6CORPORATEPARKWAY
GOOSECREEKSC29445
wwwquoizelcom
,.
..
Figure3
Mounting
Screw
LockBall
Backplate
FixtureBody
2013QuoizelInc.
October2013
STEP4- AttachFixtureBodytoMounting
Screw
A.PlacetheBackplateoftheFixtureBody(F)overthe
MountingScrews(B).Placecaulk(notsupplied)into
threadsofMountingBalls(E)andthreadthemontothe
MountingScrews(B).Handtightenuntilsnug.

ThankyouforpurchasingaQuoizelproduct.
Needassistancewithpartsorassembly?CallQuoizelcustomerserviceat1-631-273-2700
orvisituson-lineatwww.quoizel.com
5of6
AssemblyInstructionSheet#IS-SNN8406PN
ForStyleSNN8406PN
6CORPORATEPARKWAY
GOOSECREEKSC29445
wwwquoizelcom
,.
..
2013QuoizelInc.
October2013
Figure6
Bulb
Socket
STEP5- InstallBulb
A.Thisfixtureusesstandardbulbwithamediumscrewbase.
Maximum100watts.
B.Insertbulbandscrewsnuglyintoplace.
STEP6ApplySiliconeSealer-
A.Makesureexteriorwallsurfaceandfixturebackplate
arefreeofdirtbeforeapplyingcaulk.Usingexterior
gradecaulk,caulkovertopofbackplateanddown
otherside.Donotcaulkbottomoffixturebackplateto
ensurepropermoisturedrainage.
Yourfixtureisnowassembledandreadytouse.
Enjoy!
Exterior
GradeCaulk
Outdoor
Fixture
Backplate
Exterior
WallSurface
Figure7

ThankyouforpurchasingaQuoizelproduct.
Needassistancewithpartsorassembly?CallQuoizelcustomerserviceat1-631-273-2700
orvisituson-lineatwww.quoizel.com
6of6
AssemblyInstructionSheet#IS-SNN8406PN
ForStyleSNN8406PN
6CORPORATEPARKWAY
GOOSECREEKSC29445
wwwquoizelcom
,.
..
2013QuoizelInc.
October2013
Figure8
Lock
Screw
STEP7RemovetheCagefromFixtureHood-
A.ByunscrewingtheLockScrews,removetheCagefromthe
FixtureHood.
REPLACEGLASSPANELS
Fixture
Hood
Cagewith
GlassPanels
Figure9
GlassPanel
STEP8ReplaceGlassPanels-
A.UnscrewtheLockScrewsonthetopoftheCage.Remove
theGlassHolderfromtheCage.
B.RemovethebrokenGlassPanelinsideoftheCageand
insertthereplacementGlassPanel.
C.PlacetheGlassHolderbackontothetopoftheCageand
securewithLockScrews.Handtightenuntilsnug.
GlassHolder
Cage
LockScrew
Figure10
LockScrew
STEP9InstalltheCage-
A.AttachtheCagewithGlassPanelsbackontotheFixture
HoodandsecurewithLockScrews.Handtightenuntilsnug.
FixtureHood
Cagewith
GlassPanels
/