Page is loading ...

SOLAR MOTION ACTIVATED LIGHT
LAMPE SOLAIRE À DÉTECTEUR DE MOUVEMENT
LÁMPARA SOLAR DE MONITOREO
ITM. / ART. 862796 MODEL / MODÈLE / MODELO : 82103
Assembly & InstAllAtIon
AssemblAge et InstAllAtIon
montAje e InstAlAcIón
www.sunforceproducts.com
Please read these instructions thoroughly prior to installation, then
store in a safe place for future reference.
If at any time you are unclear about this product, or require further
assistance please do not hesitate to contact our trained professionals
operating the customer support line at 1-888-478-6435 (English/French/
Spanish language services, U.S.A. and Canada only), from Monday to
Friday, 8:30 am to 5:00 pm Eastern Standard Time or email us at
Veuillez lire soigneusement ces instructions avant de commencer l’installation et
conservez-les dans un endroit sûr pour référence ultérieure.
En tout temps, si vous avez des questions au sujet de ce produit ou avez besoin
d’aide, n’hésitez pas à contacter nos professionnels dûment formés à notre système
d’assistance téléphonique au 1-888-478-6435 (anglais / français / espagnol, aux États-
Unis et au Canada seulement) de 8 h 30 à 17 h du lundi au vendredi, heure normale de
l’Est ou par courrier électronique à info@sunforceproducts.com.
Por favor lea estas instrucciones antes de instalar y luego guárdelas
en un lugar seguro para su referencia.
Si tiene alguna pregunta sobre este producto o requiere asistencia,
contacte a nuestro equipo de profesionales en la línea de soporte al
1-888-478-6435 (Servicio en Inglés / Francés / Español, sólo en Estados
Unidos y Canadá) 8:30 am - 5 pm Lunes-Viernes Tiempo del Este o por
correo electrónico al info@sunforceproducts.com.
6 x Wall plugs
6 bouchons
6 x Taquetes
6 x Mounting screws
6 vis de montage
6 x Tornillos de montaje
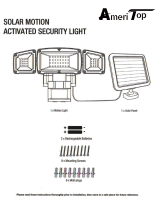
1 x Solar panel
1 Panneau solaire
1 x Panel solar
1 x Motion light
1 Lampe à détecteur de
mouvement
1 x Lámpara de monitoreo

2
1
2
WARRANTy
This product is covered under a one year limited warranty. Sunforce Products Inc. warrants to the original
purchaser that this product is free from defects in materials and workmanship for the period of one year from date
of purchase. The included battery is not covered under this warranty.
Proof of purchase including date, and explanation of complaint is required for warranty service.
• Your motion light is not a toy. Keep it out of reach of small children.
• Your motion light and solar panel are both weather-resistant.
• You can mount your motion light indoors, but your solar panel must be installed outdoors to receive light from
the sun.
• If using a step ladder, you may require a second person to help install the solar motion light.
• Prior to installation, lay out all components to ensure they correspond to the parts diagram on the
cover page.
• Never look directly into the solar motion light when illuminated.
• From time to time, ensure the plug between the solar panel and light is securely connected.
• It is advisable to adjust the angle of the solar panel to optimize the exposure of the sun during the winter months.
• The solar panel should be cleaned with a damp cotton cloth on a regular basis. This will ensure optimal
performance and battery charging. Periodically, utilize the same technique to clean the lens of the motion light.
• Never let any abrasive material come into contact with the solar panel.
• Ultra bright COB LED
• Solar panel with 4.5 m / 15 ft wire
• Adjustable motion sensor
• Adjustable time and distance settings
PRODUCT fEATURES
CARE & MAINTENANCE
Ensure your solar panel is placed so that
its exposure to the sun is optimized. Be
aware of objects such as trees or property
overhangs that may impede the panel’s
ability to generate a charge.
Optional: Use a power drill (not included) to
create the holes on your chosen mounting
surface.
Use 4 of the included wall plugs and
screws to fasten the solar panel to the
surface.
INSTALLATION
Remove the mounting bracket from the
solar motion light by unscrewing the side
bolts.
Reattach the mounting bracket to the light
and tighten the side bolts (refer to the
illustration in Step 3).
Optional: Use a power drill (not included) to
create the holes on your chosen mounting
surface.
Fasten the mounting bracket to your
chosen surface with the 2 remaining wall
plugs and screws.
4
5
3
SAfETy INfORMATION
BATTERy REPLACEMENT INSTRUCTIONS
When replacing the battery, be sure to:
• Match any replacement battery specications with the removed battery in terms of voltage, size and type.
• Use a rechargeable battery only.
• Observe the correct polarity (+ and -) when installing the replacement battery.

3
Connect the wire from the solar panel to the wire of the light
xture. Your solar motion light will now begin to charge.
Prior to using your solar motion light, the solar panel needs to
be connected to the light for a period of three days. This initial
charge should be done in the OFF position. After the third day,
your included battery will be fully charged and your solar motion
light is ready for operation. Place the light in the ON position.
7
9
6
OFF ON
LUX
TIME
SENS
+ –
The included lithium-ion battery is located in the battery
housing behind the light xture. Select the OFF position on
the light prior to opening the battery housing. Remove the
four screws to reveal the rechargeable battery.
Your solar motion light requires the use of 1 rechargeable
lithium-ion battery.
8
3 different control dials adjust the light’s duration, sensitivity to
light, and sensitivity to motion.
SENS (Sensitivity)
This dial determines the range of motion detection.
TIME (Duration)
This dial sets the duration of illumination time.
LUX (Light level)
This dial tells the sensor the level of darkness that must be
reached before the light turns on.
The sensor will trigger the light to turn on in the daytime.
The sensor will only trigger the light to turn on at dusk or
when it is dark. This is the ideal position for general usage.
LUX
TIME
SENS
OFF ON

8
SUNML82005_131216
fREqUENTLy ASkED qUESTIONS
fOIRE AUx qUESTIONS
PREGUNTAS fRECUENTES
1. Where should the solar panel be mounted?
2. Does the solar panel require direct sun to charge?
3. Can additional or extended cable wire for the solar panel be
purchased?
4. Why does the solar motion light appear to “strobe” or ash?
5. Will decorative or street lights have an effect on the motion
sensor’s ability to operate?
6. What type of battery does my solar motion light require to operate?
1. Où le panneau solaire devrait-il être installé?
2. Le panneau solaire requiert-il d’être exposé aux rayons solaires
pour charger?
3. Peut-on se procurer des câbles additionnels ou de prolongement
pour le panneau solaire?
4. Pourquoi la lampe à détecteur de mouvement semble-t-elle
produire un effet stroboscopique ou d’éclairs?
5. Les lampes décoratives ou de la rue affectent-elles la capacité
du capteur de mouvement de fonctionner?
6. Quel type de piles aurais-je besoin pour faire fonctionner ma
lumière solaire à détecteur de mouvement?
1. Montez votre panneau solaire pour qu’il capte au maximum la lumière solaire (voir l’étape 1 à la page 4). Dans l’hémisphère Nord, on doit
l’orienter normalement vers le Sud.
2. Le panneau solaire peut charger la pile interne lorsqu’il est soumis à un l’éclairage direct ou indirect. Pour les meilleurs résultats,
tentez d’optimiser l’exposition solaire de votre panneau solaire.
3. À ce moment, il n’existe aucuns câbles de prolongement disponibles pour le câble qui relie la lampe au panneau solaire. Tout
prolongement du câble annulera la garantie.
4. Une lampe qui clignote rapidement signie que la charge des piles est insufsante. Ajustez la lampe à détecteur de mouvement à la
position ‘OFF/ARRÊT’ et chargez-la pendant deux journées ensoleillées entières an de recharger complètement les piles.
5. Oui, le capteur de la lampe à détecteur de mouvement est sensible à la lumière. Pour l’utilisation nocturne, assurez-vous qu’aucune autre
lampe n’active le capteur de mouvement.
6.
Votre lumière solaire à détecteur de mouvement nécessite l’utilisation d’une pile au lithium-ion rechargeable.
1. Mount your solar panel in a position that will enable the most amount of light to be absorbed (refer to Step 1 on page 2). In the Northern
Hemisphere this is usually south facing.
2. The solar panel can charge the internal battery in direct and indirect light. For best results, try to optimize your solar panel’s sun exposure.
3. At this point there are no extensions available for the cable that connects the light to the solar panel. Any additions to the cable will void
the warranty.
4. A rapidly ashing light is caused by undercharged batteries. Turn the solar motion light to the “OFF” position and charge for two full sunny
days to bring the batteries to full charge.
5. Yes, the sensor of the solar motion light is light-sensitive. For nighttime usage, ensure no other light activates the motion sensor.
6. Your solar motion light requires the use of one lithium-ion rechargeable battery.
1. ¿Dónde se debe instalar el panel?
2. ¿El panel solar requiere sol directo para cargar?
3. ¿Se puede adquirir cable adicional o extensiones para el panel de
la lámpara?
4. ¿Por qué la luz se enciende intermitentemente?
5. ¿Tienen algún efecto las luces decorativas o de la calle en la
operación dela lámpara?
6. ¿Qué tipo de batería requiere mi lámpara de monitoreo?
1. Instale el panel solar en un sitio que permita la mejor exposición a la luz solar (referirse al Paso 1 en la página 6). Para el hemisferio norte
esta posición es generalmente hacia el sur.
2. El panel solar puede cargar la batería interna con luz directa o indirecta.
3. Por el momento no existen extensiones para el cable del panel solar. Cualquier adición de cable anulará la garantía.
4. La luz puede parpadear rápidamente debido a una carga insuciente en las baterías. Ponga el interruptor de la lámpara en la posición de
“OFF” y déjela dos días enteros al sol para recargar completamente las baterías.
5. Sí. El sensor de la lámpara solar de monitoreo es sensible a la luz. Para operación nocturna asegúrese que ninguna otra luz active el
sensor de movimiento.
6. Su lámpara de monitoreo requiere una batería recargable de iones de litio.
/