Page is loading ...

INSTRUCTION MANUAL
S10
SINGER and STUDIO are trademarks of The Singer Company Limited S.à.r.l. or its Affiliates.
©2014 The Singer Company Limited S.à.r.l. or its Affiliates. All rights reserved.

2
IMPORTANT SAFETY INSTRUCTIONS
When using an electrical appliance, basic safety precautions should always be followed, including the
following:
This sewing machine is designed and manufactured for household use only.
Read all instructions before using this sewing machine.
DANGER
—
To reduce the risk of electric shock:
1. An appliance should never be left unattended when plugged in. Always unplug
this sewing
machine from the electric outlet immediately after using and before
cleaning.
WARNING
—
To reduce the risk of burns, fire, electric shock, or injury to persons:
1. Do not allow to be used as a toy. Close attention is necessary when this sewing machine is used
by or near children.
2. Use this appliance only for its intended use as described in this owner’s manual.
Use only attachments recommended by the manufacturer as contained in this owner’s manual.
3. Never operate this sewing machine if it has a damaged cord or plug, if it is not working properly, if
it has been dropped or damaged, or dropped into water.
Return this sewing machine to the nearest authorized dealer or service center for examination,
repair, electrical or mechanical adjustment.
4. Never operate the appliance with any air opening blocked. Keep ventilation openings of this
sewing machine and foot controller free from accumulation of lint, dust and loose cloth.
5. Never drop or insert any object into any opening.
6. Do not use outdoors.
7. Do not operate where aerosol (spray) products are being used or where oxygen is being
administered.
8. To disconnect, turn all controls to the off (“O”) position, then remove plug from outlet.
9. Do not unplug by pulling on cord. To unplug, grasp the plug, not the cord.
10. Keep fingers away from all moving parts. Special care is required around the sewing machine
needle and/or cutting blade.
11. Always use the proper needle plate. The wrong plate can cause the needle to break.
12. Do not use bent needles.
13. Do not pull or push fabric while stitching. It may deflect the needle causing it to break.
14. Switch this sewing machine off (“O”) when making any adjustment in the needle area, such as
threading the needle, changing the needle, threading the bobbin or changing the presser foot, and
the like.
15. Always unplug this sewing machine from the electrical outlet when removing covers, lubricating, or
when making any other adjustments mentioned in this owner’s manual.
SAVE THESE INSTRUCTIONS
Please note that on disposal, this product must be safely recycled in accordance with relevant
National legislation relating to electrical/electronic products. If in doubt please contact your
retailer for guidance. (European Union only)
For Europe only:
This appliance can be used by children aged from 8 years and above and persons with reduced
physical, sensory or mental capabilities or lack of experience and knowledge if they have been given
supervision or instruction concerning use of the appliance in a safe way and understand the hazards
involved. Children shall not play with the appliance. Cleaning and user maintenance shall not be made
by children without supervision.
For outside Europe (except U.S.A and Canada):
This appliance is not intended for use by persons (including children) with reduced physical, sensory or
mental capabilities, or lack of experience and knowledge, unless they have been given supervision or
instruction concerning use of the appliance by a person responsible for their safety.
Children should be supervised to ensure that they do not play with the appliance.

3
Machine Identification ................................................... 4
Standard Accessories .................................................. 5
GETTING READY TO SEW
Connecting the Power Supply ...................................... 6
Polarized Plug............................................................... 6
Start/Stop Button .......................................................... 7
Presser Foot Lifter ........................................................ 7
Winding & Inserting the Bobbin ............................... 8-10
Removing Bobbin from Bobbin Case ....................... 8
Preparing Thread Spool ........................................... 8
Using Auxiliary Spool Pin ......................................... 8
Winding the Bobbin .................................................. 9
Inserting the Bobbin ............................................... 10
Threading the Machine ............................................... 11
Needle Threader ......................................................... 12
Drawing Up the Bobbin Thread .................................. 13
Changing the Needle .................................................. 14
Adjusting the Thread Tension ..................................... 15
Balanced thread tension ........................................ 15
When the needle thread tension is too tight ........... 15
When the needle thread tension is too loose ......... 15
Using Fabric and Stabilizer ......................................... 16
Stabilizer ................................................................ 16
Template ................................................................. 16
FUNCTION OF BUTTONS AND ICONS .............. 17-23
LCD Brightness Adjusting Dial ................................... 17
Function Panel ....................................................... 17-18
Customizing Settings for Machine .............................. 19
HELP ? Button ............................................................ 23
Securing Fabric in the Embroidery Hoop.................... 24
Template Sheets ......................................................... 24
Attaching the Embroidery Hoop to the Machine ......... 25
Selecting Built-in Designs ........................................... 26
Ready to Sew Screen ................................................. 26
Color List Screen ........................................................ 26
Preparing Machine and Hoop for Embroidery. ....... 27-28
Needle or Bobbin Thread Breaks ............................... 28
Programing Lettering ............................................. 29-32
Selecting Fonts....................................................... 29
Entering Characters ............................................... 29
How to Program Lettering ...................................... 30
Ready to Sew Screen............................................. 31
Color Change ......................................................... 31
Placement of Lettering Embroidery ........................ 31
Maximum Number of Characters ........................... 31
Viewing Lengthy Text .............................................. 32
Deleting a Letter ..................................................... 32
Inserting a Letter .................................................... 32
Editing Button ........................................................ 33-46
Hoop Size ............................................................... 33
Selecting a Pattern to Edit ...................................... 34
Magnifier Icon ......................................................... 35
Mirror Imaging the Pattern ..................................... 35
Resizing the Pattern ............................................... 36
Rotating the Pattern ............................................... 36
Combining Patterns ........................................... 37-40
Saving Edited Design Files .................................... 41
Saving in Machine Internal Memory ....................... 41
How to Name a File ........................................... 41-42
How to Save to the USB Memory Stick .................. 43
Creating a New Folder on the USB Memory Stick . 44
Opening a File from the Internal Machine Memory
. 45
Deleting a File ........................................................ 45
Opening a File from the USB Memory Stick
(Optional) ............................................................... 46
SMALL HOOP EMBROIDERY .............................. 47-48
CARE AND MAINTENANCE ...................................... 49
Cleaning the Bobbin Case and Hook Area ............ 49
Assembling the Bobbin Case into Hook Area ........ 49
TROUBLESHOOTING ........................................... 50-51
DESIGN CHARTS ................................................ 52-53
FONTS ....................................................................... 54
EMBROIDERY QUICK REFERENCE GUIDE ............ 55
Table of Contents

4
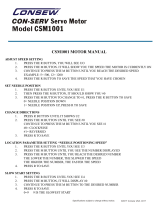
Machine Identification
1 Function panel
2 LCD screen
3 LCD brightness adjusting dial
4 Spool holder (large)
5 Spool cap
6 Bobbin thread guide
7 Thread take-up lever
8 Thread tension dial
9 Face plate
10 Thread cutter & thread holder
11 Thread guide plate
12 Needle plate
13 Bobbin case cover
14 Bobbin case cover release button
15 Start/stop button
16 Carriage
17 Needle clamp screw
18 Needle bar thread guide
19 Needle
20 Presser foot
21 Setscrew
22 Needle threader
23 Hole for auxiliary spool pin
24 Bobbin winder spindle
25 Bobbin winder stopper
26 Thread cutter
27 Handwheel
28 USB socket
29 Power switch
30 Machine socket
31 Presser foot lifter
32 Carrying handle
33 Thread guide cover
1
2
3
4
5
6
7
8
9
10
11
13 14 15
16
17
18
20
21
22
23
2425
26
27
28
29
30
32
31
33
19
12

5
1 Bobbins
2 Lint brush
3 Auxiliary spool pin
4 Felt
5 Spool stand
6 Spool cap (Large) (set on the machine)
7 Spool cap (Small)
8 Scissors
9 Screwdriver
10 Screwdriver for needle plate
11 Set of needles
12 Embroidery hoop and template
13 Embroidery hoop and template (small)
14 Instruction book
15 Template sheets
16 Power supply cord
17 Soft cover
Standard Accessories
1
2
3
4
5
6
7 8
9 10
11
12
13
14
15
16
17
Go to www.singerco.com for information on
where to buy needles and bobbins.

6
q
w
e
r
t
Connecting the Power Supply
Turn off the power switch and insert the machine plug
into the machine socket.
Insert the power supply plug into the wall outlet and turn
the power switch on.
q
Power switch
w
Machine plug
e
Machine socket
r
Power supply plug
t
Wall outlet
NOTE
When power swith is turned on, it takes approximately
ten seconds for the machine screen to come on.
For Your Safety
When your machine is embroidering do not leave the
machine unattended.
Keep the sewing area around your machine clutter free.
When watching the machine sew keep your hands away
from any moving parts such as the thread take up lever,
the handwheel and the needle.
Always turn off the power switch and unplug the power
supply:
- when leaving the machine unattended.
- when attaching or removing parts.
- when cleaning the machine.
Polarized Plug (for U.S.A and Canada only)
The symbol “O” of a switch indicates the “off” position of
a switch.
For appliances with a polarized plug (one blade wider
than the other). To reduce the risk of electric shock, this
plug is intended to fit in a polarized outlet only one way. If
it does not fit fully in the outlet, reverse the plug. If it still
does not fit, contact a qualified electrician to install the
proper outlet. Do not modify the plug in any way.
GETTING READY TO SEW

7
q
q
Lower the
Presser Foot.
w
Start/Stop button
Press this button to start or to stop the machine.
q
Start/stop button
NOTE
If you press the start/stop button without lowering the
presser foot, a warning message appears on the LCD
screen.
Lower the presser foot and press the OK √ button to
return to the previous display.
w
OK
√
button
Presser Foot Lifter
q
Presser foot lifter
The presser foot lifter raises and lowers the presser foot.
You can raise it higher than the normal up position
for easy removal of the presser foot or to install the
embroidery hoop.
The presser foot lever will not remain in a locking position
when holding at highest position with hand.

8
q
w
e
q
q
w
Winding & Inserting the Bobbin
Removing Bobbin from Bobbin Case
Step
z
Slide the bobbin case cover plate release button to the
right to remove the bobbin case cover plate.
z
x
z
x
c
Step
x
Lift out the bobbin from the bobbin case.
q
Bobbin case cover release button
w
Bobbin case cover
e
Bobbin
Preparing Thread Spool
Step
z
Place the large spool cap on the spool pin as shown.
q
Large spool cap
Step
x
Place the spool of thread on the spool pin with the
thread coming off the spool as shown. Attach the large
spool cap, and press it firmly against the spool of
thread.
q
Large spool cap
w
e
r
q
Step
c
Use the small spool cap to hold narrow or small
spools of thread.
w
Small spool cap
Using Auxillary Spool Pin
Use the auxiliary spool pin when you need to wind the
bobbin without unthreading the machine while working on
an embroidery.
Insert the auxiliary spool pin into the spool stand and
then into the hole.
Place the felt on the auxiliary spool pin and place a spool
of thread on it as shown.
q
Auxiliary spool pin
w
Spool stand
e
Hole
r
Felt

9
Step
v
Press the start/stop button again and continue filling
the bobbin. When the bobbin is fully wound it will stop
filling the bobbin.
Press the start/stop button to stop the machine motor.
Return the bobbin winder spindle to the left.
Remove the bobbin and cut the thread with the bobbin
thread cutter.
e
Bobbin thread cutter
NOTE
Do not move the bobbin winder spindle while the
machine is running. For safety purposes, the motor will
stop automatically after running for two minutes after
bobbin has been filled.
q
w
e
z
x
c
v
Winding the Bobbin
Step
z
Guide the thread around the bobbin winder thread
guide while holding the thread with both hands.
q
Bobbin winder thread guide
Step
x
Thread through the hole in the bobbin from the
inside to the outside. Put the bobbin on the bobbin
winder spindle.
w
Bobbin winder spindle
Step
c
Push the spindle to the right. Press the start/stop
button while holding the end of the thread. Stop
the machine after the bobbin is wound a few layers.
Cut the thread close to the hole on top of the bobbin.
CAUTION
Use only SINGER
®
Class 15 bobbins in your
machine. Using improperly sized bobbins
or pre-wound bobbins may cause stitching
problems. Improper bobbins can damage
your bobbin case and machine.
NOTE
For best results, use bobbinfill thread in the bobbin for
embroidery. Bobbinfill thread is lighter in weight than
all-purpose thread, making the design less dense on
the back side of the fabric.

10
z
x
c
v
Inserting the Bobbin
Step
z
Push the bobbin case cover release button to the
to release bobbin case cover. Place the bobbin in
the bobbin case. Lightly pull the bobbin thread
to ensure that the bobbin turns in a counter
clockwise direction. If it turns in a clockwise
direction, remove the bobbin and replace it so that it
turns in a counter clockwise direction.
q
Thread
w
Bobbin case
* The bobbin case cover has a helpful
picture for reference when threading.
q
w
r
r
t
e
Step
x
Guide the thread into the notch on the front of
the bobbin case.
Draw the thread to the left, sliding it between the
tension spring blades.
e
Front of the slot
Step
c
Continue to draw the thread lightly until the thread
slips into the side slot.
Pull out about 4˝ of thread to the rear.
r
Back of the slot
Step
v
Reattach the bobbin case cover.
t
Bobbin case cover plate

11
z
z
x
x
c
c
vb
v
b
q
w
e
r
t
Threading the Machine
Step
z
Raise the presser foot lifter. Bring needle up to its
highest position. Draw the loose end of the thread
under the thread guide with your left hand, as you
hold the thread near the spool with your right hand.
Then draw the thread down through the right
channel of the thread tension dial.
q
Thread guide
Step
x
Firmly draw the thread around the thread guide plate
and up to the thread take-up lever.
w
Thread guide plate
Step
c
Slip the thread from back to front through the slit and
towards the eye of the take-up lever as shown. The
thread tail should be on the left side of the take-up
lever.
e
Slit
r
Eye of the take-up lever
Step
v
Pull the thread towards the lower thread guide.
Step
b
Slip the thread in the needle bar thread guide from
the left.
t
Needle bar thread guide
Thread the needle from manually front to back or use the
built-in needle threader.
NOTE
Refer to page 12 for information about how to use the
built-in needle threader.
Complete Threading Diagram for Upper Thread
See diagram at left.

12
q
w
e
w
Needle Threader
Step
z
Lower the presser foot. Push the needle threader
lever down as far as it will go. The hook comes out
through the needle eye from behind.
q
Needle threader knob
w
Hook
Step
x
Draw the thread down around the threader guide
and under the hook.
e
Threader guide
Step
c
Release the threader knob slowly while holding
the thread end with your hand. A loop of the thread
is pulled up through the needle eye.
Step
v
Remove the loop from the threader and pull out the
thread end from the needle eye.
NOTE
SINGER
®
recommends SINGER
®
Style 2000 (woven)
and 2001(knit) chromium needles for your machine.
Need help selecting the right needle?
Embroidery tips on compatibility of thread, needle
type, fabric, and stabilizer are referenced in the
Embroidery Quick Reference Guide on page 56.
z
x
c
v

13
x
c
q
w
r
e
w
q
Drawing Up the Bobbin Thread
Step
z
Raise the presser foot lifter. Hold the needle thread
with your finger.
q
Needle thread
w
Bobbin thread
Step
x
Turn the handwheel one complete turn towards you.
Draw the needle thread up to bring a loop of the
bobbin thread above the needle plate.
Step
c
Pass the needle thread through the hole in the
embroidery foot and draw it up to the thread cutter
and holder.
e
Hole
r
Thread cutter and holder
z

14
q
q
w
e
Changing the Needle
Step
z
Turn off the power switch. Raise the needle by
turning the handwheel and lowering the presser foot.
Loosen the needle clamp screw by turning it
counterclockwise.
Remove the needle from the clamp.
CAUTION
Always make sure to turn the power switch off and
disconnect the machine from the power supply before
changing the needle.
Step
x
Insert a new needle into the needle clamp with the flat
side of the needle to the rear.
q
Needle clamp screw
w
Flat side of the needle
When inserting the needle into the needle clamp, push it
up as far as it will go and tighten the needle clamp screw
firmly.
Step
c
To check needle straightness, place the flat side of the
needle onto something flat (a needle plate, glass etc.)
The gap between the needle and the flat surface should
be consistent.
e
Gap
NOTE
Remove and discard damaged needles. Blunt, burred
or bent needles can harm your machine and fabric.
SINGER
®
recommends SINGER
®
Style 2000 (woven)
and 2001(knit) chromium needles for your machine.
The proper needle style and size will help ensure
embroidery success.
Need help selecting the right needle?
Embroidery tips on compatibility of thread, needle
type, fabric, and stabilizer are referenced in the
Embroidery Quick Reference Guide on page 56.
z
x
c

15
3
2
3
2
q
Adjusting the Thread Tension
Balanced thread tension
Balanced embroidery tension should show a small and
even amount of embroidery thread on the backside
of the embroidered design. When threads are looking
unbalanced on your design always check these steps
first.
•
Re-thread the machine on top. Be sure that the
embroidery thread is feeding evenly and correctly off
the spool.
•
Check that the embroidery thread hasn’t come out of
thread guides.
•
Check that the bobbin is correctly threaded.
When the needle thread tension is too tight
The bobbin thread shows on the right side of the fabric.
Reduce the tension by turning the tension dial to a lower
number.
q
Bobbin thread
When the needle thread tension is too loose
The embroidery thread shows more on the back of the
design and can form loops.
Increase the tension by turning the dial to a higher
number.

16
q
w
e
Fabric
Use stabilizer to produce best results when embroidering.
• Fabrics which lack rmness or stability, such as light-
weight cotton can pull in when being embroidered. This
can result in problems such as shrinkage and puckering
of the fabric around the embroidery area.
• Stretch fabrics may stretch or distort when tightening
the hoop, and the result may be uneven embroidery.
Furthermore, when the fabric is removed from the
hoop after embroidery is completed, the fabric may
shrink and cause the embroidered pattern to become
distorted.
Embroidery can be applied to many types of fabrics, but
it may be necessary to prepare these fabrics in a special
manner.
• Fabrics with a loopy or napped surface such as towels,
use a water soluble stabilizer both on the underside
and on the topside of the fabric.
• Denim and linen are considered unstable because
of the loose weave, use a medium weight cut-away
stabilizer on the backside.
• T-shirt type fabric usually requires at least one,
sometimes two layers of soft mesh-type cut-away
stabilizer on the backside.
• For medium to heavyweight stable woven fabric, use a
medium to heavy weight tear-away type stabilizer.
• For soft or sheer fabrics, use a rinse-away type
stabilizer.
Stabilizer
Stabilizer is a non-woven substance. The three most
common types of stabilizers available are tear-away,
cut-away, and wash-away. Which stabilizer you choose
will depend on the nature of the fabric on which you
are embroidering. Always follow the manufacturer’s
instructions on how to use and apply the stabilizer
correctly.
Generally, the stabilizer should be larger in size than the
hoop with which it is being used. When embroidery is
completed, use a fine point scissor to carefully remove
any excess stabilizer from the embroidery area. See
page 56 for information on using the appropriate
stabilizer.
Template
When positioning the fabric into the hoop, use the
template to align the centerlines on the fabric with the
center of the hoop. First mark the centerlines on the
fabric and place the fabric on the outer hoop. Place the
inner hoop and template over the fabric and adjust the
fabric placement.
q Center point for embroidery and center justified
lettering embroidery
w Leftmost point for left justified lettering embroidery
e
Rightmost point for right justified lettering
embroidery
Justification of lettering explained on page 31
Using Fabric and Stabilizer
Stabilizer (Adhesive surface facing down)
Hoop position
Embroidering surface (Top side)
Material (Under side)

17
FUNCTION OF BUTTONS AND ICONS
Function Panel
q
Built-in design button
Press this button to display the pattern selection
window for the built-in designs. The LCD screen
displays up to 4 patterns. Press the page forward
and back buttons to show the next or previous 4
patterns. Press the icon of desired design on screen
to select the desired pattern.
w
Lettering button
Press this button to select one of the 3 fonts for
lettering or border designs.
e
Internal memory button
Press this button to open the pattern file folders
designed to store edited designs in the machines
internal memory.
r
USB memory button
Press this button to open the pattern files you have
transferred from the computer to the USB memory
stick.
t
Forward and reverse page buttons
Press the forward page button to display the next page
and press the reverse page button to go back to the
previous page.
y
OK
√
buttton
Press this button to confirm the setting and return to
the previous window.
u
Exit X button
Press this button to close the current window and
return to the previous display.
q
w
e
r
t
y
u
Adjusting the brightness of the LCD screen can be
helpful when the light in the room varies.
q
LCD brightness adjusting dial
w
LCD screen
q
w
CAUTION
Do not press the surface of the LCD screen or function
panel with a hard or sharp object such as a pencil or
screwdriver.
LCD Brightness Adjusting Dial

18
i
Editing Button
Press this button to open the editing window. You can
resize, rotate, flip and combine the pattern to create
your own original embroidery design.
o
File Save Button
Press this button to save the lettering or edited design
as a file.
!0
Delete Button
Press this button to delete the selected pattern.
!1
SET Button
Press this button to open the custom setting windows.
You can set the machine functions to your preference
(See page 19-22 for options).
!2
Help? Button
Press this button to view the step by step illustrated
instructions of the following four basic operations:
• Changing needle
• Inserting the bobbin
• Threading the machine
• Winding the bobbin
!3
Positioning Buttons
Press one of the 4 buttons to move the hoop in the
direction of the arrows. In the editing mode, press
these buttons to move the selected pattern in the
editing window.
!4
Centering button
Press this button to move the hoop to the center.
!5
Trace Button
Press this button to trace the location of embroidery
pattern without stitching in the hoop.
!6
Carriage Return Button
Press this button to return the carriage to the home
position. The needle will be positioned in the far left
corner of the hoop.
!7
Stitch Forward Button
Press this button to move the hoop forward. The hoop
will move forward 10 stitches each time you press this
button.
!8
Stitch Back Button
Press this button to move the hoop backward. The
hoop will move backward 10 stitches each time you
press this button.
i
o
!0
!1
!2
!3
!6!5!7!8
!4

19
ON
OFF
2
inch/mm
mm
inch
3
Customizing Settings for Machine
Pressing the
SET
button will open the custom setting
windows. You can set the following 8 functions to your
preference.
q
Page Forward Button
Press the page button to display the next page
and press the reverse page button to go back to the
previous page.
w
OK
√
button
Press the OK
√
button to confirm the setting and
return to the previous SET window. See arrow.
e
Exit X button
Press the Exit X button to return to the previous
window without changing the setting.
Set 1. Maximum speed
The maximum sewing speed can be set from 400 to 650
spm.
The default setting is 650 spm.
Press the – icon to reduce the maximum sewing speed.
Press the + icon to increase the maximum sewing speed.
NOTE
Reduce the sewing speed when embroidering with
specialty threads, such as metallic thread, to help
prevent thread breakage.
Maximum
speed setting
650
spm
1
w
q
e
Maximum
speed setting
650
spm
1
Set 2. Buzzer sound
The buzzer sound can be turned ON or OFF.
The default setting is ON.
Press the ON icon to switch on the buzzer sound.
Press the OFF icon to switch off the buzzer sound.
Set 3. Inch/millimeter
You can set your machine’s measuring unit to either
inches or millimeters.
The default unit setting is millimeters.
Press the
inch
or
mm
icon to select the preferred unit.

20
Thread
selection
Madeira
Mettler
4
Robison-Anton
Format
5
Key Position
Adjustment
YES
6
6
Press
key
q
Format Memory?
5
Set 4. Thread selection
There are three brands of embroidery threads to choose
from. Press the corresponding icon of the thread you
wish to use. The color number of the selected brand will
be shown on the embroidery screen.
Set 5. Formatting the memory
To format the memory, select the memory location by
pressing the corresponding icon and pressing the
OK
√
button.
q
Built-in memory
w
USB memory stick
When formatting the USB memory stick on the machine,
be sure to allow plenty of time for the process. Do not
turn the machine off or remove the USB memory stick
until the machine prompts you.
NOTE
Formatting will erase all data stored in the memory.
If designs you stored are missing from the internal
memory or USB memory stick, reformatting may be
necessary.
Reformat using SET 5.
w
Set 6. Touch pad position adjustment
When touching screen icons or touch pad buttons, if
the wrong response comes up on the screen the touch
pad button may need realignment in the key position
adjustment window.
Step
z
Press the YES icon.
Step
x
Press the reverse page button.
z
x
/