
Installation and
Configuration Guide
HP J3245A
HP AdvanceStack Switch 800T
SEDONA.BK : sed_0cvr.fm5 Page 1 Thursday, February 27, 1997 10:11 AM

SEDONA.BK : sed_0cvr.fm5 Page 2 Thursday, February 27, 1997 10:11 AM

Perforate
✂
(over for more services)
HP Customer Support Services
How to get the latest software/agent firmware
You can download from the World Wide Web, HP FTP Library Service, CompuServe,
and HP BBS a compressed file (j3245a.exe) containing the latest version of the HP
Switch 800T software and proprietary MIB, the HP J3108A FDDI Module software, and
a software download utility file (update.exe). After you download the file, extract the
file by typing
filename
[Enter]. For example, j3245a [Enter].
World Wide Web
http://www.hp.com/go/network_city
Select the “Support” section.
From this web site, you can also download information on the HP networking prod-
ucts. If you have a growing network, download the Designing HP AdvanceStack
Workgroup Networks Guide or call 1-800-752-0900 in the U.S. to receive a copy through
the mail.
HP FTP Library Service
1. FTP to Internet IP Address — ftp ftp.hp.com.
2. Log in as anonymous and press [Return] at the password prompt.
3. Enter bin to set the transfer type.
4. Enter cd /pub/networking/software.
5. Enter get
filename
to transfer the file to your computer, then quit.
CompuServe
1. Login to CompuServe.
2. Go to the “hp” service.
3. Select “HP Systems, Disks, Tapes, etc.”
4. Select “Networking Products” library.
5.
filename
and then quit.
HP BBS
Set your modem to no parity, eight bits, 1 stop bit, set speed up to 14400 bps, and with
your telecommunication program (e.g., Windows Terminal) dial (208) 344-1691 in the
U.S. to get the latest software for your HP networking product. For other countries,
see http://www.hp.com/cposupport/eschome.html.
Obtain the latest console code (j3245a.exe) from
HP FTP Library: ftp ftp-boi.external.hp.com
World Wide Web: http://www.hp.com/go/network_city
HP BBS: (208) 344-1691
(over)
SEDONA.BK : sed_perf.fm5 Page 1 Thursday, February 27, 1997 10:11 AM

Perforate
✂
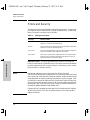
HP FIRST Fax Retrieval Service
HP FIRST is an automated fax retrieval service that is available 24 hours a day, seven
days a week. HP FIRST provides information on the following topics:
■ Product information
■ Troubleshooting instructions
■ Technical reviews and articles
■ Configuration information
To access HP FIRST, dial one of the following phone numbers:
Additional HP Support Services
In addition to the above services, you can purchase various HP telephone support
services which provide you expert HP technical assistance:
■ Network Phone-In Support provides you support at an hourly rate. In the U.S.,
call 1-800-790-5544. In other countries, please contact your local HP Response
Center to see if this service is available in your country.
■ HP SupportPack Comprehensive Network Support provides complete prob-
lem resolution for medium to large interconnected local and wide area
networks. Contact your HP Authorized Reseller or the nearest HP Sales and
Support Office for more information.
HP offers other hardware support services. Please contact your reseller for more
information.
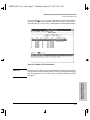
Location Phone Number
U.S. and Canada Only Dial 1 (800) 333-1917 with your fax machine or touch-tone phone
and press 1.
Outside the U.S. and Canada Dial 1 (208) 344-4809 from your fax machine and press 9.
To receive a list of currently available documents, enter document number 19941. The information
you requested will be sent to you by return fax. For other countries, see http://www.hp.com/
cposupport/eschome.html.
CompuServe: Go hpsys
Lib 7.
Download asfw.exe
Network Phone-In
Support (hourly):
1-800-790-5544
SEDONA.BK : sed_perf.fm5 Page 2 Thursday, February 27, 1997 10:11 AM

HP AdvanceStack Switch 800T
Installation and Configuration Guide
HP J3245A
SEDONA.BK : b_front.fm5 Page i Thursday, February 27, 1997 10:11 AM

Hewlett-Packard Company
8000 Foothills Boulevard, m/s 5551
Roseville, California 95747-5551
http://www.hp.com/go/network_city
© Copyright 1997 Hewlett-Packard Company
All Rights Reserved.
This document contains information which is protected by
copyright. Reproduction, adaptation, or translation without
prior permission is prohibited, except as allowed under the
copyright laws.
Publication Number
J3245-90001
March 1997
Applicable Product
HP J3245A
Disclaimer
The information contained in this document is subject to
change without notice.
HEWLETT-PACKARD COMPANY MAKES NO WARRANTY
OF ANY KIND WITH REGARD TO THIS MATERIAL,
INCLUDING, BUT NOT LIMITED TO, THE IMPLIED
WARRANTIES OF MERCHANTABILITY AND FITNESS
FOR A PARTICULAR PURPOSE. Hewlett-Packard shall not
be liable for errors contained herein or for incidental or
consequential damages in connection with the furnishing,
performance, or use of this material.
Hewlett-Packard assumes no responsibility for the use or
reliability of its software on equipment that is not furnished
by Hewlett-Packard.
Warranty
A copy of the specific warranty terms applicable to your
Hewlett-Packard products and replacement parts can be
obtained from your HP Sales and Service Office or
authorized dealer.
SEDONA.BK : b_front.fm5 Page ii Thursday, February 27, 1997 10:11 AM

iii
Preface
Preface
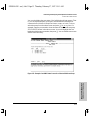
Use of This Guide and Other Switch 800T
Documentation
This guide describes how to install the Switch 800T (HP J3245A) in your
network and use the console interface for the HP AdvanceStack Switch 800T
(hereafter referred to as the “Switch 800T”).
Important! Before installing or removing a transceiver module, refer to the
specific transceiver module documentation describing these procedures.
■ If you need information on specific parameters in the console interface,
refer to the online help provided in the interface.
■ If you need further information on Hewlett-Packard switch technology,
refer to the HP AdvanceStack Products CD shipped with your Switch
800T.
SEDONA.BK : b_front.fm5 Page iii Thursday, February 27, 1997 10:11 AM

iv
Preface
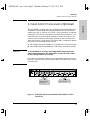
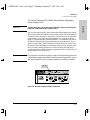
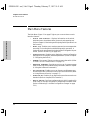
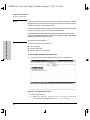
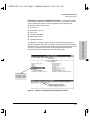
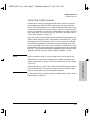
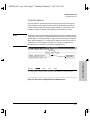
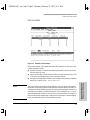
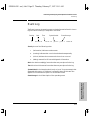
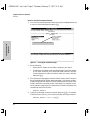
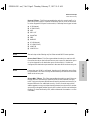
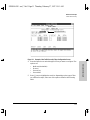
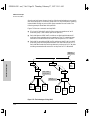
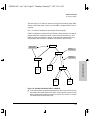
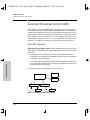
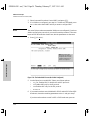
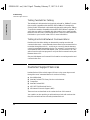
Overview of Console Applications
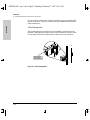
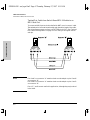
Example of the HP AdvanceStack Switch 800T with Four 100Base-TX Transceivers
installed
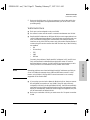
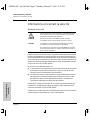
When powered-up in the factory default configuration, the Switch 800T-
automatically operates as a multiport learning bridge with the following
configuration:
■ All ports are enabled and are members of a single broadcast domain
■ Spanning tree protocol (STP) disabled
The console interface provides the following capabilities for use when you
want to move beyond this basic level of operation:
■ Monitoring system performance and status
■ Customizing the system configuration for improved performance and
unique system requirements
■ Enabling network management (SNMP) access
■ Setting passwords to help protect system security
■ Downloading system software updates
■ Troubleshooting
SEDONA.BK : b_front.fm5 Page iv Thursday, February 27, 1997 10:11 AM

v
Contents
Contents
1: Installation
Installation Summary . . . . . . . . . . . . . . . . . . . . . . . . . . . . . . . . . . . . . . . . . . 1-1
1. Install Add-In Transceivers (Optional) . . . . . . . . . . . . . . . . . . . . . . . 1-3
2. Verify the Switch’s Operation . . . . . . . . . . . . . . . . . . . . . . . . . . . . . . . 1-6
3. Mount the Switch . . . . . . . . . . . . . . . . . . . . . . . . . . . . . . . . . . . . . . . . . . 1-8
4. Connect a Power Supply . . . . . . . . . . . . . . . . . . . . . . . . . . . . . . . . . . . 1-16
5. Complete the Network Connections to the Switch . . . . . . . . . . 1-19
6. Connect a Console Device (Optional) . . . . . . . . . . . . . . . . . . . . . . 1-21
Where To Go from Here . . . . . . . . . . . . . . . . . . . . . . . . . . . . . . . . . . . . . . 1-25
2: Using the Console Interface
Overview . . . . . . . . . . . . . . . . . . . . . . . . . . . . . . . . . . . . . . . . . . . . . . . . . . . . . 2-1
Starting and Ending a Console Session . . . . . . . . . . . . . . . . . . . . . . . . . 2-2
Main Menu Features . . . . . . . . . . . . . . . . . . . . . . . . . . . . . . . . . . . . . . . . . . 2-4
Screen Structure and Navigation . . . . . . . . . . . . . . . . . . . . . . . . . . . . . . . 2-5
Using Password Security . . . . . . . . . . . . . . . . . . . . . . . . . . . . . . . . . . . . . . . 2-7
Rebooting the Switch . . . . . . . . . . . . . . . . . . . . . . . . . . . . . . . . . . . . . . . . . 2-10
Resetting the Switch . . . . . . . . . . . . . . . . . . . . . . . . . . . . . . . . . . . . . . . . . 2-12
3: Configuring the Switch
Overview . . . . . . . . . . . . . . . . . . . . . . . . . . . . . . . . . . . . . . . . . . . . . . . . . . . . . 3-1
Configurable Features . . . . . . . . . . . . . . . . . . . . . . . . . . . . . . . . . . . . . . . . . 3-3
System Features . . . . . . . . . . . . . . . . . . . . . . . . . . . . . . . . . . . . . . . . . . . . 3-5
Port Features . . . . . . . . . . . . . . . . . . . . . . . . . . . . . . . . . . . . . . . . . . . . . . . 3-6
IPX Service Features . . . . . . . . . . . . . . . . . . . . . . . . . . . . . . . . . . . . . . . . . 3-7
Internet (IP) Service Features . . . . . . . . . . . . . . . . . . . . . . . . . . . . . . . . . 3-9
Virtual LAN (VLAN) Features . . . . . . . . . . . . . . . . . . . . . . . . . . . . . . . . 3-11
IP Multicast (IGMP) Service Features—Multimedia Traffic Control 3-12
SEDONA.BK : sedona.TOC Page v Thursday, February 27, 1997 10:11 AM

vi
Contents
SNMP Communities Features . . . . . . . . . . . . . . . . . . . . . . . . . . . . . . . . 3-13
Trap Receivers Features . . . . . . . . . . . . . . . . . . . . . . . . . . . . . . . . . . . . . 3-15
Serial Link Features . . . . . . . . . . . . . . . . . . . . . . . . . . . . . . . . . . . . . . . . 3-16
Console Features . . . . . . . . . . . . . . . . . . . . . . . . . . . . . . . . . . . . . . . . . . . 3-17
Network Monitoring Port Features . . . . . . . . . . . . . . . . . . . . . . . . . . . . 3-18
Spanning Tree Features . . . . . . . . . . . . . . . . . . . . . . . . . . . . . . . . . . . . . 3-21
Traffic/Security Filter Features . . . . . . . . . . . . . . . . . . . . . . . . . . . . . . . 3-22
Automatic Broadcast Control (ABC) Features—Layer 3 Switching 3-23
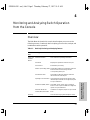
4: Monitoring and Analyzing Switch Operation from the
Console
Overview . . . . . . . . . . . . . . . . . . . . . . . . . . . . . . . . . . . . . . . . . . . . . . . . . . . . . 4-1
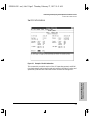
Status and Counters Menu . . . . . . . . . . . . . . . . . . . . . . . . . . . . . . . . . . . . . 4-2
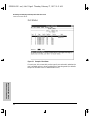
Switch Information . . . . . . . . . . . . . . . . . . . . . . . . . . . . . . . . . . . . . . . . . . 4-3
Port Status . . . . . . . . . . . . . . . . . . . . . . . . . . . . . . . . . . . . . . . . . . . . . . . . . 4-4
Port Counters . . . . . . . . . . . . . . . . . . . . . . . . . . . . . . . . . . . . . . . . . . . . . . . 4-5
Address Table . . . . . . . . . . . . . . . . . . . . . . . . . . . . . . . . . . . . . . . . . . . . . . 4-7
Port Address Table . . . . . . . . . . . . . . . . . . . . . . . . . . . . . . . . . . . . . . . . . . 4-8
Spanning Tree (STP) Information . . . . . . . . . . . . . . . . . . . . . . . . . . . . . 4-10
IP Multicast (IGMP) Status . . . . . . . . . . . . . . . . . . . . . . . . . . . . . . . . . . 4-12
Automatic Broadcast Control (ABC) Information . . . . . . . . . . . . . . . 4-14
Event Log . . . . . . . . . . . . . . . . . . . . . . . . . . . . . . . . . . . . . . . . . . . . . . . . . . . . 4-15
5: Using SNMP To Monitor and Manage the Switch
SNMP Management . . . . . . . . . . . . . . . . . . . . . . . . . . . . . . . . . . . . . . . . . . . . 5-1
SNMP Configuration Process . . . . . . . . . . . . . . . . . . . . . . . . . . . . . . . . . . 5-3
6: Using the Advanced Commands
Overview . . . . . . . . . . . . . . . . . . . . . . . . . . . . . . . . . . . . . . . . . . . . . . . . . . . . . 6-1
Commands . . . . . . . . . . . . . . . . . . . . . . . . . . . . . . . . . . . . . . . . . . . . . . . . . . . . 6-4
SEDONA.BK : sedona.TOC Page vi Thursday, February 27, 1997 10:11 AM

vii
Contents
7: Advanced Concepts
Overview . . . . . . . . . . . . . . . . . . . . . . . . . . . . . . . . . . . . . . . . . . . . . . . . . . . . . 7-1
Spanning Tree Protocol (STP) . . . . . . . . . . . . . . . . . . . . . . . . . . . . . . . . . 7-2
Port Trunking . . . . . . . . . . . . . . . . . . . . . . . . . . . . . . . . . . . . . . . . . . . . . . . . . 7-5
Filters and Security . . . . . . . . . . . . . . . . . . . . . . . . . . . . . . . . . . . . . . . . . . . 7-8
Virtual LANs (VLANs) . . . . . . . . . . . . . . . . . . . . . . . . . . . . . . . . . . . . . . . . 7-14
Effect of VLANs on Other Switch Features . . . . . . . . . . . . . . . . . . . . . 7-15
How To Configure a VLAN . . . . . . . . . . . . . . . . . . . . . . . . . . . . . . . . . . . 7-17
VLAN Restrictions . . . . . . . . . . . . . . . . . . . . . . . . . . . . . . . . . . . . . . . . . . 7-21
IP Multicast (IGMP) . . . . . . . . . . . . . . . . . . . . . . . . . . . . . . . . . . . . . . . . . 7-23
How IGMP Operates . . . . . . . . . . . . . . . . . . . . . . . . . . . . . . . . . . . . . . . . 7-23
How To Configure IGMP . . . . . . . . . . . . . . . . . . . . . . . . . . . . . . . . . . . . 7-26
Automatic Broadcast Control (ABC) . . . . . . . . . . . . . . . . . . . . . . . . . . 7-30
How ABC Operates . . . . . . . . . . . . . . . . . . . . . . . . . . . . . . . . . . . . . . . . . 7-30
How To Configure ABC . . . . . . . . . . . . . . . . . . . . . . . . . . . . . . . . . . . . . 7-32
8: File Transfers
Overview . . . . . . . . . . . . . . . . . . . . . . . . . . . . . . . . . . . . . . . . . . . . . . . . . . . . . 8-1
Downloading an Operating System . . . . . . . . . . . . . . . . . . . . . . . . . . . . . 8-2
Using TFTP To Download the OS File . . . . . . . . . . . . . . . . . . . . . . . . . . 8-3
Switch-to-Switch Download . . . . . . . . . . . . . . . . . . . . . . . . . . . . . . . . . . 8-5
Troubleshooting TFTP Downloads . . . . . . . . . . . . . . . . . . . . . . . . . . . . . 8-6
Transferring Switch 800T Configurations . . . . . . . . . . . . . . . . . . . . . . . 8-8
9: Troubleshooting
Troubleshooting Approaches . . . . . . . . . . . . . . . . . . . . . . . . . . . . . . . . . . . 9-1
Diagnosing with the LEDs . . . . . . . . . . . . . . . . . . . . . . . . . . . . . . . . . . . . . 9-2
Installation Problems . . . . . . . . . . . . . . . . . . . . . . . . . . . . . . . . . . . . . . . . . 9-5
Incorrect Hardware Installation . . . . . . . . . . . . . . . . . . . . . . . . . . . . . . . 9-5
Console RS-232 Problems . . . . . . . . . . . . . . . . . . . . . . . . . . . . . . . . . . . . 9-5
Cabling Problems . . . . . . . . . . . . . . . . . . . . . . . . . . . . . . . . . . . . . . . . . . . 9-6
Unusual Network Activity . . . . . . . . . . . . . . . . . . . . . . . . . . . . . . . . . . . . . 9-7
SEDONA.BK : sedona.TOC Page vii Thursday, February 27, 1997 10:11 AM

viii
Contents
Diagnostic Tests . . . . . . . . . . . . . . . . . . . . . . . . . . . . . . . . . . . . . . . . . . . . . . 9-7
Testing Twisted-Pair Cabling . . . . . . . . . . . . . . . . . . . . . . . . . . . . . . . . . . 9-8
Testing End-to-End Network Communications . . . . . . . . . . . . . . . . . . 9-8
Customer Support Services . . . . . . . . . . . . . . . . . . . . . . . . . . . . . . . . . . . . 9-8
A: Cables and Connectors
Recommended Cables . . . . . . . . . . . . . . . . . . . . . . . . . . . . . . . . . . . . . . . . A-2
Twisted-Pair Cable/Connector Pin-Outs . . . . . . . . . . . . . . . . . . . . . . . A-3
Twisted-Pair Cable Pin Assignments . . . . . . . . . . . . . . . . . . . . . . . . . . A-5
RS-232 Connector and Cable Pin-Outs . . . . . . . . . . . . . . . . . . . . . . . . . A-6
RS-232-C “Null Modem” Cable . . . . . . . . . . . . . . . . . . . . . . . . . . . . . . . . A-7
Minimum Cable Pin-out for Direct Console Connection . . . . . . . . . . A-7
RS-232 Modem Cable . . . . . . . . . . . . . . . . . . . . . . . . . . . . . . . . . . . . . . . A-8
B: Specifications
Physical . . . . . . . . . . . . . . . . . . . . . . . . . . . . . . . . . . . . . . . . . . . . . . . . . . . B-1
Electrical . . . . . . . . . . . . . . . . . . . . . . . . . . . . . . . . . . . . . . . . . . . . . . . . . B-1
Environmental . . . . . . . . . . . . . . . . . . . . . . . . . . . . . . . . . . . . . . . . . . . . . B-1
Connectors . . . . . . . . . . . . . . . . . . . . . . . . . . . . . . . . . . . . . . . . . . . . . . . . B-2
Electromagnetic . . . . . . . . . . . . . . . . . . . . . . . . . . . . . . . . . . . . . . . . . . . B-2
Safety . . . . . . . . . . . . . . . . . . . . . . . . . . . . . . . . . . . . . . . . . . . . . . . . . . . . B-2
C: Sample Console Configurations
Windows 3.1 Terminal Application . . . . . . . . . . . . . . . . . . . . . . . . . . . . C-1
Procomm Plus V2.01 . . . . . . . . . . . . . . . . . . . . . . . . . . . . . . . . . . . . . . . . . . C-2
Other Terminal Emulators . . . . . . . . . . . . . . . . . . . . . . . . . . . . . . . . . . . . C-3
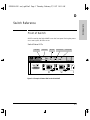
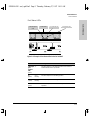
D: Switch Reference
Front of Switch . . . . . . . . . . . . . . . . . . . . . . . . . . . . . . . . . . . . . . . . . . . . . . D-1
Back of the Switch . . . . . . . . . . . . . . . . . . . . . . . . . . . . . . . . . . . . . . . . . . . D-1
SEDONA.BK : sedona.TOC Page viii Thursday, February 27, 1997 10:11 AM

ix
Contents
E: BOOTP Operation
Overview . . . . . . . . . . . . . . . . . . . . . . . . . . . . . . . . . . . . . . . . . . . . . . . . . . . . E-1
The Bootp Process . . . . . . . . . . . . . . . . . . . . . . . . . . . . . . . . . . . . . . . . . . . E-1
Bootp Database Record Entries . . . . . . . . . . . . . . . . . . . . . . . . . . . . . . . E-2
Configuring Bootp . . . . . . . . . . . . . . . . . . . . . . . . . . . . . . . . . . . . . . . . . . . . E-3
F: MAC Address Management
Overview . . . . . . . . . . . . . . . . . . . . . . . . . . . . . . . . . . . . . . . . . . . . . . . . . . . . . F-1
Switch (Default) MAC Address . . . . . . . . . . . . . . . . . . . . . . . . . . . . . . . . F-2
VLAN MAC Addresses . . . . . . . . . . . . . . . . . . . . . . . . . . . . . . . . . . . . . . . . . F-3
MAC Addresses (for Spanning Tree Operation) . . . . . . . . . . . . . . . . . F-4
Safety and Regulatory Statements
Index
SEDONA.BK : sedona.TOC Page ix Thursday, February 27, 1997 10:11 AM

SEDONA.BK : sedona.TOC Page x Thursday, February 27, 1997 10:11 AM

1-1
Installation
1
Installation
Installation Summary
This chapter describes the installation procedures for the HP J3245A
AdvanceStack Switch 800T (hereafter referred to as the Switch 800T).
The following is a summary of those procedures:
1. Site Preparation. Ensure that the cabling infrastructure meets the
network specifications for your intended use of the Switch 800T.
• For 100Base-TX transceivers used in the Switch 800T, use category 5,
four-pair, 100 ohm UTP (unshielded twisted-pair) cables. Cable
lengths can be up to 100 meters. For a connection to an end node, use
straight-through cable. For a connection to a hub or a switch, use a
crossover cable.
• For 100Base-FX transceivers used in the Switch 800T, use fiber
optical cables that:
– Are fitted with type SC connectors
– Conform to ISO/IEC 793-2 type B1 and ITU-T G.652 standards
Caution Ensure that the power source circuits are adequate and properly
grounded. That is, ensure that any Switch 800T installation , together with
any other devices, does not overload the power circuits, wiring, and over-
current protection. To determine the possibility of overloading the supply
circuits, add together the ampere ratings from the nameplates of all
devices installed on the same circuits and compare the total with the
rating limits for the supply circuits. For additional information, refer to
appendix B, “Specifications”.
SEDONA.BK : sed_1.fm5 Page 1 Thursday, February 27, 1997 10:11 AM

1-2
Installation
Installation Summary
Installation
2. Install transceivers (optional). The Switch 800T is shipped with four
HP J3192B AdvanceStack 100Base-TX Twisted-Pair Transceiver Modules
(referred to in this manual as “transceivers”) already installed.
Caution Because the Switch 800T can be damaged by installing or removing a
transceiver while powered-up, the ONLY time to install additional
transceivers is before powering up the switch or with the power
disconnected during scheduled down times.
The J3192A
twisted-pair transceiver is not supported in the Switch 800T.
Always use the “B” version (J3192B
) or any later J3192 transceiver(s).
3. Verify the switch’s operation. This is a simple process of applying
power to the Switch 800T and ensuring that the LEDs on the switch’s front
panel respond properly.
4. Mount the switch in a rack, on a wall, or on a tabletop.
Hewlett-Packard sells 19-inch free-standing equipment racks. To order a
rack, contact your HP-authorized LAN dealer.
5. (Optional) Connect the J2962A HP AdvanceStack Redundant
Power Supply (RPS) instead of using the switch’s own power
supply. This optional power supply can be used instead of the switch’s
main power supply to provide both primary and backup (redundant)
power to keep the switch operating in the event of a failure in either a
power circuit or a power supply unit.
6. Connect the Switch 800T to a network and connect computers and/
or other devices to the switch’s ports.
7. Configure the Switch 800T. The Switch 800T, in its factory default
configuration, operates as a multiport transparent bridge. You will need
to use the console interface utility to configure the switch for additional
functionality. Initially, this requires one of the following:
• A PC with a terminal emulator connected to the Console RS-232 port
on the switch either directly or via a modem
• An actual terminal directly connected to the Console RS-232 port on
the switch
(For examples of terminal emulator configurations, refer to appendix C,
“Sample Console Configurations”.)
After configuring a minimal IP or IPX configuration through one of the
above options, you can also access the console interface via Telnet or use
a network management tool, such as Hewlett-Packard’s AdvanceStack
Assistant, for some configuration and monitoring functions.
SEDONA.BK : sed_1.fm5 Page 2 Thursday, February 27, 1997 10:11 AM

1-3
Installation
1. Install Add-In Transceivers (Optional)
Installation
1. Install Add-In Transceivers (Optional)
The Switch 800T is shipped with four HP J3192B AdvanceStack 100Base-TX
Twisted-Pair Transceiver Modules already installed. (The switch does not
support use of the “A” version—HP J3192A—of this transceiver.) Additional
twisted-pair (UTP) or fiber transceivers must be purchased separately. (You
need a minimum of one transceiver installed to connect the switch to your
network, and one additional transceiver installed for each connection to a
server, hub, switch, or other device.) The Switch 800T is designed to operate
with either of the following two transceivers:
■ HP J3192B AdvanceStack 100Base-TX Twisted-Pair Transceiver Module
■ HP J3193B AdvanceStack 100Base-FX Fiber-Optic Transceiver Module
Caution To avoid damage to circuitry in the Switch 800T and transceivers,
always have the power to the Switch 800T turned off while a trans-
ceiver is being installed or removed.
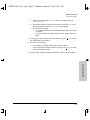
For proper cooling and for reduction of electromagnetic emissions, ensure
that a slot cover (provided with your Switch 800T) is installed on any unused
transceiver slot.
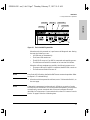
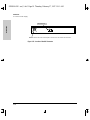
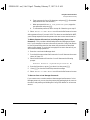
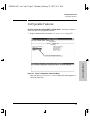
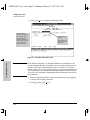
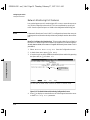
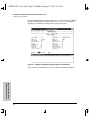
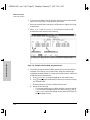
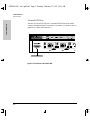
Figure 1-1. Switch 800T with Factory-Installed HP J3192B 100Base-TX (UTP)
Transceivers
Factory-Installed
100Base-TX (UTP)
Transceivers
Slot Covers on Unused
Transceiver Slots
SEDONA.BK : sed_1.fm5 Page 3 Thursday, February 27, 1997 10:11 AM

1-4
Installation
1. Install Add-In Transceivers (Optional)
Installation
It may be more convenient to install additional transceivers before installing
the Switch 800T into a rack or other location. Inspect your installation site and
determine whether the switch’s module slots will be accessible.
For a description of currently available transceivers, contact your
HP-authorized LAN dealer or check Hewlett-Packard’s World Wide Web site
listed on the card at the front of this manual.
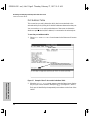
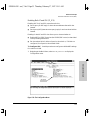
To Install a Transceiver into the Switch 800T: This procedure
describes the general installation of a transceiver. For information on the
specific transceiver you are installing, plus specific connection and trouble-
shooting information, refer to the HP 100Base-T Transceiver Modules
Installation Guide you received with the transceiver.
1. Unplug the Switch 800T from the AC power source.
Caution To avoid damage to circuitry in the Switch 800T and transceivers,
always have the power to the Switch 800T turned off while a
transceiver is being installed or removed.
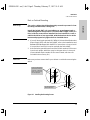
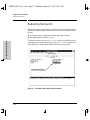
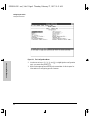
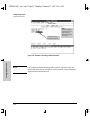
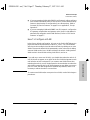
2. Use a flat-bladed or Torx T-10 screwdriver to unscrew the two retaining
screws from the cover plate on the slot in which you want to install the
transceiver. For example, to install an HP J3192B AdvanceStack 100Base-
TX Twisted-Pair Transceiver Module for port 5:
Figure 1-2. Remove the Cover Plate from the Transceiver Slot
Retain the cover plate for future use. If you remove a transceiver in the
future without replacing it, cover the unused slot with one of these cover
plates.
Loosen These Screws
SEDONA.BK : sed_1.fm5 Page 4 Thursday, February 27, 1997 10:11 AM

1-5
Installation
1. Install Add-In Transceivers (Optional)
Installation
Caution For proper cooling and reduction of electromagnetic emissions, ensure
that the slot covers (provided with your Switch 800T) are installed on any
unused slots.
3. While constantly touching a metal part of the Switch 800T to discharge
any static electric difference between your body and the switch, carefully
remove the transceiver from its protective anti-static packaging. Hold the
transceiver by its edges, taking care not to touch any of its metal connec-
tors.
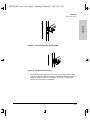
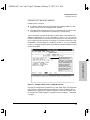
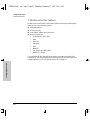
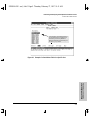
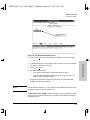
4. Slide the transceiver firmly into the open slot as far as it will go. The
transceiver’s faceplate should touch the face of the device.
Note Ensure that the transceiver you are installing has a blue color bar with the
word “100T” printed on it ([ 100T ]). (See figure 1-3, below.) Any transceiver
that does not have this bar will not operate with the Switch 800T and will cause
a fault condition.
Figure 1-3. Slide the Transceiver into the Slot
5. Tighten the retaining screws on the transceiver until they are snug. Be
careful that you do not overtighten the screws.
6. To install another transceiver, return to step 2. Otherwise, go on to the
next procedure (page 1-6).
Blue “100T” Color Bar Indicating a
Correct Transceiver for the Switch 800T
SEDONA.BK : sed_1.fm5 Page 5 Thursday, February 27, 1997 10:11 AM

1-6
Installation
2. Verify the Switch’s Operation
Installation
2. Verify the Switch’s Operation
This process verifies that the Switch 800T is operating properly.
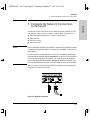
Verify the Switch Hardware
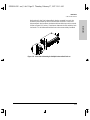
1. Connect the supplied power cord to the switch’s power receptacle.
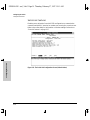
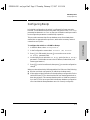
Figure 1-4. Back Panel of the Switch 800T
2. Plug the power cord into a properly grounded electrical outlet.
Note The Switch 800T does not have a power switch. It is powered on when the
switch’s power cord is connected to the switch and to a power source.
If your installation requires a different power cord than the one supplied with
the switch, be sure to use a power cord displaying the mark of the safety
agency that defines the regulations for power cords in your country. The mark
is your assurance that the power cord can be used safely with the switch.
3. Check the LEDs on the switch’s front panel.
Power Receptacle on
the Back of the Switch
SEDONA.BK : sed_1.fm5 Page 6 Thursday, February 27, 1997 10:11 AM
Page is loading ...
Page is loading ...
Page is loading ...
Page is loading ...
Page is loading ...
Page is loading ...
Page is loading ...
Page is loading ...
Page is loading ...
Page is loading ...
Page is loading ...
Page is loading ...
Page is loading ...
Page is loading ...
Page is loading ...
Page is loading ...
Page is loading ...
Page is loading ...
Page is loading ...
Page is loading ...
Page is loading ...
Page is loading ...
Page is loading ...
Page is loading ...
Page is loading ...
Page is loading ...
Page is loading ...
Page is loading ...
Page is loading ...
Page is loading ...
Page is loading ...
Page is loading ...
Page is loading ...
Page is loading ...
Page is loading ...
Page is loading ...
Page is loading ...
Page is loading ...
Page is loading ...
Page is loading ...
Page is loading ...
Page is loading ...
Page is loading ...
Page is loading ...
Page is loading ...
Page is loading ...
Page is loading ...
Page is loading ...
Page is loading ...
Page is loading ...
Page is loading ...
Page is loading ...
Page is loading ...
Page is loading ...
Page is loading ...
Page is loading ...
Page is loading ...
Page is loading ...
Page is loading ...
Page is loading ...
Page is loading ...
Page is loading ...
Page is loading ...
Page is loading ...
Page is loading ...
Page is loading ...
Page is loading ...
Page is loading ...
Page is loading ...
Page is loading ...
Page is loading ...
Page is loading ...
Page is loading ...
Page is loading ...
Page is loading ...
Page is loading ...
Page is loading ...
Page is loading ...
Page is loading ...
Page is loading ...
Page is loading ...
Page is loading ...
Page is loading ...
Page is loading ...
Page is loading ...
Page is loading ...
Page is loading ...
Page is loading ...
Page is loading ...
Page is loading ...
Page is loading ...
Page is loading ...
Page is loading ...
Page is loading ...
Page is loading ...
Page is loading ...
Page is loading ...
Page is loading ...
Page is loading ...
Page is loading ...
Page is loading ...
Page is loading ...
Page is loading ...
Page is loading ...
Page is loading ...
Page is loading ...
Page is loading ...
Page is loading ...
Page is loading ...
Page is loading ...
Page is loading ...
Page is loading ...
Page is loading ...
Page is loading ...
Page is loading ...
Page is loading ...
Page is loading ...
Page is loading ...
Page is loading ...
Page is loading ...
Page is loading ...
Page is loading ...
Page is loading ...
Page is loading ...
Page is loading ...
Page is loading ...
Page is loading ...
Page is loading ...
Page is loading ...
Page is loading ...
Page is loading ...
Page is loading ...
Page is loading ...
Page is loading ...
Page is loading ...
Page is loading ...
Page is loading ...
Page is loading ...
Page is loading ...
Page is loading ...
Page is loading ...
Page is loading ...
Page is loading ...
Page is loading ...
Page is loading ...
Page is loading ...
Page is loading ...
Page is loading ...
Page is loading ...
Page is loading ...
Page is loading ...
Page is loading ...
Page is loading ...
Page is loading ...
Page is loading ...
Page is loading ...
Page is loading ...
Page is loading ...
Page is loading ...
Page is loading ...
Page is loading ...
Page is loading ...
Page is loading ...
Page is loading ...
Page is loading ...
Page is loading ...
Page is loading ...
Page is loading ...
Page is loading ...
Page is loading ...
Page is loading ...
Page is loading ...
Page is loading ...
Page is loading ...
Page is loading ...
Page is loading ...
Page is loading ...
Page is loading ...
Page is loading ...
Page is loading ...
Page is loading ...
Page is loading ...
Page is loading ...
Page is loading ...
Page is loading ...
Page is loading ...
Page is loading ...
Page is loading ...
Page is loading ...
Page is loading ...
Page is loading ...
Page is loading ...
Page is loading ...
-
 1
1
-
 2
2
-
 3
3
-
 4
4
-
 5
5
-
 6
6
-
 7
7
-
 8
8
-
 9
9
-
 10
10
-
 11
11
-
 12
12
-
 13
13
-
 14
14
-
 15
15
-
 16
16
-
 17
17
-
 18
18
-
 19
19
-
 20
20
-
 21
21
-
 22
22
-
 23
23
-
 24
24
-
 25
25
-
 26
26
-
 27
27
-
 28
28
-
 29
29
-
 30
30
-
 31
31
-
 32
32
-
 33
33
-
 34
34
-
 35
35
-
 36
36
-
 37
37
-
 38
38
-
 39
39
-
 40
40
-
 41
41
-
 42
42
-
 43
43
-
 44
44
-
 45
45
-
 46
46
-
 47
47
-
 48
48
-
 49
49
-
 50
50
-
 51
51
-
 52
52
-
 53
53
-
 54
54
-
 55
55
-
 56
56
-
 57
57
-
 58
58
-
 59
59
-
 60
60
-
 61
61
-
 62
62
-
 63
63
-
 64
64
-
 65
65
-
 66
66
-
 67
67
-
 68
68
-
 69
69
-
 70
70
-
 71
71
-
 72
72
-
 73
73
-
 74
74
-
 75
75
-
 76
76
-
 77
77
-
 78
78
-
 79
79
-
 80
80
-
 81
81
-
 82
82
-
 83
83
-
 84
84
-
 85
85
-
 86
86
-
 87
87
-
 88
88
-
 89
89
-
 90
90
-
 91
91
-
 92
92
-
 93
93
-
 94
94
-
 95
95
-
 96
96
-
 97
97
-
 98
98
-
 99
99
-
 100
100
-
 101
101
-
 102
102
-
 103
103
-
 104
104
-
 105
105
-
 106
106
-
 107
107
-
 108
108
-
 109
109
-
 110
110
-
 111
111
-
 112
112
-
 113
113
-
 114
114
-
 115
115
-
 116
116
-
 117
117
-
 118
118
-
 119
119
-
 120
120
-
 121
121
-
 122
122
-
 123
123
-
 124
124
-
 125
125
-
 126
126
-
 127
127
-
 128
128
-
 129
129
-
 130
130
-
 131
131
-
 132
132
-
 133
133
-
 134
134
-
 135
135
-
 136
136
-
 137
137
-
 138
138
-
 139
139
-
 140
140
-
 141
141
-
 142
142
-
 143
143
-
 144
144
-
 145
145
-
 146
146
-
 147
147
-
 148
148
-
 149
149
-
 150
150
-
 151
151
-
 152
152
-
 153
153
-
 154
154
-
 155
155
-
 156
156
-
 157
157
-
 158
158
-
 159
159
-
 160
160
-
 161
161
-
 162
162
-
 163
163
-
 164
164
-
 165
165
-
 166
166
-
 167
167
-
 168
168
-
 169
169
-
 170
170
-
 171
171
-
 172
172
-
 173
173
-
 174
174
-
 175
175
-
 176
176
-
 177
177
-
 178
178
-
 179
179
-
 180
180
-
 181
181
-
 182
182
-
 183
183
-
 184
184
-
 185
185
-
 186
186
-
 187
187
-
 188
188
-
 189
189
-
 190
190
-
 191
191
-
 192
192
-
 193
193
-
 194
194
-
 195
195
-
 196
196
-
 197
197
-
 198
198
-
 199
199
-
 200
200
-
 201
201
-
 202
202
-
 203
203
-
 204
204
-
 205
205
-
 206
206
-
 207
207
-
 208
208
-
 209
209
-
 210
210
-
 211
211
-
 212
212
-
 213
213


Ask a question and I''ll find the answer in the document
Finding information in a document is now easier with AI
Related papers
Other documents
-
 StarTech.com 10/100 Mbps Fiber Ethernet Converter User manual
-
Repotec RP-MCSNMP Owner's manual
-
Cisco Systems BPX 8600 Series Installation & Configuration Guide
-
Agilent Technologies ES User manual
-
 SSP DX Series User manual
-
Dymo LetraTag® 100T Plus User manual
-
Audio Technica ES925ML6/FM5 User manual
-
 Hood J3250M User manual
-
Audio-Technica audio-technica ES925C6-FM5 Cardioid Condenser Modular Gooseneck Microphone User manual
-
Bosch D5500CU User manual


