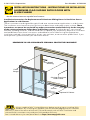
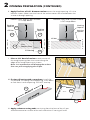
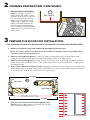
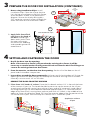
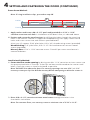
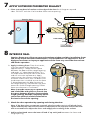
Pella 81CM0100 is a high-quality replacement aluminum sliding door designed for hard coat stucco applications in arid climates. It features a flush flange that overlaps the stucco by 1/2", providing a weather-tight seal and a clean, modern look. The door is constructed with durable aluminum-clad construction and includes a low-profile sill pan and optional sill nose for added protection against water entry. It also comes with pre-drilled holes for easy installation and is backed by Pella's Limited Warranty.
Pella 81CM0100 is a high-quality replacement aluminum sliding door designed for hard coat stucco applications in arid climates. It features a flush flange that overlaps the stucco by 1/2", providing a weather-tight seal and a clean, modern look. The door is constructed with durable aluminum-clad construction and includes a low-profile sill pan and optional sill nose for added protection against water entry. It also comes with pre-drilled holes for easy installation and is backed by Pella's Limited Warranty.


-
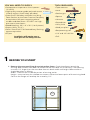
 1
1
-
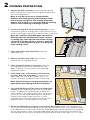
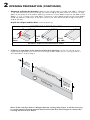
 2
2
-
 3
3
-
 4
4
-
 5
5
-
 6
6
-
 7
7
-
 8
8
-
 9
9
-
 10
10
-
 11
11
-
 12
12
-
 13
13


Pella 81CM0100 is a high-quality replacement aluminum sliding door designed for hard coat stucco applications in arid climates. It features a flush flange that overlaps the stucco by 1/2", providing a weather-tight seal and a clean, modern look. The door is constructed with durable aluminum-clad construction and includes a low-profile sill pan and optional sill nose for added protection against water entry. It also comes with pre-drilled holes for easy installation and is backed by Pella's Limited Warranty.
Ask a question and I''ll find the answer in the document
Finding information in a document is now easier with AI
Related papers
Other documents
-
 Wallecover 1-627843367703 Operating instructions
-
Movisa MVMBSSET12 Operating instructions
-
TAFCO WINDOWS MHW1528-W Installation guide
-
MD Building Products 87767 Installation guide
-
-
-
-
-
ReliaBilt VBHI3218 Installation guide
-
