Page is loading ...

Thank you for purchasing the Little Giant
®
Classic ladder – the original Multi-Use ladder. When used
correctly, the Little Giant Classic is the strongest, safest, most versatile ladder in the world. Little Giant Ladder
Systems subjects each ladder to comprehensive tests for safety in design and construction, so you can trust
it in all the work you do.
Please do not ignore the instructions! Make the most of your ladder system by learning how to use it safety.
If you have any questions about how to operate your ladder system, please contact us. We value our
customers, and we’re happy to help.
The Little Giant Classic is a Multi-Use ladder system
made up of three major components: one inner ladder
assembly and two outer ladder assemblies that
telescope over the inner section. The inner and outer
assemblies work together with the hinge locks and
Lock Tabs to adjust the ladder into different lengths
and positions, including:
1. Extension
2. A-Frame stepladder
3. Trestle-and-plank scaffolding system
4. 90-degree (only used against a secure wall)
5. Staircase
Customer Service: 800-453-1192
Little Giant Ladder Systems
1198 N. Spring Creek Place • Springville, UT 84663
SCAN THE CODE TO VIEW
INSTRUCTION & SAFETY VIDEO
1 2 3 4 5
Hinge Locks
(Palm Buttons)
Inner Ladder
Assembly
Outer Ladder
Assemblies
Tip & Glide
wheels
Lock Tabs

1. Do not force the hinges in or out using any tools. You may cause
permanent damage to the hinge mechanism.
2. If there is pressure on the hinge lock pins, they may not open
properly. Relieve the pressure by moving one half of the ladder
back and forth until the hinge locks move with minimal force.
3. Make sure each Lock Tab is fully engaged into the appropriate
rung tube before climbing on the ladder. Failure to do so may
result in injury.
4. For your safety, set up your ladder so the rungs are always level
from front to back and from side to side.
5. Keep clothing and body parts out of all moving mechanisms,
including the Hinge Locks and Lock Tabs to avoid pinching.
6. Keep clothing and body parts away from rungs when telescoping
the outer ladder over the inner ladder.
7. Use caution when using the ladder around electricity. Ensure that
the ladder does not come in contact with electrical circuits or
currents.
8. The Little Giant Classic has a maximum working load of 300 LBS.
9. Do not stand above the third rung from top.
10. Little Giant Ladder Systems assumes no liability for damage or
injury that may result from failing to follow all instructions correctly.
11. Keep all ladder rungs, ladder feet, work platforms, and other
standing and gripping surfaces clean and free from foreign
materials.
12. Do not lean too far over the side of the ladder and keep both feet
on the rungs at all times; as a rule of thumb, keep your navel
between the rails.
13. Inspect feet for wear; replace them when necessary.
14. Read all labels on the ladder before use.
A-Frame and Staircase Ladder Safety Tips
1. Ensure that the Hinge Locks and Lock Tabs are securely engaged
before climbing your ladder.
2. Make each of your ladder’s four feet are solidly planted before
climbing.
3. When using your ladder on a stair case, ensure that the rungs are
level and that each foot is on a solid, secure surface.
Extension Ladder Safety Tips
1. Do not allow the full weight of the ladder to fall on the hinges as
the ladder folds from the extension to the A-frame position.
2. When releasing the Lock Tabs, make sure you support the inner
ladder assembly with one hand to prevent it from sliding down
rapidly. Failure to do so may result in injury.
3. Use the proper angle for the extension ladder position. The
distance from the base of the ladder to the bottom of the support
wall should be one-fourth the working height of the extension
ladder (minimum distance between ladder and support wall must
be 3 feet).
4. Fully engage the Hinge Locks before use, failure to do so may
result in injury.
5. When using your Classic as a tall extension ladder, stake the feet
to the ground and tie down the top for extra security. Extend the
ladder at least 3 feet above a supporting roof or eve.
Scaffolding Safety Tips
1. Do not use outer or inner sections of the ladder as a separate
stepladder.
2. When the scaffolding plank is above the third rung (three feet
high), it may be used as a work bench, but not as a standing
platform.
3. ANSI rules state that the scaffolding plank should not be used
as a standing platform at heights greater than three times the
minimum width of the base section.
4. The scaffolding system has a one-man, 250-pound rating.
5. Only one person should be on the scaffold plank at a time.
Work Platform Safety Tips
1. If you purchased a Work Platform for your Classic, you can
use it as an additional tool tray or as a standing platform.
2. Do not use the Work Platform as a standing platform above
the third rung from the top, in either A-frame and extension
configurations.
3. Make certain the Work Platform is secure on the rung before
standing on it.
Little Giant Classic Ladders Limited Lifetime Warranty
We put our products through rigorous tests to ensure that your
ladder is built to the highest standards. In the unlikely event that
within the warranty period from the date of the original purchase,
there is a problem caused by defects in either workmanship or
materials, we’ll be happy to repair or replace, at our option and
without cost to the original purchaser. All we ask is that you
return your ladder to our manufacturing facility. If it is determined
that the problem is covered by our warranty, we’ll take care of
the rest. All freight to and from the factory is to be paid by the
customer. If a replacement is necessary and your product is no
longer available, a comparable product will be substituted.
Little Giant Classic Ladders are tested to withstand normal wear
and tear, but are not indestructible and can be damaged by
misuse. Our warranty, just like other warranties worldwide, will
not cover wear and tear, misuse and/or abusive treatment. But
we do ensure a timely resolution at a fair price. Misuse may
include, but is not limited to, damage by vehicles, tools, people,
animals, falling objects, acts of God, and using Little Giant
Classic ladders in any matter contrary to the warning/instruction
labels and owner’s manual.
This shall be in lieu of any other warranty, expressed or implied,
including, but not limited to, any implied warranty of merchant-
ability or fitness for a particular purpose. The liability of Little
Giant Classic under this warranty shall be limited solely to repair
or replacement of the ladder within the warranty period; and
Little Giant Classic shall not be liable, under any circumstances,
for consequential or incidental damages, including but not
limited to, personal injury or labor costs. Some states do not
permit the exclusion or limitation of incidental or consequential
damages, so this exclusion may not apply to you. This warranty
gives you specific legal rights and you may have other legal
rights, which may vary, from state to state. This warranty is
effective as of December 1st, 2013. Manufacturing specifica-
tions are subject to change without notice.
The Little Giant accessories have a warranty of one year.
Little Giant Ladder Systems
1198 N. Spring Creek Place
Springville, UT 84663
Phone: 801-489-3684
Fax: 801-489-3685
www. LittleGiantLadders.com

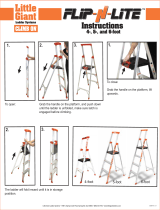
Palm Button
Change your ladder's shape.
Lock Tabs
Extension
Change your ladder's height.
Push the Palm Buttons in to release the hinge locks. The Palm Buttons allow the ladder to change
from storage, A-frame to extension.
Adjust to the desired height.
The Lock Tabs adjust the height of ladder. Pull out the Lock Tabs to unlock,
replace the Lock Tabs in the desired rung tube. Unlock only one Lock Tab at a
time while supporting the inner ladder assembly with one hand. Do not unlock the
Lock Tab if anyone is on the ladder.
Starting from the small A-frame position; open and lock your
ladder to the extension position and lay the ladder face up on
ground. Unlock the Lock Tabs and extend the top outer section
first; the top outer section must be fully extended before the
lower outer section is extended. (If your ladder has wheels, the
wheels must be placed so they are at the top of the extension.)
Once you have extended the outer sections to the desired
height, lock the Lock Tabs. Always double check the two hinge
locks and four Lock Tabs to make sure they are fully locked and
engaged.
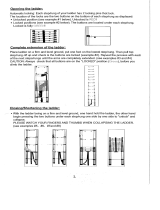
Lay the ladder down
Adjust the height
with the Lock Tabs
Flip the ladder over
Push feet against
the wall
Lift up on the end
with the wheels
Open the ladder
1
1
2
3
75.5˚
4
Next, flip the ladder over to a face-down position. Place the feet of the
ladder against a solid wall to keep the ladder from moving. Lift the other
end of the ladder, and walk the ladder hand over hand one rung at a time
until you are able to lean the ladder against the wall.
Lift the base of the ladder and carefully move the base away from the wall
until the ladder leans at a 75.5 degree angle. The distance from the
ladder's base to the base of the support wall must be 1/4 the working
length of the ladder; i.e., 1 foot out from the wall for every 4 feet in ladder
height. Ladder must be extended approximately 3 feet above a roof line
or working surface.
To take the ladder down from the extension position, lift the base of
the ladder and carefully move it to the wall to brace the feet of the
ladder. Slowly walk the ladder down hand over hand one rung at a
time until you are able to lay the ladder on the ground. Flip the
ladder over so it faces up. Unlock the Lock Tabs and telescope
each outer section to the rung nearest to the hinges, then lock the
Lock Tabs. Push in the Palm Buttons and return to the small
A-frame position.

A-Frame
Scaffolding
90˚ Staircase
Need additional help? Visit www.littlegiantladders.com or call Customer Care at 1-800-453-1192
Begin from the small A-frame position. Stand to one side of the ladder; unlock both Lock Tabs on one
outer section. When extending the ladder your hands must always be on the outside of the outer
section. Place one hand on the palm button and push away from you on the inner section to extend the
height. Once you have reached the desired height; line up the inner ladder and the outer ladder rungs,
place your hand under the rungs then lock both Lock Tabs.
Next, unlock the Lock Tabs on the opposite outer section. Place one hand on the palm button and push
up on the inner section to extend the height. Once you have reached the desired height; line up the
inner ladder and the outer ladder rungs, place your hand under the rungs then lock both Lock Tabs.
From the tall A-frame position reduce the
height on one side of the ladder by one
foot. Make sure the ladder is on a flat
level surface and the short side of the
ladder is against a secure wall.
Start from the small A-frame
position; lengthen the down
side of the ladder to the desired
height. Ensure the ladder rungs
are level before using.
1. Remove the outer sections from the inner ladder assembly.
2. Open the inner ladder assembly to the A-frame position until both hinges lock. This
is the first of two trestles needed for the scaffolding function.
3. Grasp both outer ladder bases.
4. Turn one side so it faces exactly the same as the second unit. Insert Lock Tabs of
that base into the adjacent holes of the opposite outer base.
5. Grasp the outer ladder base with the unused Lock Tabs and lower 1/2 inch, then
spread the opposite outer ladder base to form a second A-frame trestle (YES and NO).
6. Rotate forked ears on work platform to position.
7. Insert Work Platform between outer ladder bases on the third rung down of each
base. The wire-formed end of the Work Platform should surround the outer rung turned
to the inside of the outer ladder A-frame trestle.
8. Press down on top of Work Platform until it locks in a horizontal position. Outer
ladder A-frame trestle is now ready for use as second trestle.
9. Space the two trestles and place an appropriate scaffolding plank on the set of
rungs at the desired working height.
*Work Platform and Plank sold separately.
©2013 Little Giant Ladder Systems 52000 v3 3.13
Inner assemblyOuter assembly
YES
NO
Push Down
Flat
/