Disassembly and Reassembly _ 5
2-2. FRESH TANK / CAP CASE BRAKE / GASKET BRAKE (DW60A8070*/
DW60A8060* MODELS)
- FRESH TANK : DD82-01910A / SVC ASSY-FRESH TANK
- CAP CASE BRAKE : DD81-02725A / SVC CAP CASE BRAKE
- GASKET BRAKE : DD81-02726A / SVC GASKET BRAKE
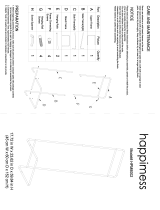
Part Figure Description
CAP CASE
BRAKE/
GASKET
BRAKE/
(DW60A8070*/
DW60A8060*
models)
A
B
[DISASSEMBLY]
1. Remove 3 screws that connect left SIDE PANEL to
front side of dishwasher.
- Type A: DD81-02693A / 2 pcs
- Type B: DD81-02694A / 1 pc
- HOUSING-LEFT : DD81-02928B/DD81-02880A/
DD81-02880C
FRESH TANK replacement: Empty the FRESH TANK
before repair. (Refer to ~page for how to empty)
WARNING
Be sure to remove the power plug before
servicing.
CAUTION
Empty the water container before lay down set.
(Refer to ~page for how to empty)
In case of Free Standing models, there’re no
screws of type B.
C
B
2
1
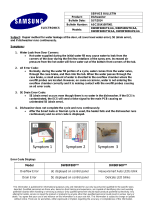
2. Remove 3 screws at the back side of dishwasher.
- Type C: DD81-02692A / 1 pc
- Type B: DD81-02694A / 2 pcs
In case of Free Standing models, take off the
COVER TOP by removing 2 screws of type A.
After removing screws, pull the COVER TOP
backward rst, and take it off upward.
-TOP COVER : DD81-02552C/DD81-02552D
Guide Tub Top
3. Remove 1 screw at the left side of GUIDE TUB TOP.
- Screw: DD81-02694A / 1 pc
- GUIDE TUB TOP : DD81-02733A