Technical Data
KR703
KR603
KR55RE
KR50RE
KR45RE
KR71RE
Black & Decker Copyright 2009 (Mar-09)
This manual is applicable for -KR, -A9 & -XD only
Hammer Drills
KR45RE/KR50RE/KR55RE/KR603/KR703/KR71RE
Intended Use
Your Black & Decker hammer drill has been designed for drilling in wood, metal, plastics and
masonry as well as for screwdriving purposes.
This tool is intended for consumer use only.
Safety Instructions
When using power tools, always observe the safety regulations applicable in your
country to reduce the risk of fire, electric shock, personal injury and material damage.
Read the following safety instructions before attempting to operate this product. Keep
these instructions in a safe place!
The following symbols are used throughout this manual:
Denotes risk of personal injury, loss of life or damage to the tool in case of non-observance
of the instructions in this manual.
Denotes risk of electric shock.
Fire hazard.
Work Area
Keep work area clean and bright. Cluttered areas and benches can cause accidents.
Keep work area well lit (250-300 Lux).
Do not operate power tools in explosive atmospheres, such as in the presence of
flammable liquids, gases or dust. Power tools create sparks that may ignite the dust
or fumes.
Keep children and bystanders away while operating a power tool. Distractions can
cause you to lose control.
Electrical Safety
Power tool plugs must match the outlet. Never modify the plug in any way. Do
not use any adapter plugs with earthed (grounded) power tools. Unmodified plugs
and matching outlets will reduce risk of electric shock.
Avoid body contact with earthed or grounded surfaces such as pipes, radiators,
ranges and refrigerators. There is an increased risk of electric shock if your body is
earthed or grounded.
Do not expose power tools to rain or wet conditions. Water entering a power tool will
increase the risk of electric shock.
Do not abuse the cord. Never use the cord for carrying, pulling or unplugging the
power tool. Keep cord away from heat, oil, sharp edges or moving parts. Damaged or
entangled cords increase the risk of electric shock.
When operating a power tool outdoors, use an extension cord suitable for
outdoor use. Use of a cord suitable for outdoor use reduces the risk of electric shock.
Personal Safety
Stay alert. Watch what you are doing. Use common sense. Do not operate the
tool when you are tired or under the influence of drugs, alcohol or medication. A
moment of inattention while operating power tools may result in serious personal injury.
Use safety equipment. Always wear eye protection. Everyday eyeglasses only have
impact resistant lenses, they are not safety glasses. Contain long hair. Safety equipment
such as dust mask, non-skid safety shoes, hardhat, heat-resistant apron or hearing
protection used for appropriate conditions will reduce personal injuries.
Avoid accidental starting. Ensure the switch is in the off position before plugging
in. Carrying power tools with your finger on the switch or plugging in power tools that have
the switch on invites accidents.
Remove any adjusting key or wrench before turning the power tool on. A wrench
or a key left attached to a rotating part of the power tool may result in personal injury.
Do not overreach. Keep proper footing and balance at all times. This enables
better control of the power tool in unexpected situations.
Dress properly. Do not wear loose clothing or jewelery. Keep your hair, clothing
and gloves away from moving parts. Loose clothes, jeweler or long hair can be caught
in moving parts.
If devices are provided for the connection of dust extraction and collection
facilities, ensure these are connected and properly used. Use of these devices
can reduce dust related hazards.
Secure workpiece. Use clamps or a vice to hold the workpiece. It is safer and it frees
both hands to operate the tool.
Power tool use and care
Do not force the power tool. Use the correct power tool for your application. The
correct power tool will do the job better and safer at the rate for which it was designed.
Do not use the power tool if the switch does not turn it on and off. Any power tool
that cannot be controlled with the switch is dangerous and must be repaired.
Disconnect the plug from the power source before making any adjustments,
changing accessories, or storing power tools. Such preventive safety measures
reduce the risk of starting the power tool accidentally.
Store idle power tools out of the reach of children and do not allow persons
unfamiliar with the power tool or these instructions to operate the power tool.
Power tools are dangerous in the hands of untrained users.
Maintain power tools. Check for misalignment or binding of moving parts, break-
age of parts and any other condition that may affect the power tools operation. If
damaged, have the power tool repaired before use. Many accidents are caused by poorly
maintained power tools.
Keep cutting tools sharp and clean. Properly maintained cutting tools with sharp
cutting edges are less likely to bind and are easier to control.
Use the power tool, accessories and tool bits etc., in accordance with these
instructions and in the manner intended for the particular type of power tool, taking
into account the working conditions and the work to be performed. Use of the power
tool for operations different from those intended could result in a hazardous situation.
Service
Have your power tool serviced by a qualified repairperson using only identical
replacement parts. This will ensure that the safety of the power tool is maintained.
Additional Safety Instructions for Hammer
Drills
Wear ear protectors with impact drills. Exposure to noise can cause hearing loss.
Use auxiliary handles supplied with the tool. Loss of control can cause personal injury.
Keep your drill bits sharp for best and safest performance.
When fitting and changing accessories, always use the instructions supplied with the
accessory.
Should your hammer drill develop a fault, do not try to fix it yourself, but take it to one of
our authorized repair agents.
Make sure that the switch is in the “off” position before you plugging in or putting down the tool.
Do not force your hammer drill – it will do a better and safer job at the speed for which
it was designed.
Warning: Some dust created by power sanding, sawing, grinding, drilling, and other
construction activities contains chemicals known to cause cancer, birth defects or other
reproductive harm. Some examples of these chemicals are:
Hammer Drill
Chuck Capacity
Power input
No load speed
Impact rate
Reverse
Max. drilling capacity
- steel
- wood
- concrete
Cable length
Weight
KR45RE
1-10
450
0-2,800
0-44,800
Yes
10
20
10
3
1.9
KR50RE
1-10
500
0-2,800
0-44,800
Yes
10
20
10
3
1.9
KR55RE
1.5-13
550
0-2,800
0-44,800
Yes
13
20
13
3
1.9
KR603
2-13
650
0-3,100
0-52,700
Yes
13
25
13
3
1.95
KR703
2-13
710
0-3,100
0-52,700
Yes
13
32
16
3
2.11
KR71RE
1.5-13
710
0-2,800
0-44,800
Yes
13
20
13
3
1.9
mm
W
RPM
BPM
mm
mm
mm
m
kg
Lead from lead-based paints,
Crystalline silica from bricks and cement and other masonry products, and
Arsenic and chromium from chemically treated lumber (CCA).
Your risk from these exposures varies, depending on how often you do this type of work.
To reduce your exposure to these chemicals: work in a well ventilated area, and work with
approved safety equipment, such as those dust masks that are specially designed to filter
out microscopic particles.
Avoid prolonged contact with dust from power sanding, sawing, grinding, drilling,
and other construction activities. Wear protective clothing and wash exposed
areas with soap and water. Allowing dust to get into your mouth, eyes, or lay on the
skin may promote absorption of harmful chemicals.
Labels on your tool
They may include the following symbols.
V volts
A Amperes
Hz Hertz
W Watts
Min. Minutes
Alternating current
Direct current
no No load speed
Class II Construction
Earthing terminal
Safety alert symbol
…/min Revolutions or reciprocation per minute
…/bpm Beats per minute
Double Insulation
The tool is double insulated. Double insulation means that all the external metal parts are
electrically insulated from the mains power supply. This is done by placing insulated
barriers between the electrical and mechanical components so as to making unnecessary for
the tool to be earthed. NOTE: Double insulation does not take the place of normal safety
precautions when operating this tool. The insulation system is for added protection against
injury resulting from a possible electrical insulation failure within the tool.
Electrical safety
The electric motor has been designed for one voltage only. Always check that the power supply
corresponds to the voltage on the rating plate.
Warning: Never connect the live (L) or neutral (N) wires to the earth pin marked E or .
Using an Extension Cable
An extension cable should not be used unless absolutely necessary. Use of an improper
extension cable could result in a risk of fire and electric shock. If an extension cable must be
used, use only those that are approved by the country’s Electrical Authority. Make sure that
extension cord is in good condition before using. Always use the cord that is suitable for the
power input of your charger (see technical data on name plate).
When using a cable reel, always unwind the cable completely.
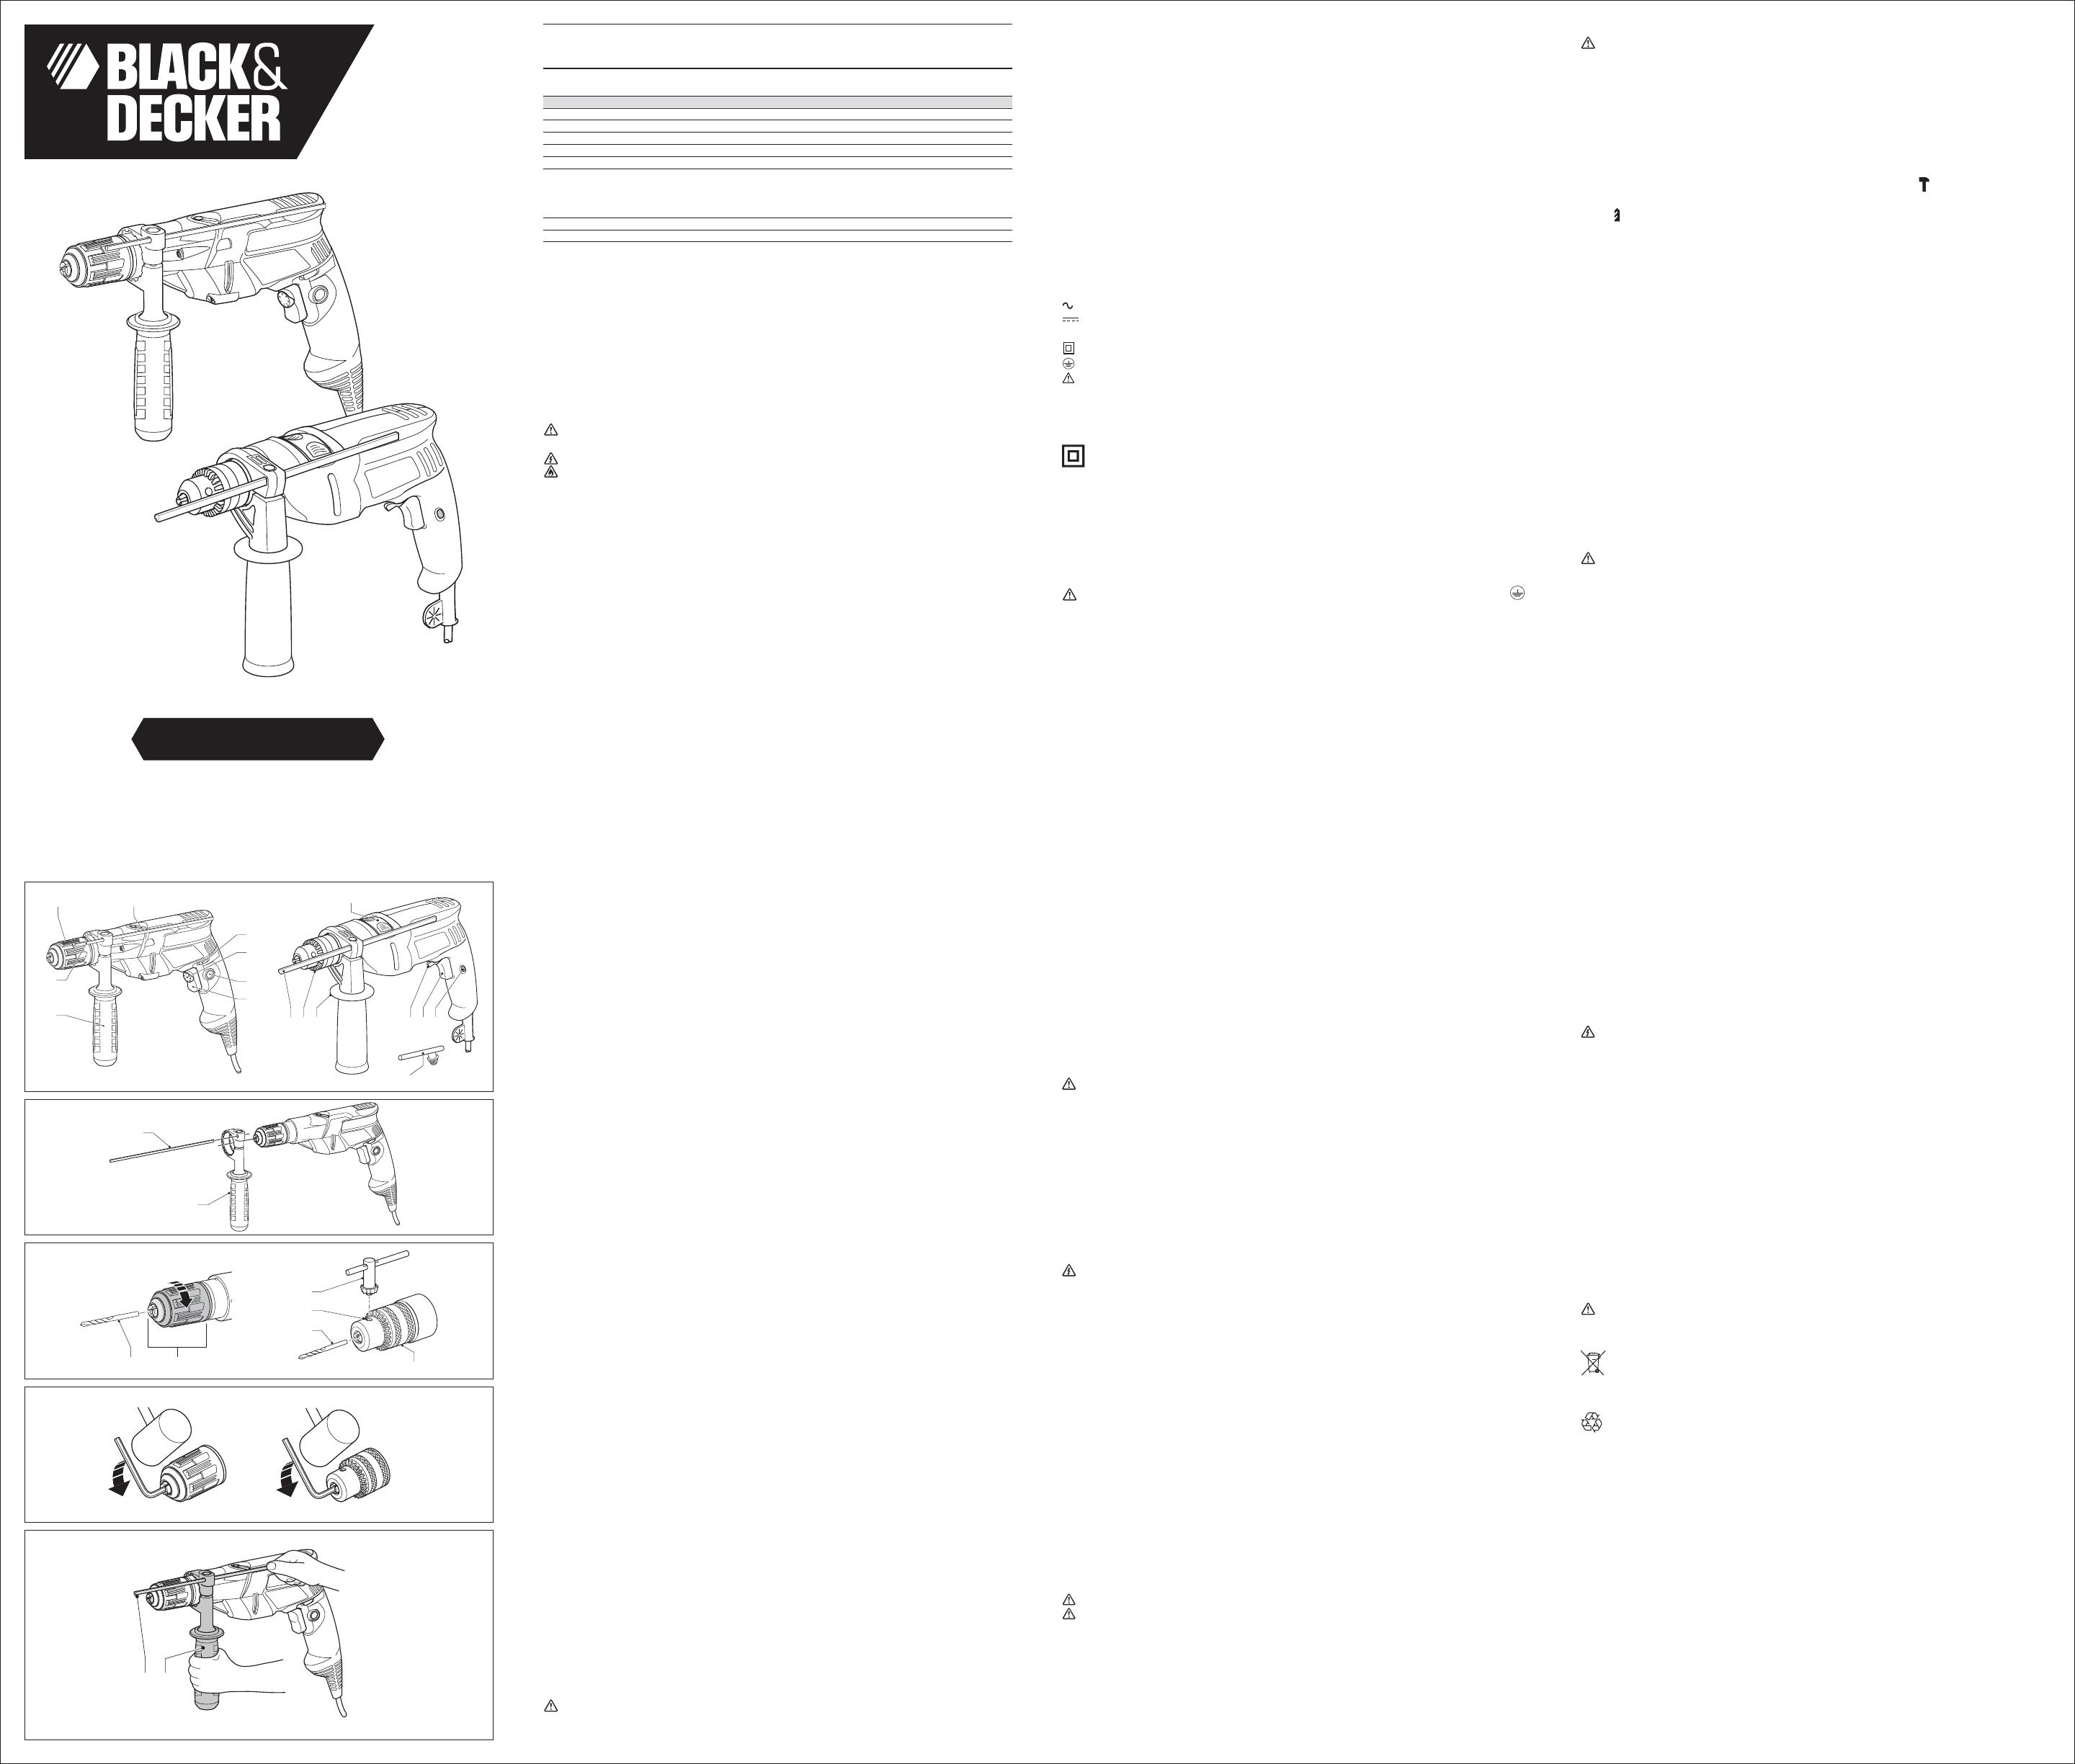
Features (fig. A)
Variable speed on/off switch
Variable speed control dial (KR703 only*)
Lock-on button
Forward/reverse slider
Drilling mode selector
Keyless chuck (KR703 & KR603 only)
Keyed chuck (KR55RE/KR50RE/KR45RE/KR71RE only)
Adjustable depth stop (exclude KR71RE-KR)
Side handle
Chuck key (KR55RE/KR50RE/KR45RE/KR71RE only)
Your Drill May Includes These Features
The on/off switch is used to operate your drill in all modes of operation.
The variable speed control dial provides optimal control of your drill for a wide range of tasks.
The lock-on button provides continuous operation of your drill.
The side handle gives a secondary gripping position for your drill.
The depth stop for setting the depth of hole to be drilled.
Your drill can operate as a hammer drill or as a rotary drill depending on the setting of the
hammer/ drill switch.
The forward/ reverse switch controls the direction of rotation when your drill is used as a
screwdriver, or when cleaning a jammed drill bit.
Assembly and Adjustment
Prior to assembly and adjustment always unplug the tool.
N.B. Accessories mentioned in this manual may not necessarily be included in your pack.
Fitting the Side Handle & Depth Stop (Fig. B)
The side handle (9) can be fitted to suit both right-handed and left-handed users.
Turn the grip counterclockwise until you can slide the side handle (9) onto the front of the
tool as shown.
Rotate the side handle into the desired position.
Insert the depth stop (8) into the mounting hole as shown. (exclude KR71RE-KR)
Set the drilling depth as described below.
Tighten the side handle by turning the grip clockwise.
Fitting and Removing a Drill Bit or Screwdriver Bit
Disconnect the plug from the electricity supply.
Keyless Chuck (KR703/ KR603 only) (Fig. C)
Open the chuck by turning the sleeve (6) counterclockwise.
Insert the bit shank (11) into the chuck.
Tighten the chuck by turning the sleeve clockwise.
Keyed Chuck (KR55RE/KR50RE/KR45RE/KR71RE only) (Fig. D)
Open the chuck by turning the sleeve (7) counterclockwise
Insert the bit shank (11) into the chuck.
Insert the chuck key (10) into each hole (12) in the side of the chuck and turn clockwise
until tight.
Removing and Fitting a Chuck (Fig. E)
Open the chuck jaws as far as possible.
Remove the chuck retaining screw, located in the chuck, by turning it clockwise using a
screwdriver.
Tighten an Allen key (not supplied) into the chuck and strike it with a hammer as shown.
Remove the Allen key.
Remove the chuck by turning it counterclockwise.
To refit the chuck, screw it onto the spindle and secure it with the chuck retaining screw.
Instruction for Use
Always observe the safety instructons and applicable regulations.
Let the tool work at its own pace. Do not overload.
Be aware of the location of pipework and wiring.
Apply only a gentle pressure to the tool (approx. 2-3 kg). Excessive force does not speed
up drilling but decreases tool performance and may shorten tool life.
Selecting the Direction of Rotation (Fig. A)
For drilling and for tightening screws, use forward (clockwise) rotation. For loosening
screws or removing a jammed drill bit, use reverse (counterclockwise) rotation.
To select forward rotation, push the forward/reverse slider (4) to the left.
To select reverse rotation, push the forward/reverse slider to the right.
Always wait until the motor has come to a complete standstill before changing the
direction of rotation.
Selecting the Speed (KR703 only*) (Fig. A)
Set the speed of your drill by setting the variable speed control dial (2) to the desired position.
Turn the dial counterclockwise for low speed and clockwise for high speed.
As a general rule, for large size drill bits use low speeds and for smaller drill bits use high
speeds.
Selecting the Drilling Mode (Fig. A)
For drilling in masonry, set the drilling mode selector (5) to the position.
For drilling in other materials and for screwdriving, set the drilling mode selector (5) to the
position.
Setting the Drilling Depth (Fig. E)
Insert the required drill bit.
Slacken the side handle (9).
Fit the depth adjustment stop (8) through the hole in the side handle clamp. (exclude
KR71RE-KR)
Slide the depth stop until the distance between the end of the depth stop and the end of
the drill bit is equal to the length of the screw you will fit.
Tighten the side handle.
Switching On and Off (Fig. A)
To switch the tool on, press the on/off trigger switch (1). The more the trigger is depressed
the faster the speed will be.
As a general rule, use low speeds for large diameter drill bits and high speeds for smaller
diameter drill bits.
For continuous operation, press the lock-on button (3) and release the on/off switch. This
option is available only at full speed or at any speed preset with the variable speed control
knob (2). This option does not work in reverse rotation.
To switch the tool off, release the on/off switch. To switch the tool off when in continuous
operation, press the on/off switch once more and release it.
Handy Hints
Drilling
WARNING: Drill may stall (if overloaded or improperly used) causing a twist. Always
expect the stall. Grip the drill firmly to control the twisting action (see Fig. F) and prevent
loss of control that could cause personal injury. If a stall does occur, release the trigger
immediately and determine the reason for the stall before re-starting. Do not click the
trigger of a stalled drill off and on in an attempt to start it. Damage to the drill can result.
Always apply a light pressure in a straight line with the drill bit. Run the drill very slowly,
using light pressure, until the hole is started enough to keep the drill bit from slipping out of it.
Use a block of wood to back up work pieces that may splinter.
Use spade bits when drilling large diameter holes in wood.
Use HSS drill bits when drilling in metal.
Use masonry bits when drilling in soft masonry.
Use a lubricant when drilling metals other than cast iron and brass.
Make an indentation using a center punch at the center of the hole to be drilled in order to
improve accuracy.
Keep the motor running while pulling the bit out of a drilled hole. This will help reduce jamming.
When using twist drill bits to drill holes in wood, it will be necessary to pull the bits out
frequently to clear chips from the flutes.
Screwdriving
Always use the correct type and size of screwdriver bit.
If screws are difficult to tighten, try applying a small amount of washing liquid or soap as a lubricant.
Always hold the tool and screwdriver bit in a straight line with the screw.
Maintenance
Your Black & Decker power tool has been designed to operate over a long period of time with a
minimum of maintenance. Continuous satisfactory operation depends upon proper tool care
and regular cleaning.
The hammer drill is not user-serviceable. Take the tool to an authorized Black & Decker repair agent.
Lubrication
Your drill has been adequately lubricated before leaving the factory.
Tool Cleaning
Unplug the tool before you clean the housing.
Regularly clean the ventilation slots in your tool using a soft brush or dry cloth.
Regularly clean the motor housing using a damp cloth. Do not use any abrasive or
solvent-based cleaner.
Regularly open the chuck and tap it to remove any dust from the interior.
Important
To ensure product SAFETY and RELIABILITY, repairs, maintenance and adjustment (other than
those listed in this manual) should be performed by authorized service centers or other qualified
organizations, always using identical replacement parts. Unit contains no user serviceable parts
inside.
Accessories
The performance of any power tool is dependent upon the accessory used. Black & Decker
accessories are engineered to high quality standards and are designed to enhance the perfor-
mance of your power tool. By using Black & Decker accessories you will get the very best from
your tool.
Black & Decker offers a large selection of accessories available at our local dealer or authorized
service center at extra cost.
CAUTION: The use of any non-recommended accessories may be hazardous.
Protecting The Environment
Separate collection. This product must not be disposed of with normal household waste.
Should you find one day that your Black & Decker product needs replacement, or if it is of
no further use to you, do not dispose of it with household waste. Make this product available for
separate collection.
Separate collection of used products and packaging allows materials to be recycled and
used again.
Re-use of recycled materials helps prevent environmental pollution and reduces the demand for
raw materials.
If necessary, contact your local municipality for proper disposal instructions in your city/town.
Service Information
Black & Decker offers a full network of company-owned and authorized service locations
throughout Asia. All Black & Decker Service Centers are staffed with trained personnel to provide
customers with efficient and reliable power tool service.
Whether you need technical advice, repair, or genuine factory replacement parts, contact the
Black & Decker location nearest to you.
Notes
Black & Decker’s policy is one of continuous improvement to our products and, as such,
we reserve the right to change product specifications without prior notice.
Standard equipment and accessories may vary by country.
Product specifications may differ by country.
Complete product range may not be available in all countries. Contact your local Black &
Decker dealers for range availability.
except Taiwan
www.BlackandDecker.com
®
•
•
•
•
•
•
•
•
•
•
•
•
•
•
•
•
•
•
•
•
•
•
•
•
•
•
•
•
•
•
•
•
•
•
•
•
•
•
*
1.
a.
b.
c.
2.
a.
b.
c.
d.
e.
3.
a.
b.
c.
d.
e.
f.
g.
4.
a.
b.
c.
d.
f.
g.
h.
5.
a.
•
•
•
•
•
•
•
•
•
•
•
•
•
•
•
•
•
•
•
•
•
•
•
•
•
•
•
•
•
•
•
•
•
•
•
1.
2.
3.
4.
5.
6.
7.
8.
9.
10.
..........
..........
..........
..........
..........
..........
..........
..........
..........
..........
..........
..........
..........
A
B
C
D
E
3978 14
5
8
9
11
6
7
10
11
12
8 9
6 5
8
9
1
3
2
4
10
90548809

