Page is loading ...

OptiChemi 600 Camera
Installation and User Instructions
UVP, LLC
2066 W. 11th Street
Upland, CA 91786
Phone: (800) 452-6788
Fax: (909) 946-3597
Web Site: www.uvp.com
81-0265-01 Rev J
Ultra-Violet Products Ltd
Unit 1, Trinity Hall Farm Estate,
Nuffield Road, Cambridge CB4 1TG UK
Phone: +44(0)1223-420022
Fax: +44(0)1223-420561

OptiChemi Camera 2
Introduction
The highly sensitive, cooled CCD OptiChemi™ 600 Camera is designed for use with UVP’s BioSpectrum® Imaging
System and ChemiDoc-It® Imager. This instruction manual covers assembly of the camera to the BioSpectrum and
ChemiDoc-It darkrooms, installation of software and use of the camera with the BioSpectrum and ChemiDoc-It.
Refer to the BioSpectrum and ChemiDoc-It manuals for additional system information and the VisionWorks®LS
Software PDF manual on the Support CD or Help Files embedded in the software for more information.
The OptiChemi 600 Camera is designed for the following applications:
• Luminescence detection,
• Chemiluminescent samples including Westerns, Northerns, Southerns and in vivo/in vitro samples,
• Autoradiograph films, and
• Fluorescent and colorimetric gels, colony and microtitre plates, dot blots and membrane arrays.

OptiChemi Camera 3
Components
Camera Kit
The camera kit includes a motorized lens or which may or may not include zoom capabilities. Refer to the packing slip or
installation components list for a complete inventory of included parts.
• OptiChemi 600 Camera
• Cables
• Camera power supply
• Motorized lens
• Brackets/screws for each lens
• Back focus rings (Note: Back focus rings may not be required for your camera. If no rings are needed, there will
not be any rings shipped with your order.)
• Additional components as described under the Installation section
The OptiChemi 600 Camera specifications include:
Specifications OptiChemi 600
Type 14.85mm x 10.26mm full frame CCD
Resolution 2184 x 1472
Pixel Size 6.8µm x 6.8µm
Full Well Capacity 55,000 electrons
Bit Depth 16-bit
Readout Noise 12 electrons (typical)
Quantum Efficiency (94% @ peak) 400nm 60%;
500nm 67%; 600nm 86%
Cooling -60˚C from ambient
Binning Yes
PC Interface Ethernet (Cat 5)
Lens Mount C-Mount
Lens 50mm
Aperture: f/1.2

OptiChemi Camera 4
Installation
The camera kit assemblies attach the OptiChemi 600 to the BioSpectrum Imaging System and ChemiDoc-It Imager. The
camera is controlled by VisionWorksLS software. Refer to the BioSpectrum or ChemiDoc-It manual for additional system
information and the VisionWorksLS Software Manual or Help Files for software information.
OptiChemi 600 Camera Kit with Motorized Fixed Lens
Installing on the BioSpectrum Imaging System
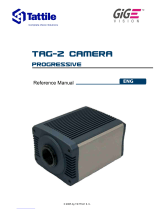
The photograph shows parts required for assembly of the camera kit with the automated/motorized fixed lens onto the
BioSpectrum Imaging System and ChemiDoc-It Imager.
• Set up the darkroom and unplug all components from the power outlet. Refer to the BioSpectrum Imaging
System Manual and ChemiDoc-It Imager Manual for more information.
• The Base Mount (1) is preassembled and attached to the BioSpectrum and ChemiDoc-It at the UVP factory. If
not, secure the base mount to the darkroom with the long screws (not shown).
• Attach the Camera Bracket (2) to the base with the Thumb Nuts (3).
• The OptiChemi 600 (4) should be attached to the Motorized Fixed Lens Controller (5) and Lens (6). Place the
camera/lens assembly over the base mount at the top of the darkroom and secure the camera to the Camera
Bracket (2) with the Knob (7).
• Connect the 15-pin camera Power Supply cord (8) to the camera well at the top of the darkroom.
Note: Although the picture shows a rectangular power supply, a power cord, and a pinned power connector, only
connect the pinned power connector coming from the darkroom to the camera. If upgrading the BioSpectrum or
1
2
3
9
6
4
7
5
8
10
1. Base Mount
2. Camera Bracket
3. Thumb Nuts
4. OptiChemi 600
5. Motorized Fixed Lens
Controller
6. Lens (f/1.2 shown)
7. Knob
8. Power Supply
9. Ethernet Adapter and
Ethernet Cable
10. Camera Cover

OptiChemi Camera 5
ChemiDoc-It from another camera type to the OptiChemi 600 camera, all power supply parts will be visible. In
this case, the power supply cord must be plugged into a wall outlet.
• Insert Ethernet Cable (9) into the camera and other end into the Ethernet Adapter.
• Once the software is installed, connect the USB cable extending from the Ethernet Adapter into an available port
on the computer.
• Install the VisionWorksLS software to run the
camera if not already installed. Refer to the PDF
VisionWorksLS software manual on the Support
CD or use the Help Files embedded in the
software for more information.
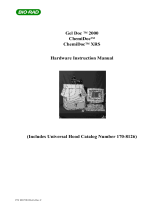
• To connect the motorized lens (showing the
motorized fixed lens in the photograph):
• Connect the Power Cable to the Power
Supply
• Connect the Power Cable to an electrical
outlet
• Connect the USB cable to an available port
on the computer.
Configure the Settings
• Connect the camera to a dedicated Ethernet port
on the computer via the Ethernet adapter cable.
• Plug in the camera power supply (extending from
the darkroom) into the 15-pin connector on
camera. If upgrading the system, plug the power
supply into the wall outlet.
• Go to the Windows Control Panel > Network
Connections
• Select the connection used for the camera, right
click and select Properties
UVP Lens Controller
(pictured without
camera and lens)
Power Cable
Control Box
Power Supply
USB cable

OptiChemi Camera 6
• Under the general tab select "Internet Protocol
(TCP/IP)" and left click the "Properties" button.
Enter the following information:
• IP address: 192.168.1.1
• Subnet Mask: 255.255.255.0
• Default Gateway: 192.168.1.117
• Leave the DNS entries blank
**** NOTE: Write down the old settings before you change your TCP/IP properties if you will need to restore these
settings at a later date ****
• Select "OK" twice to return to the desktop. Some computers may require a restart before the new TCP/IP settings
will take effect.
• If the computer controlling the camera is also connected to the Internet or to a local network, the camera should
be connected to the computer’s built-in network port. The supplied Ethernet-to-USB adapter can then be used for
the Internet/local-network connection (UVP part number 89-0380-01).

OptiChemi Camera 7
Accessories and Replacement Parts
To order accessories or replacement parts, contact UVP’s offices listed under Technical Support.
Technical Support
UVP offers expert technical support on all of its products. If you have any questions about the product’s use, operation
or repair, please contact UVP’s offices at the locations below.
Note: A Returned Goods Authorization (RGA) number must be obtained from UVP’s Customer Service prior to
returning any product.
If you are in North America, South America, East
Asia or Australia:
If you are in Europe, Africa, the Middle East or Western
Asia:
Call (800) 452-6788 or (909) 946-3197, and ask for
Technical Support during regular business days,
between 7:00 am and 5:00 pm, PST.
Call +44(0) 1223-420022, and ask for Customer Service
during regular business days between 9:00 am and 5:30
pm.
E-mail your message to: info@uvp.com or
techsupport@uvp.com
E-mail your message to: uv[email protected]k
Fax Technical Support at (909) 946-3597
Fax Customer Service at
+44(0) 1223-420561
Write to: UVP, LLC. 2066 W. 11
th
Street, Upland, CA
91786 USA
Write to: Ultra-Violet Products Ltd. Unit 1, Trinity Hall Farm
Estate, Nuffield Road, Cambridge CB4 1TG UK
BioSpectrum, ChemiDoc-It and VisionWorks are registered trademarks of UVP, LLC.
OptiChemi is a trademark of UVP, LLC.
/