Page is loading ...

!
!
!
!
TASCLADDER
!
!
!
Use and Care Instructions for the: Easy
Access/ TASC Telescopic Ladder
!
!
IMPORTANT
!
READ ALL INSTRUCTIONS CAREFULLY BEFORE
ATTEMPTING TO USE THE LADDER
!
!
WARNING
!
DO NOT OPEN THE LADDER FROM THE TOP
UNLESS EXTENDING TO FULL HEIGHT.
IT MAY COLLAPSE!
!
!
!
!
With proper use and care, your Easy Access/TASC
Telescopic Ladder
will provide you with a safe and
reliable service.
Please read and follow these instructions carefully.
Save this booklet for future reference.
!
!
!
!
!
!

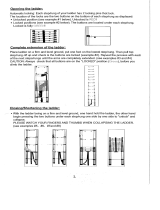
OPENING YOUR LADDER
!
!
c. The TASC Telescopic Ladder is very
portable and should be carried as shown
in Figure 1
!
Figure 2
IMPORTANT:
!
!
THE NEXT STEP IS REQUIRED TO ASSURE SAFE OPERATION FOR INTERIM HEIGHTS
!
!
!
1. Once you reach the desired height, lock the
d. To begin the opening process, place the
ladder on a firm level surface and stabilize
with your foot as shown in Figure 2
!
!
Figure 1
highest fully opened section by raising the
next higher section approximately 6 inches /
15 cms, until the locking levers are at an
angle of approximately 45 degrees. Figure 5
This section must be
opened approximately
4 inches to allow the
locking mechanisms in
the next lower section
IMPORTANT:
!
!
DO NOT OPEN LADDER FROM THE TOP UNLESS OPENING TO
THE FULL HEIGHT. SECTIONS MAY NOT PROPERLY LOCK AND
YOU COULD BE INJURED
!
!
e. There are two (2) ways to OPEN your ladder. Full extension or extension to any interim
height.
!
2. Check to be sure the locking levers for all
fully opened sections are at an angle of
approximately 60 degrees, indicating that
the locking mechanisms are properly
engaged. Figure 6
!
!
NOTE THAT THE BOTTOM LOCKING
LEVERS WITH PULL RINGS LOCK IN
THE UP POSITION.
!
!
!
!
!
!
!
!
!
Figure 6
!
!
!
!
!
!
!
LOCKING
LEVERS
to fully engage
!
!
Figure 5
!
!
!
!
!
Locked position
for all levers
except bottom
!
!
!
INTERIM HEIGHT EXTENSION
!
!
• For opening ladder to any interim
height,
!
3. If any locking levers are not at the proper
angle, lift the ladder by the tubes and
gently tap on the ground. This will
normally bring the locking levers to
!
!
!
!
!
!
!
!
UNLOCKED
!
!
!
!
!
!
!
!
LOCKED
!
!
!
Always ensure
that the locking
mechanisms have
fully engaged by
always open from bottom upwards,
correct angle.
POSITION POSITION
checking that the
proceeding as follows:
DOWN
UP
locking levers
!
!
c. Using both hands, grasp the outside edges
of the rung directly above the rung with
locking rings. Figure 3
!
!
d. Pull up and fully extend that section and
the next higher section, one at a time,
!
!
!
!
!
!
!
!
Figure 3
BOTTOM LOCKS ONLY
!
!
!
!
!
IMPORTANT:
!
!
NEVER USE THE LADDER BEFORE
ASSURING THAT THE
LOCKING MECHANISMS ARE
PROPERLY ENGAGED.
have dropped to
an angle of
approximately
60 degrees.
until you reach the desired height. Figure 4
NEVER PULL RINGED LOCKING
LEVERS WHEN LADDER IS IN USE.

FULL EXTENSION
CLOSING THE LADDER
!
!
!
c. To open ladder to full height,
use the
following procedure:
!
!
1.
To begin the opening process, place
the
ladder on a firm level surface
and stabilize with your foot. Figure
7
!
!
2.
Starting with the top rung, open
each
section to its full extension
(one section
at a time) until all
sections are fully open.
Figure 8
!
!
3.
Check to be sure the locking levers
are at
an angle of approximately
60 degrees,
indicating that the
locking mechanisms
are properly
engaged. Figure 9
!
!
NOTE THAT THE BOTTOM LOCKING
!
!
!
!
!
!
!
!
!
!
!
!
!
!
!
Figure 7
!
!
!
!
!
!
!
!
!
!
!
Figure 9
!
!
!
!
LOCKIN
G
LEVERS
!
!
!
!
!
!
!
!
!
!
!
!
!
!
!
!
Figure 8
!
!
!
!
!
!
!
Locked position
for all levers
except bottom
Care should be taken when closing the
ladder.
Unlocking and closing is quite simple when done carefully.
!
!
IMPORTANT:
!
!
DO NOT LOWER THE LADDER TO INTERIM HEIGHTS ALWAYS CLOSE LADDER
COMPLETELY AND THEN RE-OPEN TO DESIRED HEIGHT.
!
!
To close the ladder, refer to Figure 10 and proceed as follows:
!
!
a. Hold the ladder upright and firmly grasp one of the open vertical tubes with
one hand.
!
!
NEVER PUT ANY PART OF YOUR BODY, INCLUDING YOUR HANDS,
FINGERS OR THUMBS ON OR BETWEEN THE RUNGS WHEN
CLOSING THE LADDER.
!
b. With your other hand, pull down the ringed locking levers ONE AT A TIME, to
release the
bottom locks. (Sometimes it is necessary to pull the first ring a second time).
LEVERS WITH PULL RINGS LOCK IN THE
UP POSITION.
!
!
!
!
!
UNLOCKED
LOCKED
POSITION POSITION
Always ensure
that the locking
mechanisms have
fully engaged by
checking that the
USE CARE NEVER PULL BOTH
RINGS SIMULTANEOUSLY
!
!
c. When the bottom locks are
released, the
!
Figure 10
DOWN
UP
locking levers
ladder is easily closed by CAREFULLY
BOTTOM LOCKS ONLY
!
!
!
!
!
!
!
IMPORTANT:
!
!
NEVER USE THE LADDER BEFORE ASSURING THAT THE
LOCKING MECHANISMS ARE PROPERLY ENGAGED.
have dropped to
an angle of
approximately
60 degrees.
and SLOWLY telescoping each
section
down, keeping your hands
on the tubes,
NOT ON THE RUNGS. The
ladder
will unlock itself
automatically as you
lower each
section.
!
!
d. Store the ladder indoors.
!
!
!
!
!
!
!
Pull down rings
one at a time to
unlock ladder
NEVER PULL RINGED LOCKING LEVERS WHEN LADDER IS IN USE.
!
CARE IS
REOUIRED

SAFETY PROCEDURES
DO
Check to ensure all locking mechanisms are
properly engaged before climbing the ladder
DO
Always open and close the ladder in a slow
and careful manner
DO
DO#NOT#
Carry, operate or use your ladder near electrical
wires or equipment
THIS#LADDER#CONDUCTS#
ELECTRICITY#DO#NOT#
Place a box or other objects under the ladder to
gain extra height. Always have a firm level base for
ladder to stand on
#
#
#
#
#
#
#
#
LADDER NUMBER:
PURCHASER NAME:
ADDRESS:
#
#
Easy Access / TASC GUARANTEE CARD
#
#
#
Easy Access / /Tasc Telescopic Ladder
Treat the ladder with care. It is a precision built
product. If tubes are dented or damaged in any
way, the ladder may be difficult to open or close,
or may completely malfunction
DO
Always lean ladder against top rungs, never
against tubes, as they may become damaged
DO
Keep your ladder clean occasionally wipe tubes
with a clean, dry cloth. Paint should be cleaned off
immediately as it will impede telescoping action
If stiffness develops, wipe tubes with a clean
clothand apply a small amount of silicone spray
wiping any excess with a clean cloth
DO
Store your ladder indoors to avoid damp
conditions which could make the ladder difficult to
operate
DO
Read and follow additional safety information
labels provided on your ladder
#
#
SAFETY#PRECAUTIONS#
DO NOT
Place your hands, fingers or thumbs on or between
rungs when closing the ladder
DO NOT
Use your ladder if there is any doubt about the
locks being properly engaged, as this is an unsafe
condition
DO NOT
Pull ringed locking levers or tamper with other lockiing
levers when ladder is in use IT MAY COLLAPSE
DO#NOT
Use the ladder in a horizontal position, such as saw
horse. Never open or use the ladder upside down
as it could cause damage to the product or cause
bodily injury
#
#
POINTS TO REMEMBER
As with any tool, safety should always be the first
consideration when using your telescopic ladder
Always check locking levers for proper locked
position before climbing
Do not stand or climb on the top three sections of
the ladder when fully extended
Never pull ringed locking or tamper with other
locking levers while ladder in use
Do not lower the ladder to other interim heights
Always close ladder fully and then reopen to
desired height
Always close your ladder in a careful, controlled
manner remembering to avoid placing hands,
fingers or thumbs on or between rungs
When standing on the ladder, do not over reach or
push/pull ladder to change its position
MOVE#THE#LADDER#TO#THE#WORK.#
Always#
face the ladder and do not climb up the side
Whenever possible, the ladder
should be secured in position. Special care
should be used on a windy day
Keep your ladder clean
Store indoors in the closed position
TOWN: ZIP CODE:
DATE OF PURCHASE:
THE USE OF THE TELESCOPIC LADDER AS WELL AS ALL SAFETY
INSTRUCTIONS HAVE BEEN FULLY EXPLAINED TO ME.
#
#
PURCHASER’S SIGNATURE:
For Easy Access TASC use only
#
#
#
#
#
#
#
#
#
#
Easy Access / TASC GUARANTEE CARD
Easy Access / /Tasc Telescopic Ladder
#
LADDER NUMBER:
PURCHASER NAME:
ADDRESS:
TOWN: ZIP CODE:
DATE OF PURCHASE:
THE USE OF THE TELESCOPIC LADDER AS WELL AS ALL SAFETY
INSTRUCTIONS HAVE BEEN FULLY EXPLAINED TO ME.
#
#
PURCHASER’S SIGNATURE:
For Easy Access / TASC use only

SAFETY PROCEDURES
DO
Check to ensure all locking mechanisms are
properly engaged before climbing the ladder
DO
Always open and close the ladder in a slow
and careful manner
DO
DO#NOT#
Carry, operate or use your ladder near electrical
wires or equipment
THIS#LADDER#CONDUCTS#
ELECTRICITY#DO#NOT#
Place a box or other objects under the ladder to
gain extra height. Always have a firm level base for
ladder to stand on
#
#
#
#
#
#
#
#
LADDER NUMBER:
PURCHASER NAME:
ADDRESS:
#
#
Easy Access/TASC GUARANTEE CARD
#
#
Easy Access /TASC Telescopic Ladder
Treat the ladder with care. It is a precision built
product. If tubes are dented or damaged in any
way, the ladder may be difficult to open or close,
or may completely malfunction
DO
Always lean ladder against top rungs, never
against tubes, as they may become damaged
DO
Keep your ladder clean occasionally wipe tubes
with a clean, dry cloth. Paint should be cleaned off
immediately as it will impede telescoping action
If stiffness develops, wipe tubes with a clean
clothand apply a small amount of silicone spray
wiping any excess with a clean cloth
DO
Store your ladder indoors to avoid damp
conditions which could make the ladder difficult to
operate
DO
Read and follow additional safety information
labels provided on your ladder
#
#
SAFETY#PRECAUTIONS#
DO NOT
Place your hands, fingers or thumbs on or between
rungs when closing the ladder
DO NOT
Use your ladder if there is any doubt about the
locks being properly engaged, as this is an unsafe
condition
DO NOT
Pull ringed locking levers or tamper with other lockiing
levers when ladder is in use IT MAY COLLAPSE
DO#NOT
Use the ladder in a horizontal position, such as saw
horse. Never open or use the ladder upside down
as it could cause damage to the product or cause
bodily injury
#
#
POINTS TO REMEMBER
As with any tool, safety should always be the first
consideration when using your telescopic ladder
Always check locking levers for proper locked
position before climbing
Do not stand or climb on the top three sections of
the ladder when fully extended
Never pull ringed locking or tamper with other
locking levers while ladder in use
Do not lower the ladder to other interim heights
Always close ladder fully and then reopen to
desired height
Always close your ladder in a careful, controlled
manner remembering to avoid placing hands,
fingers or thumbs on or between rungs
When standing on the ladder, do not over reach or
push/pull ladder to change its position
MOVE#THE#LADDER#TO#THE#WORK.#
Always#
face the ladder and do not climb up the side
Whenever possible, the ladder
should be secured in position. Special care
should be used on a windy day
Keep your ladder clean
Store indoors in the closed position
TOWN: ______________________________________ ZIP CODE:
DATE OF PURCHASE:
THE USE OF THE TELESCOPIC LADDER AS WELL AS ALL SAFETY
INSTRUCTIONS HAVE BEEN FULLY EXPLAINED TO ME.
#
#
PURCHASER’S SIGNATURE:
For Easy Access/TASC use only
#
#
#
#
#
#
#
#
#
#
Easy Access/TASC GUARANTEE CARD
Easy Access/TASC Telescopic Ladder
#
LADDER NUMBER:
PURCHASER NAME:
ADDRESS:
TOWN: ZIP CODE:
DATE OF PURCHASE:
THE USE OF THE TELESCOPIC LADDER AS WELL AS ALL SAFETY
INSTRUCTIONS HAVE BEEN FULLY EXPLAINED TO ME.
#
#
PURCHASER’S SIGNATURE:
For Easy Access/TASC use only

Place
stamp
here
!
!
!
FORTRESS INDUSTRIES, LLC
12403 Central Avenue #188
Chino, CA 91710
USA
!
!
!
!
!
!
!
!
!
!
!
!
!
!
!
!
Easy Access/TASC GUARANTEE CARD
!
!
Your!EASY!ACCESS/TASC!Telescopic!Ladder!is!a!quality!product.!
Manufactured!With!great!precision! using!carefully!selected!materials.!
We!guarantee!this!branded!product!for!a!period!of
!
12!months!in!the!
event!of!any!defects!that!may!be!traced!back!to!a!fault!in!material
!
or!
manufacturing.!The!guarantee!entitlement!begins!on!the!date!of!receipt!
of!this!guarantee!card!by!the!main!importer!(date!of!postmark).!
!
In!addition!to!the!statutory!rights,!this!guarantee!entitles!Fortress!
Industries,!LLC!to!repair!or!replace!at!their!discretion.!
!
The!guarantee!becomes!null !and!void!in!the!event!of!proven!improper!
use.!
!
FORTRESS INDUSTRIES, LLC
12403 Central Avenue #188
Chino, CA 91710
/