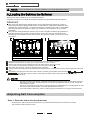
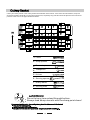
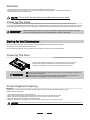
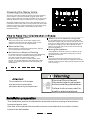
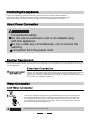
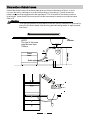
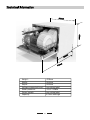
Swann SDW65 is an electric dishwasher designed for household use. It features a user-friendly control panel with indicators for salt and rinse aid levels. The dishwasher has 6 place settings and a maximum permissible inlet water pressure of 1MPa. It has a built-in water softener to ensure optimal cleaning results even in hard water areas. The dishwasher also has a cutlery basket for easy loading and unloading of cutlery. Additionally, it has a self-cleaning filter system to maintain hygiene and prevent засорениеs.
Swann SDW65 is an electric dishwasher designed for household use. It features a user-friendly control panel with indicators for salt and rinse aid levels. The dishwasher has 6 place settings and a maximum permissible inlet water pressure of 1MPa. It has a built-in water softener to ensure optimal cleaning results even in hard water areas. The dishwasher also has a cutlery basket for easy loading and unloading of cutlery. Additionally, it has a self-cleaning filter system to maintain hygiene and prevent засорениеs.


-
 1
1
-
 2
2
-
 3
3
-
 4
4
-
 5
5
-
 6
6
-
 7
7
-
 8
8
-
 9
9
-
 10
10
-
 11
11
-
 12
12
-
 13
13
-
 14
14
-
 15
15
-
 16
16
-
 17
17
-
 18
18
-
 19
19
-
 20
20
-
 21
21
-
 22
22
-
 23
23
-
 24
24
-
 25
25
-
 26
26


Swann SDW65 is an electric dishwasher designed for household use. It features a user-friendly control panel with indicators for salt and rinse aid levels. The dishwasher has 6 place settings and a maximum permissible inlet water pressure of 1MPa. It has a built-in water softener to ensure optimal cleaning results even in hard water areas. The dishwasher also has a cutlery basket for easy loading and unloading of cutlery. Additionally, it has a self-cleaning filter system to maintain hygiene and prevent засорениеs.
Ask a question and I''ll find the answer in the document
Finding information in a document is now easier with AI
Other documents
-
Groupe Brandt DFH13532W Owner's manual
-
saco DSIE2B10UK User manual
-
Groupe Brandt DFS1009 Owner's manual
-
Groupe Brandt DFH14102W Owner's manual
-
White Knight DW1260WA Owner's manual
-
White Knight DW0945WA User manual
-
-
Brandt DFH13114W User manual
-
Whirlpool ADP 750 IX User guide
-